Quantcast
Channel: o365info
Viewing all 370 articles
Browse latest View live

Display information about Deleted mail items using the PowerShell cmdlet Get-RecoverableItems | 2#3

$
0
0
In the current article, we review how to display information about deleted mail items, by using the PowerShell cmdlet – Get-RecoverableItems.

Restore deleted mail items to their original folder using PowerShell| The article series

The article series includes the following articles:

The purpose of the PowerShell cmdlet – Get-RecoverableItems is to help us to display (view or even export) information about deleted mail stored in Exchange mailbox.

As mentioned in the former article, the uniqueness of the PowerShell cmdlet – Get-RecoverableItems is, the ability to view info about “standard Deleted mail and in additional, Soft deleted mail items.

Quick reminder and reference

In the next article, we review the use of the PowerShell cmdlet – Restore-RecoverableItems that help us to restore deleted mail items of a specific Exchange mailbox.

In the context of the PowerShell cmdlets Get-RecoverableItems, the term “deleted mail items” refers to two types of deleted mail items:

  1. Standard Deleted items – the term “standard deleted mail items” is not a formal technical term, but instead, I term which I use for relating to mail items that are stored in the mailbox folder – “Deleted items” (the mailbox recycle bin).
  2. Soft Deleted mail items – mail items that were deleted from the mailbox recycle bin and classified as “Soft Deleted mail items.” These mail items are stored in the “Deletion” folder, a special hidden system folder, that is part of the “Recoverable item folder” space and store Soft Deleted mail items.

Display Deleted mail items | Filter by – Folder scope

In case that we use the PowerShell cmdlet Get-RecoverableItems as it is, without any parameters, the Restore-RecoverableItems display information about all deleted mail items, that are stored in one of the following mailbox folders:

  1. Deleted items (recycle bin) folder.
  2. Deletion folder – the special hidden folder that is part of the “Recoverable item folder” space and store Soft Deleted mail items.

PowerShell command example

Get-RecoverableItems Jeff

Using “Folder scope” for display information on specific types of deleted mail items

To be able to display information only about a specific type of deleted mail items,
we can use the parameter “SourceFolder.”

The structure of the PowerShell command is written as follows:

Get-RecoverableItems <mailbox> -SourceFolder <The mailbox folder >

Display Deleted mail items | Deleted mail items stored in the mailbox recycle bin folder.

To view\display only mail items that are stored in the Deleted items (recycle bin) folder, we can use the following syntax:

Get-RecoverableItems Jeff -SourceFolder DeletedItems

Display Deleted mail items | Soft deleted mail items

To display information only about Soft Deleted mail items, we can use the following syntax:

Get-RecoverableItems Jeff -SourceFolder RecoverableItems

Display Deleted mail items | Filter by – Date

To display Deleted mail items from a specific date range, we use the following 2 parameters:

  • FilterStartTime
  • FilterEndTime

PowerShell command syntax example:

Get-RecoverableItems Jeff -FilterStartTime "9/1/2018 12:00:00 AM" -FilterEndTime "9/1/2018 12:00:00 AM"

Display Deleted mail items | Filter by – E-mail message subject

To display deleted mail items that have a specific text string in their subject, we can use the parameter – SubjectContains

PowerShell command syntax example:

Get-RecoverableItems Jeff -SubjectContains "test"

Display Deleted mail items | Filter by – E-mail message type

Exchange mailbox serves as a container for various types of “mail items.”
For example, standard E-mail message, calendar meeting, task items and mail contact item.

When we ask to view deleted mail items, the PowerShell cmdlet
Get-RecoverableItems will display all the types of mail items that considered as “deleted mail items.”

In case that we need to define a search filter that looks for a specific type of deleted mail items, we can use the parameter “FilterItemType”.

The following table displays the 4 types of “mail item”:

E-mail message IPM.Note
Contact IPM.Contact
Calendar item IPM.Appointment
Task item IPM.Task

For example, in case that we want to display only deleted mail items that considered as “calendar mail items”, we can use the following syntax:

Get-RecoverableItems Jeff -FilterItemType IPM.Appointment

Display Deleted mail items | Filter by – Number of deleted mail items

By default, the PowerShell cmdlet Get-RecoverableItems display all the deleted mail items.
In case that we want to ask to display only a specific amount of deleted mail items, we can use the parameter – ResultSize

For example, we want to display only the last 5 mail items that classified as “Deleted mail items.”

Get-RecoverableItems Jeff -ResultSize 5

Count the number of deleted mail items

In case that we want to count the number of deleted mail items, we can use the following PowerShell syntax:

(Get-RecoverableItems Jeff).count

Additional PowerShell command syntax that we can use for counting the mail items is:

Get-RecoverableItems jeff | Measure-Object

Display Deleted mail items | Filter by – Last parent folder id

The term “Last parent folder identity” define the identity of the Exchange mailbox folder that hosts the mail items before the mail items were deleted.

The “Last parent folder identity” appears is a property named – LastParentFolderID

In case that we need to define a scenario in which we want to restore only specific deleted mail items which were located in a specific folder, we can use the parameter -LastParentFolderID

For example

Get-RecoverableItems Jeff -LastParentFolderID 9B52034A478A6141B401DF3BF7851B460000000015E0

Additional options for displaying output

Group by

In case that we want to display all the deleted mail items grouped by “mail type” such as – E-mail message mail items, calendar mail items and so on, we can use the following PowerShell syntax:

Get-RecoverableItems jeff | Format-list Subject,SourceFolde -Groupby itemclass

Export information

In case that you want to export information about all the deleted mail items of a specific Exchange mailbox, we can use the following PowerShell command syntax:

Get-RecoverableItems jeff | Export-csv c:\temp\2.csv

Now it’s Your Turn!
It is important for us to know your opinion on this article

The post Display information about Deleted mail items using the PowerShell cmdlet Get-RecoverableItems | 2#3 appeared first on o365info.com.


Restoring Deleted mail items using the PowerShell cmdlet Restore-RecoverableItems | 3#3

$
0
0
In the current article, we review the use of the PowerShell cmdlet – Restore-RecoverableItems.

Restore deleted mail items to their original folder using PowerShell| The article series

The article series includes the following articles:

The purpose of the PowerShell cmdlet – Restore-RecoverableItems is to help us to restore deleted mail items in their original folder. As mentioned in the former article, the uniqueness of the PowerShell cmdlet – Restore-RecoverableItems is the ability to restore Deleted mail items to their original folder (the folder that stored the mail items before they have been deleted).

Quick reminder and reference

In the former article, we review the use of the PowerShell cmdlet – Get-RecoverableItems that help us to display information about the delete mail items of a specific Exchange mailbox.

In the context of the PowerShell cmdlets Get-RecoverableItems and Restore-RecoverableItems
, the term “deleted mail items” refers to two types of deleted mail items:

  1. Standard Deleted items – the term “standard deleted mail items” is not a formal technical term, but instead, I term which I use for relating to regulated mail items that are stored in the mailbox folder – “Deleted items” (the mailbox recycle bin).
  2. Soft Deleted mail items – mail items that were deleted from the mailbox recycle bin and classified as “Soft Deleted mail items.” These mail items are stored in the “Deletion” folder, a special hidden system folder, that is part of the “Recoverable item folderspace and store Soft Deleted mail items.

Restore Deleted mail items | Filter by – Folder scope

In case that we use the PowerShell cmdlet Restore-RecoverableItems as it is, without any folder scope parameters, the Restore-RecoverableItems cmdlet will automatically restore all the following types of deleted mail items:

  • Standard Deleted items
  • Soft Deleted mail items

In case that we use the PowerShell cmdlet Restore-RecoverableItems without any folder scope, the cmdlet will automatically restore the two type of deleted mail items.

PowerShell command example

Restore-RecoverableItems Jeff

Using “Folder scope” for restoring specific type of deleted mail items
To be able to perform a restore procedure that related only to specific types of “deleted mail,” we use the parameter “SourceFolder.”

The structure of the PowerShell command is written as follows:

Restore-RecoverableItems <mailbox> -SourceFolder <The mailbox folder >

Restore only standard Deleted mail items (Deleted items stored in recycling bin)

To restore only “standard Deleted mail items,” meaning mail items that are stored in the “Deleted items” folder, we need to use the following PowerShell command syntax:

Restore-RecoverableItems Jeff -SourceFolder DeletedItems

Restore only Soft Deleted mail items.

To restore only “Soft Deleted mail items,” meaning mail items that are stored in the “Deletion” folder (sub-folder in the “Recoverable item folder” space), we need to use the following PowerShell command syntax:

Restore-RecoverableItems Jeff -SourceFolder RecoverableItems

Restore Deleted mail items | Filter by – Date

To restore deleted mail items from a specific date range, we use the following 2 PowerShell parameters:

  • FilterStartTime
  • FilterEndTime

PowerShell command syntax example:

Restore-RecoverableItems Jeff -FilterStartTime "9/1/2018 12:00:00 AM" -FilterEndTime "9/1/2018 12:00:00 AM"

Restore Deleted mail items | Filter by – E-mail message subject

To restore deleted mail items that have a specific text string in their subject, we can use the parameter –   SubjectContains

PowerShell command syntax example:

Restore-RecoverableItems Jeff -SubjectContains "test"

Restore Deleted mail items | Filter by – E-mail message type

Exchange mailbox serves as a container for various types of “mail items.”
For example, standard E-mail message, calendar meeting, task items and mail contact item.

When we ask to restore deleted mail items, the PowerShell cmdlet Restore-RecoverableItems will automatically restore all the type of mail items, that’s considered as “deleted mail items.”
In case that we need to define a search filter that looks for a specific type of deleted mail items, we can use the parameter “FilterItemType”.
The following table displays the 4 types of “mail item”:

E-mail message IPM.Note
Contact IPM.Contact
Calendar item IPM.Appointment
Task item IPM.Task

For example, in case that we want to restore only deleted mail items that considered as “calendar mail items”, we can use the following syntax:

Restore-RecoverableItems Jeff -FilterItemType IPM.Appointment

Restore Deleted mail items | Filter by – Number of deleted mail items

By default, the PowerShell cmdlet Restore-RecoverableItems will restore all the deleted mail items.
In case that we want to ask to restore only a specific amount of deleted mail items, we can use the parameter – ResultSize

For example, we want to restore only the last 5 mail items that classified as “Deleted mail items.”

Restore-RecoverableItems Jeff -ResultSize 5

Restore Deleted mail items | Filter by – Last parent folder id

The term “Last parent folder identity,” define the identity of the Exchange mailbox folder that hosts the mail items before the mail items were deleted.

The “Last parent folder identity” appears is a property named – LastParentFolderID
In case that we need to define a scenario in which we want to restore only specific deleted mail items, which were located in a specific folder, we can use the parameter –  LastParentFolderID

For example

Restore-RecoverableItems Jeff -LastParentFolderID 9B52034A478A6141B401DF3BF7851B460000000015E0

Restorer mail items | Additional options

Measure the estimated time that is needed to restore mail items

Measure-command {Restore-RecoverableItems jeff}


Now it’s Your Turn!
It is important for us to know your opinion on this article

The post Restoring Deleted mail items using the PowerShell cmdlet Restore-RecoverableItems | 3#3 appeared first on o365info.com.

How to use the spam mail report PowerShell script | Part 3#3

$
0
0
In the current article, we review the PowerShell menu script that I created for exporting and viewing information stored in Exchange Online spam mail log file.

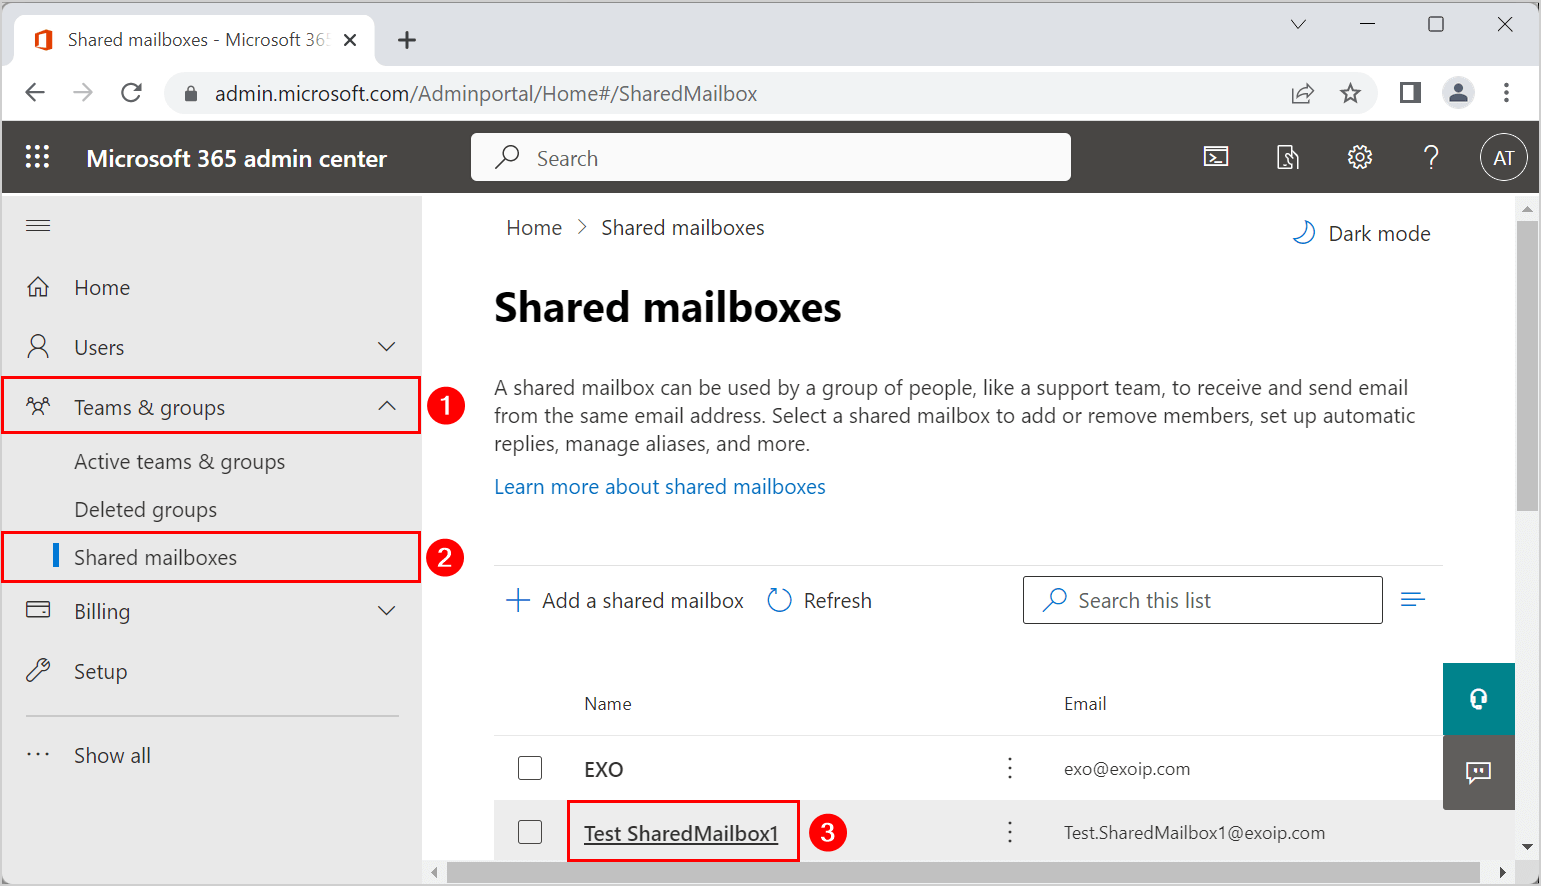
The purpose of the PowerShell script

The current PowerShell script is based on the PowerShell cmdlet –  Get-MailDetailSpamReport

The PowerShell cmdlet – Get-MailDetailSpamReport, (available only in an Exchange Online environment), enables us to view (display on the PowerShell console), and export to file information about “spam mail events.”

The main purpose of the current PowerShell script is, to simplify and optimize the use of this useful PowerShell cmdlet.
The PowerShell script menu options, enable you to export various types of “spam mail reports” using various file type formats (TXT, CSV, and HTML), that will help you to get a deeper understanding of spam mail events in your Office 365 (Exchange Online) environment.

For example:

  • Internal spam – identify and deal with, events in which the spam mail is “generated” by a legitimate organization user\s.
  • Spoof events – identify and deal with, events in which hostile element tries to spoof the identity of a legitimate organization user (send spam mail using his identity).
  • Spam mail attacks – identify and deal with, events in which hostile element targets a specific recipient or recipients by flooding them with spam mail.

The logic and the concepts of the Office 365 spam mail reports PowerShell script

The following PowerShell script is configured to automatically export many different spam mail reports, based on a predefined “search queries” and filters (that will be explained later on).

The purpose of the different type of spam mail reports is, to provide the ability to get insight and draw conclusions, about “spam mail events” that occur in our organization environment.

The concept of “E-mail addresses entities”

The spam mail report relates to the identity of the “entity” that sends spam mail or receives the spam mail, by specifying the E-mail address of this entity.

The “E-mail address” can be classified as the E-mail address of organization recipient, meaning E-mail address that includes our organization domain name suffix or E-mail address of non-organization recipients, meaning any E-mail address that includes a domain name suffix that doesn’t include our organization domain name.

When we use the term “organization E-mail address,” the meaning can be translated into many types of Exchange Online recipients such as – Distribution Group, contact, Public Folder, Shared mailbox, Room mailbox, User mailbox and so on.

Most of the times, our main concern is to analyze information that relates to our organization recipients (E-mail addresses that their suffix includes our organization domain name).

Although that we want to get information about each spam mail event that involved E-mail address of our organization recipients, in many cases, we want to use additional “classification,” in which our main target is to review and investigate spam mail events, that are related to specific types of Exchange Online recipient – Exchange user (the technical term is User Mailbox).

To enable you to get more “closer views” about spam mail events that relate to – Exchange Online users, each type of the spam mail report (summary spam mail report and spam mail events reports), include a dedicated section that “reveal” spam mail events that relate only to E-mail address that “belong” to Exchange Online users.

The PowerShell script will “fetch” from Exchange Online a list of Exchange Online Users and their E-mail addresses, and in the next step, “scan” the Exchange Online spam mail log file, looking for any type of spam mail events that include the “E-mail address” that appears on this list.

Organization E-mail address of non-existing recipients

Many times, when we look at the results of the spam mail reports, we will find information about E-mail address that includes “our domain name suffix” which allegedly “look like” organization E-mail address but in reality, there are no such E-mail addresses!

Most of the times, this phenomenon is realized when hostile elements try to “guess” E-mail addresses of our organization recipients, and try to send mail to “non-existing” recipients (non- existing E-mail addresses).

E-mail addresses entities1

Summary spam mail report Versus spam mail events reports  

The current PowerShell script will generate two types of spam mail reports:

“Summary spam mail report,” and “spam mail events reports.”

These terms are not formal terms, but instead, terms that I use for describing the different type of spam mail reports that are automatically generated by the PowerShell script.

Summary spam mail report

Summary spam mail reports are created by using a manipulation of the data that appears in the “original” Exchange Online spam mail log file. The Summary spam mail report is created by using a formula that counts the spam mail events, that relate to a specific E-mail address in a specific time period (30 days is the default time period used in the current PowerShell script).

The purpose of the “Summary spam mail report” is, to provide a quick insight about the “volume” of spam mail events that are related to a specific E-mail address.

For example, in case that we find in the report that there are many spam mail events that relate to emails that were sent from E-mail address of one of our organization users, this could be a sign to a scenario, in which the user account was comprised, and it used by hostile elements for distributing spam mail using the legitimate identity of the organization recipient.

Spam mail events reports

The report which I described as – “spam mail events reports,” are reports that include a detailed description of each specific “spam mail event.”

For example, a “spam mail event” will include information such as – the E-mail address of the sender, the E-mail address of the recipient, the specific date, the E-mail message subject, the direction (inbound or outbound) and so on.

 Summary spam mail report Versus spam mail events reports

Generate spam mail report automatically using menu 2

The current PowerShell script includes two types of menus:

  • Fully automated menu (menu 2).
  • Generate spam mail report by using as a specific search query

Menu number 2 was created for implementing automation of the following tasks:

  1. Fetch the content of the Exchange Online spam mail log
  2. Automatically generate various types of spam mail reports. Each of these reports will help you to get a different “angle” of the information in the spam mail log.

Spam mail report PowerShell script menu11

When you “hit” the menu option number “2,” the PowerShell script will start an automatic process that includes the following sequence of steps:

1.  Create folder hierarchy

The PowerShell script starts by creating a custom folder hierarchy, that will be used to store the various spam mail reports.

For example, the folder that stores the primary spam mail report will be created in C: drive, using the following folder path: C:\INFO\Spam mail Reports – <Date>

2.  Fetch information from Exchange Online spam mail log file

Next, the PowerShell script connects Exchange Online and fetches all the information that is stored in Exchange Online spam mail log file for a period of 30 days.

The information that was fetched, will be saved in the “Primary spam mail report.”

We can define this spam mail report as-  a “row” data because, the information appears as it is, without any customization or search query that “filter” specific type of data.

3.  Create the various types of spam mail reports.

The “foundation stone” for the various spam mail reports is – the “main spam mail report.”
This primary spam mail report, include all the available information about – every spam event that appears in the Exchange Online spam mail Log file, for the last 30 days period.

The PowerShell script uses the information that is stored in the “Primary spam mail report file” for – creating additional custom spam mail reports. We can relate to the additional spam mail reports, as a derivative of the primary spam mail report.

Spam mail reports structure and hierarchy -01

Spam mail reports structure and folder hierarchy.

The Spam mail reports folder hierarchy is built using a structure that is similar to the concept of Matryoshka doll.

Spam mail reports structure and hierarchy -02

First-level folder hierarchy

In the following diagram, we can see the “first level” of the folder hierarchy that will be automatically created by the spam mail PowerShell script:

Spam mail reports structure and hierarchy -03

A. ALL Spam mail events – Last 30 days

This folder will store the “Primary spam mail report file.”

B. Summary Spam Report – Count (Sum) RECEIVED & SENT spam emails

This folder will store the spam mail reports, which I describe as “Summary Spam Report.”
This term is not a formal technical term, but instead, a term that is used for describing a custom type of spam mail reports that count (sum) the spam events that related to a specific E-mail address.

C. Dedicated Spam Mail Report For Each e-mailed address.

This folder will store the spam mail reports, which I describe as “Dedicated Spam Report.”
The PowerShell script will automatically create a dedicated folder, for each E-mail address that appears in the spam mail report.

Second level folder hierarchy

Each of the “first-level level folders,” include an additional subfolder (Second level folder) that used for storing the spam mail reports, that are based on a specific classification (filtered view) of the “row” spam mail data.

To demonstrate the Second-level folder hierarchy, let’s review the hierarchy of “first level” folder named – “B. Summary Spam Report – Count RECEIVED & SENT spam emails

Inside this folder, we will find the “Second level folder hierarchy” that includes the following two folders:

1.  Exchange Online users

This folder includes a spam mail report that relates only to specific types of E-mail addresses: The E-mail addresses of Exchange Online recipients who describe as “Mailbox user.”
The purpose of this classification is, to enable us to focus on “spam mail events” that relate to our organization users (technically speaking, Exchange Online includes many types of recipients besides the “user recipient”).

2.  All E-mail Addresses

This folder includes a spam mail report, that relates to – ALL the E-mail addresses that appear in the spam mail report.
In this case, the report will not relate to a specific type of E-mail addresses, but instead, relate to each of the E-mail addresses that appear in the spam log (organization recipients E-mail addresses and non-organization E-mail addresses).

Spam mail reports structure and hierarchy -04

Third-level folder hierarchy

This is the “last folder hierarchy.” For example, the “1. Exchange Online users” folder, will include additional two folders:

1.1 Count RECEIVED spam mail

This folder includes a spam mail report that filters the information from the primary spam mail report, by using the following two criteria:

  • Spam mail events that related to the E-mail address of Exchange Online users.
  • Spam mail events which described as – RECEIVED spam mail. The meaning is – spam mail that was sent to (received by) Exchange Online user.

1.2 Count SENT spam mail

This folder includes a spam mail report that filters the information from the primary spam mail report, by using the following two criteria:

  • Spam mail events that related to the E-mail address of Exchange Online users.
  • Spam mail events which described as – SENT spam mail. The meaning is – spam mail that was sent from (sent by) E-mail address of the Exchange Online user.

 Spam mail reports structure and hierarchy -05

Spam mail reports type.

The current PowerShell script is configured to export the various spam mail reports to three different file formats: text file, SCV (Comma Separated Values) file, and HTML file.

Spam mail reports – CSV file format -01

Each file format has his strengths and weaknesses.
For example, the HTML spam mail report is very “friendlily” and easy to read. The “weakness” of the HTML file format is that there is no option for “manipulating” or editing the data.

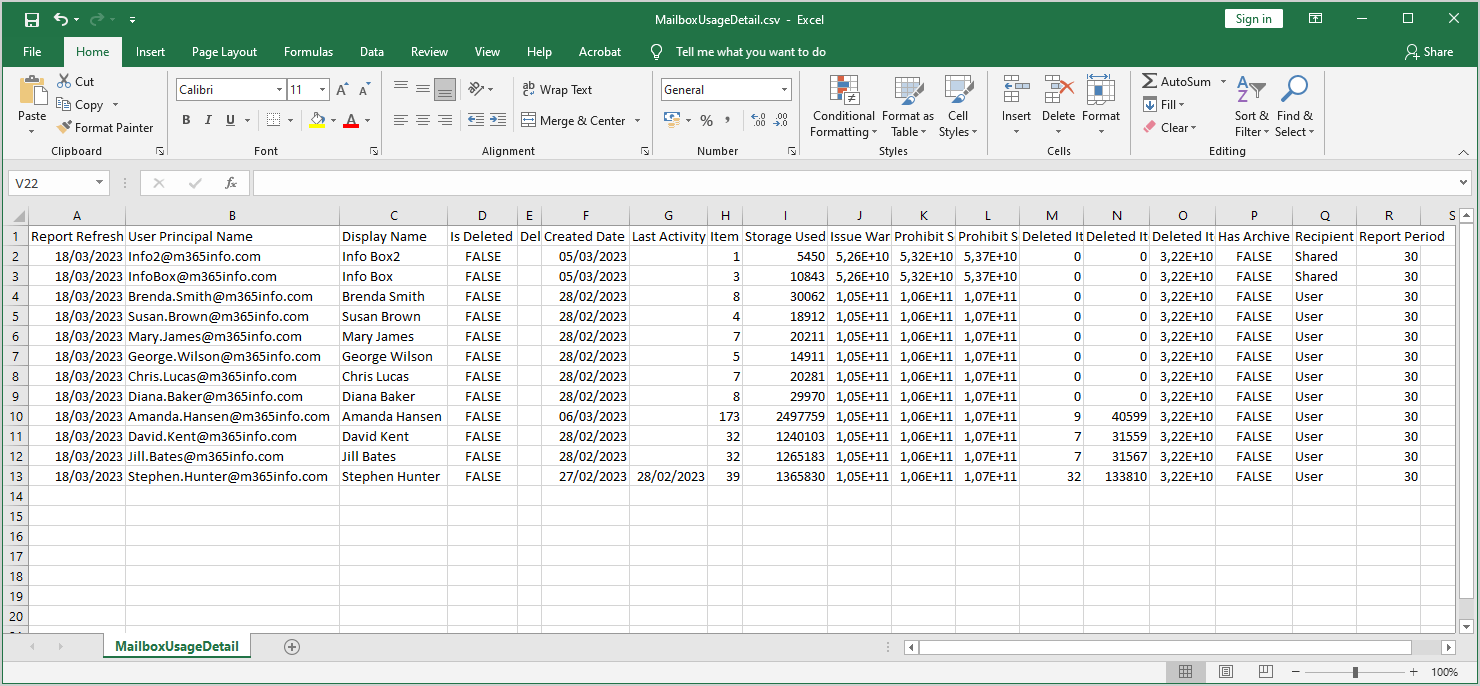
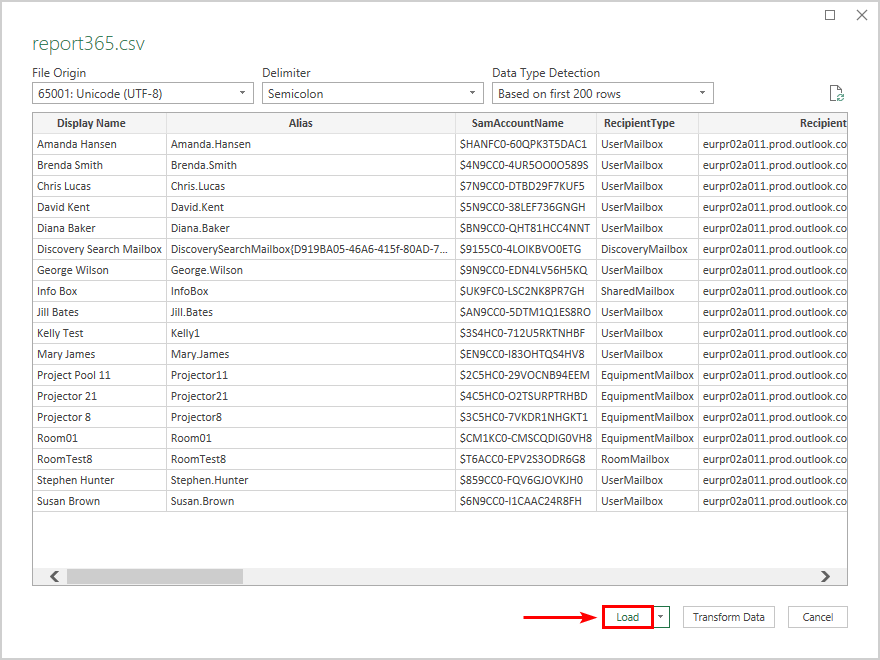
Regarding the CSV file format, most of the times we use an application such as Microsoft Excel to view and edit the content of the CSV file.

This is an example of the CSV spam mail summary report that was created.

Spam mail reports – CSV file format -02

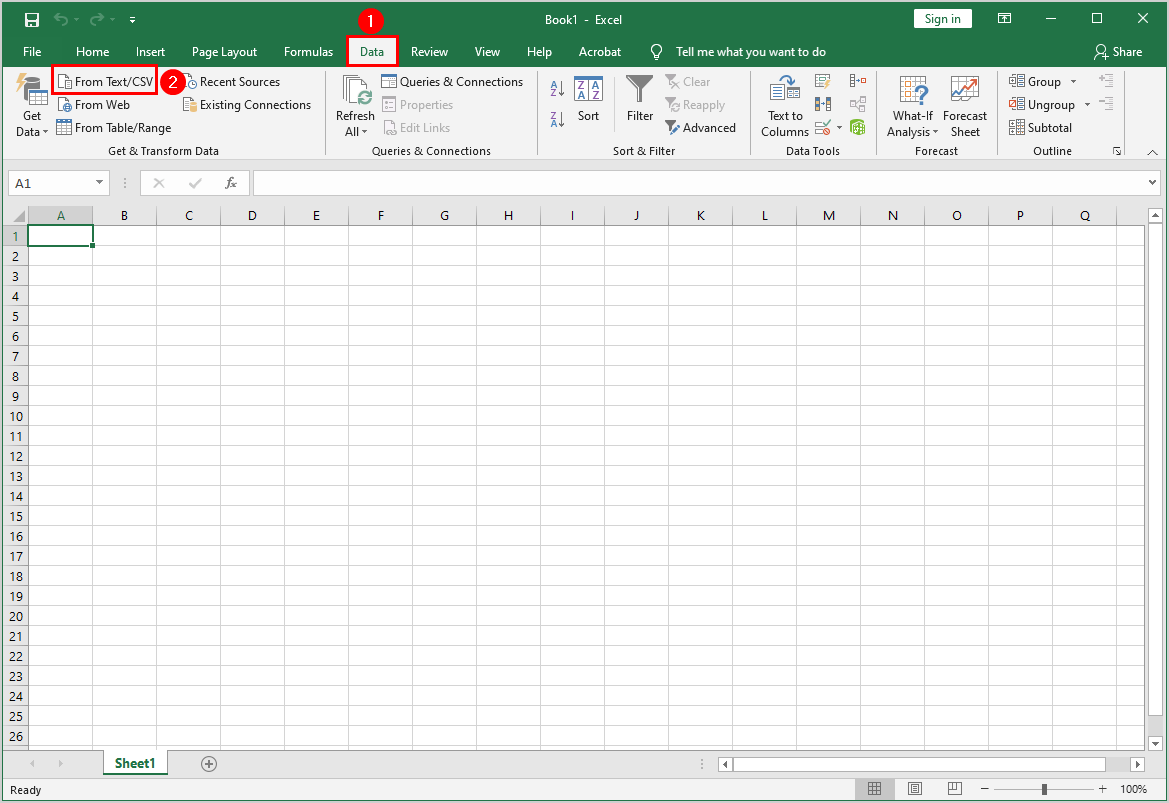
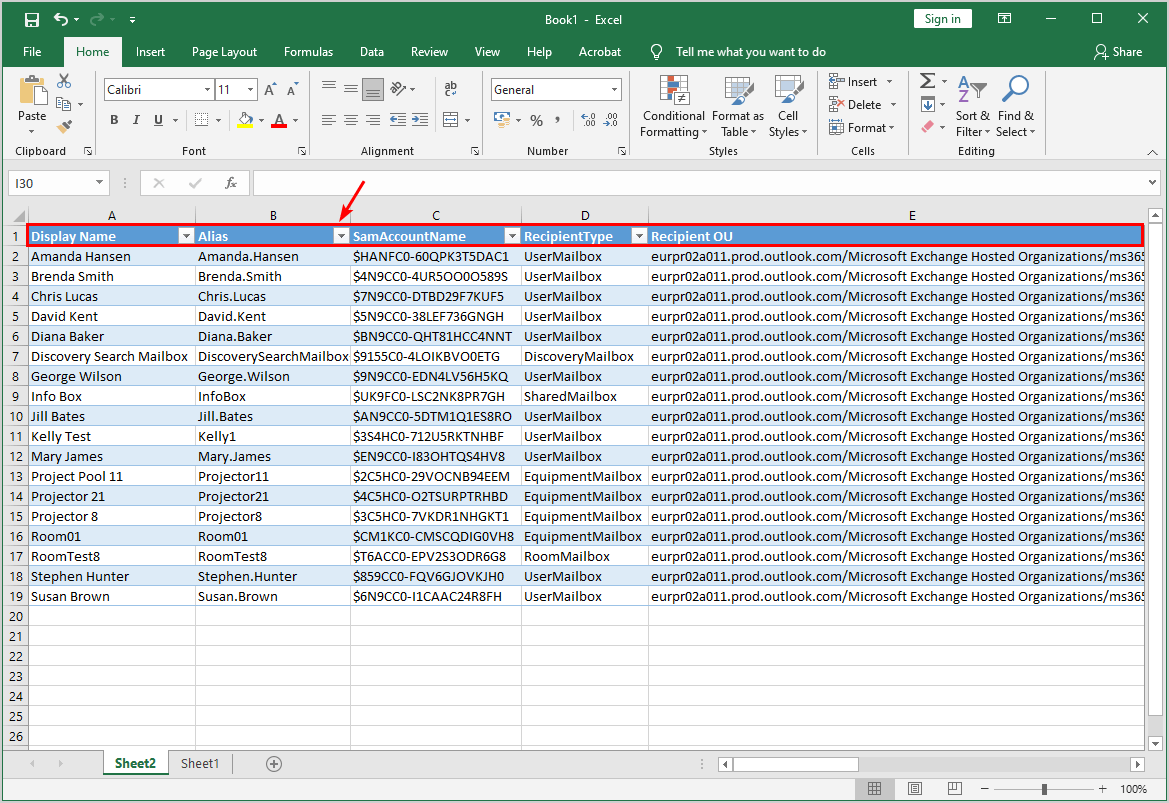
Quick tip – to optimize the way we view the “data,” we can use the option of – Table view.

  • Select one of the cells that include data (number 1)
  • Select the menu Insert and the submenu – Table (number 2)

Spam mail reports – CSV file format -03

In the following screenshot, we can see that Excel format that data in a “Table style.”

In addition, Excel adds to each column header, a “small arrow,” that enables us to manipulate the data. For example, filter specific values, sort the information and so on.

Spam mail reports – CSV file format -04

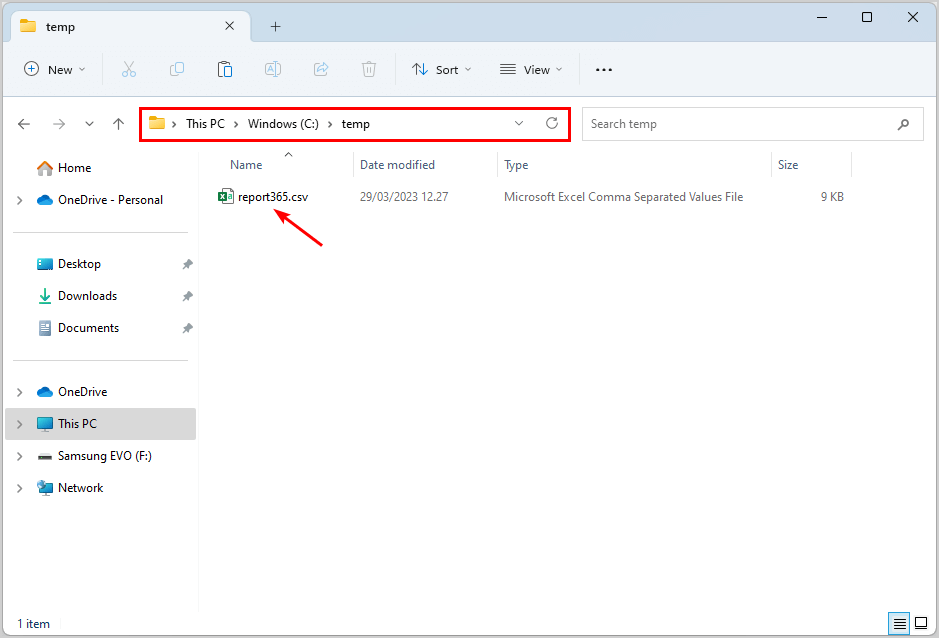
The Excel “issue” with long path and file names

In some scenario, when you try to open a CSV file, the following error appears:

Sorry we couldn’t find XYZ file. It is possible it was moved, renamed or deleted? “.
This error is related to Excel “issue” that relates to file that stored in a deep folder hierarchy or have a very long file name.

The solution, in this case, will be to shorten the CSV file name or move the file to “top folder”

Brief review – the two types of spam mail reports

As mentioned, the spam mail reports PowerShell script, will generate two types of reports:

The summary spam mail reports

In the following screenshot, we can see an example of summary spam mail reports.
The information table includes only two columns:

The E-mail address that appears in the spam mail log file + sum of the spam events that are “related” to the specific E-mail address.

In the current example, the report includes information only about the Exchange Online user recipient who received spam mail.

Using this “received spam mail summary report”, could help us to identify a scenario in which hostile element try to “flood” specific Exchange Online user\user, identify who are the organization user who suffers most from spam mail attack and so on.

Exchange Online users - Count RECEIVED spam mail - HTML

The “Dedicated Spam Mail Report”

I use the term “Dedicated Spam Mail Report” to highlight the special way that the current PowerShell script use for generating spam mail reports.

The spam mail reports PowerShell script, is configured to create a list of Exchange Online User E-mail address.
in the next step, the PowerShell script will scan the “primary spam mail report,” looking for information about each of the E-mail addresses in the list (spam events that are related to each of these E-mail addresses).

Given that there were spam mail events that relate to the specific E-mail address, the PowerShell script will automatically create a dedicated folder for each Exchange Online user, that will be named by using the Exchange Online user display name.

In the following screenshot, we can see an example of the results from the “Dedicated Spam Mail Report.” A Dedicated folder will be created for each Exchange Online user who (in this scenario) received spam emails.

Dedicated Spam mail Report -01

The “Dedicated user folder,” will contain the three-spam mail reports using the following file formats – Text, CSV, and HTML.

Dedicated Spam mail Report -02
In the following screenshot, we can see an example of a “Dedicated spam mail report” that includes all the spam mail events that are related to Exchange user named – Angelina.

Dedicated Spam mail Report -03

2.2 – PowerShell script menus | Description

PowerShell script includes the following sections:

Connect to Exchange Online using Remote PowerShell

General information – to be able to manage Exchange Online infrastructure, you must first create a Remote PowerShell session.

Menu 1 – Login to Exchange Online using Remote PowerShell

To create the required Remote PowerShell session, select the menu “1”.
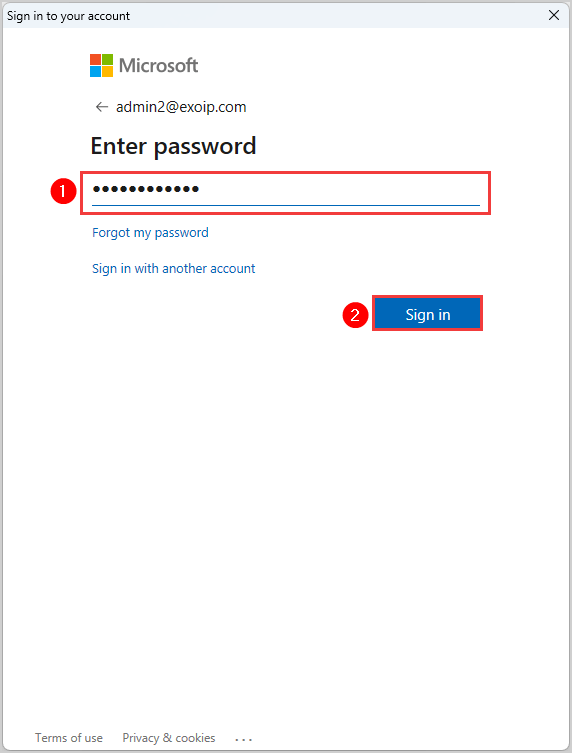
A user credential’s window will appear.
You will need to provide your Office 365 Global Administrator credentials.

SECTION A: Export Various type of spam mail reports

Menu 2 – Export Spam Mail Reports | Last 30 days

This is the main menu option.
To be able to generate all the various spam mail reports that were described in the former sections, all you need to do is just hit the number “2”, and the PowerShell script will do all to work for you.

The spam mail reports will be stored by using the following folder hierarchy:

  1. ALL Spam mail events – Last 30 days
  2. Summary Spam Report – Count RECEIVED & SENT spam emails
  3. Exchange Online users

1.1 Count RECEIVED spam mail

1.2 Count SENT spam mail

  1. All E-mail Addresses

2.1 Count RECEIVED spam mail – ALL E-mail Address

2.2 Count SENT spam mail – ALL E-mail Address

  1. Dedicated Spam Mail Report For Each E-mail Address
  2. Exchange Online users

1.1 – RECEIVED Spam mail report

1.2 – SENT Spam mail report

  1. All E-mail Addresses

2.1 – RECEIVED Spam mail report

2.2 – SENT Spam mail report

SECTION B: Display + Export about spam mail senders or receivers that passes a certain threshold

Menu 3 – Display + Export Spam Mail Reports | E-mail addresses that pass a certain spam mail threshold

The purpose of the following menu is, enable you to locate “E-mail addresses” that involved in spam mail activity that passes a certain threshold.
Based on the specified threshold that you provide, the PowerShell script will scan all the events that appear in the Exchange Online spam mail (using date range of a 30-day period) looking for the following E-mail addresses:

  • E-mail address that RECEIVED number of spam emails, that are equal or higher from the specified threshold value.
  • E-mail address that SENT number of spam emails, that are equal or higher from the specified threshold value.

SECTION C: Spam mail report | Top 10 spam mail Receiver and Senders

Menu 4 – Export Spam Mail Reports | Dedicated spam events report for Top 10 spam mail Receiver and Senders

The purpose of the following menu is, to automatically create a dedicated spam mail events report, for each E-mail address in the spam mail log file, that answers the following criteria:

  • The Top 10 spam mail SENDERS.
  • The Top 10 spam mail RECEIVER.

Save sent items in shared mailbox

$
0
0

A Microsoft 365 shared mailbox allows a group of two or more users to send and receive emails from the same email address. As a result, the group can always see the same inbox. By default, the emails sent from one person in the group can’t be seen by the other users. This article will show you how to save sent items in a shared mailbox with Microsoft 365 admin center and PowerShell.

How to save sent items in Microsoft 365 shared mailbox

By default, the user who sends an email from a shared mailbox is the only one in the group who can see it. This can be troubling, as the other users don’t know what a person has sent from the same shared mailbox.

Therefore, you need to edit the settings in the sent items of the shared mailbox in Office 365. It allows all the users of the shared mailbox to see the sent emails. This way, when a user sends an email, the email will be in their personal sent items folder, and a copy will be saved in the shared mailbox sent items folder.

There are two ways to automatically save sent items to your shared mailbox in Office 365:

  1. Microsoft 365 admin center
  2. Exchange Online PowerShell

First, we will show you how to enable a copy of sent items using the Microsoft 365 admin center for one shared mailbox. Then we will show the steps to save sent items in a single and all shared mailboxes with PowerShell.

Save copy sent items with Microsoft 365 admin center

Follow the steps below to enable save copy items sent in Microsoft 365 shared mailbox:

  1. Sign in to Microsoft 365 admin center
  2. On the navigation pane, expand Teams & groups and select Shared mailboxes
  3. Click on the shared mailbox name on the right
save sent items Microsoft 365 shared mailboxes
  1. Scroll down to Sent items and click on Edit
Manage sent items Microsoft 365 shared mailboxes
  1. Select both boxes
    • Copy items sent as this mailbox
    • Copy items sent on behalf of this mailbox
  2. Click on Save
Copy items sent on behalf of this mailbox Microsoft 365

You can go through each one of your shared mailboxes in the Microsoft admin center and change the settings. Follow the above steps and enable both features for each shared mailbox.

Suppose you want to enable these features for multiple shared mailboxes in one command, we suggest you use PowerShell. Let’s look into that in the next step.

Connect to Exchange PowerShell

If you want to run the below commands to change the copy item sent settings, you need to connect to Exchange Online PowerShell.

Connect-ExchangeOnline

Note: When you run the PowerShell commands, it may take a few minutes before it takes effect in the Microsoft 365 admin portal. Also, it can take up to one hour to see the sent emails in the shared mailbox sent items folder.

Save sent items in single shared mailbox with PowerShell

Use the PowerShell commands below to save sent items in shared mailboxes automatically. Here you can change the settings for a single shared mailbox or all the shared mailboxes in Office 365. We will first enable copy items sent for one single shared mailbox.

Enable copy items sent as

Run the below command to enable copy items sent as this mailbox for a single shared mailbox. You can type the name or email address between quotation marks.

Set-Mailbox "info@0365info.com" -MessageCopyForSentAsEnabled $true

Enable copy items send on behalf

Run the below command to copy items sent on behalf of this mailbox for a single shared mailbox.

Set-Mailbox "info@o365info.com" -MessageCopyForSendOnBehalfEnabled $true

Enable copy items sent as and on behalf in one command

You can also enable both features for a single shared mailbox in one command with PowerShell.

Enable copy items sent as and on behalf of a single shared mailbox with the command below.

Set-Mailbox "info@0365info.com" -MessageCopyForSentAsEnabled $true -MessageCopyForSendOnBehalfEnabled $true

Save sent items on all shared mailboxes with PowerShell

You can save sent items on all shared mailboxes with a single command with PowerShell. We will first show you how to enable each one of the features for all shared mailboxes in Microsoft 365. Then you can enable both features in one command; copy items sent as and on behalf of all shared mailboxes.

Enable copy items sent as for all shared mailboxes

You can copy items sent as for all shared mailboxes in one command shown below.

Get-Mailbox –ResultSize Unlimited -RecipientTypeDetails Sharedmailbox | Set-Mailbox -MessageCopyForSentAsEnabled $true

Enable copy items send on behalf of all shared mailboxes

Run the command below to enable the feature copy items send on behalf of all shared mailboxes in Microsoft 365.

Get-Mailbox –ResultSize Unlimited -RecipientTypeDetails Sharedmailbox | Set-Mailbox -MessageCopyForSendOnBehalfEnabled $true

Enable copy items sent as and send on behalf of all shared mailboxes

Enable both features for all the shared mailboxes in one command.

Get-Mailbox –ResultSize Unlimited -RecipientTypeDetails Sharedmailbox | Set-Mailbox -MessageCopyForSendOnBehalfEnabled $true -MessageCopyForSentAsEnabled $true

Conclusion

You learned how to save sent items in a single shared mailbox with PowerShell and via Microsoft 365 admin center. With PowerShell, you can copy sent items for all shared mailboxes in Microsoft 365 in one command.

If you configure a shared mailbox, remember to enable the copy items sent settings. This way, all the users of the shared mailbox can see the sent emails in the shared mailbox sent items folder.

Enable reply all storm protection in Exchange Online

$
0
0

The reply-all storm protection feature reduces the impact of email recipients for large organizations. If an employee sends an email using Reply All, it may send to all the recipients of an organization which could be over 10,000 users. To avoid this storm, Microsoft has released an update of the reply-all storm protection. In this article, we will show you how to enable this feature with Exchange Online PowerShell and Exchange Admin Center. Then you will learn to change the settings of the reply-all storm protection.

How to set reply-all storm protection

Microsoft announced a new reply-all storm protection feature with an updated version. Now the admins can modify the settings of this feature in the Exchange Admin Center and with PowerShell.

If you want to protect your organization from unwanted and disruptive reply-all email storms, you should enable this feature.

There are two ways to enable and configure reply-all storm protection in Microsoft 365:

  1. Exchange Admin Center (EAC)
  2. Exchange Online PowerShell

Note: The reply-all storm protection feature only protects large organizations with a minimum of 1000 employees. There is no need to enable this feature if you have a smaller organization, as you can’t change its settings to lower than 1000 recipients.

Enable reply-all storm protection with Exchange Online

How to enable the reply-all storm protection with Exchange Online:

  1. Sign in to Exchange Admin Center
  2. On the navigation pane, click on Settings
  3. Click on Mail flow
  4. Select Enable reply-all storm protection
  5. Click Save
enable reply-all storm protection exchange

Change reply-all storm protection settings in Exchange Online

Once you enable the reply-all storm protection feature in Exchange Online, you can change its settings:

  • Lower the number of recipients to a minimum of 1000
  • Change the number of reply-alls to 8
  • Change the block duration hours to 10
  • Click Save

An alert appears: Your change has been saved. Now you have successfully adjusted the reply-all storm protection settings.

change reply all storm protection settings

View reply-all storm protection with PowerShell

You can also view the reply-all storm protection feature with PowerShell. First, you need to connect to Exchange Online PowerShell.

Connect-ExchangeOnline

Run the command below to view the reply-all storm protection status.

Get-TransportConfig | fl *storm*

The PowerShell console output shows these settings below if it is enabled.

PS C:\> Get-TransportConfig | fl *storm*

ReplyAllStormProtectionEnabled          : True
ReplyAllStormDetectionMinimumRecipients : 2500
ReplyAllStormDetectionMinimumReplies    : 10
ReplyAllStormBlockDurationHours         : 6

Enable reply-all storm protection with PowerShell

Use the below command to enable the reply-all storm protection feature.

Set-TransportConfig -ReplyAllStormProtectionEnabled $true

Change the number of recipients with PowerShell

You can adjust the settings of the number of recipients in the reply all storm protection by using the below command. In our example, we lowered it to 1000 recipients (which is the minimum).

Note: The number that you can set is between 1000 (minimum) and 5000 (maximum).

Set-TransportConfig -ReplyAllStormDetectionMinimumRecipients 1000

Change the number of replies with PowerShell

Run the below PowerShell command to lower the minimum of replies to 8.

Note: The number that you can set is between 5 (minimum) and 20 (maximum).

Set-TransportConfig -ReplyAllStormDetectionMinimumReplies 8

Change the block duration hours with PowerShell

Adjust the block duration hours to 10 by using the PowerShell command below. It’s better to set a longer block duration hour, so nobody of the users restarts the reply-all storm.

Note: The number that you can is between 1 (minimum) and 24 (maximum) hours.

Set-TransportConfig -ReplyAllStormBlockDurationHours 10

Change reply-all storm protection settings in one PowerShell command

You can also change all the settings of the reply-all storm protection in a single PowerShell command. Use the below command to adjust the settings at once. In our example, we used the same numbers as above.

Set-TransportConfig -ReplyAllStormProtectionEnabled $true -ReplyAllStormDetectionMinimumRecipients 1000 -ReplyAllStormDetectionMinimumReplies 8 -ReplyAllStormBlockDurationHours 10

Reply-all storm protection report

To check the reply-all storm protection report, follow the below steps:

  1. Sign in to Exchange Admin Center
  2. In the navigation pane > expand Reports
  3. Click on Mail flow
  4. Scroll down and click on Reply-all storm protection report
    • Or click on View and assess the impact of detected reply-all mail storms
view report reply all storm protection

You can observe any details of the last couple of hours or days. In our example, we changed it to 30 days, but no data is available.

The reply-all storm protection report shows:

  • Current settings
  • Retrieve data of min. 3 hours and max. 30 days
  • Details of detected reply-all storms in a report
reply-all storm protection report exchange admin center

Conclusion

You learned how to enable the reply-all storm protection in Exchange Admin Center and Exchange Online PowerShell. The latest update allows admins to change the settings of the reply-all storm protection. You can also view the reply-all storm protection report for details and analysis.

Increase and improve Azure MFA security

$
0
0

It’s necessary to protect your organization and have strong security to prevent MFA fatigue. That’s why you need to increase and improve Azure MFA security for the tenant. To secure your MFA sign-ins, enable the features number matching, application name, and geographic location. In this article, you will learn the Microsoft 365 MFA security best practices to secure your Microsoft 365 tenant.

Configure MFA in Azure or Microsoft 365

Before you start, you need to configure MFA in Azure or Microsoft 365. Otherwise, the user or users will not have MFA security enabled correctly, and the below MFA security configuration will not work.

Go through one of the below articles to enable MFA:

  1. Configure Azure AD MFA
  2. Configure per-user MFA in Microsoft 365

We suggest you use method 1 and configure Azure AD Multi-Factor Authentication. But it requires having Azure AD Premium plan 1 or 2.

Note: You can enable MFA for a single user or all users in both methods. We recommend to enable MFA for all users and only exclude service accounts.

Azure MFA Security best practices

Enable the following three options in Azure AD to increase and improve your Azure MFA security:

  1. Require number matching for push notifications
    When a user gets a notification to enter the number in the Microsoft Authenticator app.
  1. Show application name in push and passwordless notifications
    The user receives a passwordless phone sign-in or MFA push notification in Microsoft Authenticator. They will see the application’s name that requests approval from where the sign-in is made.
  1. Show geographic location in push and passwordless notifications
    The user receives a passwordless phone sign-in or MFA push notification in Microsoft Authenticator. The user will see a geographic location map that requests approval from where the sign-in is made.

Let’s see how to enable these three features in the next step.

Enable Azure MFA security options

To enable the options in Azure AD, follow the below steps:

  1. Sign in to Microsoft Azure Portal
  2. Expand Menu and click on Azure Active Directory
Sign in to Microsoft Azure Active Directory
  1. Scroll down and click on Security
Microsoft Azure Security
  1. Click on Authentication methods
Authentication methods in Microsoft Azure security
  1. Click on Policies
  2. Click on Microsoft Authenticator
Policies Microsoft Authenticator
  1. Click on Enable and Target tab
  2. Enable > On
  3. Target: Include > All users
  4. Authentication mode > Select Any

Note: If you click Save, you will be redirected to Policies Microsoft Authenticator.

Enable and Target MFA security to all users
  1. Click on the Configure tab
Configure and improve Azure MFA security configure
  1. Go to each one of the features:
  • Require number matching for push notifications
  • Show application name in push and passwordless notifications
  • Show geographic location in push and passwordless notifications

Change the below settings for all three features:

  • Status > select Enabled
  • Target: Include > All users
  1. Click Save
Improve MFA security enable
  1. The policy was successfully saved notification appears, and the Microsoft Authenticator method shows the target (all users) and status (enabled)
Increase and improve Azure MFA security enabled all users

It’s always essential to test the configuration once it’s active. Let’s look into that in the next step.

Test Azure MFA security configuration

To ensure you enabled all three Microsoft Authenticator features correctly, you can test by following the steps below:

  1. Sign in to Microsoft Office
  2. Type your user account and password
  3. Click Sign in

Note: The account needs to be MFA enabled, and the Authenticator app needs to be installed on the mobile device.

Increase and improve Azure MFA security
  1. A random number will display, which you need to enter in the Authenticator app
Microsoft Authenticator app to increase Azure MFA security
  1. Enter the number in the Authenticator app
  2. Tap on Yes
Authenticator app verification Microsoft Security
  1. You successfully did sign into your Microsoft 365 account with Azure MFA security protection enabled
Increase and improve Azure MFA security

That’s it!

Read more: Save sent items in shared mailbox »

Conclusion

You learned how to increase and improve Azure AD MFA security. We recommend enabling number matching, application name, and geographic location to protect your organization.

Enable message recall in Exchange Online

$
0
0

If you send an email within the Microsoft 365 organization, you can recall the message if the recipient has not read it. To use the message recall feature, the sender must use the Outlook app for Windows from a Microsoft 365 Exchange Online account. In this article, you will learn how to enable message recall in Exchange Admin Center and Exchange Online PowerShell.

Message recall

When you send an email to a recipient, you can make a mistake. While this is completely normal and can happen to all of us, you don’t want to send another email to explain it was a mistake. That is when the message recall feature in Exchange Online comes to the rescue.

With message recall in Exchange Online you can retrieve the message you sent from the recipient’s mailbox if it is not opened yet.

Message recall update

Microsoft has updated Message Recall in Exchange Online to a new version. Now it will be possible to recall an email you sent within the same organization even though the recipient does not use Outlook. The latest update allows users to track the recall status for all recipients in the message recall status report.

Note: The message recall won’t happen (like for messages sent outside the Microsoft 365 organization).

How to enable message recall in Exchange Online

There are two methods to enable the recall message:

  1. Exchange Admin Center
  2. Exchange Online PowerShell

We will show you the steps to enable message recall in both methods. However, some conditions must be met for message recall to succeed.

  • You can only recall messages sent within the Microsoft organization with an Exchange or Microsoft 365 account
  • You can only recall a message in the Outlook app on a Windows desktop
  • The sender can only recall the message if the recipient has not read it
  • You can’t recall messages protected by Azure Information Protection
  • The recall message does not work if you have a MAPI or POP account

Enable message recall in Exchange admin center

  1. Sign in to Exchange admin center
  2. Click on Settings
  3. Click on Mail flow
  4. Scroll down and select Allow users to recall messages read by the recipients
  5. Click Save
Message recall Exchange Admin Center enable

Enable message recall with PowerShell

First, you need to connect to Exchange Online.

Connect-ExchangeOnline

Run the below PowerShell command to enable message recall.

Set-OrganizationConfig -RecallReadMessagesEnabled $true

To get the message recall status in Exchange Online PowerShell, run the command below.

Get-OrganizationConfig | fl RecallReadMessagesEnabled

Test message recall

Message recall is available after you send an email in Outlook. In our case, Stephen (sender) wants to email Carol (recipient).

How to recall a message in the Outlook app for Windows:

  1. Sign in Outlook app on Windows
  2. Click on Sent Items
  3. Double-click the message you want to recall
  4. The message opens in a new window
  5. Click on File
Message recall Outlook send items

You will be redirected to the start page of the Outlook app.

  1. Click on Resend or Recall
  2. Select Recall This Message
Message recall or resend Outlook

In the Recall This Message dialog box, there are two options:

  • Delete unread copies of this message
  • Delete unread copies and replace with a new message

The first option will delete the unread message. The second option opens the email so you can edit and replace it. Select one of these options.

  1. Select Tell me if recall succeeds or fails for each recipient
  2. Click OK

Note: Always select the option (Tell me if recall succeeds or fails for each recipient) so you get a notification whether the message recall has failed or succeeded.

  1. First, you get a notification on the exact message you tried to recall with the date and time
Message recall Outlook notification
  1. Go to your Inbox folder
  2. You will get a mail showing whether the message recall has failed or succeeded

The below picture is the ideal outcome. However, in some situations, you can’t recall messages in Outlook. Therefore, we want to look into a few examples of message recall.

message recall outlook success

Message recall success

Let’s take a look at a message recall success. Suppose you send a test email from Outlook to another account in the same organization.

  • Stephen (sender) sends a test email to Carol (recipient)
  • Stephen wants to recall this message
message recall test from sender

Stephen wants to recall the message in Outlook by following the steps below:

  1. Click on Sent Items folder
  2. Double-click to open the message
  3. Click Move
  4. Select Actions
  5. Click on Recall This Message
message recall sender outlook
  1. The Recall This Message dialog box opens
  2. Select Delete unread copies of this message
  3. Select Tell me if recall succeeds or fails for each recipient
  4. Click OK
recall message notification

Stephen (sender) gets a notification with the date and time he tried to recall the message.

recall message notification

Within a few minutes, Stephen gets an email in his Inbox: Message Recall Success.

Message recall success Exchange Online

Message recall success – recipient inbox

The below picture shows Carol’s inbox. Carol receives the message, and it is marked unread.

In this case, the recipient can do two things:

  1. Carol opens the mail by double-clicking on it and marks it unread afterward
message opened in outlook recipient
  1. Carol does not open the email, so the message stays unread
message recall outlook recipient unread

When the sender recalls the message and it is unread, the recipient will see two emails in her inbox. If you click on the above email (Recall), you can’t read its content. You need to double-click the email to open it.

recall message recipient inbox

Once you double-click on the Recall email, you will get a notification saying that the sender has recalled the message. It automatically deletes both emails from Carol’s Outlook inbox.

recall message recipient inbox empty

Message recall failure

Sometimes the message recall fails because of the recipients’ settings in Outlook. We will show you different scenario’s to understand why message recall does not always succeed. In our case, Stephen is the sender, and Carol is the recipient.

Stephen sends an email, but he wants to recall the message by following these steps:

  1. Click on Sent Items folder
  2. Double-click to open the message
  3. Click Move
  4. Select Actions
  5. Click on Recall This Message
message recall fail
  1. The Recall This Message dialog box opens
  2. Select Delete unread copies of this message
  3. Select Tell me if recall succeeds or fails for each recipient
  4. Click OK
message recall delete

The sender, Stephen gets an update that he tried to recall the message.

message recall notification sender

Stephen receives a notification that the message can’t be recalled.

message recall failure

Message recall failure – recipient inbox

Now we will look at the recipient Carol’s inbox, where there are two emails:

  1. The recall email
  2. The message from the sender Stephen

The email is in the progress of being recalled. The recipient receives a notification that the sender tried to recall the message.

The reasons why the message recall failed:

  • Carol decides to open the email from the sender Stephen
  • Carol (recipient) opens the email before the sender tried to recall the message
  • Or Carol does not open the mail but marks it as read
  • The recipient, Carol, marks the mail as read, and then marks it as unread afterwards

All these examples give the same outcome, which is message recall failure.

message recall

Conclusion

You learned how to enable message recall in Exchange Admin Center and Exchange Online PowerShell. With the latest Microsoft update, it is possible to recall or replace sent emails if the sender and recipient use Exchange Online. That’s because the message recalls happens in the recipient’s cloud mailbox.

Did you enjoy this article? You may also like Save sent items in shared mailbox. Don’t forget to follow us and share this article.

Bulk create shared mailboxes with PowerShell

$
0
0

To add a shared mailbox in Exchange Online, you can do this manually in Microsoft 365 Admin Center. But it’s much faster to create multiple shared mailboxes and add users with access rights with a PowerShell script. In this article, you will learn how to bulk shared mailboxes in Exchange Online with PowerShell.

Connect to Exchange Online

Before creating shared mailboxes in the next step, you must install and connect to Exchange Online PowerShell. Start Windows PowerShell as administrator and run the below cmdlet.

Connect-ExchangeOnline

Create bulk shared mailboxes with PowerShell

For this step, you must create a single CSV file to use in PowerShell as a source file. Initially, we want to keep it simple and start to create bulk shared mailboxes only.

Create a single CSV file

First, we need to type the data into notepad and save it as a CSV file. In our example, it is saved as info.csv in C:\temp.

Note: The name of the shared mailbox must be unique.

You should use the following format for the CSV file:

  • Name: Unique email address of the shared mailbox
  • DisplayName: Name of the shared mailbox
Bulk create shared mailboxes csv names

Check CSV file with Import-Csv cmdlet

Run Windows PowerShell as administrator. Make sure that PowerShell can read the file, run Import-Csv cmdlet.

Import-Csv "C:\temp\info.csv"

This is how it looks in our example.

PS C:\> Import-Csv "C:\temp\info.csv"

Name        DisplayName
----        -----------
Finance1    Finance Team
Marketing1  Marketing Team
HR1         HR Department
IT1         IT Department
Security1   Security Department
Management1 Management Team
Design1     Design Team
Sales1      Sales Team
Production1 Product Team
RD1         Research and Development

Run PowerShell script to create bulk shared mailboxes in Exchange Online

Use the below PowerShell script to create new shared mailboxes in Exchange Online.

# Import CSV file
$Datas = Import-Csv "C:\temp\info.csv"

# Get all recipients
$Recipients = Get-Recipient -ResultSize Unlimited | select Name

foreach ($Data in $Datas) {

    # Check if shared mailbox does not exist
    If (($Recipients | Where { $_.Name -eq $Data.Name }) -eq $Null) {

        # Create shared mailbox
        New-Mailbox -Name $Data.Name -DisplayName $Data.DisplayName -Shared
        Write-Host -f Green "Shared mailbox '$($Data.Name)' created successfully."
    }
    Else {
        Write-host -f Green "Shared Mailbox '$($Data.Name)' already exists."
    }
}

Check shared mailboxes in Microsoft 365 Admin Center

You managed to create bulk shared mailboxes in PowerShell. You can also check which shared mailboxes you created in the Microsoft 365 admin center.

The outcome will look like the picture below.

Bulk create shared mailboxes microsoft 365 admin center

We have not assigned any users to these shared mailboxes. Look into the next step to add users with full access rights to each of these shared mailboxes.

Create bulk shared mailboxes with users access rights in PowerShell

For this step, you must create a CSV file with more data to use as a source file in PowerShell. We want to create shared mailboxes, import multiple users, and assign permission.

Create CSV to create bulk shared mailboxes with users

You need to type the following data format in the CSV file:

  • Name: Unique email of the shared mailbox
  • DisplayName: Name of the shared mailbox
  • User: Active users
  • AccessRights: FullAccess

In our example, we typed the data into notepad and named the file info.csv and placed it in C:\temp.

Bulk create shared mailboxes csv users

Check CSV file with Import-Csv cmdlet

Run Windows PowerShell as administrator. Make sure that PowerShell can read the file, run Import-Csv cmdlet.

Import-Csv "C:\temp\info.csv"

This is how it looks in our example.

PS C:\> Import-Csv "C:\temp\info.csv"

Name        DisplayName              User                                                AccessRights
----        -----------              ----                                                ------------
Finance1    Finance Team             Amanda Morgan;Stephen Hunter;Carol Baker            FullAccess
Marketing1  Marketing Team           Craig Hansen;Edward Jones                           FullAccess
HR1         HR Department            Edward Wilson;Emma Arnold;Nick Carlson;Lisa Philips FullAccess
IT1         IT Department            Piers Bower;Lisa Davies;Anna Welch;John Hamod       FullAccess
Security1   Security Department      Edward Wilson;Jonathan Fisher                       FullAccess
Management1 Management Team          Neil Graham;Sarah Coleman;Viola Simon               FullAccess
Design1     Design Team              Wallace Zheng;Abigail Hodges;Emma Arnold            FullAccess
Sales1      Sales Team               Edward Lincoln;Amanda Morgan;Stephen Hunter         FullAccess
Production1 Product Team             Kylie Davidson;Mary Walsh                           FullAccess
RD1         Research and Development Max Gibson;Curt Berry;Owen Simpson                  FullAccess

Run PowerShell script to bulk create shared mailboxes in Exchange Online with users access rights

Run the below PowerShell script to create shared mailboxes in Exchange Online. You can create multiple shared mailboxes, add existing users and assign permission simultaneously.

The PowerShell output lets you know if the shared mailbox already exists. If you have an incorrect user in your CSV file, the output will inform you that the user was not found. It will also not add an existing user twice to the same shared mailbox. You will get a warning that the user access rights are already present on this shared mailbox.

# Import CSV file
$Datas = Import-Csv "C:\temp\info.csv"

# Get all recipients
$Recipients = Get-Recipient -ResultSize Unlimited | select Name

foreach ($Data in $Datas) {

    # Check if shared mailbox does not exist
    If (($Recipients | Where { $_.Name -eq $Data.Name }) -eq $Null) {

        # Create shared mailbox
        New-Mailbox -Name $Data.Name -DisplayName $Data.DisplayName -Shared
        Write-Host -f Green "Shared mailbox '$($Data.Name)' created successfully."
    }
    Else {
        Write-Host -f Green "Shared Mailbox '$($Data.Name)' already exists."
    }
    # Assign permissions on shared mailbox
    $Users = $Data.User -split ";"
    foreach ($User in $Users) {
        Add-MailboxPermission -Identity $Data.Name -User $User.Trim() -AccessRights $Data.AccessRights
    }
}

Check shared mailboxes with its users and permission in Microsoft 365 Admin Center

You will see the shared mailboxes in the Microsoft 365 admin center. If you click on each shared mailbox, you will see how many users are assigned and their permission.

Bulk create shared mailboxes users permission

If you click Read and manage permissions, you will see which users are assigned to the shared mailbox.

Bulk create shared mailboxes all users

Did you find it easy to use a PowerShell script to create bulk shared mailboxes with users and grant them access rights?

Read more: Enable reply all storm protection in Exchange Online »

Conclusion

You learned how to create bulk shared mailboxes with a PowerShell script and a CSV file. It is the fastest way to import over a thousand users and assign their access rights to multiple shared mailboxes. Our last PowerShell script allows you to create bulk shared mailboxes, add multiple users to each shared mailbox and grant them access rights.

Did you enjoy this article? You may also like Save sent items in shared mailbox. Don’t forget to follow us and share this article.


Reset MFA for Microsoft 365 user

$
0
0

When a user loses or replaces a mobile device or can’t use the Authenticator app, they can’t sign in to Microsoft 365. The admin has to re-register the user’s Multi-factor Authentification (MFA). The MFA settings for this user will be removed, and the user needs to set up the MFA options on the next login. In this article, you will learn how to reset MFA for a Microsoft 365 user in Azure Active Directory.

How to reset MFA user in Azure AD portal

Before the next step, you need admin permissions to reset MFA settings.

In our example, we want to reset the MFA settings for the user Hannah Duncan.

Time needed: 10 minutes.

Follow the steps below to reset MFA for a user in Azure AD:

  1. Go to Azure AD portal

    Sign in to Azure AD & open the portal menu.

  2. In the portal menu

    Click on Azure Active Directory.

  3. You will be redirected to a new page

    Click on Users.

  4. You will be redirected to the Users page

    Search for a user and click on the name from the list.

  5. Go to the left pane of the user profile

    Click on Authentication Methods.

  6. It opens a top status bar with options

    Click on Require re-register multifactor authentication.

  7. Complete

    You will get a notification that you completed it. You managed to reset the user’s MFA settings. It will not delete any previously registered authentication methods.

When the user signs in next time, they must re-register their MFA details. If you can see the user account in the Authenticator app, you need to click on the user, click settings, and remove account.

Note: Multi-factor Authentication will no longer be available in MFA server. Make sure to migrate to Azure AD by September 2024

Conclusion

You learned how to reset MFA for a Microsoft 365 user in Azure Active Directory. If the user’s phone is lost or stolen or you can’t access the authentication app, you should require re-register MFA. When a user signs in next time, they must set up a new MFA method.

Did you enjoy this article? You may also like Increase and improve Azure MFA security. Don’t forget to follow us and share this article.

Install Exchange Online PowerShell module

$
0
0

Some things can only be done in Exchange Online using PowerShell. With Exchange Online PowerShell, you can work remotely and manage features in the cloud. For example, create bulk mailboxes or create a specific report. Read this article to learn how to install the Exchange Online PowerShell module.

Exchange Online PowerShell module

The Exchange Online PowerShell module allows admins online access on remote computers. Once you connect to Exchange Online, you can get data, update, create, or remove objects in Microsoft 365 remotely.

In September 2022, Microsoft released version 3.0.0, which is known as the Exchange Online PowerShell V3 module (EXO V3 module).

Install Exchange Online PowerShell

We will guide you through the steps to install Exchange Online PowerShell module.

1. Set Execution Policy

First, we need to open PowerShell as administrator in Windows.

Run the below Powershell command.

Set-ExecutionPolicy RemoteSigned

You will get the following result shown below. Now you need to press Y and then press Enter.

PS C:\> Set-ExecutionPolicy RemoteSigned

Execution Policy Change
The execution policy helps protect you from scripts that you do not trust. Changing the execution policy might expose
you to the security risks described in the about_Execution_Policies help topic at
http://go.microsoft.com/fwlink/?LinkID=135170. Do you want to change the execution policy?
[Y] Yes [A] Yes to All [N] No [L] No to All [S] Suspend [?] Help (default is "N"): Y

Warning: You must close the PowerShell window and reopen it to save the changes.

2. Install PowerShellGetModule

Open PowerShell as administrator in Windows again and run the below command.

Install-Module PowershellGet -Force

You will see the following result. If you get asked to install the NuGet provider, press Y and then press Enter.

PS C:\> Install-Module PowershellGet -Force

NuGet provider is required to continue
PowerShellGet requires NuGet provider version '2.8.5.201' or newer to interact with NuGet-based repositories. The NuGet provider must be available in 'C:\Program Files\PackageManagement\ProviderAssemblies' or
'C:\Users\administrator.EXOIP\AppData\Local\PackageManagement\ProviderAssemblies'. You can also install the NuGet provider by running 'Install-PackageProvider -Name NuGet -MinimumVersion 2.8.5.201 -Force'. Do you want PowerShellGet to install
and import the NuGet provider now?
[Y] Yes [N] No [S] Suspend [?] Help (default is "Y"): Y

3. Install Exchange Online Management Module

Run the below command to install Exchange Online Management Module.

Install-Module -Name ExchangeOnlineManagement

You will see the below result on your screen. Press Y followed by Enter.

PS C:\> Install-Module -Name ExchangeOnlineManagement

Untrusted repository
You are installing the modules from an untrusted repository. If you trust this repository, change its
InstallationPolicy value by running the Set-PSRepository cmdlet. Are you sure you want to install the modules from
'PSGallery'?
[Y] Yes [A] Yes to All [N] No [L] No to All [S] Suspend [?] Help (default is "N"): Y

Connect to Exchange Online PowerShell V3

In this step, we will connect to Exchange Online with PowerShell.

Run the below command in PowerShell.

Connect-ExchangeOnline -UserPrincipalName admin@domain.com

The sign in to your account window appears, where you can enter the password and click Sign in.

Install Exchange Online PowerShell module

If you have MFA enabled, you will get a verification code sent as a text message or to your Authentication app on your phone. If your MFA is disabled, you will not do anything here.

Now you must go back to the PowerShell window, where you will see this text.

----------------------------------------------------------------------------------------
This V3 EXO PowerShell module contains new REST API backed Exchange Online cmdlets which doesn't require WinRM for Client-Server 
communication. You can now run these cmdlets after turning off WinRM Basic Auth in your client machine thus making it more secure.

Unlike the EXO* prefixed cmdlets, the cmdlets in this module support full functional parity with the RPS (V1) cmdlets.

V3 cmdlets in the downloaded module are resilient to transient failures, handling retries and throttling errors inherently.

However, REST backed EOP and SCC cmdlets are not available yet. To use those, you will need to enable WinRM Basic Auth.

For more information check https://aka.ms/exov3-module
----------------------------------------------------------------------------------------
PS C:\>

If you don’t want to see this information and new commands, then you can use this below.

Run this command below to hide the text banner.

Connect-ExchangeOnline -UserPrincipalName admin@exoip.com -ShowBanner:$false

That’s it! You installed the Exchange Online PowerShell module successfully.

Conclusion

You managed to install Exchange Online PowerShell module. The next step is to connect to Exchange Online with PowerShell, whether you have MFA enabled or not. After verifying, you can use the new commands in PowerShell.

Did you enjoy this article? You may also like Enable message recall in Exchange Online. Don’t forget to follow us and share this article.

Rotate DKIM keys in Microsoft 365

$
0
0

DomainKeys Identified Mail (DKIM) is extra security for your outgoing messages. It is essential to rotate the public and private DKIM keys every few months to secure your domain. Once you rotate the DKIM keys, you use new public and private keys to sign and authenticate messages. This article will show you how to rotate DKIM keys in Exchange Admin Center and PowerShell.

DomainKeys Identified Mail (DKIM)

DomainKeys Identified Mail (DKIM) is an email authentication procedure that helps to prevent email spoofing and make emails more reliable. When you implement DKIM keys to your domains, the recipients know that the emails came from users within the same organization and are not changed in transit.

Before you start, you need to have the DKIM keys configured and enabled for your domain.

Why should I rotate DKIM keys?

DKIM keys consist of private and public key pairs to authenticate mail. It is critically important to use strong keys, but it is also important to rotate DKIM keys regularly. Key rotation helps to minimize the risk of compromising private keys.

If a third-party stole or deciphered your private key, they could “sign” their spam or phishing email with your valid DKIM signature. Negative data signals gathered from those spam or phishing emails then become associated to your domain, causing deliverability problems for your email.

Rotating DKIM keys renders old keys worthless, providing an extra layer of security to help you maintain good deliverability.

How frequently should I rotate DKIM keys?

Now you understand why it is important to rotate DKIM keys. The question is how often you should rotate DKIM keys for any organization. It depends on each organization’s security policy and its risk.

  • Low-volume senders: If your organization receives emails from local and regional senders, you should rotate DKIM keys every six months or once a year.
  • High-volume senders: If your organization receives emails from international senders frequently, you should rotate DKIM keys monthly or every three months.
  • Security breach: If there is a security breach, you should rotate DKIM keys immediately.

Note: For best practices, you should rotate DKIM keys every six months. But if you detect a security system breach, you should change it instantly, even if you rotated it two months ago.

Rotate DKIM keys in Exchange Admin Center

To rotate DKIM keys for a domain in Exchange Online, follow the steps below.

Check DKIM status in Microsoft 365

We have to check if the DKIM keys are enabled before rotating them.

Check the DKIM status in Microsoft 365 portal:

  1. Sign in to Microsoft 365 Defender portal
  2. Click on the menu Email & Collaboration
  3. Click Policies & Rules
  4. Click on Threat Policies
Rotate DKIM keys in Microsoft 365 threat policies
  1. Click on Email authentication settings
Rotate DKIM keys in Microsoft 365 Defender email
  1. Click on DKIM
Rotate DKIM keys in Microsoft 365 Defender page

Note: You can directly go to the DKIM page in Microsoft 365 Defender.

View and rotate DKIM keys in Microsoft 365

On the DomainKeys Identified Mail (DKIM) page, you will see your domains.

  1. Click on the name of your domain from the list to open the details. In our example, the domain is exoip.com
  2. Slide the toggle from Disabled to Enabled
  3. Click on Rotate DKIM keys

You can do these steps for each domain in Microsoft 365 admin center.

Rotate DKIM keys for domain

Rotate DKIM keys with PowerShell

To rotate DKIM keys for a domain in Exchange Online with PowerShell, follow the steps below.

Connect to Exchange Online PowerShell

First, you must connect to Exchange Online PowerShell as a global administrator.

View DKIM keys status in PowerShell

Get the DomainKeys Identified Mail (DKIM) status for domains in a cloud-based organization, including their validity.

Run the Get-DkimSigningConfig cmdlet.

Get-DkimSigningConfig "exoip.com" | fl Name,isvalid,enabled,status,selector1*,selector2*

The output will show as below example.

PS C:\> Get-DkimSigningConfig "exoip.com" | fl Name,isvalid,enabled,status,selector1*,selector2*


Name               : exoip.com
IsValid            : True
Enabled            : True
Status             : Valid
Selector1KeySize   : 2048
Selector1CNAME     : selector1-exoip-com._domainkey.exoip365.onmicrosoft.com
Selector1PublicKey : v=DKIM1; k=rsa; p=MIIBIjANBgkqhkiG9w0BAQEFAAOCAQ8AMIIBCgKCAQEAXU9fiyN7ydzclwM60wnAXU6CaPjjeM5oqMRW
                     lrKUdeakL35VTVK7vYGDCRowCm9zOYOVuuufx0Fc9edp2DNKp0tQenJOKKczAk0kh6TCJ807S/tLgqCX9epUI+RZmL1wCacEgg
                     4yVBy6y943AfmyqZXvxZHpSW7f3PN+ACVT/r/bTj2DzsFoms9L8xG+yRm21hSr10GfZdEncVx9adBDkTol0FNYZ/A5JtrIacte
                     24Axq8AxRn6eynZgVmEdcrJ69shnDmh1ViJFxiE9ADwtpKplISNhdwio530z/X6FBqEk1CE+AanPt2zJIxEsgq087hXK7Fr3/9
                     2DEXWPGDY+/QIDAQAB;
Selector2KeySize   : 2048
Selector2CNAME     : selector2-exoip-com._domainkey.exoip365.onmicrosoft.com
Selector2PublicKey : v=DKIM1; k=rsa; p=MIIBIjANBgkqhkiG9w0BAQEFAAOCAQ8AMIIBCgKCAQEAtXmhGJWOes+j494nDUhHJNCnpMPNnkkYEllE
                     pQW2NmpB63nqUTfZ0on0z6Fo0bGhRMqfcpT0WFWRN2DWh8rxmJSFdjFVLOS1v4vhft/Q0bwNUvvUTgy0ohUhiOA2S6ILyZNWd7
                     UsU68cqOQZxWerc7uqDynb0R7FJhaQk7/VoGZjM4pzMJawAGgqILYHrGfAyCoFkwdwLuETaRqTnCDBwjjk0enmzZpwKVPl6z/G
                     4cx4KSZTDXrdf2SNoEJK9yJI0KSFsSXItT8VdRSL90ZSIxbDqsu2NvBbzWfWElXasjBJLK++LXDbQYEd/W4Hbpgfu/qC8oWtkh
                     N/I5FH9clx8QIDAQAB;

Rotate DKIM keys with PowerShell cmdlet

Run the PowerShell cmdlet below to rotate new DKIM keys for your domain.

Rotate-DkimSigningConfig -Identity "exoip.com" -KeySize "2048"

Check DKIM keys rotated

Check if you rotated the DKIM keys in MxToolBox.

  1. Type your domain name
  2. Type selector1
  3. Click DKIM Lookup
DKIM record selector 1 check

The test results show that the DKIM record for selector1 is published.

Now we need to check selector 2 for the same domain.

  1. Change the lookup field from selector1 to selector2
  2. Click DKIM Lookup

The test results show that the DKIM record for selector2 is published.

DKIM record selector 2 check

That’s it!

Read more: Save sent items in shared mailbox »

Conclusion

You have learned to rotate the DKIM keys in Exchange Admin Center and PowerShell. Use the PowerShell cmdlet to rotate DKIM signing policy keys for domains in Exchange Online. Lastly, you can check and verify the DKIM records in MxToolBox by typing the domain name and both selectors.

Did you enjoy this article? You may also like Enable reply all storm protection in Exchange Online. Don’t forget to follow us and share this article.

How to install PowerShell 7 on Windows

$
0
0

PowerShell is an open-source program that automates tasks and processes with commands and scripting language. In some cases, you need to update to PowerShell 7. However, it’s all free, and you can do this in three different ways. This article shows you three ways to install the latest PowerShell 7 on Windows.

How to download and install PowerShell 7

There are three different options to download and install PowerShell 7 on Windows. Let’s look at all these options, and you can decide which suits you best.

Option 1. Get PowerShell 7 app in Microsoft Store

The easiest way to install PowerShell 7 on Windows 10 is to get the app on Microsoft Store.

  1. Open the Microsoft Store app
  2. Type PowerShell and search
  3. Click on Get

It will download the PowerShell 7 app on your Windows, and it is ready to use.

Install PowerShell 7 Microsoft Store App

Another option is to download the PowerShell app by going to the Microsoft Store homepage and clicking on the Get in Store app.

Install PowerShell 7 Microsoft Store

That’s it! You successfully downloaded the PowerShell app on your PC, and you can start using it.

Option 2. Use Winget to download and install PowerShell 7

It is recommended to use Winget to download and install the latest version of PowerShell 7. Winget is a command-line tool supported on Windows 11 and Windows 10 version 1709 or later. With this tool, you can download, install or upgrade applications on Windows.

  1. Open PowerShell as administrator and run the below command
winget install Microsoft.PowerShell
  1. It will download and install the latest version of PowerShell 7
  2. Wait for Windows to configure PowerShell 7

The output will appear as below.

PS C:\> winget install Microsoft.PowerShell
Found PowerShell [Microsoft.PowerShell] Version 7.3.1.0
This application is licensed to you by its owner.
Microsoft is not responsible for, nor does it grant any licenses to, third-party packages.
Downloading https://github.com/PowerShell/PowerShell/releases/download/v7.3.1/PowerShell-7.3.1-win-x64.msi
  ██████████████████████████████   101 MB /  101 MB
Successfully verified installer hash
Starting package install...
Successfully installed

You have successfully installed PowerShell 7, and it’s ready to use.

If your Windows does not support Winget command-line, use the next option.

Option 3. Download MSI package to install PowerShell 7 on Windows

Another way is to download the MSI package from Microsoft.

There are two different packages:

  • PowerShell-7.3.2-win-x64.msi
  • PowerShell-7.3.2-win-x86.msi

In our example, we did download the PowerShell x64 package.

Follow the steps below to install it:

  1. Double-click the setup PowerShell-7.3.2-win-x64.msi
  2. Click Run
  3. Click Next
PowerShell 7 setup download and install
  1. Keep the default options and click Next three times
  2. Click Install
PowerShell 7 setup install
  1. Click Finish
PowerShell 7 setup complete

This option is the same as using the Winget command-line as shown in the previous step. The difference is that you need to download the PowerShell 7 setup and go through the setup wizard instead of the previous methods, which does it automatically for you.

Run PowerShell 7

To run PowerShell 7 on Windows, follow the below steps:

  1. Click on Start
  2. Search for PowerShell 7
  3. Select Run as administrator
Install PowerShell 7 using Winget

Did this help you to install PowerShell 7 on Windows? Let us know which option you choose!

Read more: Install Exchange Online PowerShell module »

Conclusion

You learned how to download and install PowerShell 7 on Windows in three different ways. The fastest ways are to download the PowerShell app from Microsoft Store or use the Winget command-line tool in PowerShell. Another way is to download the setup and install PowerShell 7 on Windows, but it takes a bit longer because you have to go through the setup wizard.

Did you enjoy this article? You may also like Bulk create shared mailboxes with PowerShell. Don’t forget to follow us and share this article.

Export Microsoft 365 users licenses

$
0
0

In Microsoft 365 admin center, you can export a list of users with each of their licenses. However, this list does not show the details of the assigned licenses and apps of all users. Therefore, you must click on each user in the Microsoft admin center to get information about their licenses, which costs time. A better way to export Microsoft 365 users licenses report is with PowerShell. In this article, you will learn how to export all Microsoft 365 user licenses with Exchange Online PowerShell.

Get users licenses in Microsoft 365

We want to show you how to export user licenses in Microsoft 365 admin center.

Export licensed users in Microsoft 365 admin center

Follow the steps below to get all licensed users in Microsoft 365:

  1. Sign in to Microsoft 365 admin center
  2. On the navigation menu, click Billing
  3. Click Licenses
  4. Click on the number under Assigned licenses
  5. Or click Organization under Account type
View Microsoft 365 users licenses list
  1. It shows a list of all the users with licenses. Now you can export the list of users with licenses to an Excel CSV file.

You need to find your Excel skills to sort and filter the data. It does not show you information about which assigned apps each user license has.

View licenses for one user

To view the licenses for a single user, you need to click on each Microsoft 365 user to see which licenses and apps they have assigned.

Export Microsoft 365 for one user licenses and apps services

In Microsoft 365 admin center, you can’t export a list of all the users’ licenses and apps. So you can’t find which licensed user has enabled or disabled an app like Yammer Enterprise.

Note: Each user can have multiple licenses, and each license has access to numerous apps. Some users might not have enabled access to all the apps of each license. Unfortunately, this can only be seen if you click on each user to get the details. That’s when PowerShell comes to the rescue.

Therefore you need to use the Export-Microsoft365LicenseStatus.ps1 PowerShell script that we will show in the next step. It is faster and easier to use that script that reports all licensed users with the assigned licenses and status.

Connect to Microsoft Graph PowerShell

Before we start, you need to install the Microsoft Graph PowerShell module and connect to Microsoft Graph with your admin account.

Run the Connect-MgGraph cmdlet.

Connect-MgGraph -Scopes "Organization.Read.All","User.ReadWrite.All"

The sign in to your account window will appear. Enter your password, and click Sign in

Export Microsoft 365 users licenses sign in

If this is the first time you have installed Microsoft Graph PowerShell, you might get the permissions requested verification like the below picture.

Select the checkbox Consent on behalf of your organization and click Accept.

Microsoft Graph PowerShell verification

After completing the verification, you must go back to the PowerShell window. You will see this text below.

PS C:\> Connect-MgGraph -Scopes "Organization.Read.All","User.ReadWrite.All"
Welcome To Microsoft Graph!

Install PowerShell 7

For this script to work, you must install PowerShell 7 on Windows. Otherwise, you will get a warning like the one below.

Setup : This script supports only PowerShell 7.  Please try again using PowerShell 7.
At C:\scripts\Export-Microsoft365LicenseStatus.ps1:195 char:5
+     Setup
+     ~~~~~
    + CategoryInfo          : NotSpecified: (:) [Write-Error], WriteErrorException
    + FullyQualifiedErrorId : Microsoft.PowerShell.Commands.WriteErrorException,Setup

Download Export Microsoft 365 License Status PowerShell script

Download the Export-Microsoft365LicenseStatus.ps1 PowerShell script and save it in the C:\scripts folder. Next, create a folder named temp in the (C:) drive.

Export all Microsoft 365 users licenses report

Use the below command to export all users’ licenses status in PowerShell.

C:\scripts\.\Export-Microsoft365LicenseStatus.ps1 -All

You will get a pop-up window to know if you want to continue. Click Yes.

Export Microsoft 365 users licenses script

The result will be a long list. It shows all the users’ licenses and the apps they have enabled. Of course, you can copy the list and paste it into Notepad or any other application.

UserPrincipalName  : Amanda.Morgan@exoip.com
DisplayName        : Amanda Morgan
Department         : IT
UsageLocation      : NL
SkuPartNumber      : DEVELOPERPACK_E5
ServicePlanName    : VIVA_LEARNING_SEEDED
ProvisioningStatus : Success

UserPrincipalName  : Amanda.Morgan@exoip.com
DisplayName        : Amanda Morgan
Department         : IT
UsageLocation      : NL
SkuPartNumber      : DEVELOPERPACK_E5
ServicePlanName    : Nucleus
ProvisioningStatus : Success

UserPrincipalName  : Amanda.Morgan@exoip.com
DisplayName        : Amanda Morgan
Department         : IT
UsageLocation      : NL
SkuPartNumber      : DEVELOPERPACK_E5
ServicePlanName    : MIP_S_Exchange
ProvisioningStatus : Success

UserPrincipalName  : Amanda.Morgan@exoip.com
DisplayName        : Amanda Morgan
Department         : IT
UsageLocation      : NL
SkuPartNumber      : DEVELOPERPACK_E5
ServicePlanName    : MICROSOFT_COMMUNICATION_COMPLIANCE
ProvisioningStatus : Success

Export all Microsoft 365 users licenses report to CSV

You can also export all Microsoft users’ licenses to a CSV file. This way, you can search for the different licenses or apps enabled for each user.

First, you must connect to Microsoft Graph as mentioned above.

Then use the below PowerShell command to export all users’ information to a CSV file.

C:\scripts\.\Export-Microsoft365LicenseStatus.ps1 -All | Export-Csv c:\Temp\LicenseReport.csv

In PowerShell you need to press Y followed by enter.

PS C:\> C:\scripts\.\Export-Microsoft365LicenseStatus.ps1 -All | Export-Csv "C:\Temp\LicenseReport.csv"

This script runs Get-MgUser to get all users and Get-MgUserLicenseDetail for all users. It may take long time to
complete, or execution may fail due to Microsoft Graph throttling.
Do you really want to continue?
[Y] Yes  [N] No  [S] Suspend  [?] Help (default is "Y"): Y

Once you export the information, you can find the CSV file in the C:\temp folder.

Open the CSV file with an application like Microsoft Excel to see the results.

Export Microsoft 365 users licenses CSV folder

Export specific Microsoft 365 user license details with PowerShell

You can also export a specific user’s license information in PowerShell using the command below.

In our example, we want to get the license information of Carol Baker.

C:\scripts\.\Export-Microsoft365LicenseStatus.ps1 -UserPrincipalName "Carol.Baker@exoip.com"

In our example, the result in PowerShell will look like this. You can copy the list and paste it into Notepad or any other application to save the information.

UserPrincipalName  : Carol.Baker@exoip.com
DisplayName        : Carol Baker
Department         : 
UsageLocation      : NL
SkuPartNumber      : DEVELOPERPACK_E5
ServicePlanName    : VIVA_LEARNING_SEEDED
ProvisioningStatus : Success

UserPrincipalName  : Carol.Baker@exoip.com
DisplayName        : Carol Baker
Department         : 
UsageLocation      : NL
SkuPartNumber      : DEVELOPERPACK_E5
ServicePlanName    : Nucleus
ProvisioningStatus : Success

UserPrincipalName  : Carol.Baker@exoip.com
DisplayName        : Carol Baker
Department         : 
UsageLocation      : NL
SkuPartNumber      : DEVELOPERPACK_E5
ServicePlanName    : MIP_S_Exchange
ProvisioningStatus : Success

UserPrincipalName  : Carol.Baker@exoip.com
DisplayName        : Carol Baker
Department         : 
UsageLocation      : NL
SkuPartNumber      : DEVELOPERPACK_E5
ServicePlanName    : MICROSOFT_COMMUNICATION_COMPLIANCE
ProvisioningStatus : Success

Export specific Microsoft 365 user details to CSV

You can also export the licenses of a specific Microsoft 365 user to a CSV file.

In our example, we will export the license information of Carol Baker to a CSV file.

C:\scripts\.\Export-Microsoft365LicenseStatus.ps1 -UserPrincipalName "Carol.Baker@exoip.com" | Export-Csv "C:\Temp\LicenseReportUser.csv"

Then you can find the CSV file in the C:\temp folder. Open the CSV file with an application like Microsoft Excel to see the results.

Export one Microsoft 365 user licenses CSV folder

Did you manage to export all Microsoft 365 user licenses? Let us know in the comments below!

Read more: Reset MFA for Microsoft 365 user »

Conclusion

You managed to get a list of all the licensed users in the Microsoft 365 admin center. But unfortunately, you only see the licenses and assigned apps when you click on a single user. A better way is to export all Microsoft 365 user licenses with the PowerShell script to get all the users and their license details in a report.

Did you enjoy this article? You may also like Enable reply all storm protection in Exchange Online. Don’t forget to follow us and share this article.

Configure Certificate Based Authentication to run automated PowerShell scripts

$
0
0

Sometimes you want to run an automated Exchange Online PowerShell script without inserting credentials or getting MFA prompts. What is a safe and excellent way to do that? In this article, you will learn how to configure Certificate Based Authentication (CBA) to run automated PowerShell scripts.

Certificate Based Authentication

In the old days, you used to save user credentials in an encrypted file or use basic authentication to run automated scripts in Exchange Online PowerShell. From September 2022 Basic Authentication is depreciated in Exchange Online and can’t be used anymore.

Certificate Based Authentication is a new cryptographic method that allows one to automate Exchange Online PowerShell sessions securely. It is a safe method that avoids the need to provide user credentials each time you run a PowerShell script. It supports unattended scripts and automated sessions using Exchange Online. There is also no need for usernames, passwords, and MFA when authenticating.

How Certificate Based Authentication works

The Exchange Online PowerShell module uses the Active Directory Authentication Library to fetch an app-only token using three parameters:

  1. Application Id
  2. Tenant Id (organization)
  3. Certificate thumbprint

The application you create in Azure AD has a Directory Role assigned to it, which is returned in the access token. Exchange Online configures the session role based access control (RBAC) using the directory role information available in the token.

How to configure Certificate Based Authentication in Exchange Online

We will guide you through the steps to implement Exchange Online Certificate Based Authentication for unattended scripts.

Step 1. Create self-signed certificate

First, you need to generate a self-signed certificate. It’s better to make the certificate on the same machine you want to run the unattended PowerShell script.

Log into any Windows Server or Desktop with Windows PowerShell as administrator.

Note: Self-signed certificate is valid for one year by default.

In our case, we will add 4 years to the self-signed certificate to avoid yearly renewal.

Use the below PowerShell cmdlet to create a certificate.

$mycert = New-SelfSignedCertificate -DnsName "exoip.com" -CertStoreLocation "cert:\LocalMachine\My" -NotAfter (Get-Date).AddYears(4) -KeySpec KeyExchange -FriendlyName "EXO automated scripts"

The certificate is now stored. To view the thumbprint, use the below cmdlet.

$mycert | Select-Object -Property Subject,Thumbprint,NotBefore,NotAfter

Copy the Thumbprint and paste it into Notepad. You will need it later when you connect to Exchange Online PowerShell with CBA.

PS C:\> $mycert | Select-Object -Property Subject,Thumbprint,NotBefore,NotAfter

Subject      Thumbprint                               NotBefore           NotAfter           
-------      ----------                               ---------           --------           
CN=exoip.com 71E8CD2932E252ED4C70A731795D595715905460 07/02/2023 13.04.09 07/02/2027 13.14.09

We want to create a .cer file to upload it later in Azure AD application. With a .cer file you can only connect to Exchange Online from the machine where the self-signed certificate is generated.

Create a folder named temp to save it in the C:\temp.

Use the below PowerShell cmdlet to export the certificate to .cer file.

$mycert | Export-Certificate -FilePath "C:\temp\EXOAutomatedScripts.cer"

See the below output in PowerShell.

PS C:\> $mycert | Export-Certificate -FilePath "C:\temp\EXOAutomatedScripts.cer"


    Directory: C:\temp


Mode                 LastWriteTime         Length Name                                                                 
----                 -------------         ------ ----                                                                 
-a----        07/02/2023     13.31            796 EXOAutomatedScripts.cer                                                                                                         

You can find the .cer file on your computer in C:\temp

Create self-signed certificate PowerShell cer file

We will also create a .pfx file so that you can connect to Exchange Online from any machine. You can copy or send a .pfx file to a person so that when installed on another machine, it can be retrieved during the authentication process.

Export the certificate to .pfx file by using the PowerShell cmdlet.

$mycert | Export-PfxCertificate -FilePath "C:\temp\EXOAutomatedScripts.pfx" -Password $(ConvertTo-SecureString -String "P@ssw0Rd1234" -AsPlainText -Force)

This is how the below output looks in PowerShell.

PS C:\> $mycert | Export-PfxCertificate -FilePath "C:\temp\EXOAutomatedScripts.pfx" -Password $(ConvertTo-SecureString -String "P@ssw0Rd1234" -AsPlainText -Force)


    Directory: C:\temp


Mode                 LastWriteTime         Length Name                                                                 
----                 -------------         ------ ----                                                                 
-a----        07/02/2023     13.33           2685 EXOAutomatedScripts.pfx 

You can find the .pfx file on your computer in C:\temp

Create self-signed certificate PowerShell pfx file

Step 2. Create new app registration in Azure AD

Follow the steps to register a new application in Azure AD:

Set Certificate Based Authentication to run automated Exchange Online PowerShell scripts
  • Click on App registrations
  • Click New registration
Set Certificate Based Authentication to run automated Exchange Online PowerShell scripts to register app
  • Name your application EXO PowerShell automated
  • Select Accounts in this organizational directory only – (Single tenant)
  • Click Register
Set Certificate Based Authentication to register an application

You will get a notification stating Successfully created application, and it will show the EXO PowerShell automated overview.

  • Copy the Application (client) ID and paste it into Notepad, as we will use it when connecting to Exchange Online
Set Certificate Based Authentication application Client ID

Step 3. Set up Azure app API permissions

You must assign API permissions to the EXO PowerShell automated application you created. To configure API permissions, we will use a script and edit the manifest properties.

From the EXO PowerShell automated overview:

  • Click on Manifest
  • Scroll down in the editor to line 42, “requiredResourceAccess”
  • Select the script from line 43 to 52
Set Certificate Based Authentication to run automated PowerShell scripts
  • Copy the below PowerShell syntax
   {
      "resourceAppId": "00000002-0000-0ff1-ce00-000000000000",
      "resourceAccess": [
         {
            "id": "dc50a0fb-09a3-484d-be87-e023b12c6440",
            "type": "Role"
         }
      ]
   }
],
  • Paste the PowerShell syntax in the manifest
  • Click Save

You will get a notification stating Successfully updated application manifest.

Set Certificate Based Authentication to run automated PowerShell scripts
  • Click API permission
  • Click Grant admin consent for exoip365
  • Click Yes
Set Certificate Based Authentication to run automated PowerShell scripts

A green check mark appears that you granted admin consent successfully!

Set Certificate Based Authentication to run automated PowerShell scripts

Step 4. Upload certificate to application

Now we need to upload the self-signed certificate you created earlier.

From the EXO PowerShell automated overview:

  • Click Certificates & secrets
  • Select Certificates
  • Click Upload certificate
Microsoft Azure certificate & secrets
  • Click on the browse icon to search in C:\temp and select the EXOAutomatedScripts.cer file
  • Add description EXO Automated Scripts
  • Click Add
Upload certificate (public key) in Azure AD

The certificate appears in the list.

Note: Always ensure it has the same certificate thumbprint as the one you created previously.

Certificate thumbprint Azure AD

Step 5. Assign required Azure AD roles to application

The last step for the configuration is the RBAC roles with the required permissions for the registered application.

  • Click on Menu > Azure Active Directory
  • Select Roles and administrators
  • Select All roles
  • Search for exchange
  • Click on Exchange Administrator
RBAC roles and administrators
  • Click on Assignments
  • Click Add assignments
  • Search for the Azure application name EXO PowerShell automated
  • Select the application from the results
  • Click Add
Add assignments RBAC

The Azure assignment name EXO PowerShell automated is added successfully to the Exchange Administrator role assignments list.

Role based access control (RBAC) assignments

Connect to Exchange Online PowerShell with Certificate Based Authentication

Note: You have to install Exchange Online PowerShell module before you proceed further.

We will use Certificate Based Authentication (CBA) to connect to EXO PowerShell. You need to get the values from the Microsoft Azure portal and add these values to the following variables:

  1. $AppId
  2. $CertificateThumbPrint
  3. $Organization

In the previous steps, we showed how to get the $AppId and $CertificateThumbprint values. Now we will find the organization name in Azure Active Directory and add the value to the $Organization variable.

  • Click Custom domain names from the menu
  • Find it in the domain list
Custom domain names organization Azure AD

Once you have found all the values, fill in the below three variables to connect to Exchange Online PowerShell with Certificate Based Authentication:

$AppId = "89e1d6c0-5105-41a0-b741-894b2331ca07"
$CertificateThumbprint = "71E8CD2932E252ED4C70A731795D595715905460"
$Organization = "exoip365.onmicrosoft.com"

Connect-ExchangeOnline -AppId $AppId -CertificateThumbprint $CertificateThumbprint -Organization $Organization -ShowBanner:$false

An excellent way to check that you are connected successfully is to run the Get-EXOMailbox cmdlet to view the mailboxes.

PS C:\> Get-EXOMailbox -ResultSize 5 | ft Name,UserPrincipalName

Name           UserPrincipalName       
----           -----------------       
Zoe Howard     Zoe.Howard@exoip.com    
Amanda Morgan  Amanda.Morgan@exoip.com 
Amelia Nash    Amelia.Nash@exoip.com   
Stephen Hunter Stephen.Hunter@exoip.com
Carol Baker    Carol.Baker@exoip.com   

Run PowerShell automated script with CBA

Use the below automated PowerShell script that will export the list of mailboxes in Exchange Online to a CSV file in C:\temp. This script is added to a scheduled task that will run every day.

Note: Add Disconnect-ExchangeOnline -Confirm:$false at the end of the PowerShell script. If the script runs without disconnecting the session, you could use up all the remote PowerShell sessions available, and you’ll need to wait for the sessions to expire.

# Connect Exchange Online PowerShell
$AppId = "89e1d6c0-5105-41a0-b741-894b2331ca07"
$CertificateThumbprint = "71E8CD2932E252ED4C70A731795D595715905460"
$Organization = "exoip365.onmicrosoft.com"

Connect-ExchangeOnline -AppId $AppId -CertificateThumbprint $CertificateThumbprint -Organization $Organization -ShowBanner:$false

# Split path
$Path = Split-Path -Parent "C:\temp\*.*"

# Create variable for the date stamp
$LogDate = Get-Date -f yyyyMMddhhmm

# Define CSV and log file location variables
$Csvfile = $Path + "\AllMailboxes_$logDate.csv"

Get-EXOMailbox -ResultSize Unlimited | Select-Object DisplayName, PrimarySmtpAddress | Sort-Object PrimarySmtpAddress | Export-CSV -Path $Csvfile -NoTypeInformation -Encoding UTF8

# Disconnect Exchange Online PowerShell
Disconnect-ExchangeOnline -Confirm:$false

You can successfully connect with Exchange Online Certificate Based Authentication to run automated PowerShell scripts!

Read more: Increase and improve Azure MFA »

Conclusion

You learned how to configure Certificate Based Authentication to connect to Exchange Online and run automated PowerShell scripts. There are no more user interactions, usernames, passwords, or MFA involved, which makes it much easier.

Did you enjoy this article? You may also like Bulk create shared mailboxes with PowerShell. Don’t forget to follow us and share this article.

Create unlimited Client Secret in Azure AD

$
0
0

A Client Secret has an expiration date of up to 2 years when you create it from the Azure AD portal. But we don’t want to take care of it and renew the Client Secret every 2 years. What if we could create a Client Secret with an unlimited expiration date? In this article, you will learn how to create an unlimited Client Secret in Azure AD with PowerShell.

Client Secret in Azure AD

Credentials allow your application to authenticate itself, requiring no interaction from a user at runtime. Because it is easy to use, we will add a Client Secret as credentials to an app registration.

There are two ways to create a client secret to an application:

  1. Client Secret in Azure AD valid for a maximum of 24 months
  2. Client Secret with PowerShell valid for unlimited time

If you already have a Client Secret for an application in Azure AD and need to renew it, then you don’t need to create a new one in Azure AD. You can use the PowerShell script to create an unlimited Client Secret.

Register an application in Azure AD

To register an application in Azure AD, follow these steps:

  1. Sign in to Microsoft Azure
  2. Click Menu > Azure Active Directory
Create unlimited Client Secret in Azure AD Portal Sign
  1. Click App registrations
  2. Click New registration
Create unlimited Client Secret in Azure AD new registration
  1. Name your application Unlimited
  2. Select Accounts in this organizational directory only – (Single tenant)
  3. Click Register
Register an application in Microsoft Azure AD

You will get a notification stating Successfully created an application, and it will show the application Unlimited overview.

  1. Copy the Object ID and paste it into Notepad, as you will need it later with PowerShell when creating an unlimited Client Secret
Application overview copy Object ID

Create a Client Secret for application in Azure AD

To create a Client Secret for your application in Azure AD, follow these steps:

  1. Click on Certificates & secrets
  2. Click Client secrets > New client secret
  3. Type the description
  4. Select an expiration date
  5. Click Add

Note: The Client Secret expiration date has a maximum of 24 months (2 years). You can’t choose a longer expiration period in Azure AD when you create or renew a Client Secret. This is only possible with PowerShell, where you can set an unlimited expiration date.

Create unlimited Client Secret in Azure AD
  1. Copy the Client Secret Value and save it

Note: Client secret values cannot be viewed except immediately after creation. Remember to save the secret when created before leaving the page.

Create unlimited Client Secret in Azure AD copy Value

Create unlimited Client Secret for application with PowerShell

Once you create an app registration, you can create a Client Secret and set the expiration date unlimited with PowerShell.

Note: You must install the Azure Active Directory PowerShell Module.

Follow the steps below to create an unlimited Client Secret with PowerShell:

  1. Open PowerShell ISE as administrator
  2. Copy the below script and paste it into PowerShell ISE
  3. Paste the Object ID you copied earlier on line 2
  4. Fill in the Client Secret Description you created earlier on line 3
  5. Type the number of expiration years on line 4
# Parameters
$AppObjectID = "bb32d329-b30c-4b4b-97cb-17de0768541c"
$AppSecretDescription = "Unlimited"
$AppYears = "50"

# Connect to AzureAD
Connect-AzureAD

# Add App Client Secret - Valid for 50 years (change to 999 for unlimited years)
$StartDate = Get-Date
$EndDate = $StartDate.AddYears($AppYears)
$AppClientSecret = New-AzureADApplicationPasswordCredential -ObjectId $AppObjectID -StartDate $StartDate -EndDate $EndDate -CustomKeyIdentifier $AppSecretDescription

# Write Client Secret value
Write-Host $AppClientSecret.Value
  1. Run the PowerShell script and sign in with your global administrator credentials
Create unlimited Client Secret in Azure AD Sign in Microsoft

The PowerShell output shows the Client Secret value.

ov607HSo/xiOxQZh99emJt0SUaqxmIN/fua/rYAbxUw=
Account              Environment TenantId                             TenantDomain AccountType
-------              ----------- --------                             ------------ -----------
msadmin@m365info.com AzureCloud  a2ff010e-0e03-4c56-8863-2ae7f07876dd m365info.com User       
  1. Copy the Client Secret Value and save it

Note: Client secret values cannot be viewed except immediately after creation. Remember to save the secret before you close the PowerShell window.

  1. Go to your application in Azure
  2. Click on Certificates & Secrets > Clients Secrets
  3. Delete the Client Secret that is going to expire

You can see that your new Client Secret is added and expires after 50 years.

Create unlimited Client Secret in Azure AD never expire

You successfully configured a Client Secret for an application in Microsoft Azure that never expires!

Read more: Configure Certificate Based Authentication to run automated PowerShell scripts »

Conclusion

You learned how to create an unlimited Client Secret in Azure AD with PowerShell. First, create a new Client Secret in Azure AD. Next, use the Object ID and paste it into the PowerShell script with an expiration year of your choice. From now on, it is no longer necessary to renew the Client Secret as there is no expiration date.

Did you enjoy this article? You may also like How to set Microsoft 365 password to never expire. Don’t forget to follow us and share this article.


Convert user mailbox to shared mailbox

$
0
0

If you want multiple users to access the same mailbox, without paying a license because it is under 50 GB, it’s best to have a shared mailbox instead. There are three ways to convert a user mailbox to shared mailbox. In this article, you will learn how to convert a user mailbox to a shared mailbox in Exchange Admin Center (EAC), Microsoft Admin Center, and PowerShell.

User mailbox vs. shared mailbox

Let’s explain the main differences between a user and a shared mailbox.

User mailbox:

  • Paid license
  • Sign in with your credentials

Shared Mailbox:

  • Free license under 50 GB of storage
  • Multiple users accessible (25 persons recommended)
  • Sign in with a user account that has access permission

Note: If you want to store more than 50 GB, you must have Exchange Online plan 2 license assigned to the shared mailbox. And if you need the online archive, you need to assign the Exchange Online plan 1 license to it.

Convert user to shared mailbox in Exchange Admin Center

From December 2022, Microsoft announced that the classic Exchange Admin Center will be depreciated. Therefore, Microsoft recommends using the new EAC. We want to show you the steps to convert the user mailbox to a shared mailbox in the new Exchange Admin Center (EAC).

Note: The user mailbox must have an Exchange Online license assigned before you can convert it to a shared mailbox. Otherwise, you won’t see the option to convert the mailbox. If you’ve removed the license, you must add it back to convert the mailbox.

Follow the steps below to convert a regular user mailbox to a shared mailbox in EAC:

  1. Sign in to Exchange Admin Center
  2. Click on Recipients > Mailboxes
  3. Select the user mailbox you want to convert
  4. Click Others
  5. Select Convert to shared mailbox
  1. Click Confirm
Convert mailbox from regular to shared confirm Exchange Admin Center

The mailbox is being converted from a regular to a shared mailbox. You successfully converted the mailbox!

Note: After converting the user mailbox to a shared mailbox, you can remove the license from the user’s account.

To verify that you converted to a shared mailbox, navigate to EAC > Recipients > Mailboxes. Click on the user, and you will see Shared mailbox under the user name.

Convert user to shared mailbox verify in Exchange admin center

Convert user to shared mailbox in Microsoft 365 Admin Center

Follow the steps below to convert a regular user to a shared mailbox in Microsoft 365 Admin Center:

  1. Sign in to Microsoft 365 Admin Center
  2. Click on Users > Active users
  3. Select the user mailbox you want to convert
  4. Click Mail
  5. Click Convert to shared mailbox
Convert user mailbox to shared mailbox in Microsoft 365 admin center
  1. Click Convert
Convert user to shared mailbox in Microsoft 365 admin center Confirm

To verify that you successfully converted the user to a shared mailbox, navigate to Microsoft 365 admin center > Teams & groups > Shared mailboxes. Find the user in the shared mailboxes list.

Verify in Microsoft 365 admin center user to shared convert

Use PowerShell to convert user to shared mailbox

Another option to convert a user to a shared mailbox is with PowerShell. Before you start, you need to Install Exchange Online PowerShell module.

1. Use the below command to Connect to Exchange Online PowerShell.

Connect-ExchangeOnline

We will use the -Type parameter with the Shared value to make it a shared mailbox type.

2. Use the below PowerShell command to convert a user mailbox to shared mailbox. Type in the name of the user mailbox.

Set-Mailbox "Amanda Hansen" -Type Shared

You can also use the same PowerShell command and type the user’s email address instead.

Set-Mailbox "Amanda.Hansen@m365info.com" -Type Shared

3. To check that you converted this user to a shared mailbox in PowerShell, you can run the Get-Mailbox cmdlet, including the mailbox name.

Get-Mailbox -Identity "Amanda Hansen" | Format-Table Name, RecipientTypeDetails

Or use the below PowerShell command to verify you converted and type the mailbox email address.

Get-Mailbox -Identity "Amanda.Hansen@m365info.com" | Format-Table Name, RecipientTypeDetails

The PowerShell output shows that you successfully converted to a shared mailbox.

Note: Always double-check the licenses to see if they are correctly set, as you don’t need a license for a shared mailbox under 50 GB of storage.

PS C:\> Get-Mailbox -Identity "Amanda.Hansen@m365info.com" | Format-Table Name, RecipientTypeDetails

Name          RecipientTypeDetails
----          --------------------
Amanda Hansen SharedMailbox

Which of the three options did you use to convert a user mailbox to a shared mailbox? Let us know in the below comments.

Conclusion

You learned how to convert a user mailbox to a shared mailbox in three ways. It’s possible to do this in the Exchange Admin Center (EAC), Microsoft 365 admin center, or PowerShell Exchange Online. A shared mailbox doesn’t require having licenses, so remember to remove licenses or double-check them after you convert.

Did you enjoy this article? You may also like Bulk create shared mailboxes with PowerShell. Don’t forget to follow us and share this article.

Manage user mailbox with PowerShell

$
0
0

In this article, we will show you how to manage a Microsoft 365 user mailbox with PowerShell. Learn how to create a new user mailbox, manage different mailbox permissions, export mailbox information, convert user mailbox to another type and delete the mailbox.

Office 365 Mailbox types

There are four different mailbox types in Microsoft 365:

  1. User mailbox
  2. Shared mailbox
  3. Room mailbox
  4. Equipment mailbox

In this article, we will cover how to manage the regular user mailbox with PowerShell.

Connect to Exchange Online PowerShell

To be able to run PowerShell commands, you must Connect to Exchange Online PowerShell.

Open Windows PowerShell as administrator and run the below cmdlet.

Connect-ExchangeOnline

Sign in to your account and enter the password.

Connect to Exchange Online PowerShell sign in

1. Create new user mailbox

A regular user mailbox is a special type of Exchange mailbox. You must use the Microsoft 365 admin center or Exchange Online PowerShell to create a user mailbox. We will only show the PowerShell commands.

Run the New-Mailbox cmdlet and fill in the information for the following parameters:

  • Alias
  • Name
  • FirstName
  • LastName
  • DisplayName
  • MicrosoftOnlineServicesID (User email address)

The below PowerShell command will create a new user mailbox named Kelly Test. We added the parameter -RestetPasswordOnNextLogon, so the user needs to reset the password the first time they sign in to Microsoft 365.

New-Mailbox -Alias "Kelly1" -Name "KellyTest" -FirstName "Kelly" -LastName "Test" -DisplayName "Kelly Test" -MicrosoftOnlineServicesID "KellyTest@m365info.com" -Password (ConvertTo-SecureString -String 'P@s$w0rd' -AsPlainText -Force) -ResetPasswordOnNextLogon $true

The PowerShell output shows the new user mailbox you created and a warning to notify you that a license is needed.

PS C:\> New-Mailbox -Alias "Kelly1" -Name "KellyTest" -FirstName "Kelly" -LastName "Test" -DisplayName "Kelly Test" -MicrosoftOnlineServicesID "KellyTest@m365info.com" -Password (ConvertTo-SecureString -String 'P@s$w0rd' -AsPlainText -Force) -ResetPasswordOnNextLogon $true

Name                      Alias           Database                       ProhibitSendQuota   
----                      -----           --------                       -----------------   
KellyTest                 Kelly1          EURPR02DG514-db460             99 GB (106,300,44...
WARNING: After you create a new mailbox, you must go to the Office 365 Admin Center and assign 
the mailbox a license, or it will be disabled after the grace period.

Note: Remember to assign a license within 30 days to this new user to activate this mailbox.

2. Manage user mailbox permissions

You can give other licensed users different permissions to another Microsoft 365 user mailbox:

  • Read and manage permissions (Full Access)
  • Send As permissions
  • Send on behalf of permissions

It means you can add other licensed users and give them permission to the new user mailbox.

When we assign a user Full Access permission to another user’s mailbox, the mailbox is automatically added to the user’s Outlook mail profile. This feature is described as AutoMap and is enabled by default.

Assign Full Access permission user mailbox

We will run the Add-MailboxPermission cmdlet to manage the Full Access permission for mailboxes.

Note: You must have a licensed user mailbox to manage permissions.

PowerShell command syntax.

Add-MailboxPermissions "User Mailbox" -User "Mail Recipient" -AccessRights FullAccess -InheritanceType All

Run the below PowerShell command to assign a mailbox to a user mailbox.

Add-MailboxPermission "User Test" -User "David Kent" -AccessRights FullAccess -InheritanceType all

The PowerShell output shows that you successfully assigned Full Access rights to the specific user.

PS C:\> Add-MailboxPermission "User Test" -User "David Kent" -AccessRights FullAccess -InheritanceType all

Identity User                 AccessRights IsInherited Deny 
-------- ----                 ------------ ----------- ---- 
UserTest S-1-5-21-70143928... {FullAccess} False    False

Assign Full Access permission user mailbox without Automapping

We want to assign a specific user Full Access permission to another user mailbox. You can disable the AutoMap option when you assign permissions. In this case, we don’t want the user mailbox to automatically add to the specific user’s Outlook profile.

So you must add the PowerShell parameter -AutoMapping with the value $False.

Run the below PowerShell command to give the user “David Kent” Full Access permissions to another user’s mailbox without automapping

Add-MailboxPermission "User Test" -User "David Kent" -AccessRights FullAccess -InheritanceType All –AutoMapping $False

The PowerShell output shows that you have successfully assigned Full Access rights to the user mailbox.

PS C:\> Add-MailboxPermission "User Test" -User "David Kent" -AccessRights FullAccess -InheritanceType All –AutoMapping $False

Identity             User                 AccessRights                       IsInherited Deny 
--------             ----                 ------------                       ----------- ---- 
UserTest             S-1-5-21-70143928... {FullAccess}                       False       False

Bulk assign Full Access permission user mailbox without Automapping

You can also bulk assign a single user mailbox (David Kent) Full Access permissions to all user mailboxes. We will also add the parameter -Automapping to disable automatic automapping in Outlook.

Use the below PowerShell command to assign Full Access permission for a specific user for all Office 365 user mailboxes.

Get-Mailbox -Filter '(RecipientTypeDetails -eq "UserMailbox")' | Add-MailboxPermission -User "David Kent" -AccessRights FullAccess -InheritanceType All -AutoMapping $False

The PowerShell output will look like the example below.

PS C:\> Get-Mailbox -Filter '(RecipientTypeDetails -eq "UserMailbox")' | Add-MailboxPermission -User "David Kent" -AccessRights FullAccess -InheritanceType All -AutoMapping $False

Identity             User                 AccessRights IsInherited Deny 
--------             ----                 ------------ ----------- ---- 
ea2b7e6a-fb01-42e... S-1-5-21-70143928... {FullAccess} False       False
d912b0fc-6f7e-4ec... S-1-5-21-70143928... {FullAccess} False       False
eec2668a-0773-494... S-1-5-21-70143928... {FullAccess} False       False
fd199cb4-2ebf-417... S-1-5-21-70143928... {FullAccess} False       False
fa956d8c-87df-4cd... S-1-5-21-70143928... {FullAccess} False       False
d89be5ce-6495-400... S-1-5-21-70143928... {FullAccess} False       False
a9532b30-4edb-4b6... S-1-5-21-70143928... {FullAccess} False       False
b602b148-2fcf-435... S-1-5-21-70143928... {FullAccess} False       False
3bb176aa-d0ba-47f... S-1-5-21-70143928... {FullAccess} False       False
41377e9c-dc47-46c... S-1-5-21-70143928... {FullAccess} False       False
KellyTest            S-1-5-21-70143928... {FullAccess} False       False

Remove Full Access permissions user mailbox

Let’s say that you made a mistake and want to remove the Full Access permissions of a user mailbox. We will run the Remove-MailboxPermission cmdlet to remove permission from a user mailbox.

PowerShell command syntax.

Remove-MailboxPermission "User Mailbox" -AccessRights "The type of permissions" -User "Recipient"

Use the below PowerShell command to remove Full Access permissions of a user mailbox.

Remove-MailboxPermission "Brenda Smith" -AccessRights FullAccess -User "David Kent"

To verify you removed the user’s Full Access permissions from this specific user mailbox, run the Get-MailboxPermission.

Run the below PowerShell command to see all Full Access permissions of a single user mailbox.

Get-MailboxPermission "Brenda Smith" | Where-Object { ($_.IsInherited -eq $False) -and -not ($_.User -like "NT AUTHORITY\SELF") } | Select-Object Identity, User, AccessRights

If the PowerShell output is empty, you haven’t assigned any mailbox with Full Access permissions.

Assign Send As permissions user mailbox

You can assign Send As permissions to a regular user mailbox. In our example, we want to give the user mailbox (KellyTest) the Send As permissions to another user mailbox (Brenda Smith).

PowerShell command syntax.

Add-RecipientPermission "User Mailbox" -Trustee "Mail Recipient" -AccessRights SendAs -Confirm:$False

Use the below PowerShell example to assign Send As permissions for a user mailbox.

Add-RecipientPermission "Brenda Smith" -Trustee "KellyTest" -AccessRights SendAs -Confirm:$False

The PowerShell output shows.

PS C:\> Add-RecipientPermission "Brenda Smith" -Trustee "KellyTest" -AccessRights SendAs -Confirm:$False

Identity                             Trustee   AccessControlType AccessRights Inherited
--------                             -------   ----------------- ------------ ---------
d912b0fc-6f7e-4ec2-a9e4-854ed27a511a KellyTest Allow             {SendAs}     False    

Bulk assign Send As permission user mailbox

You can also assign Send As permission of a specific user to all user mailboxes in one PowerShell command. In our example, we want to assign the user mailbox (Brenda Smith) to all Office 365 user mailboxes.

Run the below PowerShell command example.

Get-Mailbox -Filter '(RecipientTypeDetails -eq "UserMailbox")' | Add-RecipientPermission -Trustee "Brenda Smith" -AccessRights SendAs -Confirm:$False

The PowerShell output shows all the user mailboxes where it assigned Send As permissions.

PS C:\> Get-Mailbox -Filter '(RecipientTypeDetails -eq "UserMailbox")' | Add-RecipientPermission -Trustee "Brenda Smith" -AccessRights SendAs -Confirm:$False

Identity                             Trustee                              AccessControlType
--------                             -------                              -----------------
ea2b7e6a-fb01-42e3-9fb8-ccf13a5f2e67 d912b0fc-6f7e-4ec2-a9e4-854ed27a511a Allow            
d912b0fc-6f7e-4ec2-a9e4-854ed27a511a d912b0fc-6f7e-4ec2-a9e4-854ed27a511a Allow            
eec2668a-0773-4947-93ba-2223f6acfe55 d912b0fc-6f7e-4ec2-a9e4-854ed27a511a Allow            
fd199cb4-2ebf-4171-96e2-12fd75453e39 d912b0fc-6f7e-4ec2-a9e4-854ed27a511a Allow            
fa956d8c-87df-4cd4-ac2a-ac1f3d7cac8b d912b0fc-6f7e-4ec2-a9e4-854ed27a511a Allow            
d89be5ce-6495-4009-b61b-81126c239c34 d912b0fc-6f7e-4ec2-a9e4-854ed27a511a Allow            
a9532b30-4edb-4b66-a3b0-6ac972a6065b d912b0fc-6f7e-4ec2-a9e4-854ed27a511a Allow            
b602b148-2fcf-435a-9d34-ce72c3a8c748 d912b0fc-6f7e-4ec2-a9e4-854ed27a511a Allow            
3bb176aa-d0ba-47f7-aecc-f4837593006e d912b0fc-6f7e-4ec2-a9e4-854ed27a511a Allow            
41377e9c-dc47-46c0-b4a5-1d5bbdcb5cc5 d912b0fc-6f7e-4ec2-a9e4-854ed27a511a Allow            
KellyTest                            d912b0fc-6f7e-4ec2-a9e4-854ed27a511a Allow         

Remove Send As permissions user mailbox

If you made a mistake and didn’t want to give Send As permissions of a user mailbox (Brenda Smith) to another user mailbox (David Kent), you can remove it.

Let’s show how you can remove the Send As permission of the single user mailbox.

PowerShell command syntax.

Remove-RecipientPermission "User Mailbox" -AccessRights "The type of permissions" -Trustee "Recipient" -Confirm:$False

Run the PowerShell command example to remove Send As permissions from Brenda Smith’s user mailbox.

Remove-RecipientPermission "Brenda Smith" -AccessRights SendAs -Trustee "David Kent" -Confirm:$False

To verify you removed the Send As permission from Brenda Smith’s user mailbox, run the Get-RecipientPermission.

Run the below PowerShell command to see all Send As permission for a single user mailbox (Brenda Smith).

Get-RecipientPermission "Brenda Smith" | Where-Object {($_.IsInherited -eq $False) -and -not ($_.Trustee -like "NT AUTHORITY\SELF") } | Select-Object Trustee, AccessRights

If the PowerShell output is empty, you haven’t assigned any mailbox with Send As permissions.

3. Display information user mailbox

Run the below PowerShell command to get a list of all licensed user mailboxes.

Get-Mailbox -Filter '(RecipientTypeDetails -eq "UserMailBox")' | Select Name,Alias

The PowerShell output looks like the below example.

PS C:\> Get-Mailbox -Filter '(RecipientTypeDetails -eq "UserMailBox")' | Select Name,Alias

Name                                 Alias         
----                                 -----         
ea2b7e6a-fb01-42e3-9fb8-ccf13a5f2e67 Stephen.Hunter
d912b0fc-6f7e-4ec2-a9e4-854ed27a511a Brenda.Smith  
eec2668a-0773-4947-93ba-2223f6acfe55 David.Kent    
fd199cb4-2ebf-4171-96e2-12fd75453e39 Susan.Brown   
fa956d8c-87df-4cd4-ac2a-ac1f3d7cac8b Chris.Lucas   
d89be5ce-6495-4009-b61b-81126c239c34 George.Wilson 
a9532b30-4edb-4b66-a3b0-6ac972a6065b Jill.Bates    
b602b148-2fcf-435a-9d34-ce72c3a8c748 Diana.Baker   
3bb176aa-d0ba-47f7-aecc-f4837593006e Mary.James    
41377e9c-dc47-46c0-b4a5-1d5bbdcb5cc5 Amanda.Hansen 
KellyTest                            Kelly1  

Export list of licensed user mailboxes to CSV file

You can export information about all the existing user mailboxes to a single CSV file. This way, you can easily search for the different user mailboxes.

Run the below PowerShell command to export a list of all user mailboxes to a CSV file.

Get-Mailbox -Filter '(RecipientTypeDetails -eq "UserMailbox")' | Select-Object DisplayName,Alias,RecipientTypeDetails,PrimarySmtpAddress | Export-CSV "C:\temp\User Mailboxes Info.CSV" –NoTypeInformation -Encoding UTF8

Once you export the information, you can find the CSV file in the C:\temp folder.

Open the CSV file with an application like Microsoft Excel to see the results.

Manage user mailbox with PowerShell export information CSV file

Display user mailbox information permissions

Display information about Full Access and Send As permission:

  1. The PowerShell cmdlet Get-MailboxPermission shows Full Access permission
  2. The PowerShell cmdlet Get-RecipientPermission shows Send As permission

The default output of both these PowerShell commands shows redundant information, making it difficult to understand the Exchange mailbox permissions clearly. For this reason, we will filter and remove redundant information.

In our example, we want to see the information on Brenda Smith’s user mailbox.

1. Display Full Access permission of a user mailbox

Run the below PowerShell command to show all Full Access permissions of a user mailbox.

Get-MailboxPermission "Brenda Smith" | Where-Object { ($_.IsInherited -eq $False) -and -not ($_.User -like "NT AUTHORITY\SELF") } | Select-Object Identity, User, AccessRights

The PowerShell output shows all the Full Access permission of a user mailbox (Brenda Smith).

PS C:\> Get-MailboxPermission "Brenda Smith" | Where-Object { ($_.IsInherited -eq $False) -and -not ($_.User -like "NT AUTHORITY\SELF") } | Select-Object Identity, User, AccessRights

Identity                             User                    AccessRights
--------                             ----                    ------------
d912b0fc-6f7e-4ec2-a9e4-854ed27a511a David.Kent@m365info.com {FullAccess}

2. Display Send As permission of a user mailbox

Run the below PowerShell command to show all Send As permissions of a user mailbox.

Get-RecipientPermission "Brenda Smith" | Where-Object {($_.IsInherited -eq $False) -and -not ($_.Trustee -like "NT AUTHORITY\SELF") } | Select-Object Trustee, AccessRights

The PowerShell output shows all the Send As permissions of a user mailbox (Brenda Smith).

PS C:\> Get-RecipientPermission "Brenda Smith" | Where-Object {($_.IsInherited -eq $False) -and -not ($_.Trustee -like "NT AUTHORITY\SELF") } | Select-Object Trustee, AccessRights

Trustee                    AccessRights
-------                    ------------
Brenda.Smith@m365info.com  {SendAs}    
Amanda.Hansen@m365info.com {SendAs}    
KellyTest@m365info.com     {SendAs}  

4. Convert user mailbox

You can easily convert a licensed user mailbox to a shared, room or equipment mailbox.

Note: You can’t convert a user mailbox without an Exchange Online license assigned.

Convert user mailbox to shared mailbox

Run the PowerShell command to Convert the user mailbox to shared mailbox.

Get-Mailbox "KellyTest" | Set-Mailbox -Type Shared

Convert user mailbox to room mailbox

Use the PowerShell command to convert the user mailbox to room mailbox.

Get-Mailbox "KellyTest" | Set-Mailbox -Type Room

Convert user mailbox to equipment mailbox

Run the PowerShell command to convert user mailbox to equipment mailbox.

Get-Mailbox "KellyTest" | Set-Mailbox -Type Equipment

5. Delete user mailbox

You can easily soft delete a specific user mailbox with PowerShell. It means that the deleted user will stay in the Azure AD recycle bin for 30 days before it is permanently deleted. You can restore deleted users in Manage Office 365 recycle bin with PowerShell.

PowerShell command syntax.

Remove-Mailbox -Identity "<User Identity>" -Confirm:$False

Run the below PowerShell command to soft delete a single user mailbox.

Remove-Mailbox -Identity "KellyTest" -Confirm:$False

Bulk soft delete user mailbox

Run the below PowerShell command to bulk soft delete user mailboxes.

Get-Mailbox -Filter '(RecipientTypeDetails -eq "UserMailBox")' -ResultSize Unlimited | Remove-Mailbox -Confirm:$False

Did this help you to manage Office 365 user mailboxes with PowerShell?

Read more: Export Microsoft 365 user licenses »

Conclusion

You learned how to create a new regular user mailbox and manage permissions with PowerShell. Once you export information about all user mailboxes, you can easily convert the regular mailbox to another type. With PowerShell, you can bulk soft delete user mailbox.

Did you enjoy this article? You may also like Reset MFA for Microsoft 365 user. Don’t forget to follow us and share this article.

Configure technical contact details in Microsoft 365

$
0
0

It’s important to configure technical contact details in Microsoft 365. Suppose there are technical issues from Microsoft’s side, then you immediately get an email with the service disruptions and updates. In this article, you will learn to change the organization name, company name, address, and technical contact details in Microsoft 365.

Microsoft 365 technical contact

Technical contact in Microsoft 365 represents a person that serves as a main point for technical issues relating to the Microsoft 365 tenant subscription. This person will receive communications about Microsoft 365 service status.

Examples of when you use a technical contact:

  • Reset global administrator password: If the global administrator forgets his password and can’t reset the password, then he must try to connect with the technical contact person. The global administrator can use the technical contact email address or phone number.
  • Directory synchronization: When an organization implements directory synchronization, all of the error/success messages from the directory synchronization server will be sent to the email address of the technical contact.
  • Message from Office 365: Different messages, such as future upgrades, important information, and so on, will be sent automatically to the email address of the technical contact.

How to configure Microsoft 365 technical contact

  1. Sign in to Microsoft 365 admin center
  2. Click on (Show all) > Settings > Org settings
  3. Click on the Organization profile
  4. Click on Organization information
Configure technical contact details in Microsoft 365 organization infromation

Or you can directly click on the link with your Office 365 organization name

Microsoft 365 admin center link organization name

Once you navigate to organization information, you will see a list of details you can change or fill in with the correct information:

  • Name
  • Street address
  • City
  • State or province
  • ZIP or postal code
  • Phone
  • Technical contact: The email address for the primary technical person who administers your Microsoft 365 subscription
  • Preferred language

Note: It is impossible to change the country or region afterward. The only solution to modify it is to cancel your Microsoft 365 subscription and re-register or take a new Microsoft 365 subscription.

Configure organization information Microsoft 365 admin center
  1. You need to fill all the fields with the red asterisk
  2. Click Save

Note: You can’t save the changes if you don’t fill in all the required fields marked with a red asterisk.

Add and change organization information Microsoft 365 admin center

Did this help you to find the technical contact details in Microsoft 365?

Read more: Enable message recall in Exchange Online »

Conclusion

You learned to configure and update the contact information in Microsoft 365 admin center. Always check the technical contact information and modify it whenever you want. Remember that you can’t change the country or region of your Microsoft 365 subscription afterward.

Did you enjoy this article? You may also like Enable reply all storm protection in Exchange Online. Don’t forget to follow us and share this article.

Force delete Microsoft 365 mailbox with PowerShell

$
0
0

You get an error when you force delete a Microsoft 365 mailbox from the recycle bin with PowerShell Exchange Online. The problem is that most hard deleted mailboxes are not entirely correctly removed. This article will show you how to permanently force delete user, shared, room, and equipment mailbox with PowerShell.

Force hard delete Microsoft 365 mailbox error

Let’s look at how the force hard delete mailbox error appears with PowerShell.

Note: Before permanently deleting any mailbox, you must soft delete it to find it in the Azure AD recycle bin.

In our example, we have soft deleted all types of mailboxes, and we want to delete them permanently from the recycle bin.

1. Start Windows PowerShell as administrator and run the cmdlet Connect-ExchangeOnline to Connect to Exchange Online PowerShell.

Connect-ExchangeOnline

2. Sign in with your credentials.

3. Run the below command to get a list of all the soft deleted mailboxes with PowerShell.

Get-Mailbox -SoftDeletedMailbox

The PowerShell output result is shown below.

PS C:\> Get-Mailbox -SoftDeletedMailbox

Name                      Alias           Database            ProhibitSendQuota    ExternalDirectoryObjectId           
----                      -----           --------            -----------------    -------------------------           
Melissa Kelly             Melissa.Kelly   EURPR02DG235-db031  99 GB (106,300,44... 3c790bcf-48d2-44f7-b1f7-e06c18bbe097
Projector 11              Projector11     EURPR02DG257-db113  49.5 GB (53,150,2... 2c849a06-2d71-48ca-b35e-21c894b93072
EquipmentTest             EquipmentTest   EURPR02DG506-db110  49.5 GB (53,150,2... 3745e1c5-8764-4f75-914a-46f69ffeb20d
Info Box3                 InfoBox3        EURPR02DG493-db376  49.5 GB (53,150,2... bb7fd29a-ec5a-407f-aaf4-34ce4bbc97ea
Projector 21              Projector21     EURPR02DG202-db028  49.5 GB (53,150,2... 628cd9d3-3994-4469-8794-f089396bae40
c474ceb9-a536-4526-83d... Amanda.Hansen   EURPR02DG180-db069  49.5 GB (53,150,2... c474ceb9-a536-4526-83db-8c72ed1604a8
Julia Wood                Julia           EURPR02DG528-db077  99 GB (106,300,44... 99df7b19-ab34-4bc2-8d69-d7de1382cbee
Info Box                  InfoBox         EURPR02DG504-db416  49.5 GB (53,150,2... bd8a36bd-cd76-4e69-8162-f700e268ee79

4. The PowerShell syntax below will show an error for all mailbox types (user, shared, room, and equipment), and it will not remove the hard deleted mailboxes from this list.

Get-Mailbox -Identity "user@domain.com" | Remove-Mailbox -PermanentlyDelete -Force -Confirm:$false

This is what it looks like in the output.

PS C:\> Get-Mailbox -Identity "Julia.Wood@m365info.com" | Remove-Mailbox -PermanentlyDelete -Force -Confirm:$false

Write-ErrorMessage : Ex6F9304|Microsoft.Exchange.Configuration.Tasks.ManagementObjectNotFoundException|The operation couldn't be performed because object 'Julia.Wood@m365info.com' couldn't 
be found on 'HE1PR02A11DC002.EURPR02A011.PROD.OUTLOOK.COM'.
At C:\Users\AppData\Local\Temp\tmpEXO_01jl4f0q.nce\tmpEXO_01jl4f0q.nce.psm1:1121 char:13
+             Write-ErrorMessage $ErrorObject
+             ~~~~~~~~~~~~~~~~~~~~~~~~~~~~~~~
    + CategoryInfo          : NotSpecified: (:) [Get-Mailbox], ManagementObjectNotFoundException
    + FullyQualifiedErrorId : [Server=AM9PR02MB7203,RequestId=cc70c628-35c2-74ca-45ad-6df02e5db1ba,TimeStamp=Wed, 15 Mar 2023 22:59:05 GMT],Write-ErrorMessage

Why do we get the error when we want to delete the mailbox permanently with PowerShell?

Let’s take a look at the solution in the next step.

Solution permanently force delete Microsoft 365 mailbox with PowerShell

The solution to force delete any mailbox with PowerShell is to hard delete it first and then permanently remove it. Follow the steps below to see how you can hard delete a mailbox with PowerShell without an error.

1. Connect to Azure AD with PowerShell

Start Windows PowerShell as administrator and run the cmdlet Connect-MsolService to Connect to Azure AD PowerShell.

Connect-MsolService

Fill in the administrator credentials and sign in.

Force delete mailbox error with PowerShell sign in

2. Display all soft deleted mailboxes

Before we can hard delete a mailbox, we need the information value of the parameters -UserPrincipalName and -ObjectId.

Therefore we will display a list of all soft deleted mailboxes from the Azure AD recycle bin.

Run the below PowerShell command to get all soft deleted mailboxes.

Get-MsolUser -All -ReturnDeletedUsers | Select Displayname,UserPrincipalName,ObjectId |ft

The results of the PowerShell output look like the example shown below.

PS C:\> Get-MsolUser -All -ReturnDeletedUsers | Select Displayname,UserPrincipalName,ObjectId |ft 

DisplayName   UserPrincipalName                                                    ObjectId                            
-----------   -----------------                                                    --------                            
Amanda Hansen Amanda.Hansen@m365info.com                                           c474ceb9-a536-4526-83db-8c72ed1604a8
Info Box      ExRemoved-bbb7d65e6c8148dca7e8dd2a3216c0cc@ms365info.onmicrosoft.com bd8a36bd-cd76-4e69-8162-f700e268ee79
Info Box3     ExRemoved-64477f816fec42dba49f49bfc8977563@ms365info.onmicrosoft.com bb7fd29a-ec5a-407f-aaf4-34ce4bbc97ea
Projector 11  ExRemoved-c313d792e43243cb8f56c7b0b80aa0ee@ms365info.onmicrosoft.com 2c849a06-2d71-48ca-b35e-21c894b93072
Projector 21  ExRemoved-b632283276da4357aaae2c646898baa4@ms365info.onmicrosoft.com 628cd9d3-3994-4469-8794-f089396bae40
EquipmentTest ExRemoved-249e8a70ed5f4da98d1e97fb68149b9a@ms365info.onmicrosoft.com 3745e1c5-8764-4f75-914a-46f69ffeb20d
Julia Wood    ExRemoved-f62eb6868e674d33a94a50f078d523eb@ms365info.onmicrosoft.com 99df7b19-ab34-4bc2-8d69-d7de1382cbee
Melissa Kelly ExRemoved-69f44afbaf1f4dfb973bc7b005af6635@ms365info.onmicrosoft.com 3c790bcf-48d2-44f7-b1f7-e06c18bbe097

3. Hard delete mailbox with PowerShell

This above list will only display the soft deleted mailboxes, as seen in the Azure Active Directory recycle bin. In our example, we want to hard delete the user mailbox of Julia Wood, so we need to copy and use the UserPrincipalName or ObjectId.

There are two ways to hard delete a mailbox with PowerShell.

1. Hard delete a mailbox with the below PowerShell syntax.

Remove-MsolUser -UserPrincipalName "userprincipalname" -RemoveFromRecycleBin -Force

Copy the UPN value and run the below PowerShell example to hard delete a mailbox.

Remove-MsolUser -UserPrincipalName "ExRemoved-f62eb6868e674d33a94a50f078d523eb@ms365info.onmicrosoft.com" -RemoveFromRecycleBin -Force

2. Hard delete a mailbox with the below PowerShell syntax.

Remove-MsolUser -ObjectId "objectid" -RemoveFromRecycleBin -Force

Copy the ObjectId value and run the below PowerShell example to hard delete a mailbox.

Remove-MsolUser -ObjectId "99df7b19-ab34-4bc2-8d69-d7de1382cbee" -RemoveFromRecycleBin -Force

4. Check soft deleted mailbox removed from recycle bin

After running one of the above commands, we can check if the deleted user is not in the Azure AD recycle bin list.

Run the below PowerShell command, and the output shows no mailbox with a DisplayName Julia Wood.

PS C:\> Get-MsolUser -All -ReturnDeletedUsers | Select Displayname,UserPrincipalName,ObjectId |ft

DisplayName   UserPrincipalName                                                    ObjectId                            
-----------   -----------------                                                    --------                            
Amanda Hansen Amanda.Hansen@m365info.com                                           c474ceb9-a536-4526-83db-8c72ed1604a8
Info Box      ExRemoved-bbb7d65e6c8148dca7e8dd2a3216c0cc@ms365info.onmicrosoft.com bd8a36bd-cd76-4e69-8162-f700e268ee79
Info Box3     ExRemoved-64477f816fec42dba49f49bfc8977563@ms365info.onmicrosoft.com bb7fd29a-ec5a-407f-aaf4-34ce4bbc97ea
Projector 11  ExRemoved-c313d792e43243cb8f56c7b0b80aa0ee@ms365info.onmicrosoft.com 2c849a06-2d71-48ca-b35e-21c894b93072
Projector 21  ExRemoved-b632283276da4357aaae2c646898baa4@ms365info.onmicrosoft.com 628cd9d3-3994-4469-8794-f089396bae40
EquipmentTest ExRemoved-249e8a70ed5f4da98d1e97fb68149b9a@ms365info.onmicrosoft.com 3745e1c5-8764-4f75-914a-46f69ffeb20d
Melissa Kelly ExRemoved-69f44afbaf1f4dfb973bc7b005af6635@ms365info.onmicrosoft.com 3c790bcf-48d2-44f7-b1f7-e06c18bbe097

To double-check it, you can also run the below PowerShell command.

Get-Mailbox -SoftDeletedMailbox | ft

Note: Wait a few minutes before you run the PowerShell command Get-Mailbox -SoftDeletedMailbox to see the correct results.

The PowerShell output result looks different because it also displays the hard deleted mailboxes.

PS C:\> Get-Mailbox -SoftDeletedMailbox | ft

Name                      Alias           Database            ProhibitSendQuota    ExternalDirectoryObjectId
----                      -----           --------            -----------------    ------------------------- 
Melissa Kelly             Melissa.Kelly   EURPR02DG235-db031  99 GB (106,300,44... 3c790bcf-48d2-44f7-b1f7-e06c18bbe097
Projector 11              Projector11     EURPR02DG257-db113  49.5 GB (53,150,2... 2c849a06-2d71-48ca-b35e-21c894b93072
EquipmentTest             EquipmentTest   EURPR02DG506-db110  49.5 GB (53,150,2... 3745e1c5-8764-4f75-914a-46f69ffeb20d
Info Box3                 InfoBox3        EURPR02DG493-db376  49.5 GB (53,150,2... bb7fd29a-ec5a-407f-aaf4-34ce4bbc97ea
Projector 21              Projector21     EURPR02DG202-db028  49.5 GB (53,150,2... 628cd9d3-3994-4469-8794-f089396bae40
c474ceb9-a536-4526-83d... Amanda.Hansen   EURPR02DG180-db069  49.5 GB (53,150,2... c474ceb9-a536-4526-83db-8c72ed1604a8
Julia Wood                Julia           EURPR02DG528-db077  99 GB (106,300,44... 
Info Box                  InfoBox         EURPR02DG504-db416  49.5 GB (53,150,2... bd8a36bd-cd76-4e69-8162-f700e268ee79

Check if the ExternalDirectoryObjectId for the hard deleted mailbox is empty. In our example, Julia Wood has no ExternalDirectoryObjectId value, meaning the user mailbox is hard deleted.

Note: Suppose you already hard deleted a mailbox from the Azure AD recycle bin before, and you might still find it in the soft deleted mailbox list. The only difference is that the mailbox is without an ExternalDirectoryObjectId.

It means the mailbox is not entirely deleted permanently because you must complete one last step.

5. Permanently force delete Microsoft 365 mailbox with PowerShell

The last step is to delete the mailbox without an ExternalDirectoryObjectId from this soft deleted mailbox list.

Force hard delete any mailbox type with the below PowerShell syntax.

Get-Mailbox -Identity "user@domain.com" -SoftDeletedMailbox | Remove-Mailbox -PermanentlyDelete -Force -Confirm:$false

Run the PowerShell command example to delete a mailbox permanently.

Get-Mailbox -Identity "Julia.Wood@m365info.com" -SoftDeletedMailbox | Remove-Mailbox -PermanentlyDelete -Force -Confirm:$false

You successfully force deleted a mailbox with PowerShell without an error.

Verify Microsoft 365 mailbox deleted permanently

To verify that you removed the mailbox permanently, you must wait a minute before running the below cmdlet.

Run the below PowerShell command to display a list of all soft deleted mailboxes.

Get-Mailbox -SoftDeletedMailbox

Check if the hard deleted mailbox is on the list. For example, if you permanently deleted the user mailbox Julia.Wood@m365info.com, you should not find it in this list anymore.

The PowerShell output look like this.

PS C:\> Get-Mailbox -SoftDeletedMailbox

Name                      Alias           Database            ProhibitSendQuota    ExternalDirectoryObjectId
----                      -----           --------            -----------------    -------------------------
Melissa Kelly             Melissa.Kelly   EURPR02DG235-db031  99 GB (106,300,44... 3c790bcf-48d2-44f7-b1f7-e06c18bbe097
Projector 11              Projector11     EURPR02DG257-db113  49.5 GB (53,150,2... 2c849a06-2d71-48ca-b35e-21c894b93072
EquipmentTest             EquipmentTest   EURPR02DG506-db110  49.5 GB (53,150,2... 3745e1c5-8764-4f75-914a-46f69ffeb20d
Info Box3                 InfoBox3        EURPR02DG493-db376  49.5 GB (53,150,2... bb7fd29a-ec5a-407f-aaf4-34ce4bbc97ea
Projector 21              Projector21     EURPR02DG202-db028  49.5 GB (53,150,2... 628cd9d3-3994-4469-8794-f089396bae40
c474ceb9-a536-4526-83d... Amanda.Hansen   EURPR02DG180-db069  49.5 GB (53,150,2... c474ceb9-a536-4526-83db-8c72ed1604a8
Info Box                  InfoBox         EURPR02DG504-db416  49.5 GB (53,150,2... bd8a36bd-cd76-4e69-8162-f700e268ee79

Now you can permanently force delete every mailbox you already hard deleted from the Azure AD recycle bin.

Did this help you to solve your force delete mailbox error with PowerShell?

Read more: Manage Office 365 recycle bin with PowerShell »

Conclusion

You learned to force delete Microsoft 365 mailbox with PowerShell. The solution to this error is to connect to MsolService with PowerShell to hard delete the mailbox. After that, you need to force delete the mailbox permanently with PowerShell Exchange Online.

Did you enjoy this article? You may also like Manage Office 365 Shared Mailbox with PowerShell. Don’t forget to follow us and share this article.

Export Microsoft 365 mailbox size report with PowerShell

$
0
0

Do you want to export all Microsoft 365 mailbox storage size data? In Microsoft 365 admin center, you can export a mailbox usage report. But this list does not show detailed information. In this article, we will show you how to export the Microsoft 365 mailbox size report with PowerShell.

Get mailbox size report in Microsoft 365 admin center

We want to show you how to display and export the mailbox usage report in Microsoft 365 admin center.

1. Display mailbox usage report

Follow the steps below to get all user mailboxes storage in Microsoft 365:

  1. Sign in to Microsoft 365 admin center
  2. On the menu, click Reports > Usage
  3. Under Overview > Click Exchange
  4. Click on Mailbox usage
Export all users mailbox size report in Microsoft 365 admin center.

You can see the total number of mailbox storage used in the graphs. But we want to see the storage used per mailbox.

  1. Scroll below to see the list of information for each mailbox

Note: By default, you can only see numbers and letters instead of the usernames of each mailbox. Since September 2021, Microsoft has been hiding user information for all reports, but you can change these settings.

The username for each mailbox is concealed for privacy. In the next step, we will show you how to view the usernames in a report.

The username for mailbox usage reports is concealed in Microsoft 365

If you can see the username, skip the next step and go to Export mailbox usage to CSV file.

2. Display username in mailbox usage report

To display usernames in reports, follow these steps:

  1. Click on Settings > Org Settings
  2. Click Services
  3. Click Reports
  4. Clear the checkbox Display concealed user, group, and site names in all reports
  5. Click Save
Display concealed user, group, and site names in all reports

3. Export mailbox usage to CSV file

Once you display the usernames, you can export the mailbox size report to a CSV file.

Return to the list of all mailbox usage. In Microsoft 365 admin center, navigate to Reports > Usage > Exchange > Mailbox usage.

  1. Click Export
  1. Open the CSV file with Microsoft Excel to view and sort the data

The mailbox usage report from Microsoft 365 shows all the mailboxes and how much storage is used.

Mailbox usage export CSV file in Microsoft 365 admin center

The Mailbox Usage Report shows limited data on the mailbox sizes. If you want more detailed data, we recommend you use the PowerShell script in the next step.

Get Microsoft 365 mailbox size report with PowerShell script

An excellent way to get the mailbox size of all users is with the below PowerShell script.

The MailboxSizeReport365.ps1 PowerShell script has 2 options:

  1. Export to CSV File (OFFICE 365)
  2. Enter the Mailbox Name with Wild Card (Export) (OFFICE 365)

The scripts will run and find all users with a mailbox and gather the following information per mailbox in the CSV file:

  1. Display Name
  2. Alias
  3. SamAccountName
  4. RecipientType
  5. Recipient OU
  6. Primary SMTP address
  7. Email Addresses
  8. Database
  9. ServerName
  10. TotalItemSize
  11. ItemCount
  12. DeletedItemCount
  13. TotalDeletedItemSize
  14. ProhibitSendReceiveQuota-In-MB
  15. UseDatabaseQuotaDefaults
  16. LastLogonTime
  17. ArchiveName
  18. ArchiveStatus
  19. ArchiveState
  20. ArchiveQuota
  21. ArchiveTotalItemSize
  22. ArchiveTotalItemCount

We will show you both options and the results in the next steps.

1. Connect to PowerShell Online

Start Windows PowerShell as administrator and run the cmdlet Connect-ExchangeOnline to Connect to Exchange Online PowerShell.

Connect-ExchangeOnline

2. Download MailboxSizeReport365 PowerShell script

To download the MailboxSizeReport365 PowerShell script, choose one of the options:

  1. Download the MailboxSizeReport365.ps1 PowerShell script
  2. Or copy the below script into Notepad and save it as a MailboxSizeReport365.ps1 file

Note: The script will not fetch inactive mailbox folder statistics. You need to assign a license to the user mailbox before you can get any data.

<#
    .SYNOPSIS
    .\MailboxSizeReport365.ps1

    .DESCRIPTION
    Connect to Exchange Online PowerShell first.
    The script exports a Mailbox Size Report for all Microsoft 365 mailboxes
    to a CSV file. You can also export a single mailbox or WildCard as an option.

    .LINK
    o365info.com/microsoft-365-mailbox-size-report

    .NOTES
    Written By: o365info
    Website:    o365info.com

    .CHANGELOG
    V1.00, 03/24/2023 - Initial version
#>

Write-host "

Mailbox Size Report 365
----------------------------

1.Export to CSV File (OFFICE 365)

2.Enter the Mailbox Name with Wild Card (Export) (OFFICE 365)"-ForeGround "Cyan"

#----------------
# Script
#----------------

Write-Host "               "

$number = Read-Host "Choose The Task"
$output = @()
switch ($number) {

    1 {

        $i = 0 
        $CSVfile = Read-Host "Enter the Path of CSV file (Eg. C:\Report.csv)" 

        $AllMailbox = Get-mailbox -Resultsize Unlimited

        Foreach ($Mbx in $AllMailbox) {

            $Stats = Get-mailboxStatistics -Identity $Mbx.distinguishedname -WarningAction SilentlyContinue

            if ($Mbx.ArchiveName.count -eq "0") {
                $ArchiveTotalItemSize = $null
                $ArchiveTotalItemCount = $null
            }
            if ($Mbx.ArchiveName -ge "1") {
                $MbxArchiveStats = Get-mailboxstatistics $Mbx.distinguishedname -Archive -WarningAction SilentlyContinue
                $ArchiveTotalItemSize = $MbxArchiveStats.TotalItemSize
                $ArchiveTotalItemCount = $MbxArchiveStats.BigFunnelMessageCount
            }

            $userObj = New-Object PSObject

            $userObj | Add-Member NoteProperty -Name "Display Name" -Value $mbx.displayname
            $userObj | Add-Member NoteProperty -Name "Alias" -Value $Mbx.Alias
            $userObj | Add-Member NoteProperty -Name "SamAccountName" -Value $Mbx.SamAccountName
            $userObj | Add-Member NoteProperty -Name "RecipientType" -Value $Mbx.RecipientTypeDetails
            $userObj | Add-Member NoteProperty -Name "Recipient OU" -Value $Mbx.OrganizationalUnit
            $userObj | Add-Member NoteProperty -Name "Primary SMTP address" -Value $Mbx.PrimarySmtpAddress
            $userObj | Add-Member NoteProperty -Name "Email Addresses" -Value ($Mbx.EmailAddresses -join ",")
            $userObj | Add-Member NoteProperty -Name "Database" -Value $Stats.Database
            $userObj | Add-Member NoteProperty -Name "ServerName" -Value $Stats.ServerName
            $userObj | Add-Member NoteProperty -Name "TotalItemSize" -Value $Stats.TotalItemSize
            $userObj | Add-Member NoteProperty -Name "ItemCount" -Value $Stats.ItemCount
            $userObj | Add-Member NoteProperty -Name "DeletedItemCount" -Value $Stats.DeletedItemCount
            $userObj | Add-Member NoteProperty -Name "TotalDeletedItemSize" -Value $Stats.TotalDeletedItemSize
            $userObj | Add-Member NoteProperty -Name "ProhibitSendReceiveQuota-In-MB" -Value $Mbx.ProhibitSendReceiveQuota
            $userObj | Add-Member NoteProperty -Name "UseDatabaseQuotaDefaults" -Value $Mbx.UseDatabaseQuotaDefaults
            $userObj | Add-Member NoteProperty -Name "LastLogonTime" -Value $Stats.LastLogonTime
            $userObj | Add-Member NoteProperty -Name "ArchiveName" -Value ($Mbx.ArchiveName -join ",")
            $userObj | Add-Member NoteProperty -Name "ArchiveStatus" -Value $Mbx.ArchiveStatus
            $userObj | Add-Member NoteProperty -Name "ArchiveState" -Value $Mbx.ArchiveState 
            $userObj | Add-Member NoteProperty -Name "ArchiveQuota" -Value $Mbx.ArchiveQuota
            $userObj | Add-Member NoteProperty -Name "ArchiveTotalItemSize" -Value $ArchiveTotalItemSize
            $userObj | Add-Member NoteProperty -Name "ArchiveTotalItemCount" -Value $ArchiveTotalItemCount

            $output += $UserObj  
            # Update Counters and Write Progress
            $i++
            if ($AllMailbox.Count -ge 1) {
                Write-Progress -Activity "Scanning Mailboxes . . ." -Status "Scanned: $i of $($AllMailbox.Count)" -PercentComplete ($i / $AllMailbox.Count * 100)
            }
        }

        $output | Export-csv -Path $CSVfile -NoTypeInformation -Encoding UTF8 #-Delimiter ","

        ; Break
    }

    2 {
        $i = 0
        $CSVfile = Read-Host "Enter the Path of CSV file (Eg. C:\DG.csv)" 

        $MailboxName = Read-Host "Enter the Mailbox name or Range (Eg. Mailboxname , Mi*,*Mik)"

        $AllMailbox = Get-mailbox $MailboxName -Resultsize Unlimited

        Foreach ($Mbx in $AllMailbox) {

            $Stats = Get-mailboxStatistics -Identity $Mbx.distinguishedname -WarningAction SilentlyContinue

            if ($Mbx.ArchiveName.count -eq "0") {
                $ArchiveTotalItemSize = $null
                $ArchiveTotalItemCount = $null
            }
            if ($Mbx.ArchiveName -ge "1") {
                $MbxArchiveStats = Get-mailboxstatistics $Mbx.distinguishedname -Archive -WarningAction SilentlyContinue
                $ArchiveTotalItemSize = $MbxArchiveStats.TotalItemSize
                $ArchiveTotalItemCount = $MbxArchiveStats.BigFunnelMessageCount
            }

            $userObj = New-Object PSObject

            $userObj | Add-Member NoteProperty -Name "Display Name" -Value $mbx.displayname
            $userObj | Add-Member NoteProperty -Name "Alias" -Value $Mbx.Alias
            $userObj | Add-Member NoteProperty -Name "SamAccountName" -Value $Mbx.SamAccountName
            $userObj | Add-Member NoteProperty -Name "RecipientType" -Value $Mbx.RecipientTypeDetails
            $userObj | Add-Member NoteProperty -Name "Recipient OU" -Value $Mbx.OrganizationalUnit
            $userObj | Add-Member NoteProperty -Name "Primary SMTP address" -Value $Mbx.PrimarySmtpAddress
            $userObj | Add-Member NoteProperty -Name "Email Addresses" -Value ($Mbx.EmailAddresses -join ",")
            $userObj | Add-Member NoteProperty -Name "Database" -Value $Stats.Database
            $userObj | Add-Member NoteProperty -Name "ServerName" -Value $Stats.ServerName
            $userObj | Add-Member NoteProperty -Name "TotalItemSize" -Value $Stats.TotalItemSize
            $userObj | Add-Member NoteProperty -Name "ItemCount" -Value $Stats.ItemCount
            $userObj | Add-Member NoteProperty -Name "DeletedItemCount" -Value $Stats.DeletedItemCount
            $userObj | Add-Member NoteProperty -Name "TotalDeletedItemSize" -Value $Stats.TotalDeletedItemSize
            $userObj | Add-Member NoteProperty -Name "ProhibitSendReceiveQuota-In-MB" -Value $Mbx.ProhibitSendReceiveQuota
            $userObj | Add-Member NoteProperty -Name "UseDatabaseQuotaDefaults" -Value $Mbx.UseDatabaseQuotaDefaults
            $userObj | Add-Member NoteProperty -Name "LastLogonTime" -Value $Stats.LastLogonTime
            $userObj | Add-Member NoteProperty -Name "ArchiveName" -Value ($Mbx.ArchiveName -join ",")
            $userObj | Add-Member NoteProperty -Name "ArchiveStatus" -Value $Mbx.ArchiveStatus
            $userObj | Add-Member NoteProperty -Name "ArchiveState" -Value $Mbx.ArchiveState 
            $userObj | Add-Member NoteProperty -Name "ArchiveQuota" -Value $Mbx.ArchiveQuota
            $userObj | Add-Member NoteProperty -Name "ArchiveTotalItemSize" -Value $ArchiveTotalItemSize
            $userObj | Add-Member NoteProperty -Name "ArchiveTotalItemCount" -Value $ArchiveTotalItemCount

            $output += $UserObj  
            # Update Counters and Write Progress
            $i++
            if ($AllMailbox.Count -ge 1) {
                Write-Progress -Activity "Scanning Mailboxes . . ." -Status "Scanned: $i of $($AllMailbox.Count)" -PercentComplete ($i / $AllMailbox.Count * 100) -ErrorAction SilentlyContinue
            }
        }

        $output | Export-csv -Path $CSVfile -NoTypeInformation -Encoding UTF8 #-Delimiter ","

        ; Break
    }

    Default { Write-Host "No matches found , Enter Options 1 or 2" -ForeGround "red" }

}
  1. Create the folders scripts and temp in the (C:) drive if you don’t have them already
  2. Save the MailboxSizeReport365.ps1 PowerShell script in the C:\scripts folder

Open the file to check if it is unblocked to prevent errors when running the script.

MailboxSizeReport script folder in C: drive

3. Export all Microsoft 365 size report

1. Run the following PowerShell command to start the script.

C:\scripts\.\MailboxSizeReport365.ps1

The output will display the Mailbox Size Report 365 script, which has 2 options.

PS C:\scripts\.\MailboxSizeReport365.ps1

Mailbox Size Report 365
----------------------------
1.Export to CSV File (OFFICE 365)

2.Enter the Mailbox Name with Wild Card (Export) (OFFICE 365)
 
Choose The Task:

First, we want to show option 1. Export to CSV File (OFFICE 365)

2. Type 1 and press Enter.

PS C:\scripts\.\MailboxSizeReport365.ps1


Mailbox Size Report 365
----------------------------

1.Export to CSV File (OFFICE 365)

2.Enter the Mailbox Name with Wild Card (Export) (OFFICE 365)
               
Choose The Task: 1

The script will ask for a path, so when you export the CSV file, it will get exported to that path.

3. Insert the following path C:\temp\report365.csv and press Enter.

PS C:\scripts\.\MailboxSizeReport365.ps1


Mailbox Size Report 365
----------------------------

1.Export to CSV File (OFFICE 365)

2.Enter the Mailbox Name with Wild Card (Export) (OFFICE 365)
               
Choose The Task: 1
Enter the Path of CSV file (Eg. C:\Report.csv): C:\temp\report365.csv

The Mailbox Size Report 365 script starts scanning all the mailboxes in the organization. It may take a few minutes if you have many mailbox users.

After that, the list is created, and the results are exported to a CSV file. When it is done, you can exit the script.

You will find the list exported in a CSV file in C:\temp.

Export Microsoft 365 mailbox size report csv file in temp folder

4. Export specific Microsoft 365 mailbox size report

You can also export one specific Microsoft 365 mailbox or several mailboxes that start or end with the same letters or numbers.

1. Run the following PowerShell command to start the script.

C:\scripts\.\MailboxSizeReport365.ps1

The output will display the Mailbox Size Report 365 script with 2 options.

We want to show option 2. Enter the Mailbox Name with Wild Card (Export) (OFFICE 365)

2. Type number 2 and press Enter.

PS C:\scripts\.\MailboxSizeReport365.ps1

Mailbox Size Report 365
----------------------------
1.Export to CSV File (OFFICE 365)

2.Enter the Mailbox Name with Wild Card (Export) (OFFICE 365)
 
Choose The Task: 2

The script will ask for a path, so when you export the CSV file, it will get exported to that path.

3. Type the following path C:\temp\report365project.csv and press Enter.

PS C:\scripts\.\MailboxSizeReport365.ps1

Mailbox Size Report 365
----------------------------
1.Export to CSV File (OFFICE 365)

2.Enter the Mailbox Name with Wild Card (Export) (OFFICE 365)
 
Choose The Task: 2
Enter the Path of CSV file (Eg. C:\DG.csv): C:\temp\report365project.csv

Now the script will ask to enter the mailbox name or a range.

You can type the full name of the mailbox or the letters and numbers the mailbox has with an asterisk (*). Use the asterisk before, after, or between letters and numbers.

We will show you examples of how to use the asterisk (*):

  1. Place (*) at the end to show all mailboxes that start with pr*
  2. Insert two asterisks to show all mailboxes that have these letters *pr*
  3. Place (*) at the beginning to show all mailboxes that end with *pr

4. Insert project* to show all the mailboxes that start with the name project.

PS C:\scripts\.\MailboxSizeReport365.ps1

Mailbox Size Report 365
----------------------------

1.Export to CSV File (OFFICE 365)

2.Enter the Mailbox Name with Wild Card (Export) (OFFICE 365)
               
Choose The Task: 2
Enter the Path of CSV file (Eg. C:\DG.csv): C:\temp\report365project.csv
Enter the Mailbox name or Range (Eg. Mailboxname , Mi*,*Mik): project*

The Mailbox Size Report 365 PowerShell script will start scanning all the mailboxes. When it’s done, you can exit the script.

Check if the list is successfully exported to a CSV file. Go to the path C:\temp\ and find the report365project.csv file.

Export Microsoft 365 mailbox size specific report csv file in temp folder

5. Open Microsoft 365 report CSV file with Excel

Load all the CSV data into Microsoft Excel by following the below steps:

  1. Open Microsoft Excel and select New blank workbook
Export Microsoft 365 mailbox size report in Excel
  1. Click on Data > From Text/CSV
Import Microsoft 365 mailbox size report data from csv in Excel
  1. Find and select the report365.csv file
  2. Click Import
Import data from CSV file into Microsoft Excel
  1. Check all the columns and click Load

Note: If you don’t have a license, you can’t find the mailbox because it will not show the inactive mailbox. Assign a license first, and then you can fetch the mailbox.

Export Microsoft 365 mailbox size report with Excel csv load
  1. Microsoft Excel loads and formats the data from the CSV file
  2. Sort and filter the columns by clicking on the arrows in the first row
Export Microsoft 365 mailbox size report data in Excel

It is easy to export a Microsoft 365 mailbox size report, and you can also remove unnecessary information.

Read more: Export Microsoft 365 users licenses »

Conclusion

You learned how to export the Microsoft 365 mailbox size report in Exchange Online with PowerShell. Use the MailboxSizeReport365.ps1 PowerShell script to list the mailbox size data of all mailboxes. This script shows information per mailbox, such as storage usage, item size, and deleted items size.

Did you enjoy this article? You may also like How to set Microsoft 365 password to never expire. Don’t forget to follow us and share this article.

Viewing all 370 articles
Browse latest View live