Multiple users can access a shared mailbox, but you can convert it to a regular user mailbox. You can give a single user full control over the mailbox, including the ability to log in with their own credentials and manage the mailbox as they would with their own personal mailbox. In this article, you will learn to convert a shared mailbox to a user mailbox in Exchange Admin Center (EAC) and PowerShell.
Sign in with a user account that has access permission
Note: If you want to store more than 50 GB, you must have Exchange Online plan 2 license assigned to the shared mailbox. And if you need the online archive, you need to assign the Exchange Online plan 1 license to it.
Convert shared to user mailbox in Exchange Admin Center
We will start by converting the mailbox in the new Exchange Admin Center (EAC). The regular and shared mailboxes are in the same list under mailboxes.
You can find the shared mailbox in EAC in three different ways:
If the shared mailbox is unlicensed and you convert it to a user mailbox, the result will be an unlicensed user mailbox. It means that you need to assign a license to the user mailbox.
Note: Double-check if your user mailbox has a license assigned. Remember that a user mailbox without a license will be deleted after 30 days.
Verify that you successfully converted to a regular user mailbox by navigating to EAC > Recipients > Mailboxes. Search for the user, and you will see UserMailbox under Recipient type.
Convert shared to user mailbox with PowerShell
Another option to convert a shared mailbox to regular mailbox is with PowerShell:
3. Convert shared mailbox to user mailbox using the Set-Mailbox cmdlet. We will use the Regular parameter to tell Exchange we want to set it as a user mailbox type.
6. Always double-check the license to see if it’s correctly set.
Note: Double-check if your user mailbox has a license assigned. Remember that a user mailbox without a license will be deleted after 30 days.
Did you use the Exchange Admin Center or Exchange Online PowerShell to convert your mailbox?
Conclusion
You learned how to convert a shared mailbox to a user mailbox in the Exchange Admin Center (EAC) and Exchange Online PowerShell. A shared mailbox doesn’t always need a license, while a user mailbox does. So remember to add a license after you convert to a regular user mailbox.
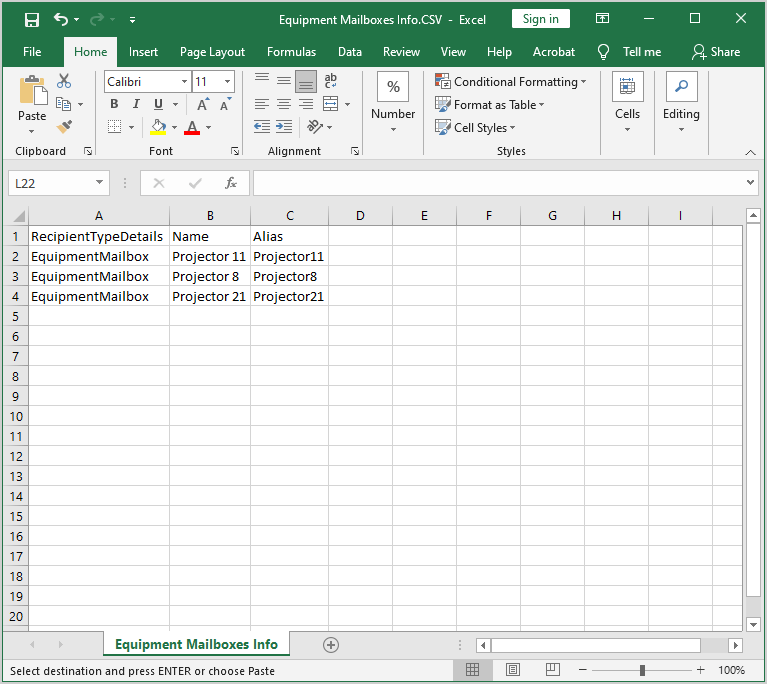
In this article, we will show how to manage a Microsoft 365 equipment mailbox with PowerShell. Learn how to create, manage and modify an equipment mailbox. You can also view and export information about the equipment mailbox, convert it to another type, and bulk soft delete it.
The resource mailbox doesn’t require a license and is used to manage meetings. Resource mailboxes are useful for managing the schedule of a conference room and allow users to reserve a timeslot.
There are two types of resource mailboxes:
Room mailbox is assigned to a physical location such as a meeting room or conference place.
Equipment mailbox is assigned to objects, not location-specific, such as laptops, cars, or microphones.
Note: Do you want to know more about how to find, restore, or permanently delete the equipment mailbox in Microsoft 365? Read the article Manage Office 365 recycle bin with PowerShell.
Did this help you to manage Office 365 equipment mailbox with PowerShell?
Conclusion
You learned how to manage equipment mailboxes with PowerShell. There are a lot of possibilities when it comes to managing an equipment mailbox. The most essential tasks are to create, convert, delete, assign permissions, and export a list of equipment mailboxes.
It’s important to add the organization’s contact information to the Microsoft 365 help pane. This way, users can find the help desk contact details under the default help support. In this article, you will learn to configure help desk information in Microsoft 365.
The help desk information displays the company’s support contact. When a user signs into Microsoft 365 and clicks the help button, the help pane opens. If you haven’t configured a help desk information, the user will only find the default Microsoft help support.
When you provide your users with the correct help desk information, they can quickly contact your company’s support.
You learned to configure and change the help desk information in Microsoft 365 admin center. Always check the help desk contact information and modify it when there are updates to support your users. Remember that the user needs to sign back in to see the changes.
Your organization has switched to Exchange Online and needs to migrate its old emails to the new Microsoft 365 account. To get the old emails, we need to create a PST file and import it into the cloud-based Microsoft 365 mailbox. This article will show you how to import a PST file using the Azure Storage Explorer tool into Microsoft 365 mailbox.
How to import PST files into Microsoft 365 account
We want to move multiple mailboxes from an organization server to the new cloud-based Microsoft 365. There are different methods, depending on the size (GB) and how many PST files you need to migrate to Microsoft 365.
We will show you the steps to import multiple PST files (max. 20 GB) into Microsoft 365 mailboxes.
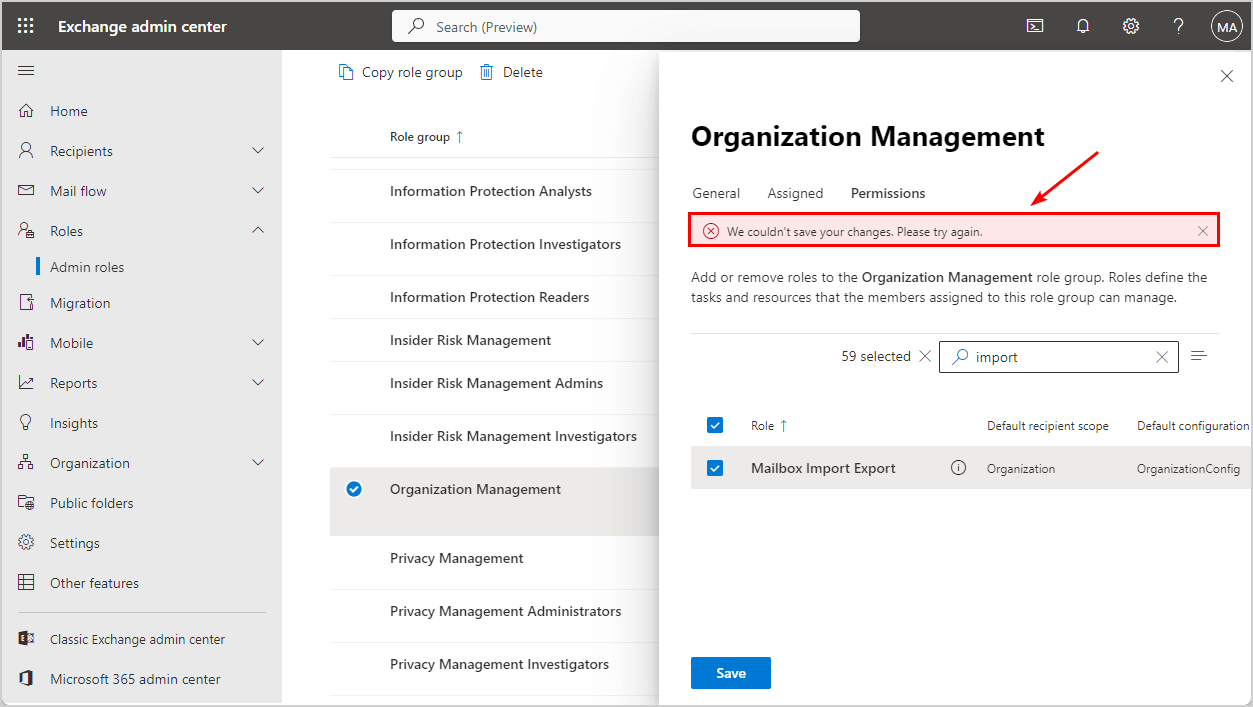
1. Assign Mailbox Import Export role
You must assign the Mailbox Import Export role in Exchange Online to import PST files into user mailboxes. Otherwise, you cannot create a new import job in the Microsoft Purview compliance portal.
Assign Mailbox Import Export role in Exchange Online:
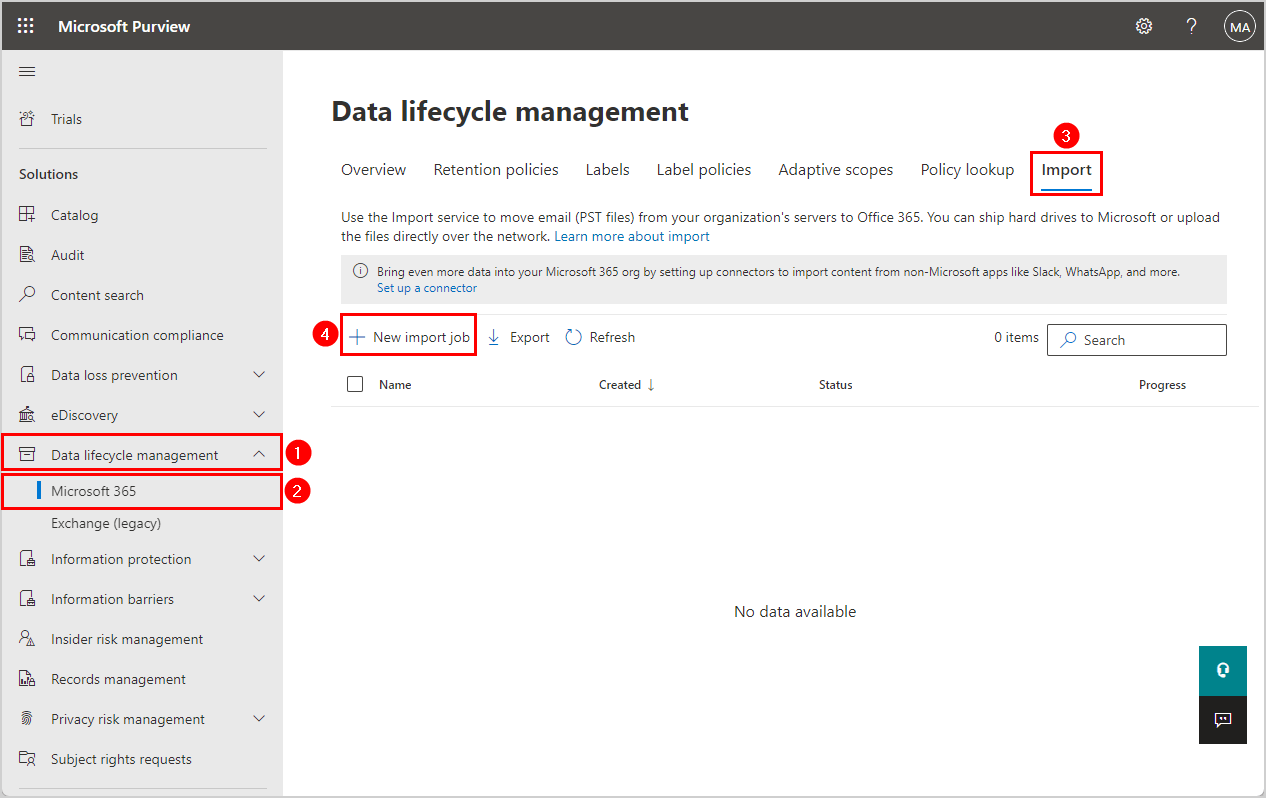
Click on Data lifecycle management > Microsoft 365
Choose Import
Click New Import Job
If you don’t see a New import job, then the changes in the previous steps are not yet applied. There will be a yellow message like the one below.
Note: To create import jobs, you must be assigned the Mailbox Import Export role in Exchange Online. After this role is assigned, it might take up to 24 hours before you can start creating jobs.
Wait until the above warning removes so you can perform the above step.
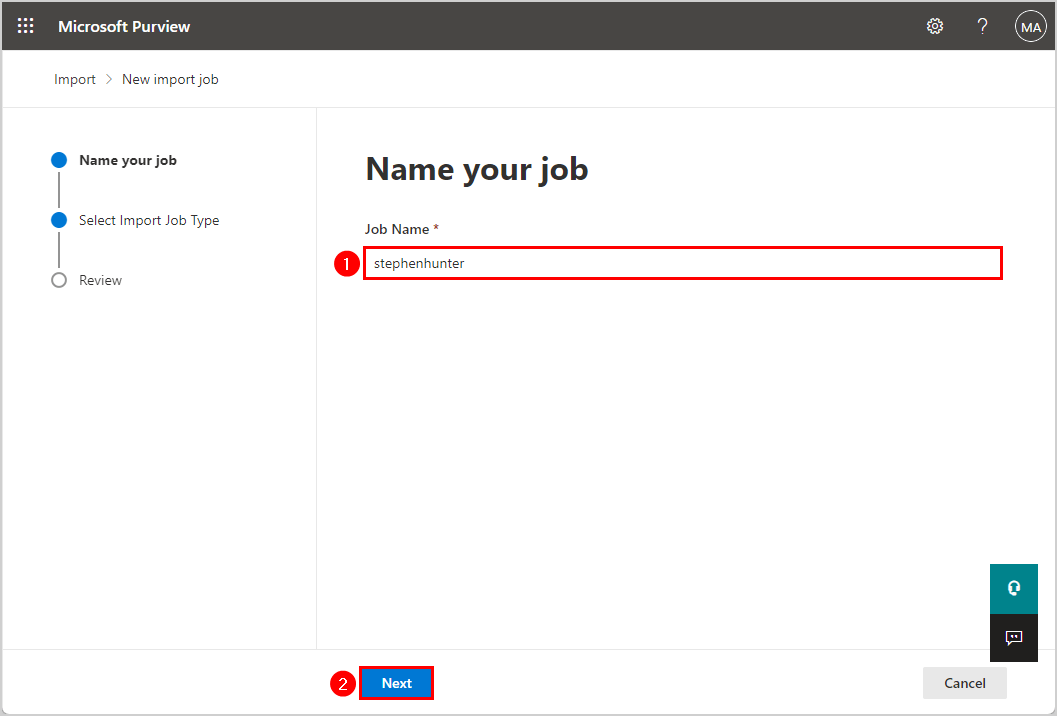
Give the import job a name, e.g. stephenhunter
Click Next
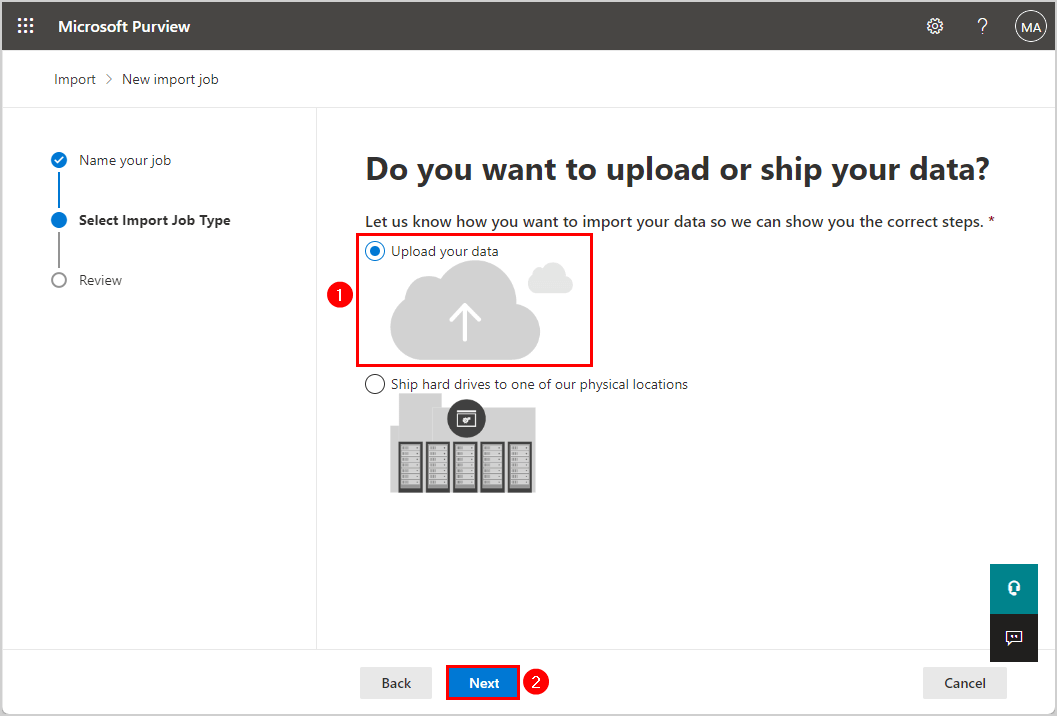
Select Upload your data
Click Next
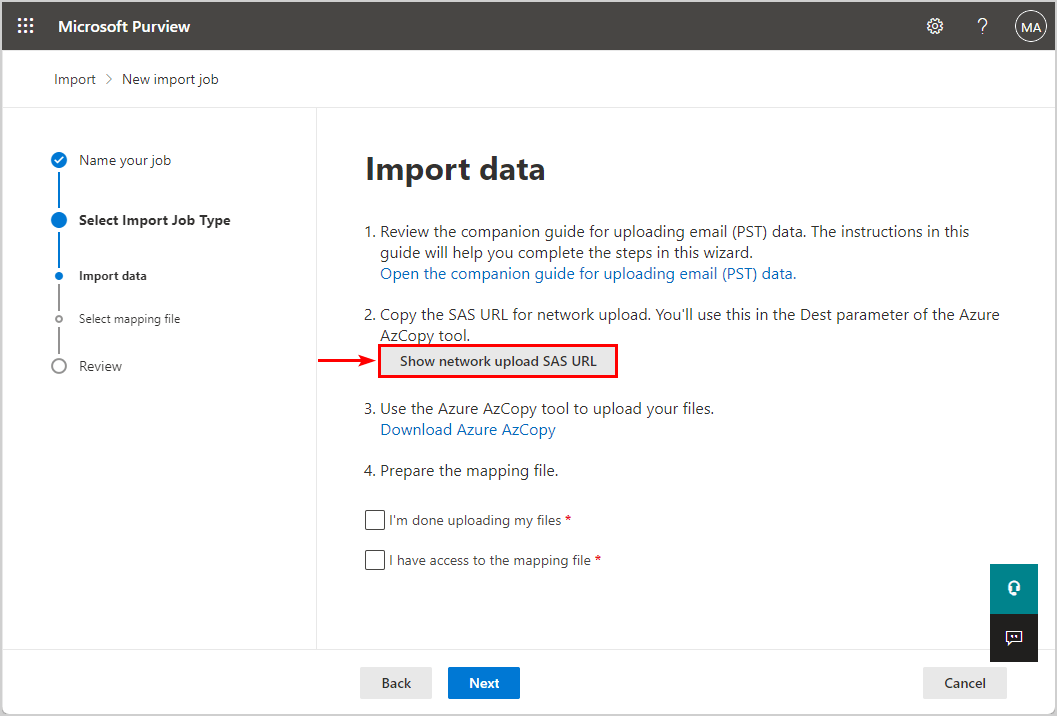
Click on Show network upload SAS URL
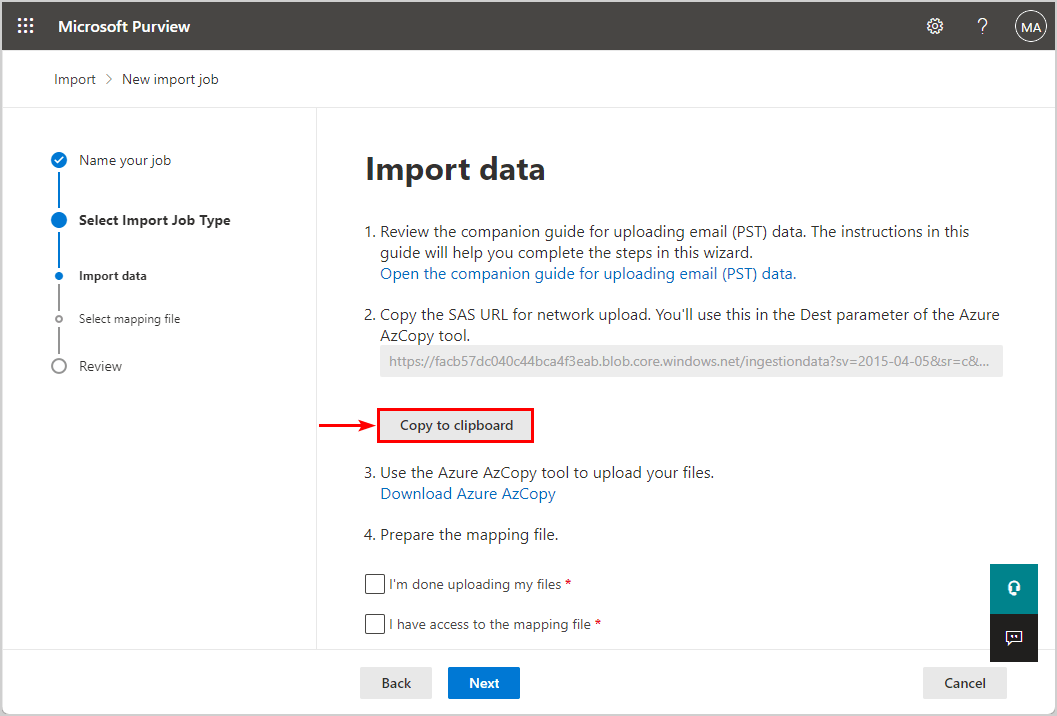
Click on Copy to clipboard
In the next step, you will upload the PST file to Microsoft 365 using Azure Storage Explorer.
Note: Keep the Microsoft Purview > New import job window open because you will return to complete the last steps. Don’t cancel the import data, or you will start from the beginning.
3. Install Azure Storage Explorer
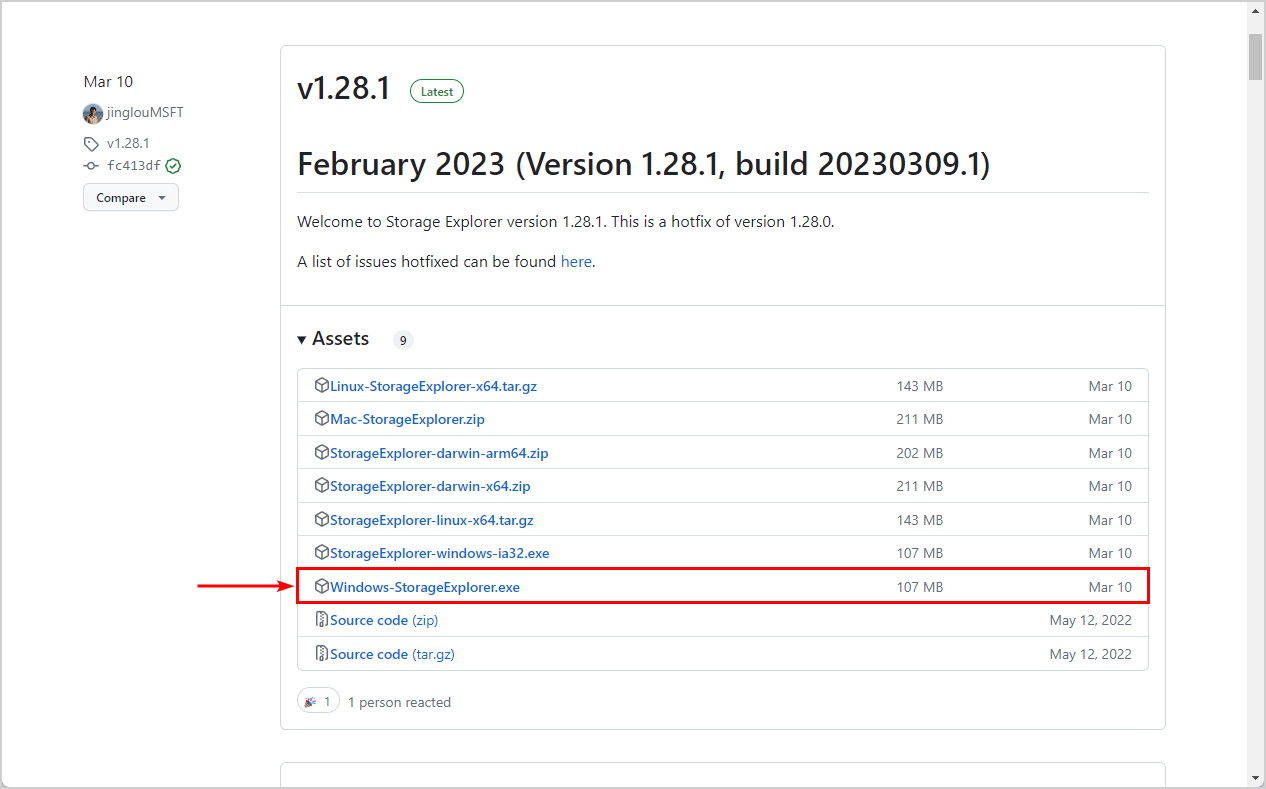
We need to download and install the Microsoft Azure Storage Explorer.
Select the Windows-StorageExplorer.exe to download it
Run the application and keep the default settings to install the Microsoft Azure Storage Explorer
4. Upload PST files uploaded to Microsoft 365
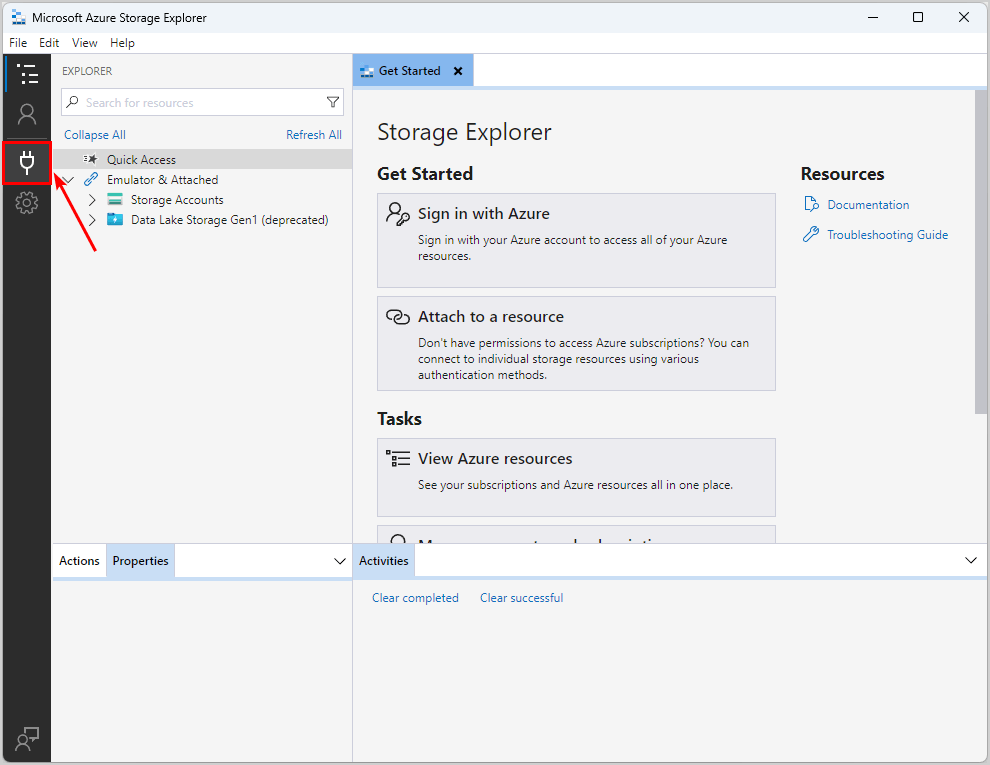
Open Microsoft Azure Storage Explorer
Click on the Connect Dialog icon
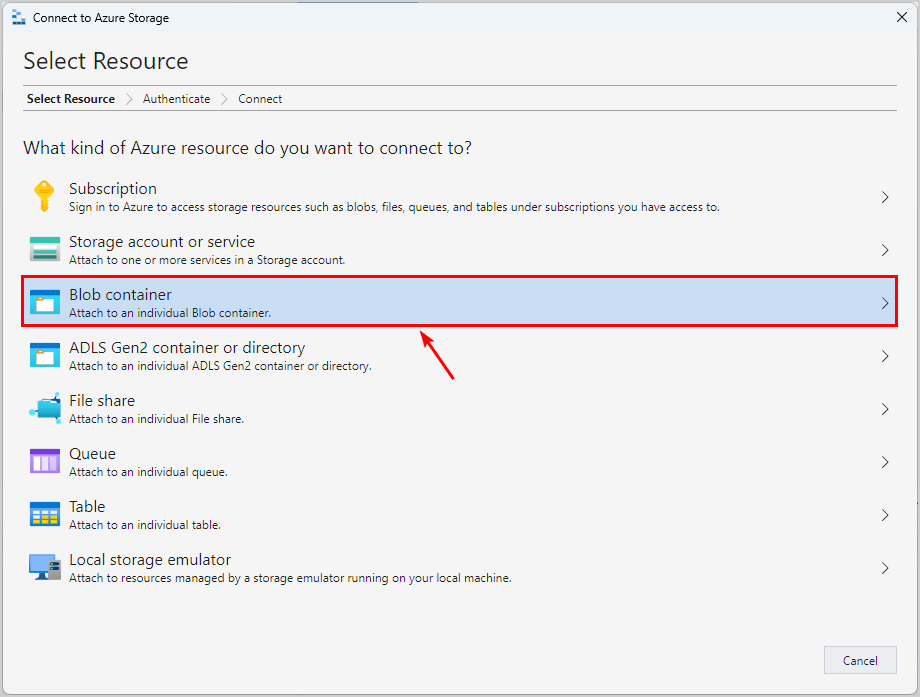
Click on Blob container
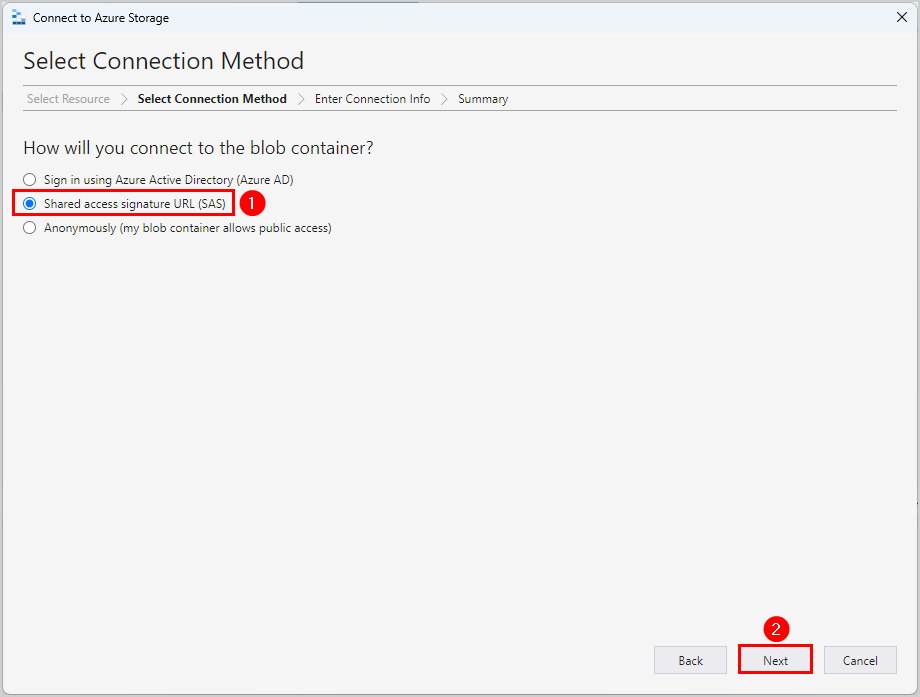
Select Shared access signature URL (SAS)
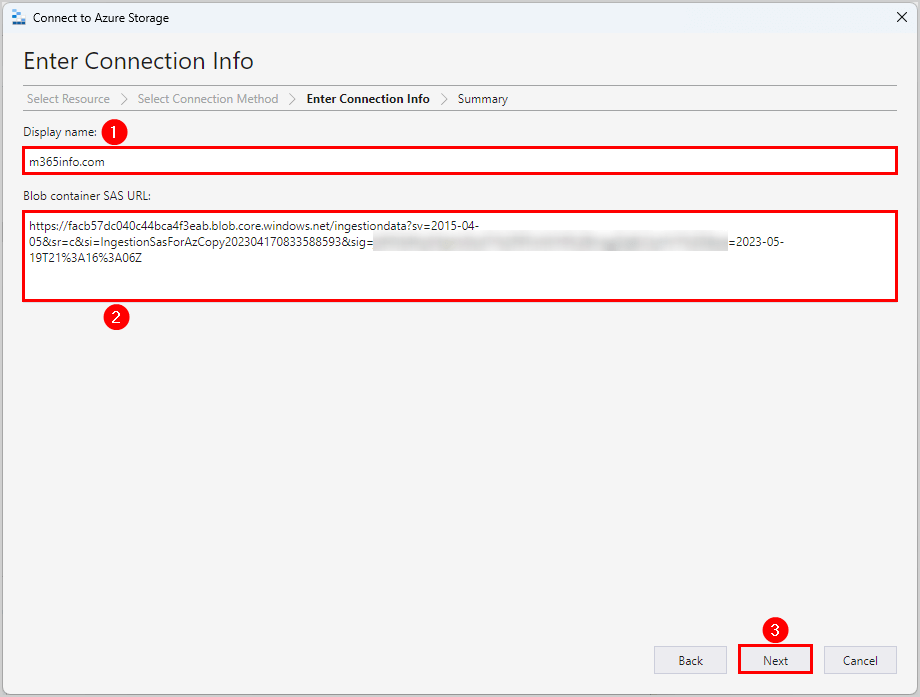
Insert Display name
Paste the SAS URL you copied from the previous step in the Blob container SAS URL
Click Next
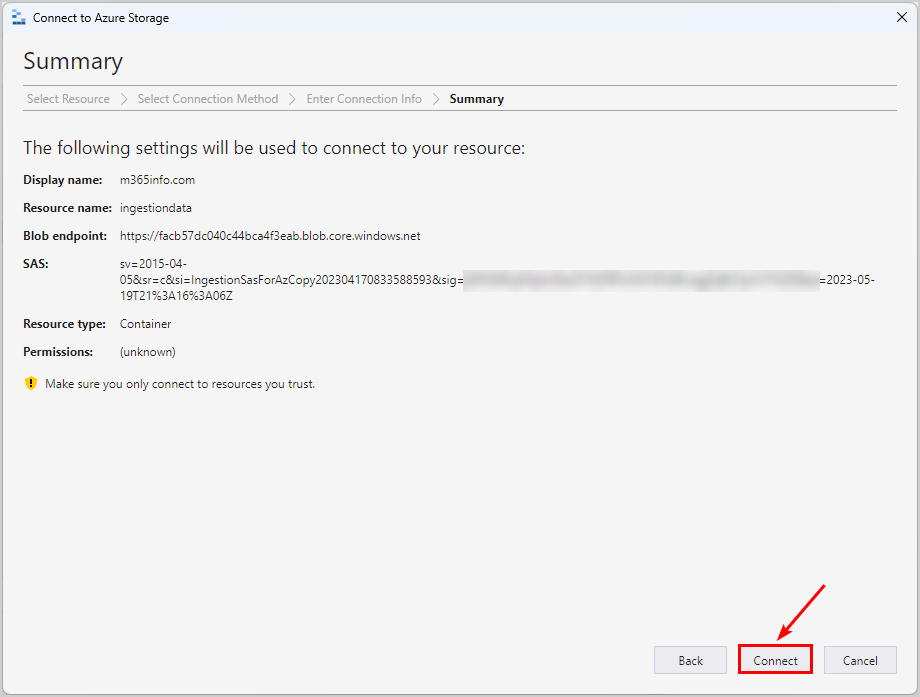
Click Connect
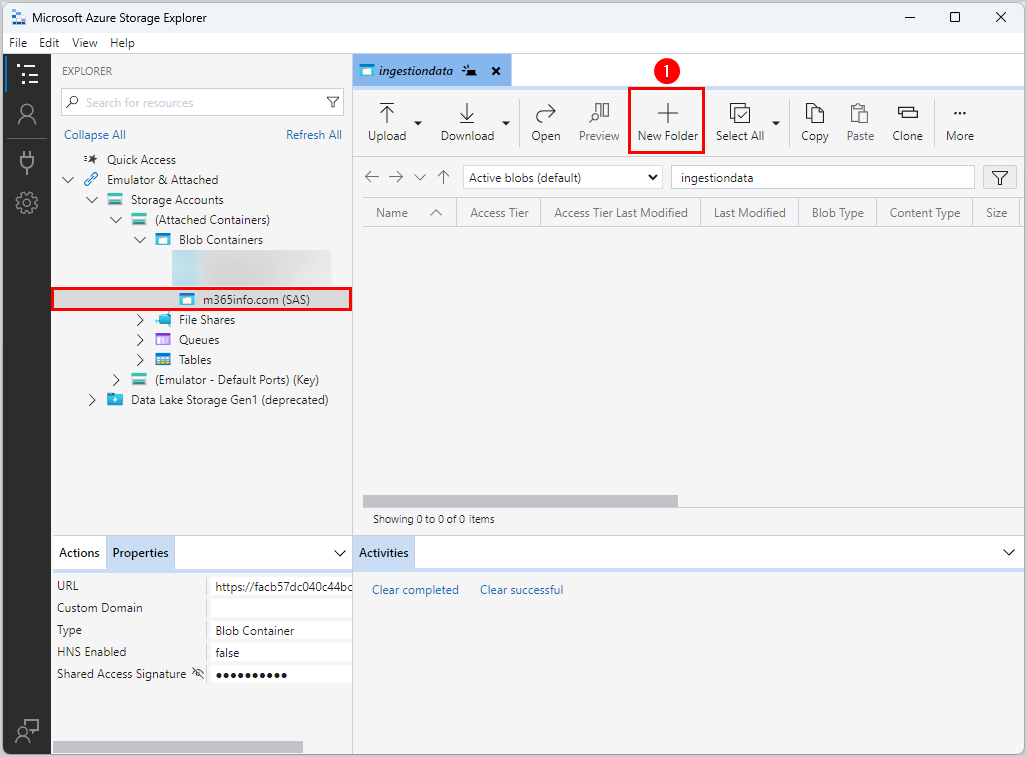
In Microsoft Azure Storage Explorer, you can see the display name of your SAS. Now we need to create a new folder.
Click on New Folder
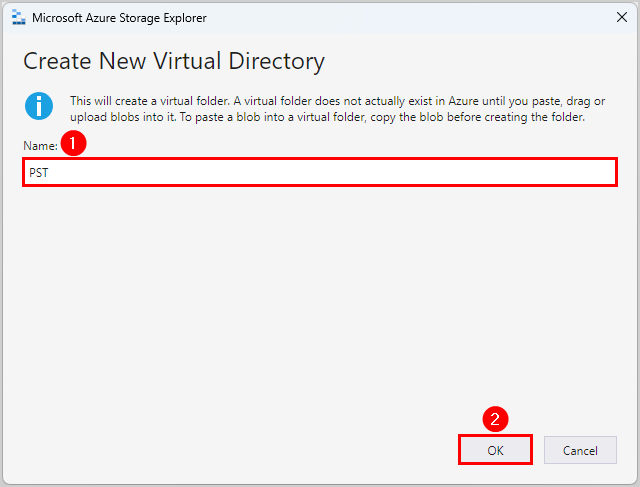
Give the folder a Name, e.g. PST
Click OK
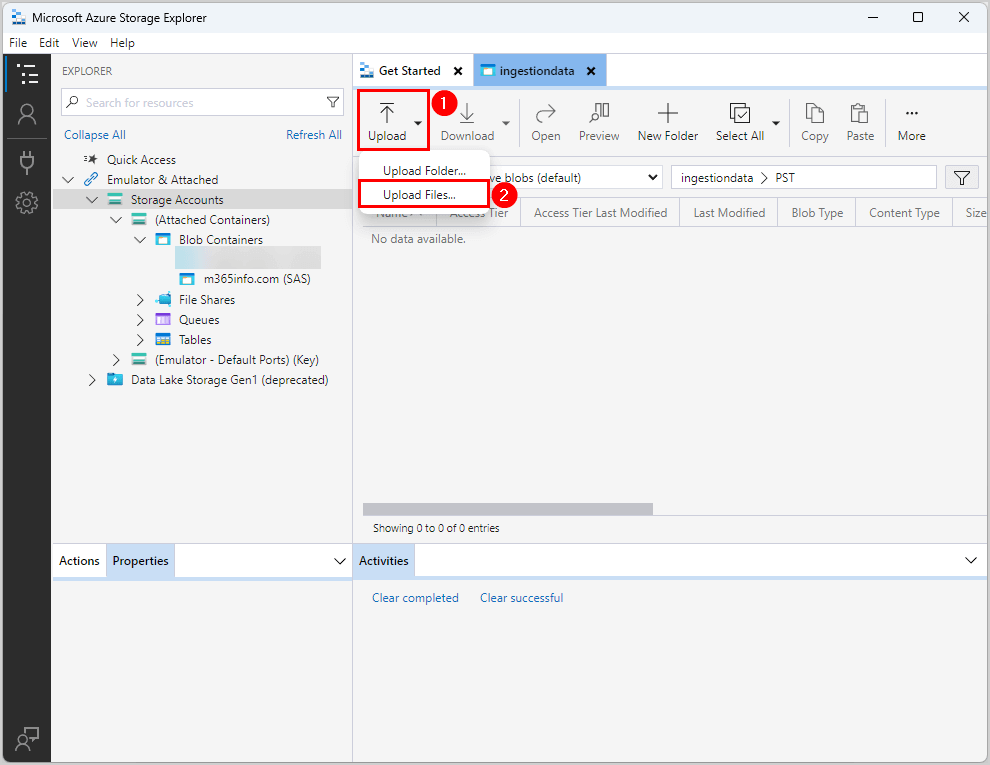
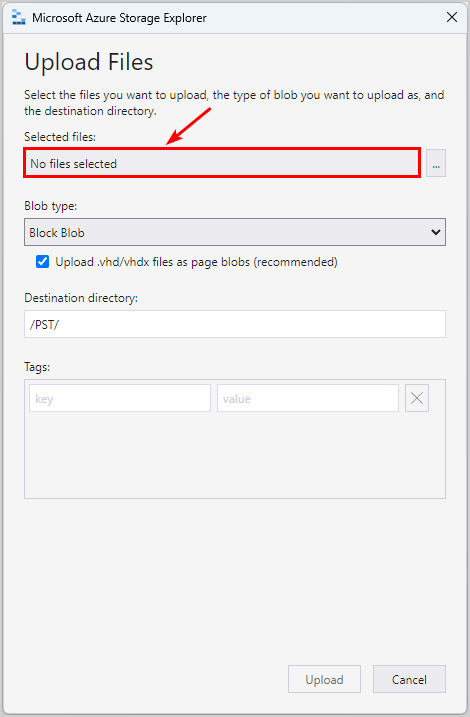
Click Upload
Select Upload Files
Click on No files selected
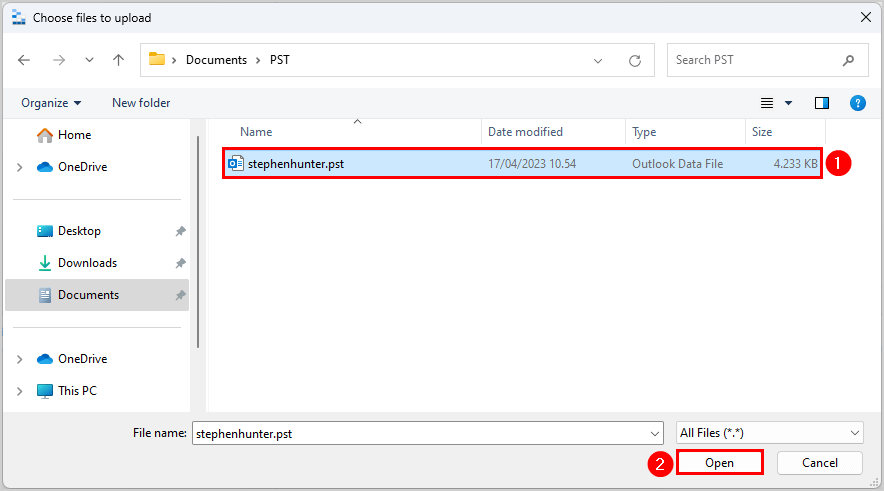
Select the PST file and click Open
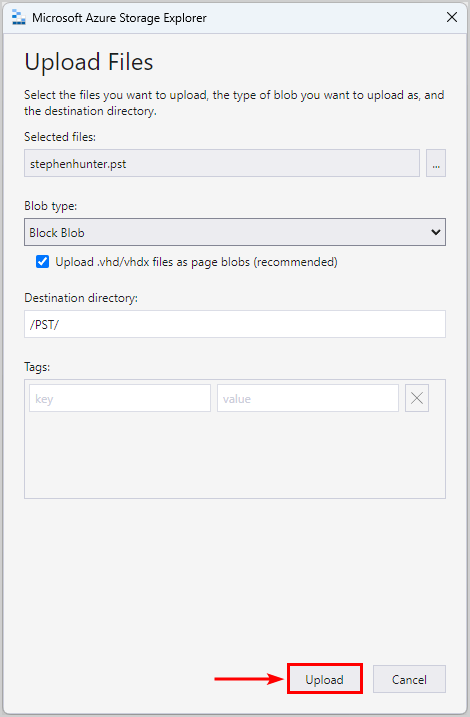
Check if you selected the correct file. Also, see if the directory path is your created folder (PST).
Click Upload
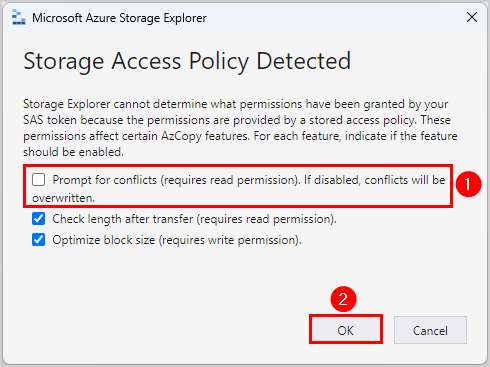
Clear Prompt for conflicts (requires read permission). If disabled, conflicts will be overwritten.
Click OK
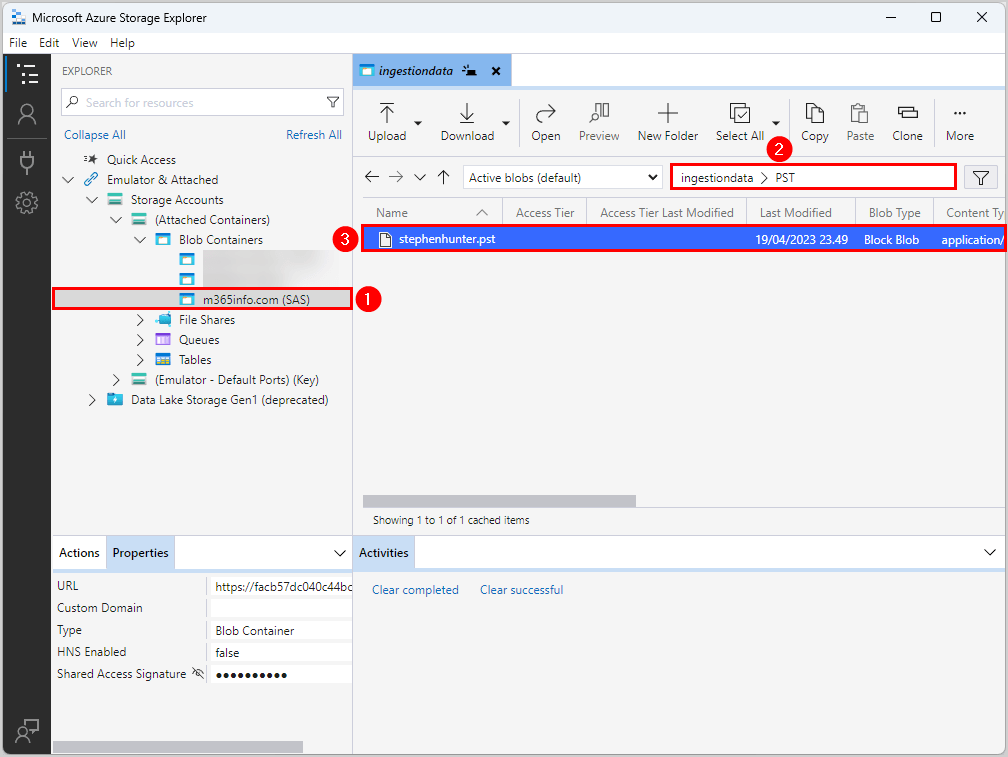
You will see the .pst file in the PST folder under the Blob Containers in the Microsoft Azure Storage Explorer.
Next time you want to view the PST files you uploaded, you only need to open Azure Storage Explorer and type the display name of the PST file in the search bar.
Note: All PST files are automatically deleted from your Azure storage. The PST files in the ingestiondata container are deleted after 30 days, if no import job is in progress. You can’t delete a PST file or folder under Blob Container in Microsoft Azure Storage Explorer.
You can close the Microsoft Azure Storage Explorer and continue to the next step.
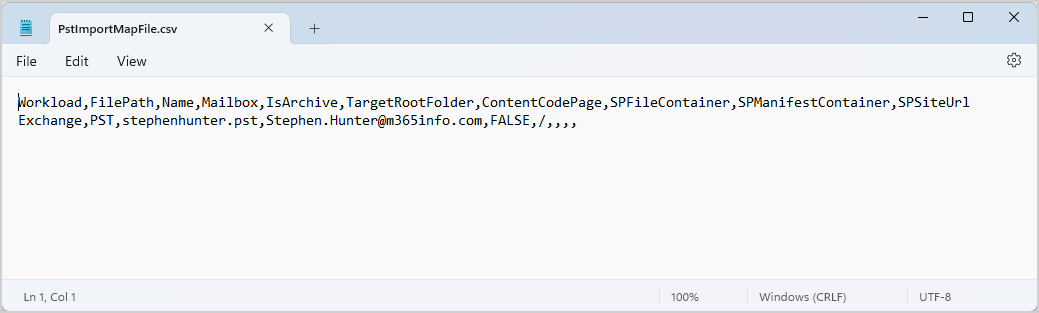
Workload: Specifies the service that data will be imported to. It should be set to Exchange to import PST files to user mailboxes.
FilePath: Specifies the name of the folder path in the Azure Storage location to which you uploaded the PST files.
Name: Specifies the name of the PST file that will be imported to the user mailbox. The value for this parameter is case-sensitive.
Mailbox: Specifies the mailbox’s email address to which the PST file will be imported.
IsArchive: Specifies whether to import the PST file to the user’s archive mailbox. Set the value TRUE or FALSE. If you choose TRUE, ensure the user’s archive mailbox is enabled.
TargetRootFolder: Specifies the mailbox folder that the PST file is imported to. If you leave this parameter blank, the PST file will be imported to a new folder named Imported at the root level of the mailbox (the same level as the Inbox folder and the other default mailbox folders). If you specify /, the folders and items in the PST file are imported to the top of the folder structure in the target mailbox or archive. If you specify /newfoldername, items, and folders in the PST file are imported to a folder named newfoldername.
The other fields in the CSV file are optional, so you can leave them empty.
In the next step, we will show you how to edit the CSV file with the Microsoft Excel application.
6. Edit CSV file in Excel
To save the Excel file as CSV comma delimited, you need to make Excel use a comma for the list separator.
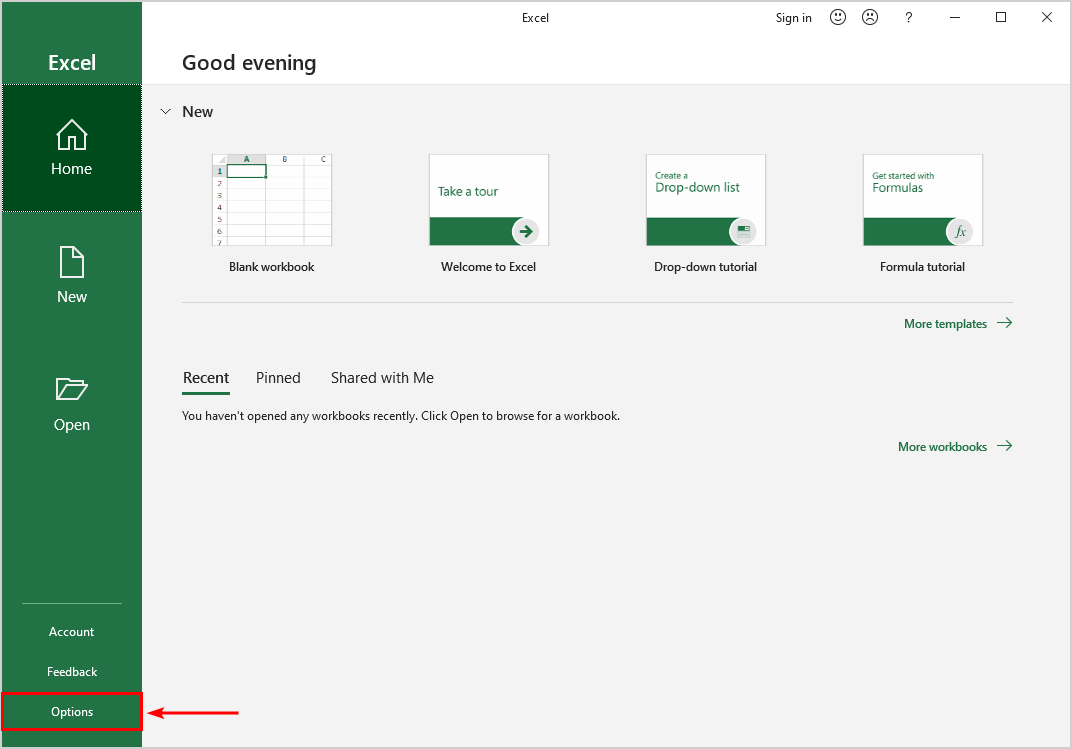
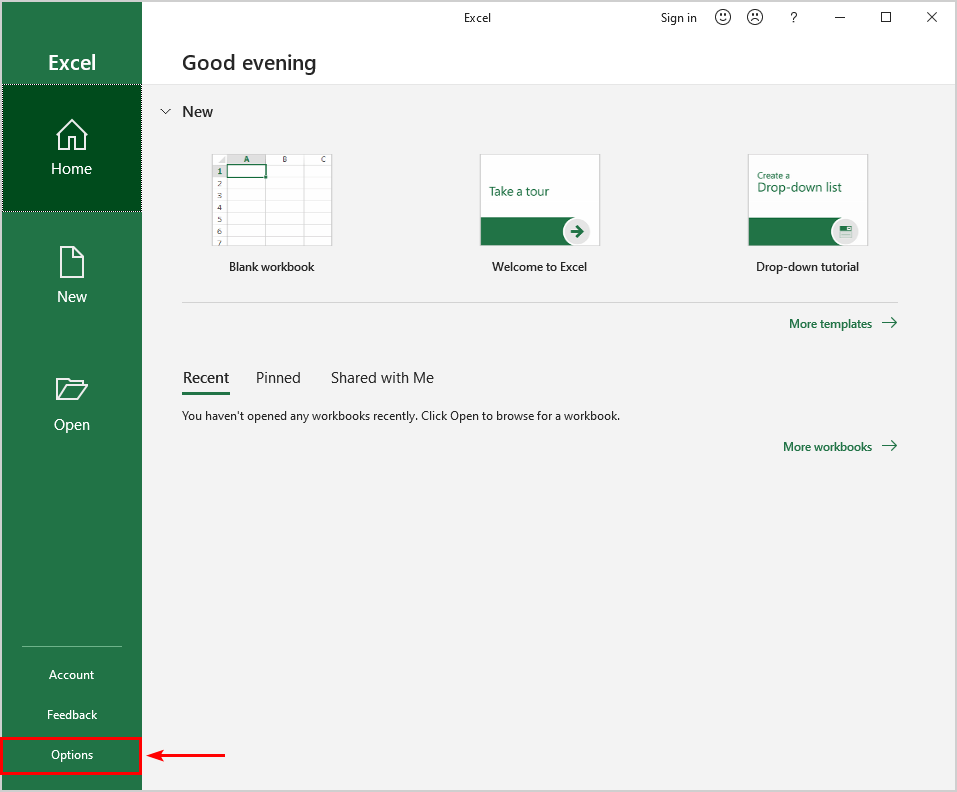
Open Microsoft Excel
Click Options
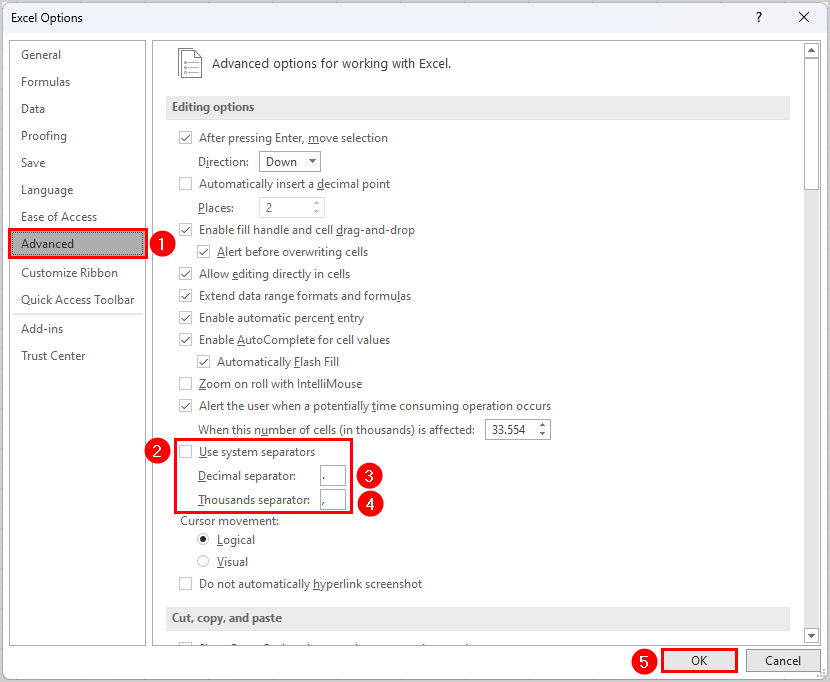
In the Excel Options, you need to make some changes:
Click Advanced
Under Editing options > Clear System separators
Set Decimal separator to period (.)
Set Thousands separator to comma (,)
Click OK
Note: Close the Microsoft Excel application to save the changes.
To load data into Microsoft Excel, follow the below steps:
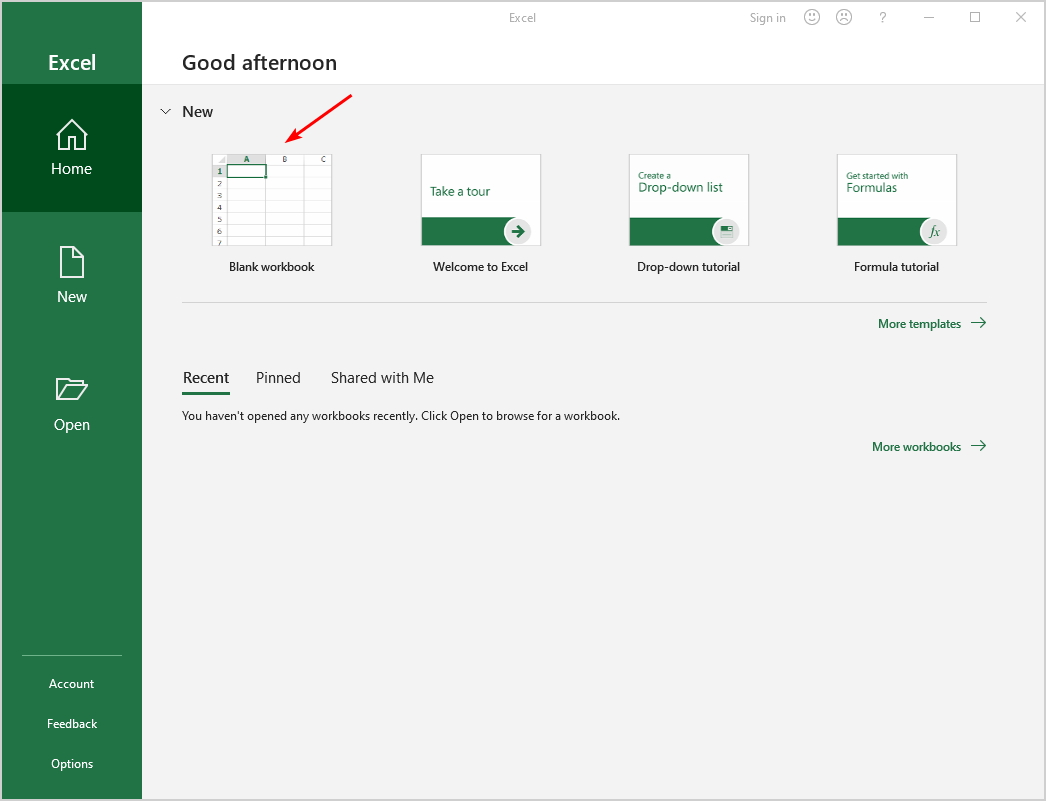
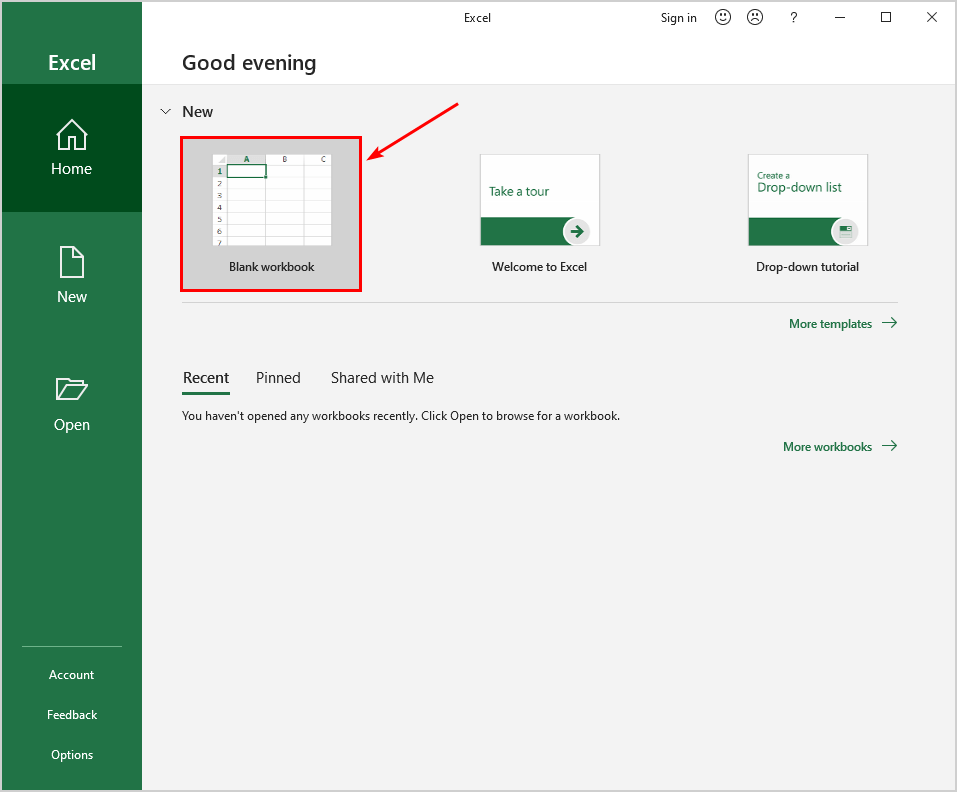
Open Microsoft Excel again
Select New blank workbook
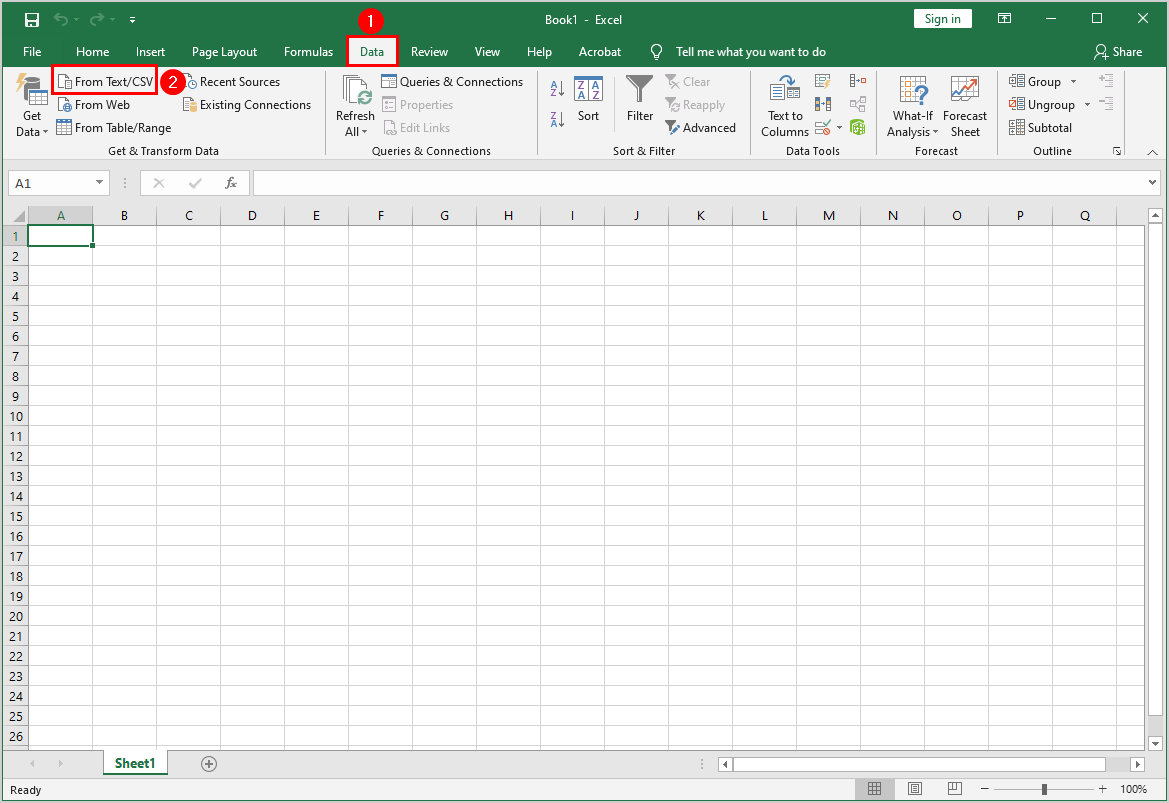
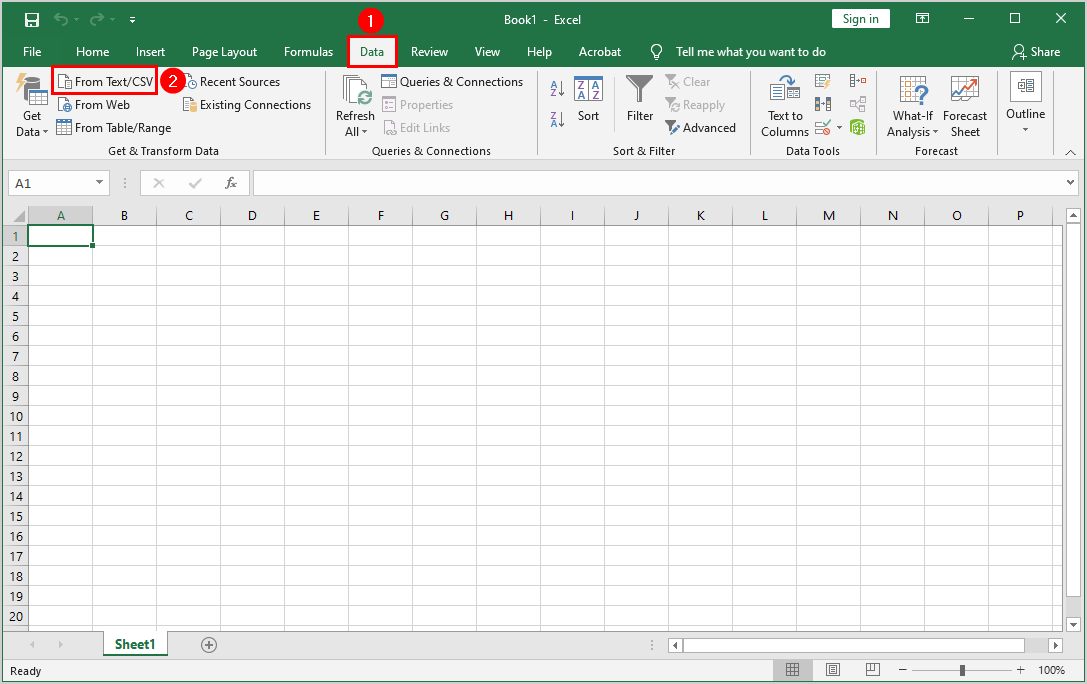
Click on Data > From Text/CSV
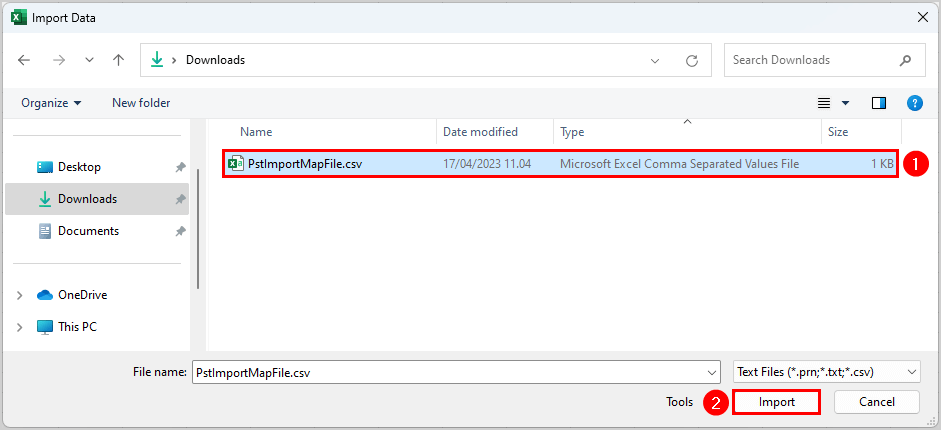
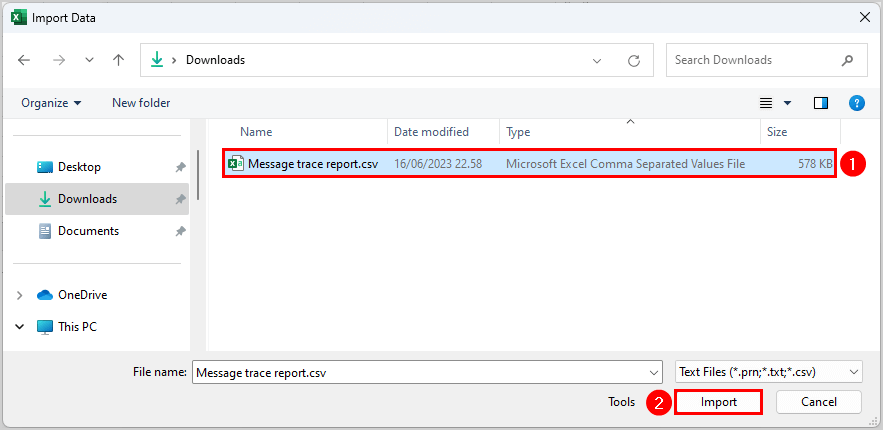
Find and select PstImportMapFile.csv
Click Import
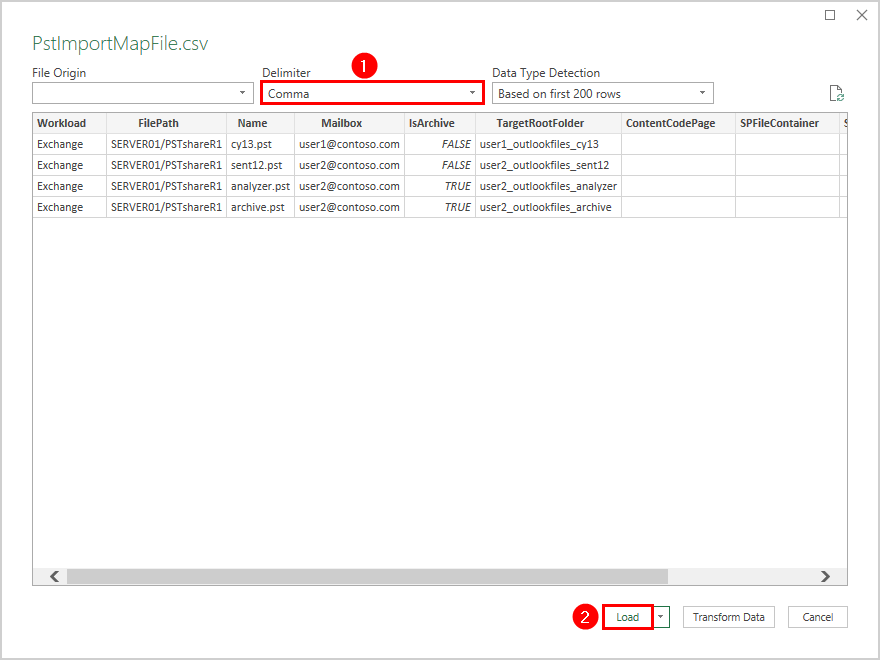
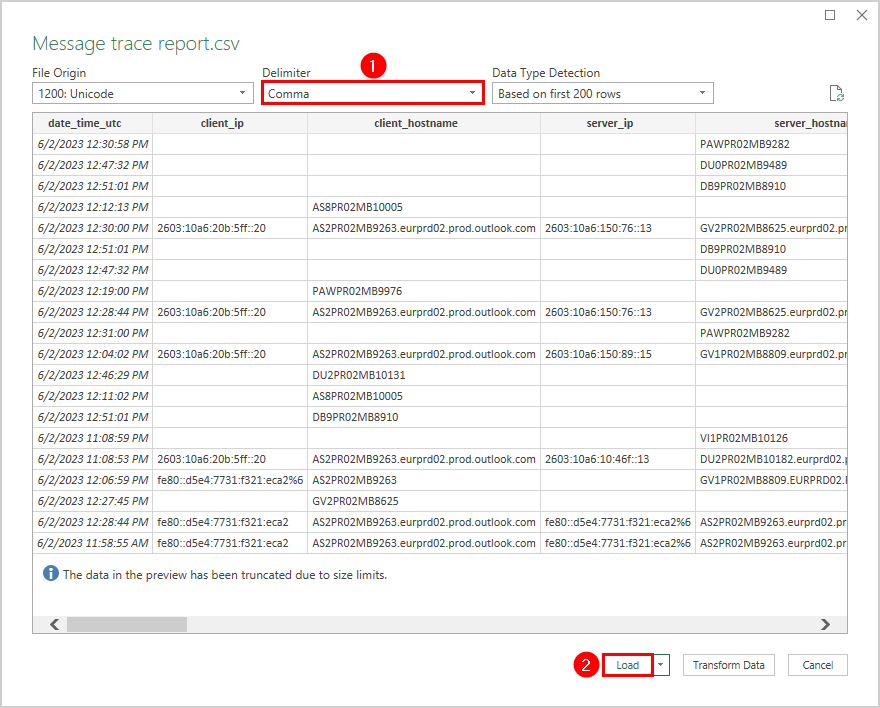
Set the delimiter to Comma
Click Load
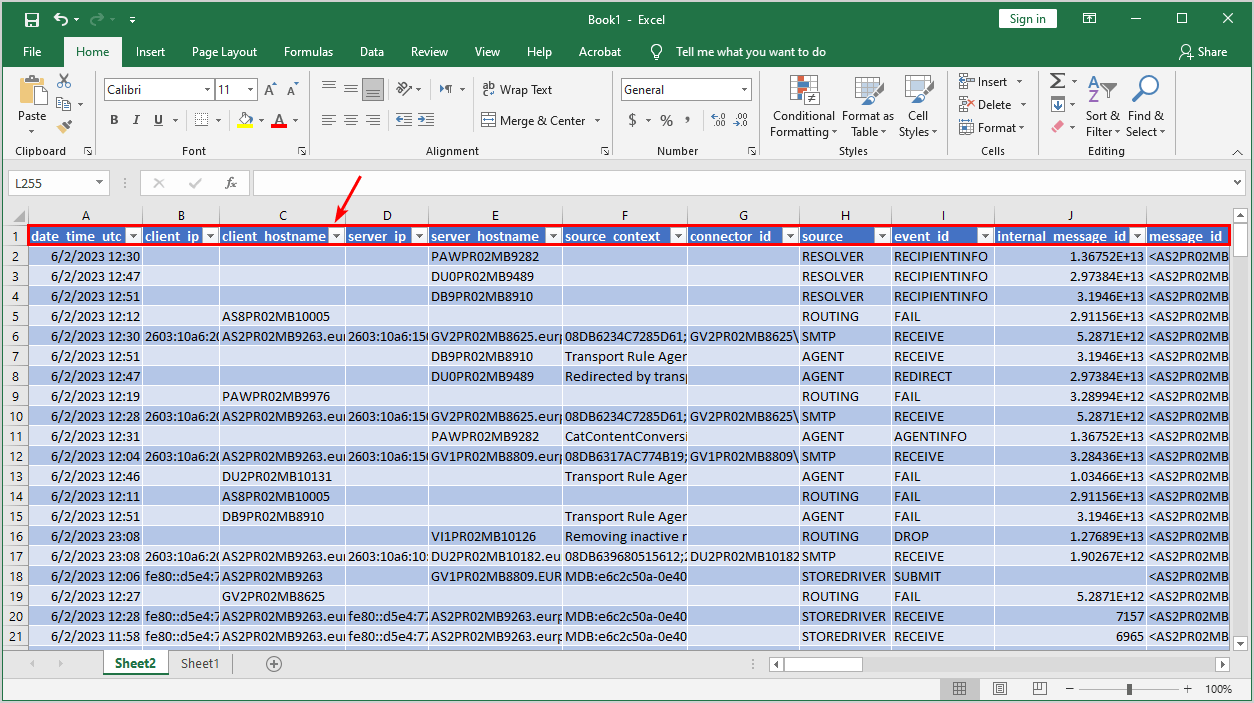
Microsoft Excel loads and formats the data from the CSV file.
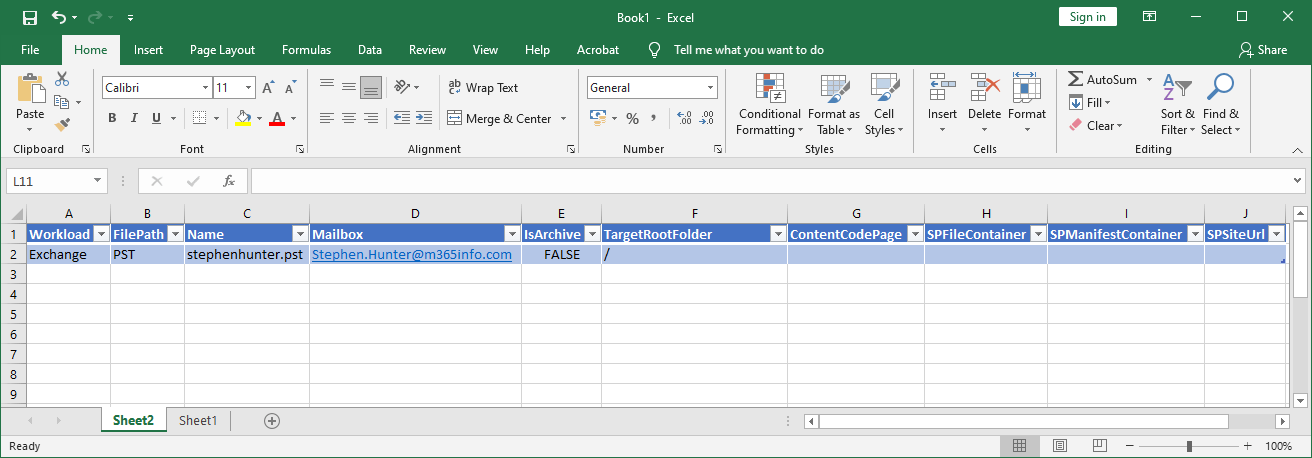
Edit the values like the below example
Once you have made your changes, save the file as .csv.
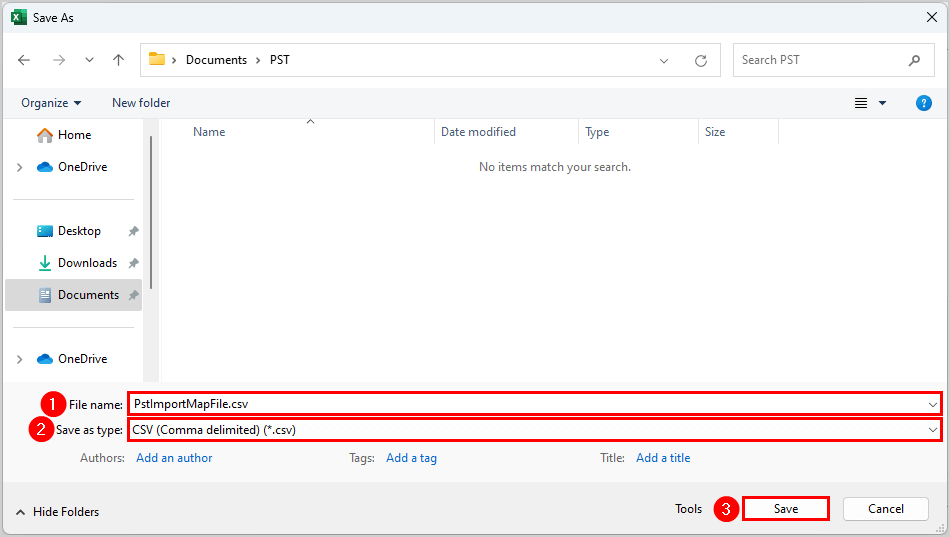
Type the File name
Save the file type as CSV (Comma delimited)
Click Save
Open the file with Notepad to double-check if the CSV file is comma delimited
7. Select CSV mapping file
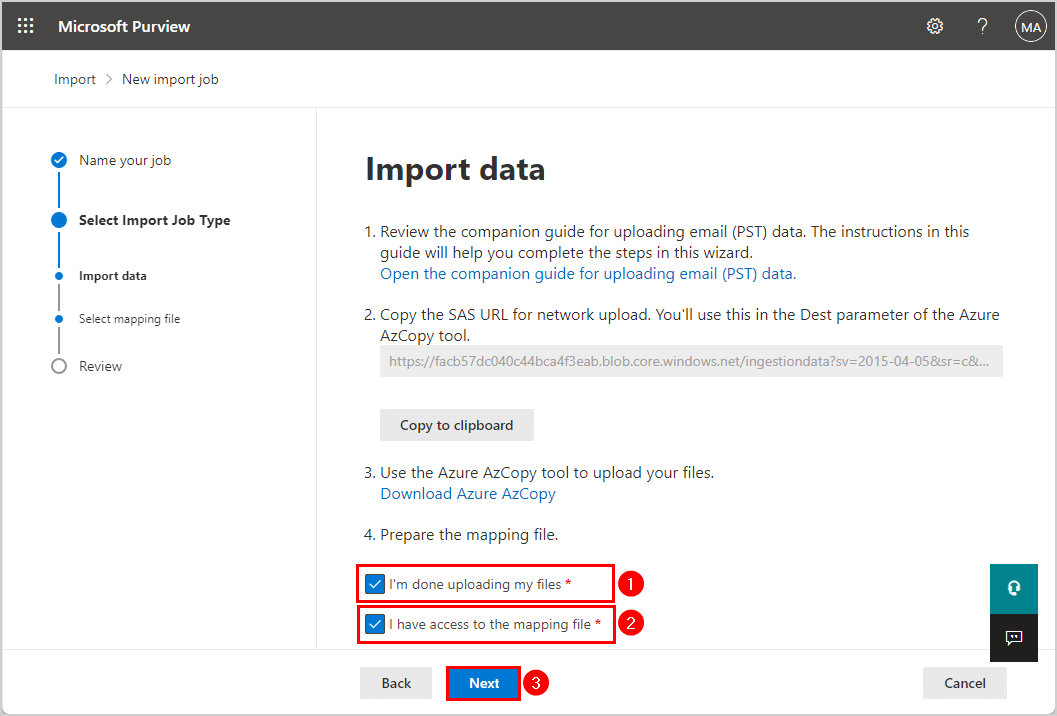
Go back to the Microsoft Purview > New import job window
Select I’m done uploading my files
Select I have access to the mapping file
Click Next
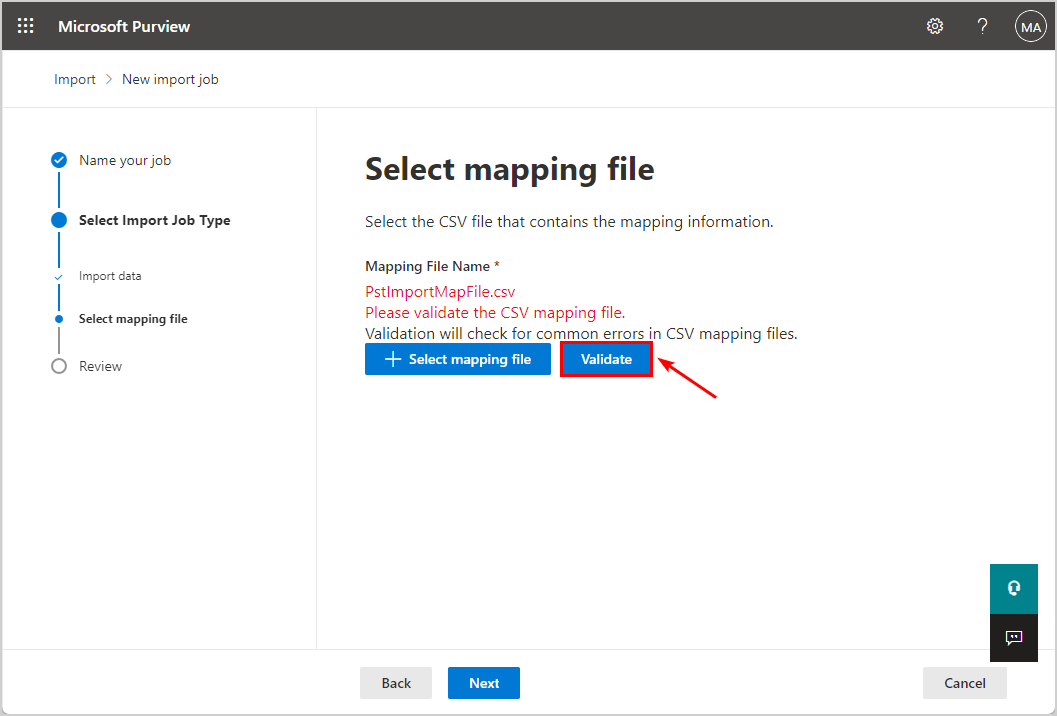
Click on Select mapping file
Browse and select the PstImportMapFile.csv file
Click on Validate
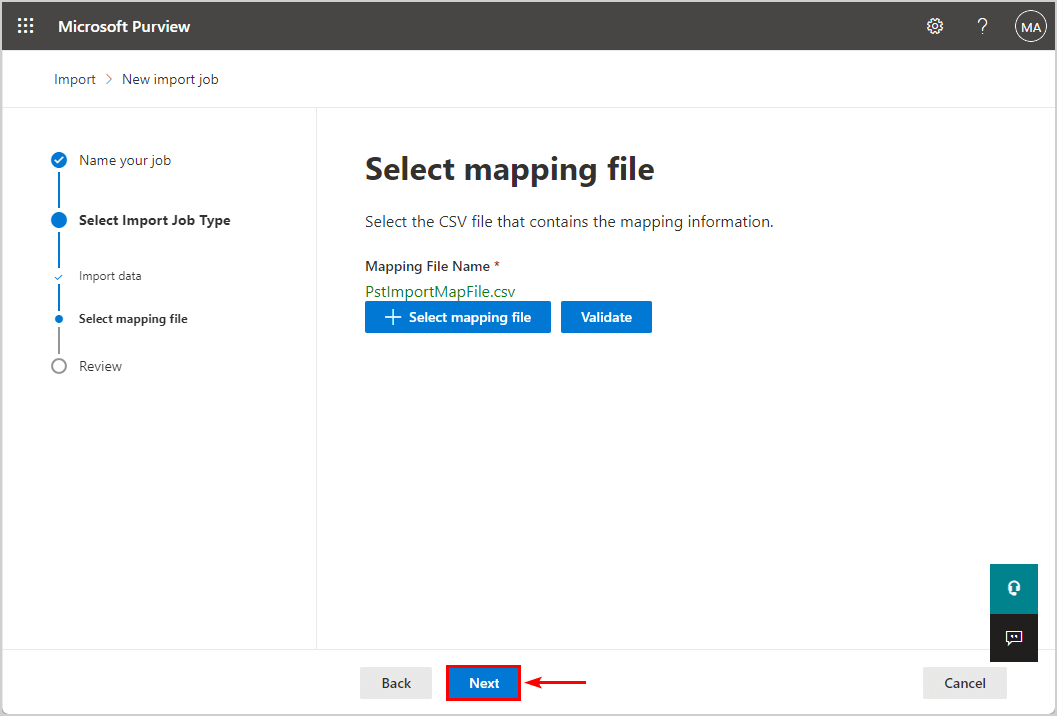
It shows a green text, which means that it’s valid.
Click Next
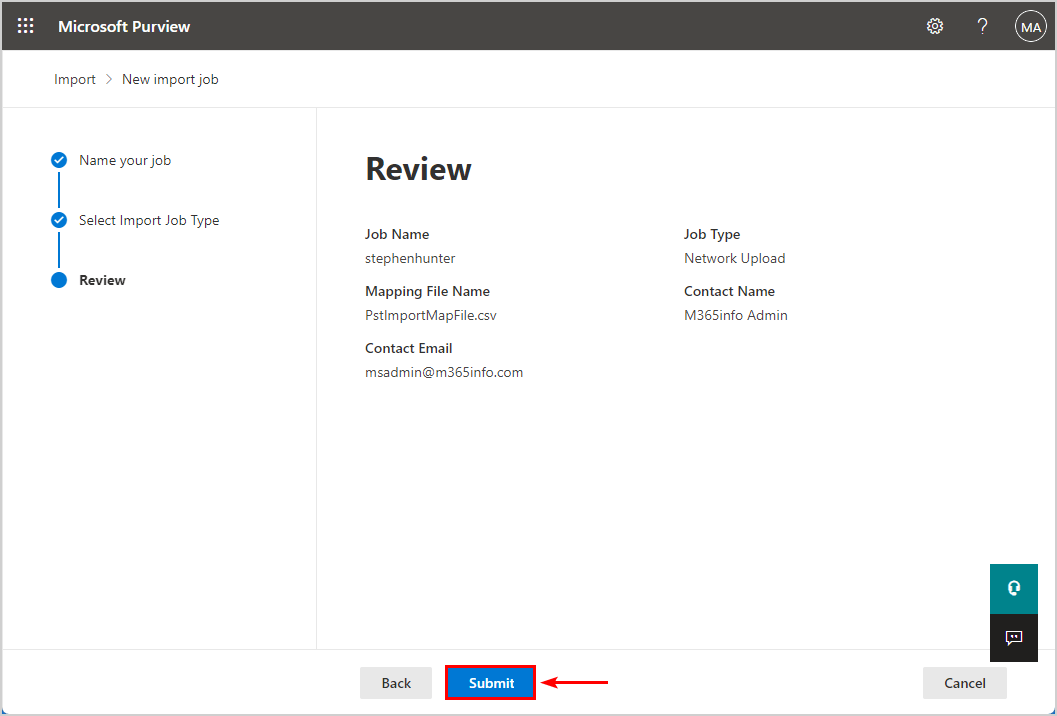
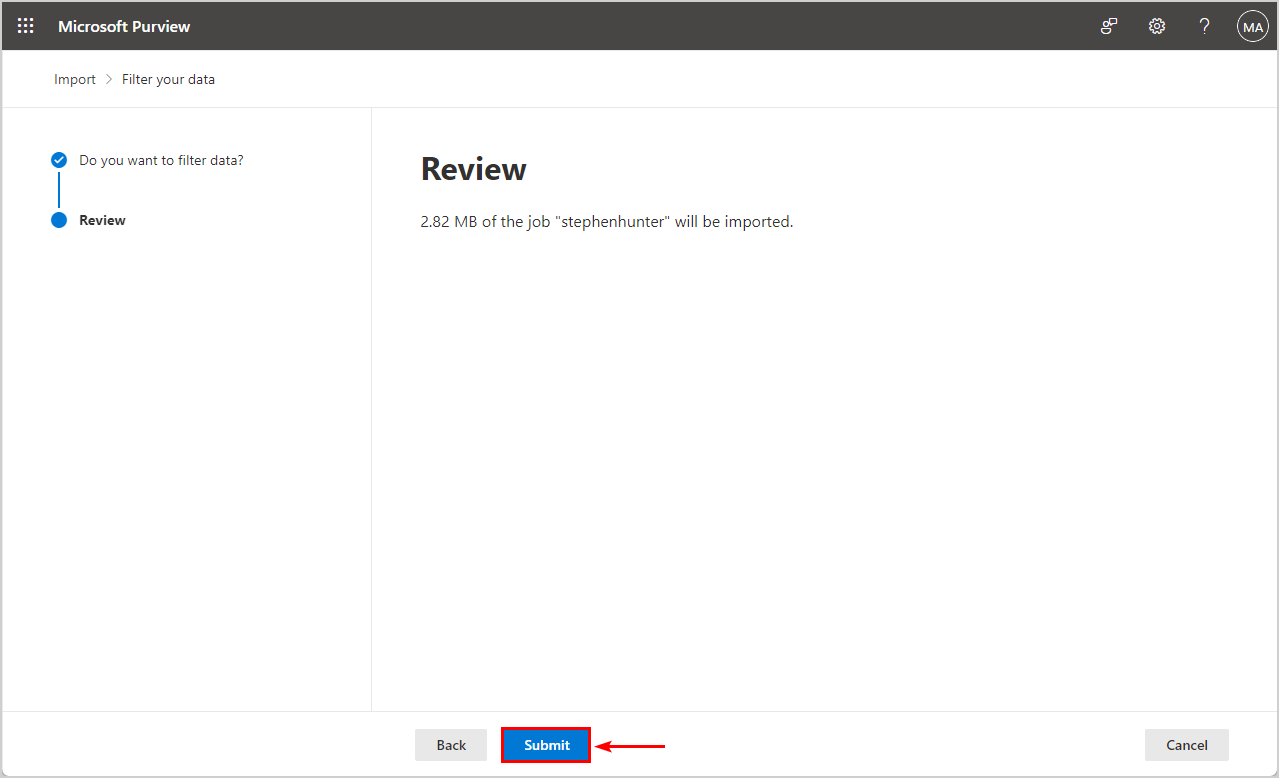
Review the PST import job.
Click Submit
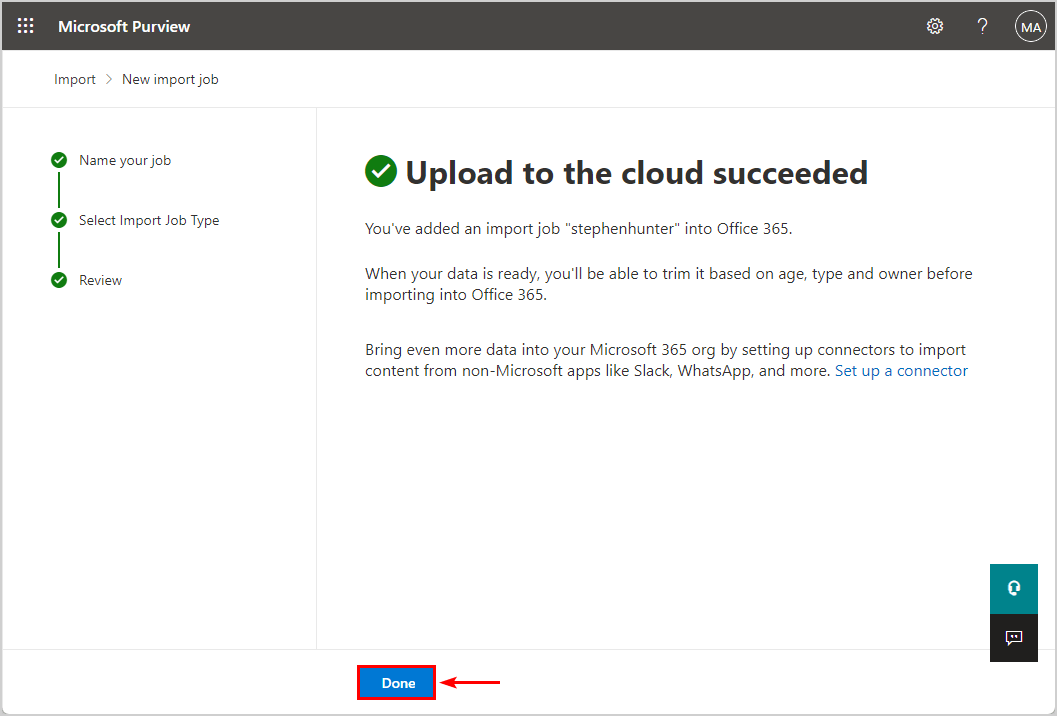
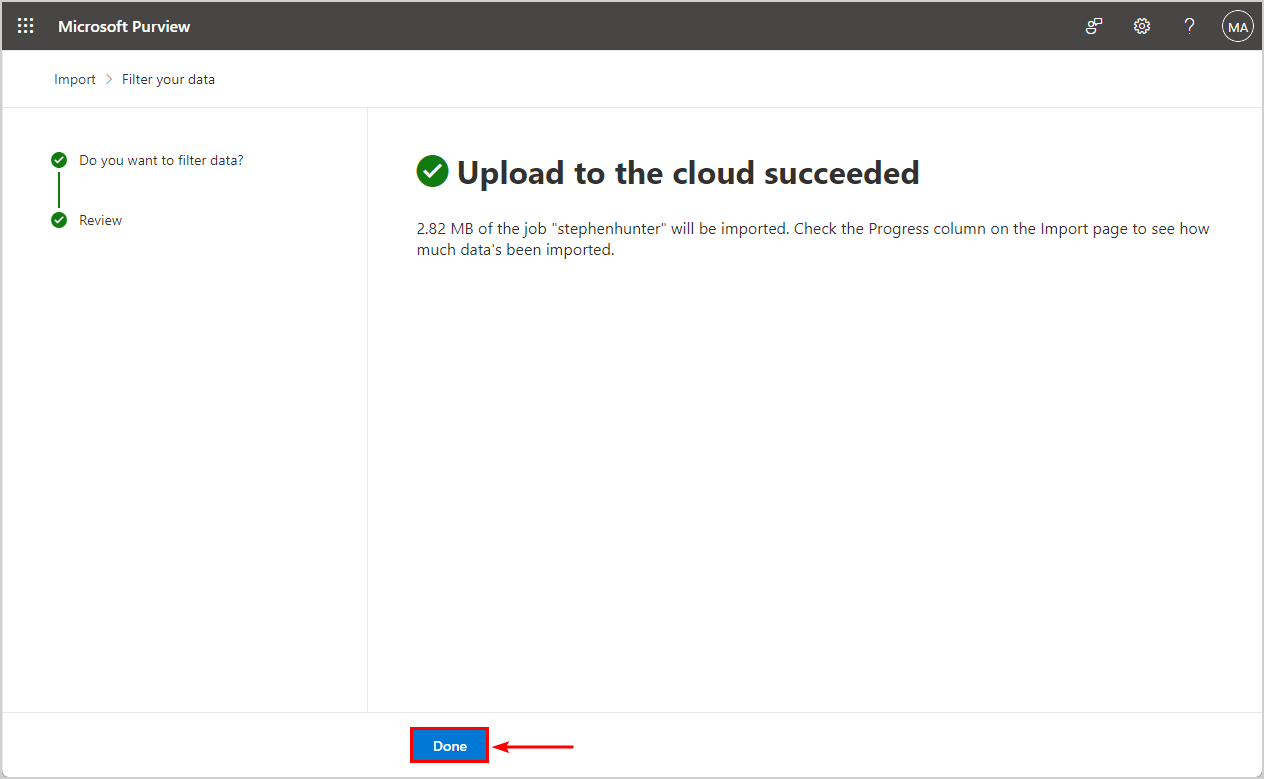
Upload to the cloud succeeded.
Click Done
You are not finished yet, because the analysis is in progress. The last step is where we will start the PST import into Microsoft 365.
Note: Wait for the analysis to complete, which can take several minutes or an hour. You can safely close the Microsoft Purview window.
8. Import PST into Microsoft 365
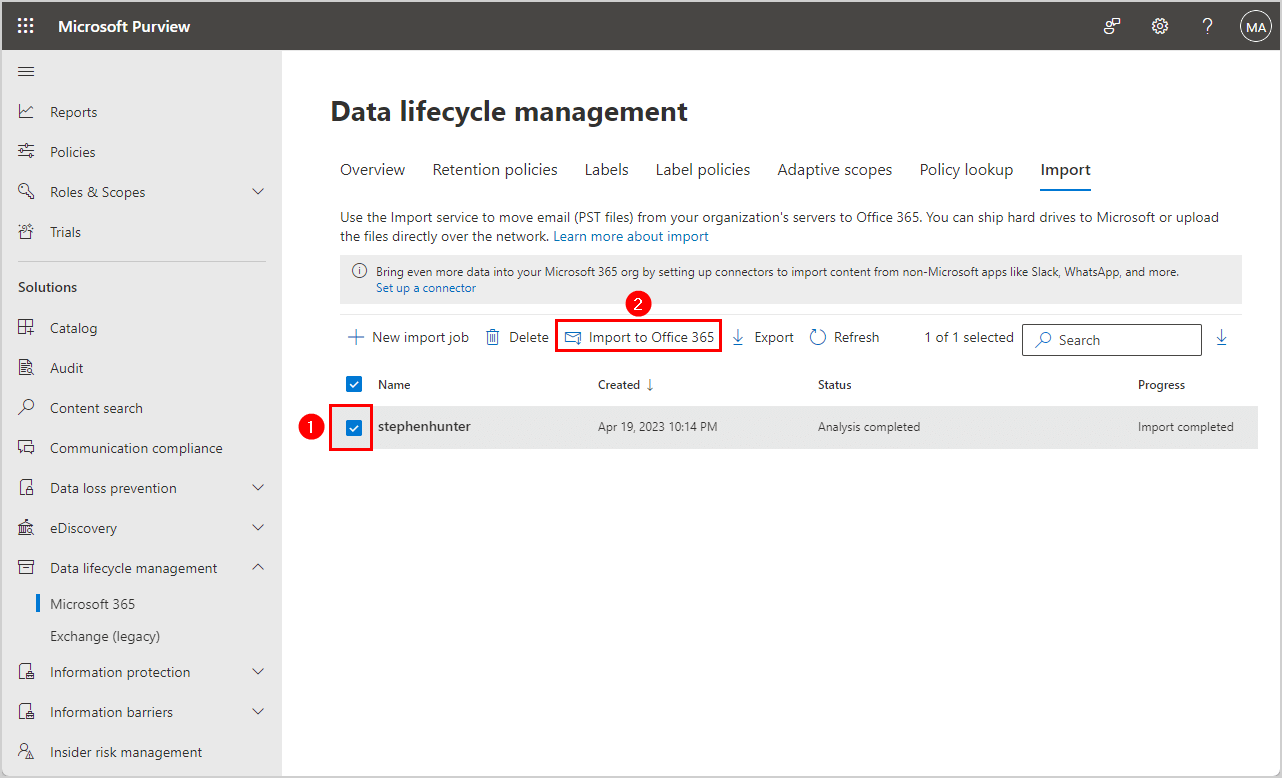
Once it shows Status > Analysis completed and Progress > Import completed, you can start to import the PST file into Microsoft 365.
Select the checkbox in front of the Import Job, e.g., stephenhunter
Click on Import to Office 365 icon
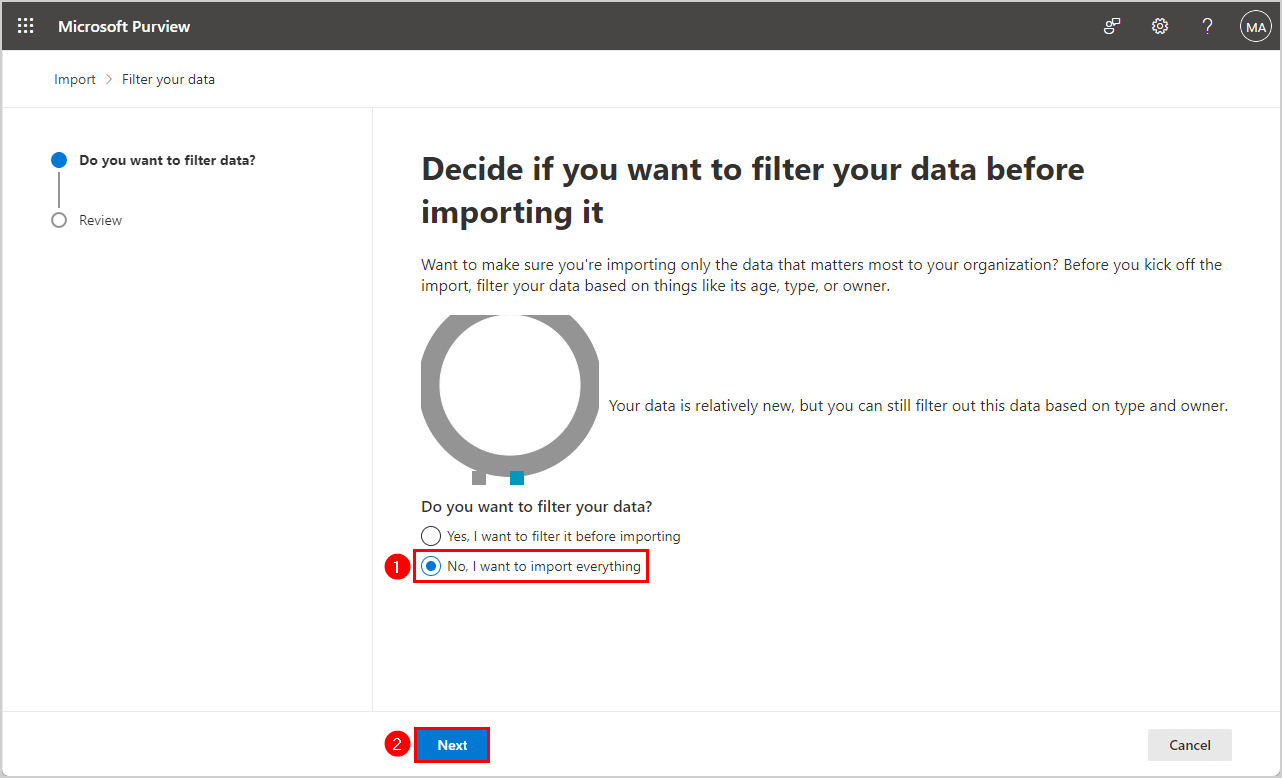
Select No, I want to import everything
Click Next
Click on Submit
Upload to the cloud succeeded.
Click Done
The status of the import job shows Import in progress, so you must wait until all the data has been imported. It’s not possible to force the PST import into Microsoft 365.
Note: The PST import can take one hour to complete. You can safely close the Microsoft Purview window and wait until the import completes.
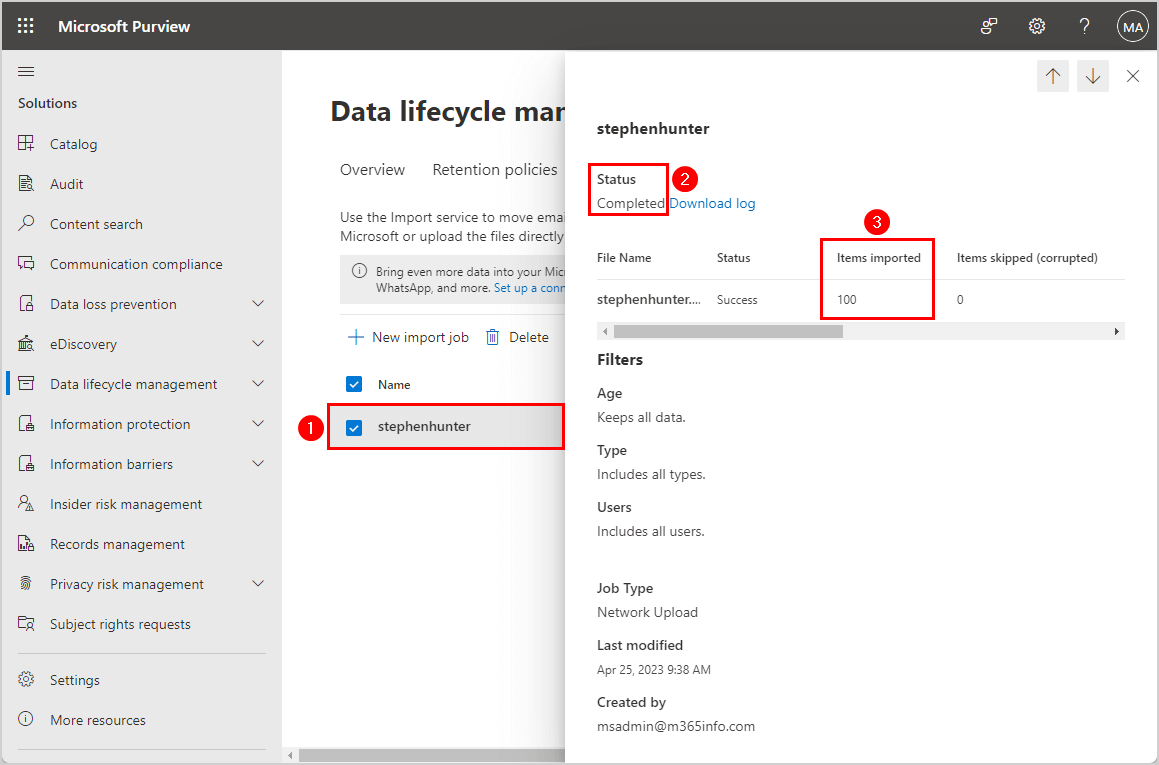
9. Verify PST import job status completed
You can verify that the PST import job is completed.
Click on the Import Job (e.g. stephenhunter) from the list view
It shows Status completed and all Items imported.
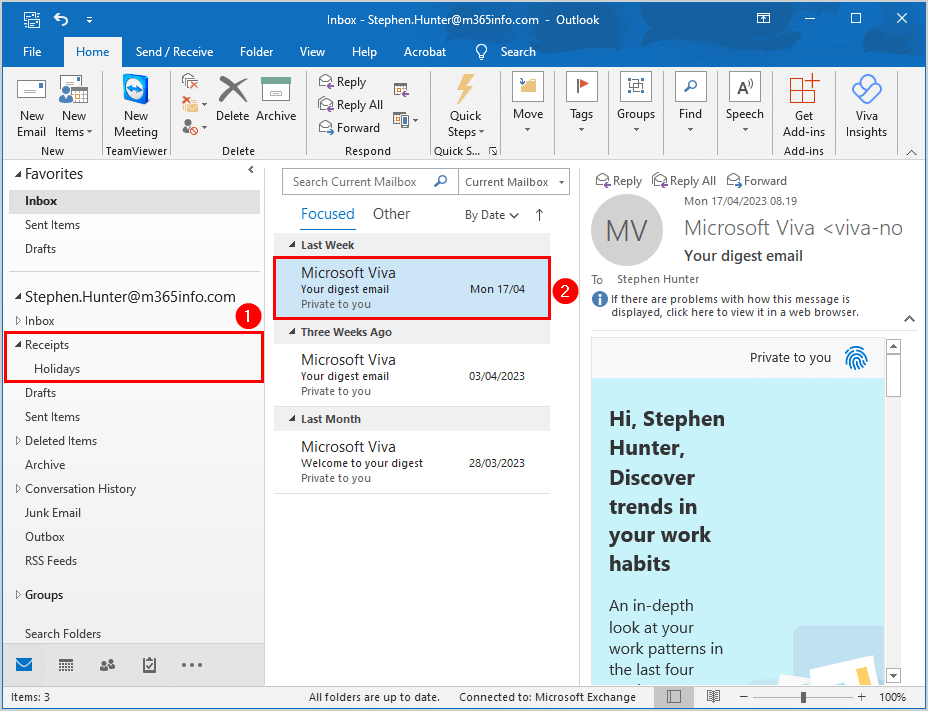
You should find all the emails and folders you created to verify the PST imported correctly into Outlook.
Folder and subfolder
Inbox old email
This is how you successfully import a PST file into Microsoft 365.
You learned how to import a PST file into Microsoft 365 mailbox. Using the Azure Explorer Tool and Microsoft Purview compliance portal is an excellent way to import PST files into Microsoft 365 mailboxes. It’s faster than importing the PST into each Outlook user.
Did you enjoy this article? You may also like Reset MFA for Microsoft 365 user. Don’t forget to follow us and share this article.
You need to export the Microsoft 365 mailbox and create a PST file to save the old email data. The best way to do this migration is to use the Microsoft Purview compliance portal and export the Microsoft 365 mailbox to PST. We will use the free Microsoft eDiscovery tool when exporting Microsoft 365 mailboxes to PST files. This article will teach you to export Microsoft 365 mailbox to a PST file.
Export PST file from Microsoft 365 using eDiscovery
Export Microsoft 365 mailbox to a PST file by following the below steps.
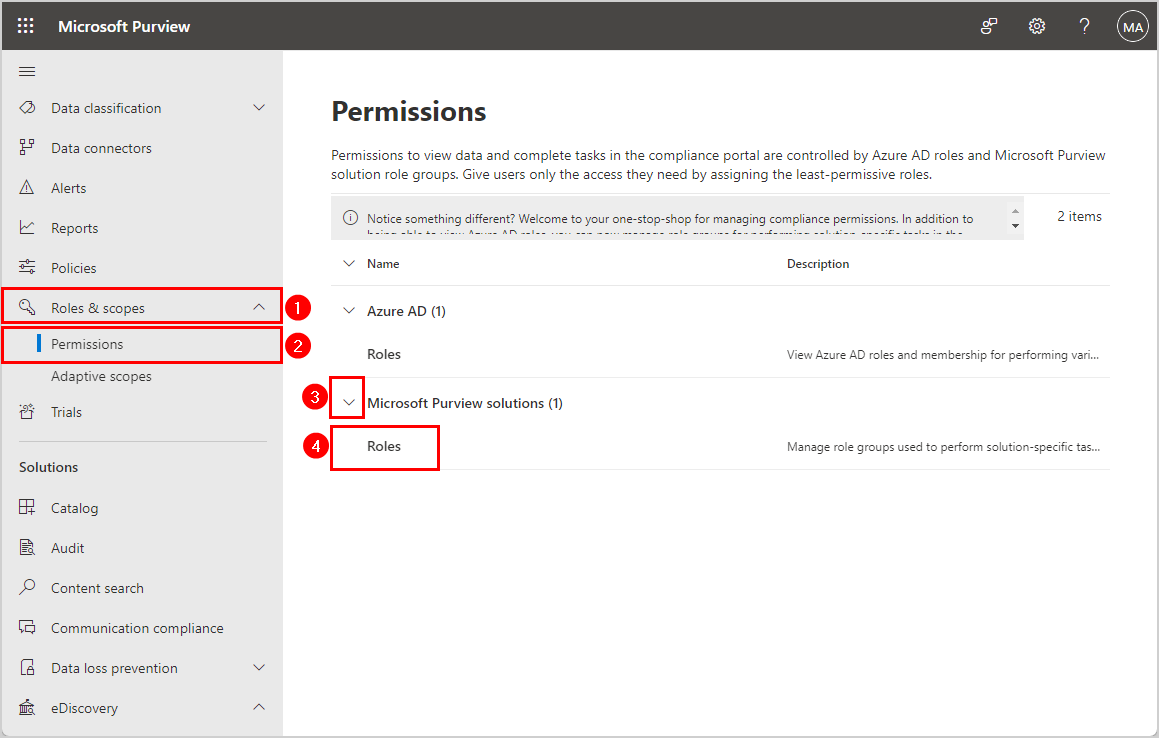
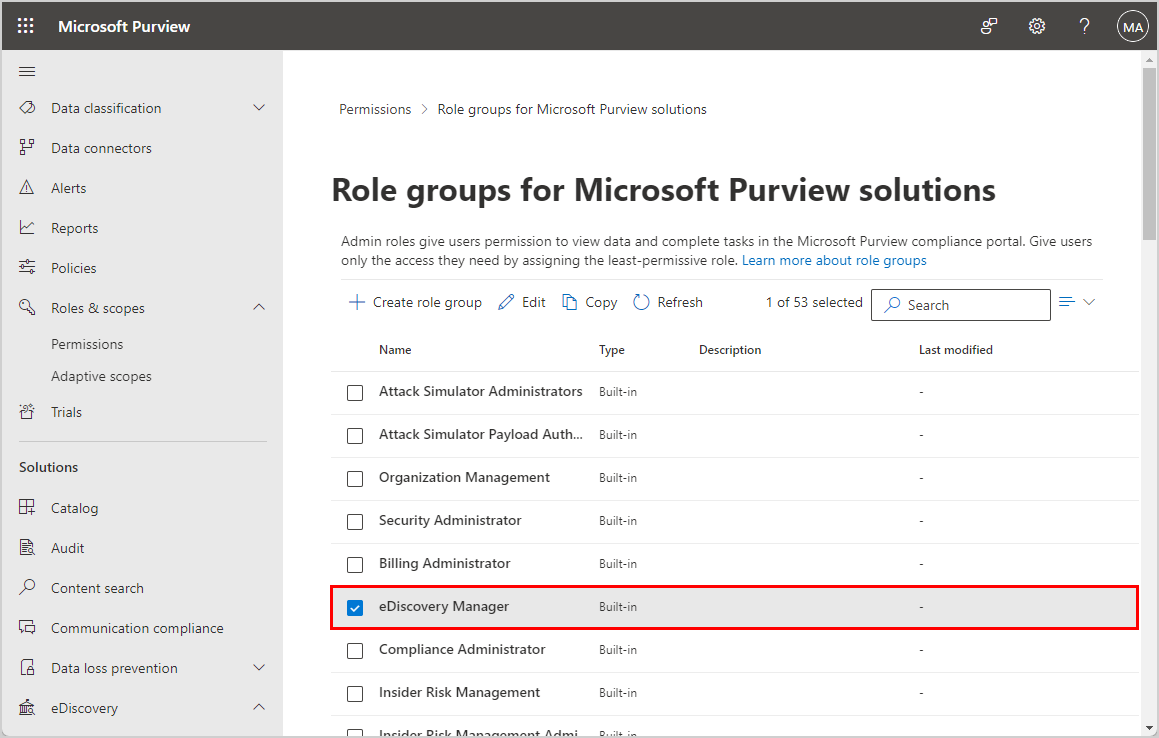
1. Assign eDiscovery Administrator role group
The administrator has the Global admin role in the organization. But they don’t have the permission to export the mailboxes. To get access, you need to check if the permissions are set. Otherwise, we need to add them to the role group eDiscovery Manager.
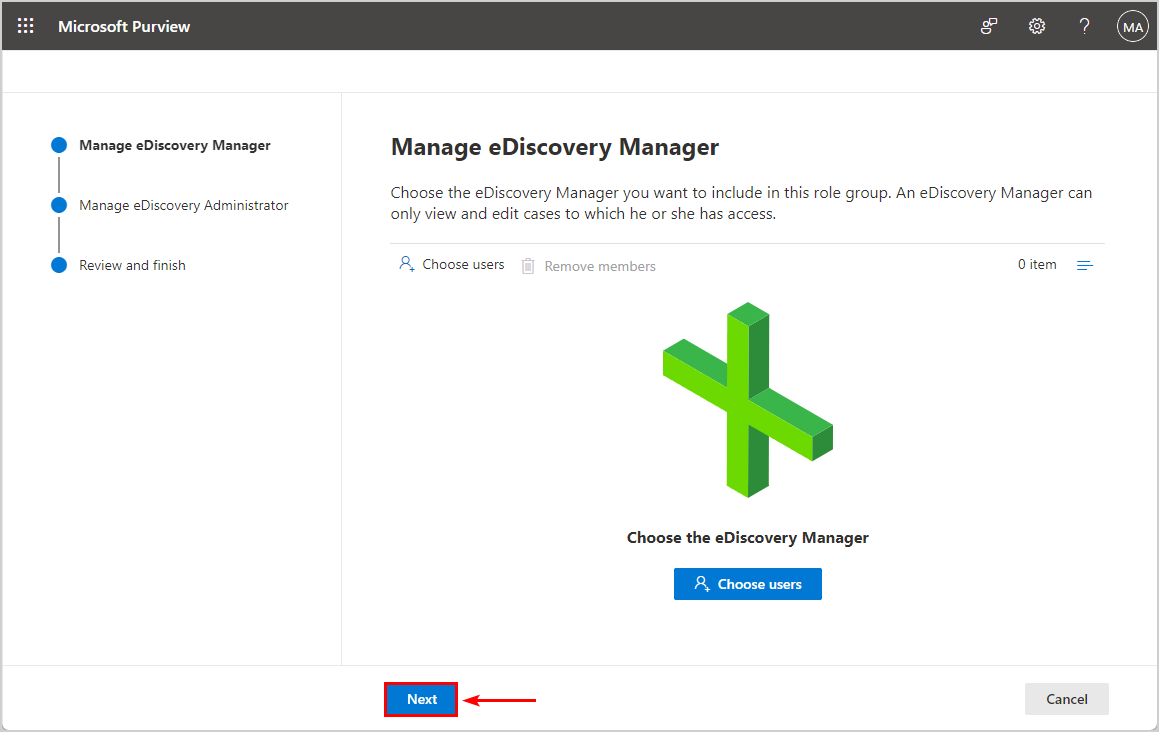
It will ask which eDiscovery Manager you want to include, but we don’t need to choose any users.
Note: An eDiscovery Manager can only view and edit cases to limited cases. An eDiscovery Administrator can view and edit all cases regardless of permissions.
Click Next
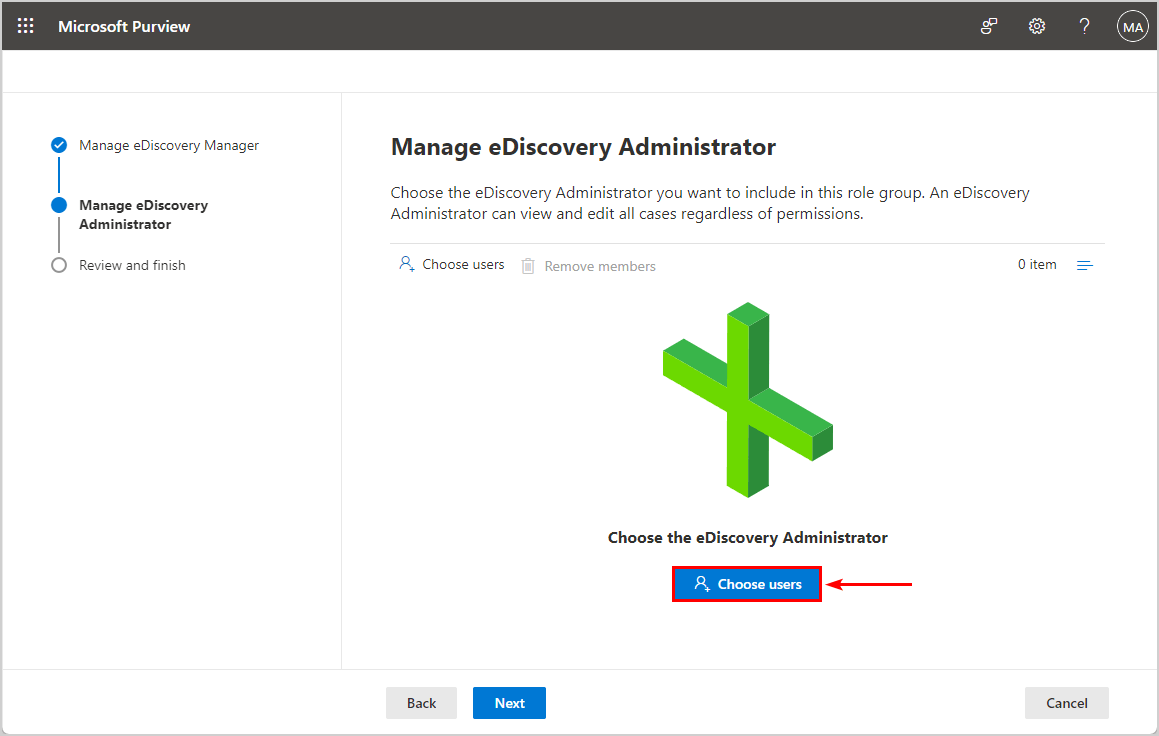
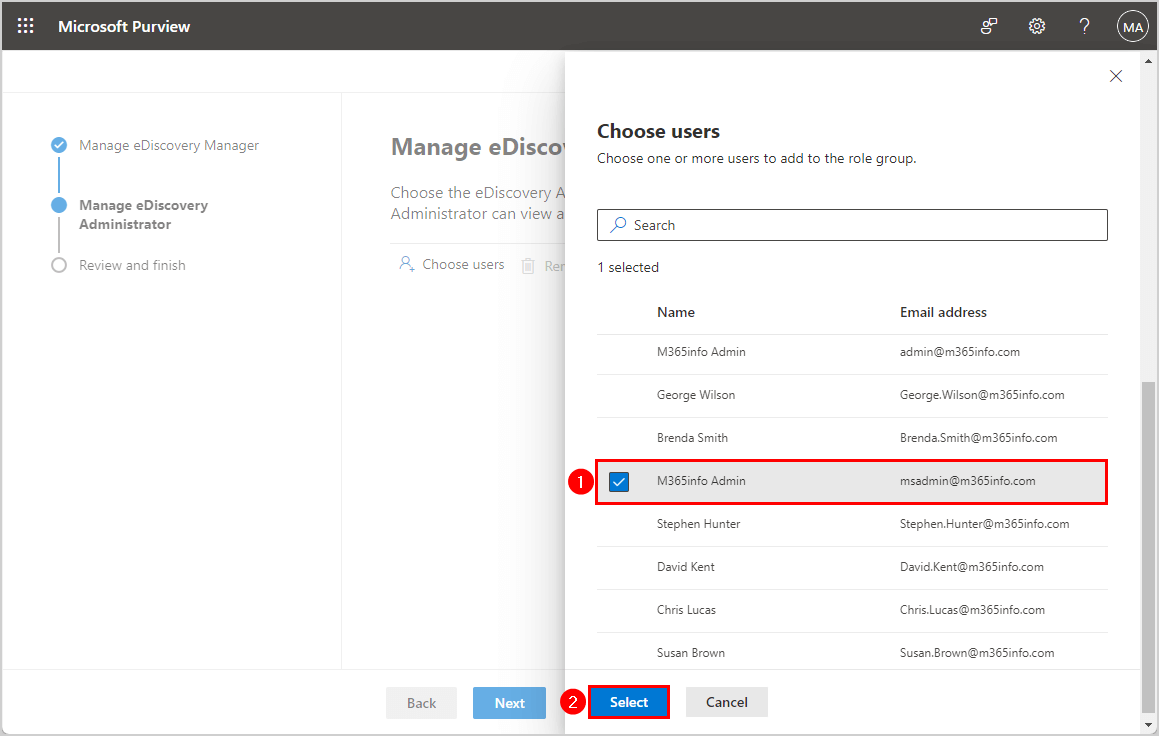
Next, we will add the administrator account for the eDiscovery Administrator role group.
Click Choose users
Find and select the administrator account from the list
Click Select
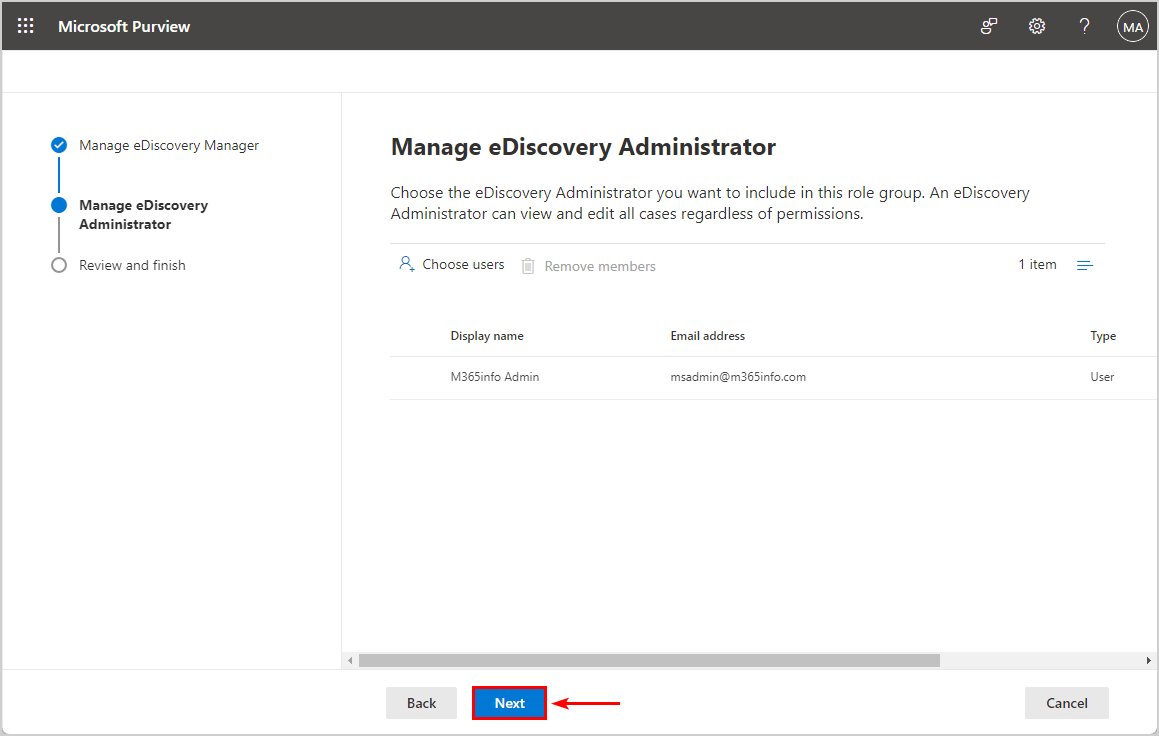
Click Next
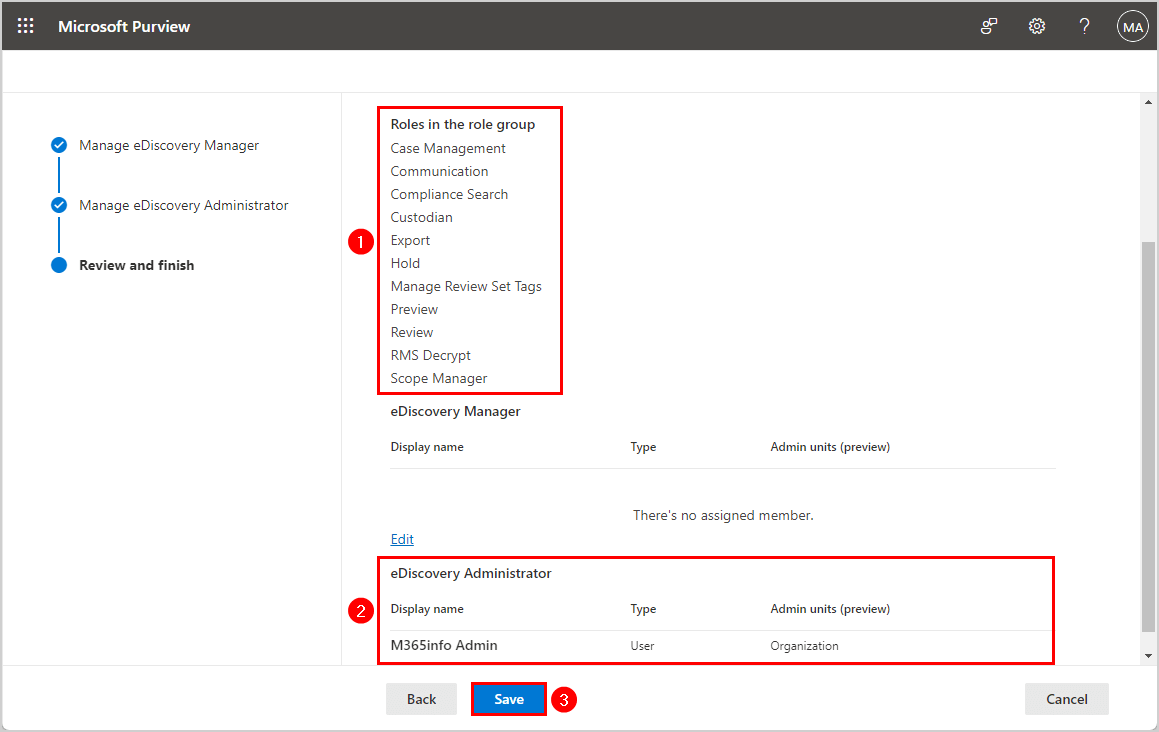
Check if there are Roles in the role group eDiscovery Manager
Check you assigned the administrator account to eDiscovery Administrator.
Click Save
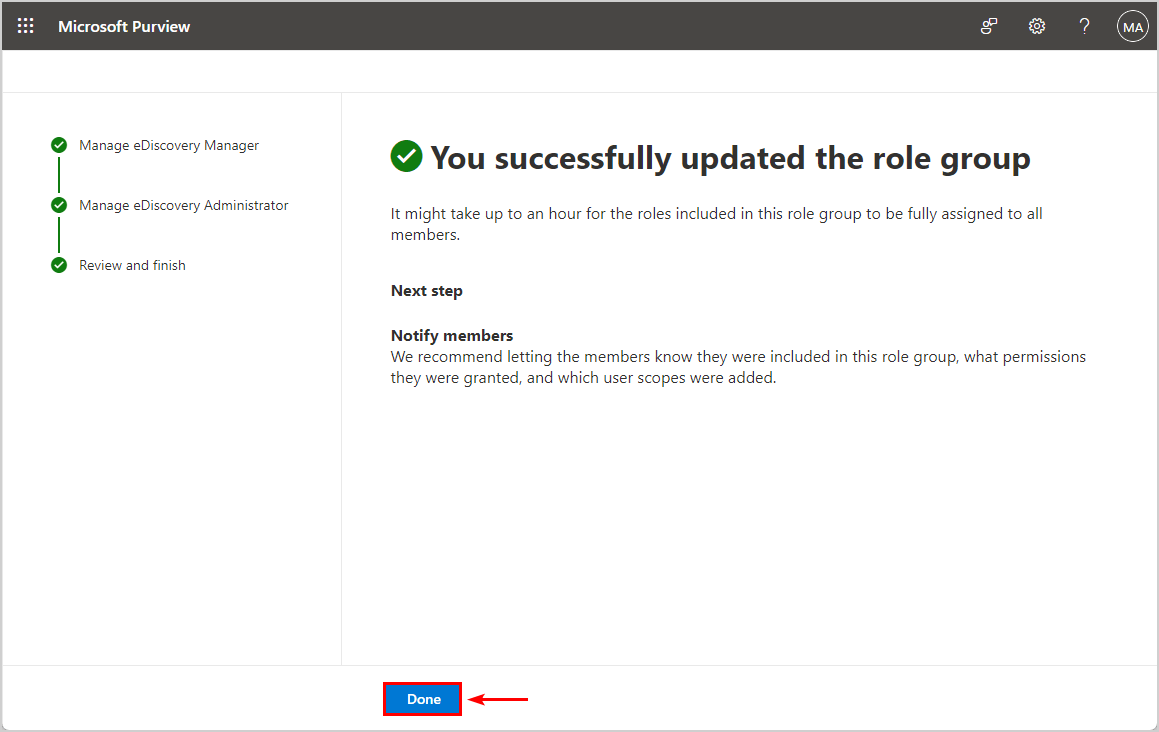
You successfully updated the role group.
Note: Once you save, the changes can take up to 24 hours to apply. Most of the time, it will work within 1 hour.
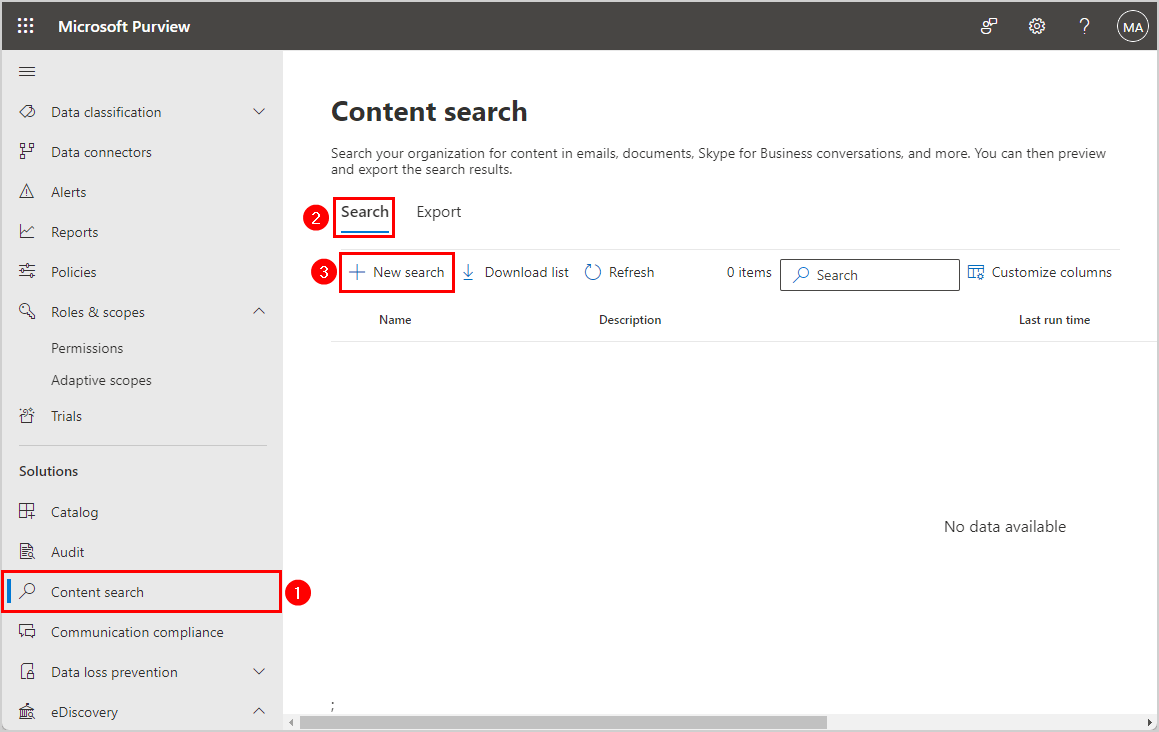
2. Create content search
In this step, we will search for the exchange mailbox.
Go back to Microsoft Purview
Click on Content search
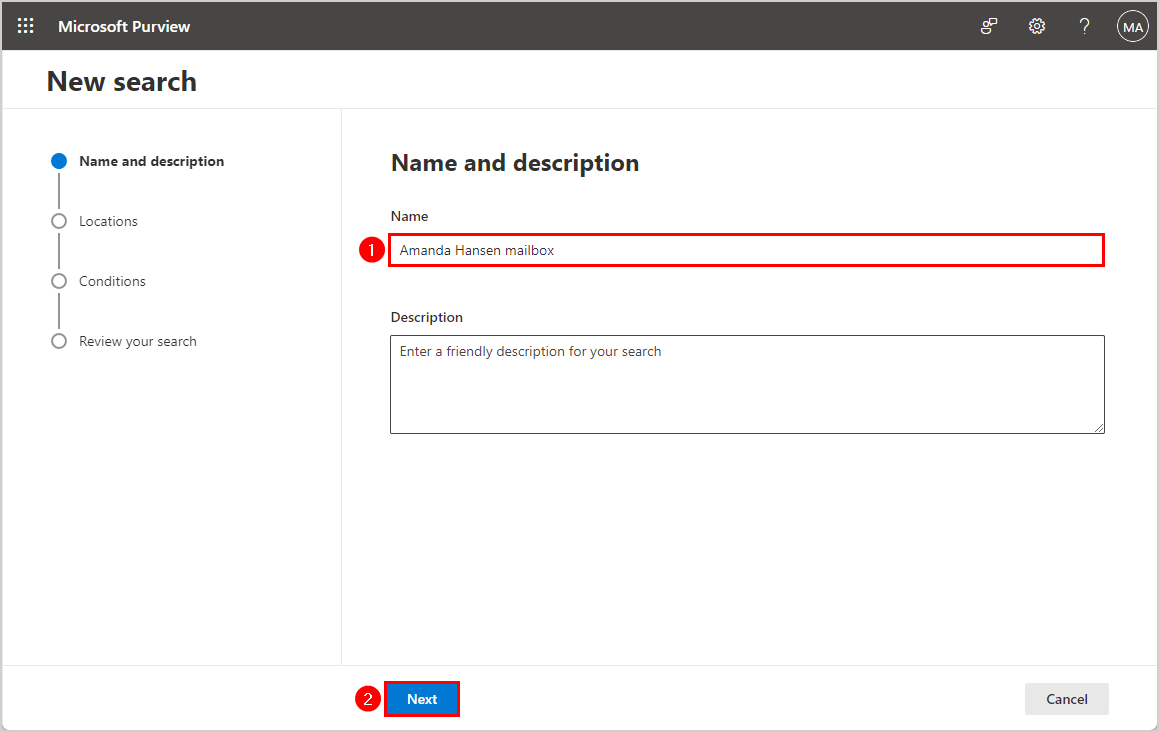
Click Search > New search
Add the mailbox Name (e.g. Amanda Hansen mailbox)
Click Next
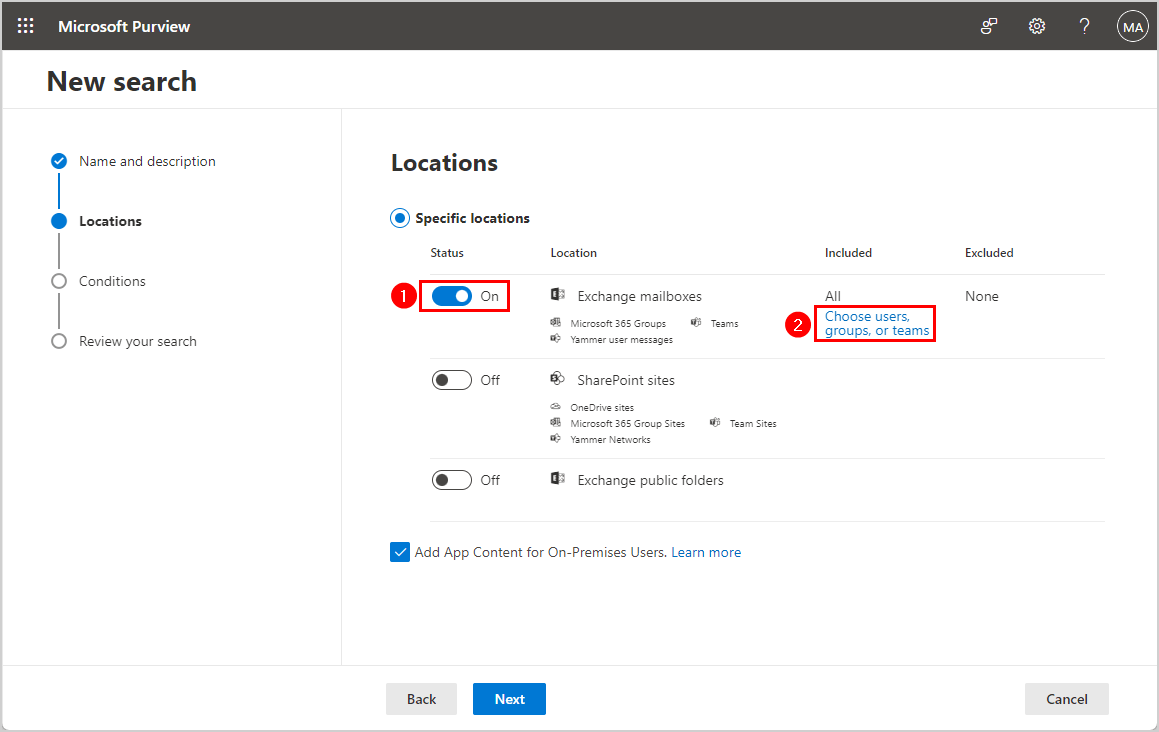
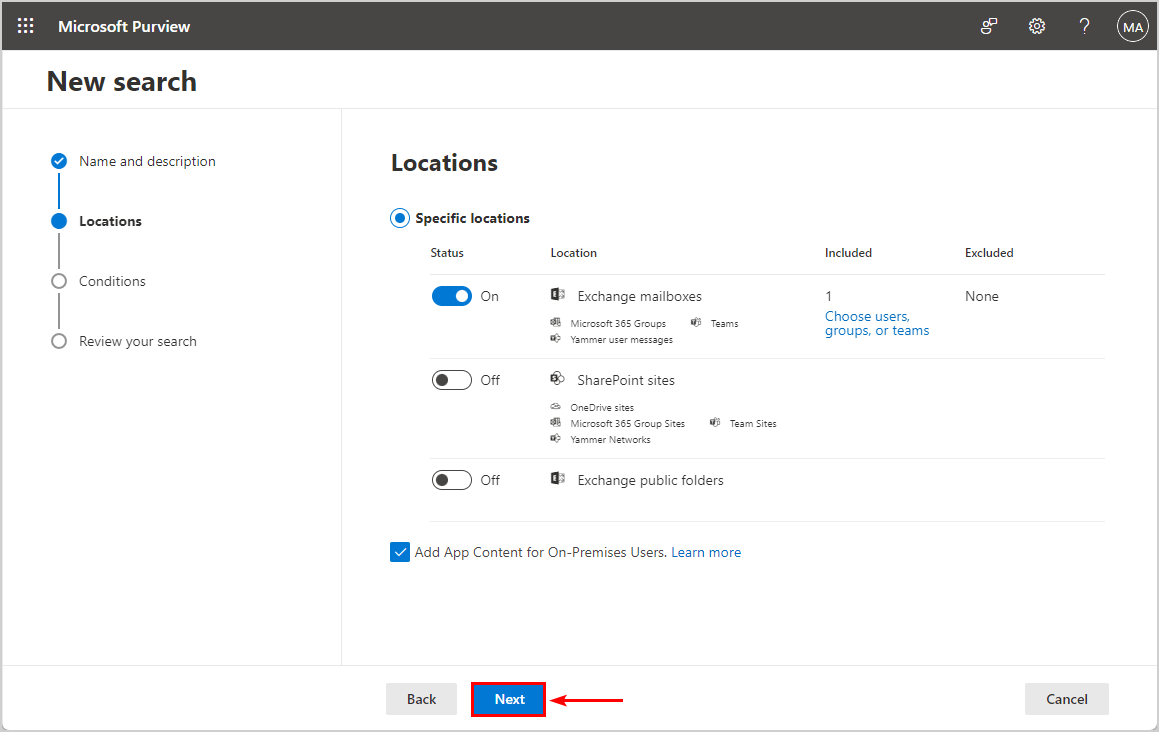
Turn the switch On for Exchange mailboxes
Click on Choose users, groups, or teams
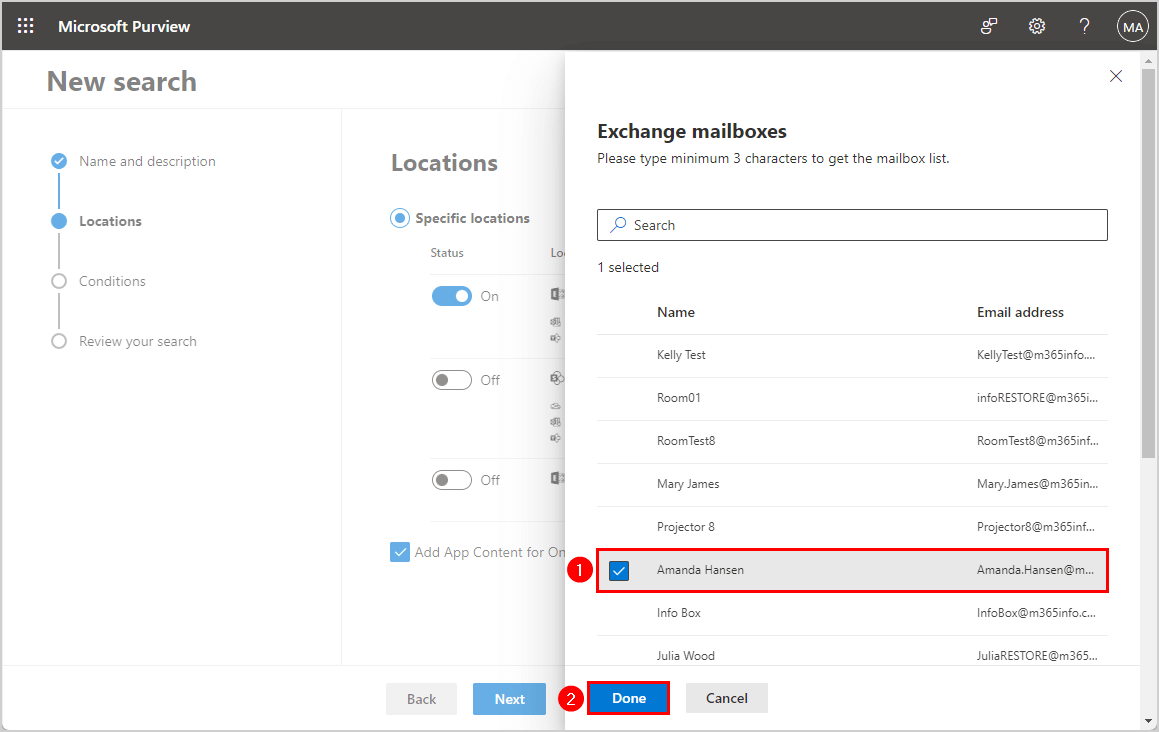
Search for the Exchange mailbox if needed
Select the mailbox
Click Done
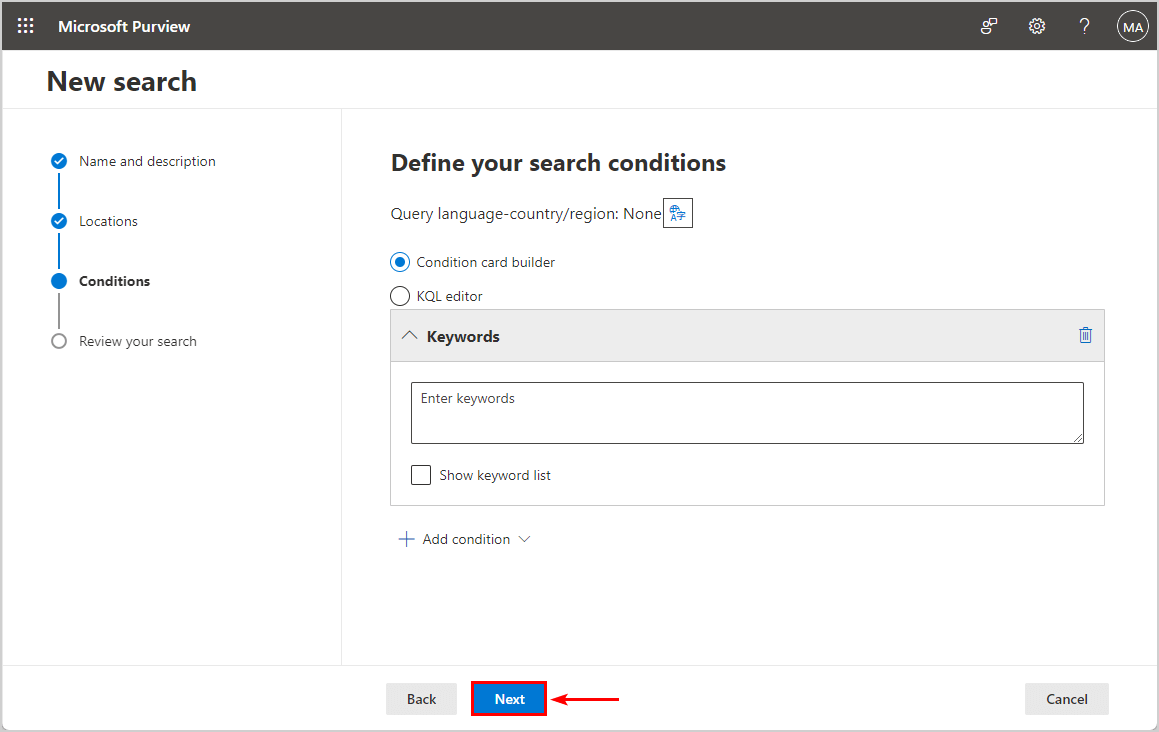
Click Next
Click Next again
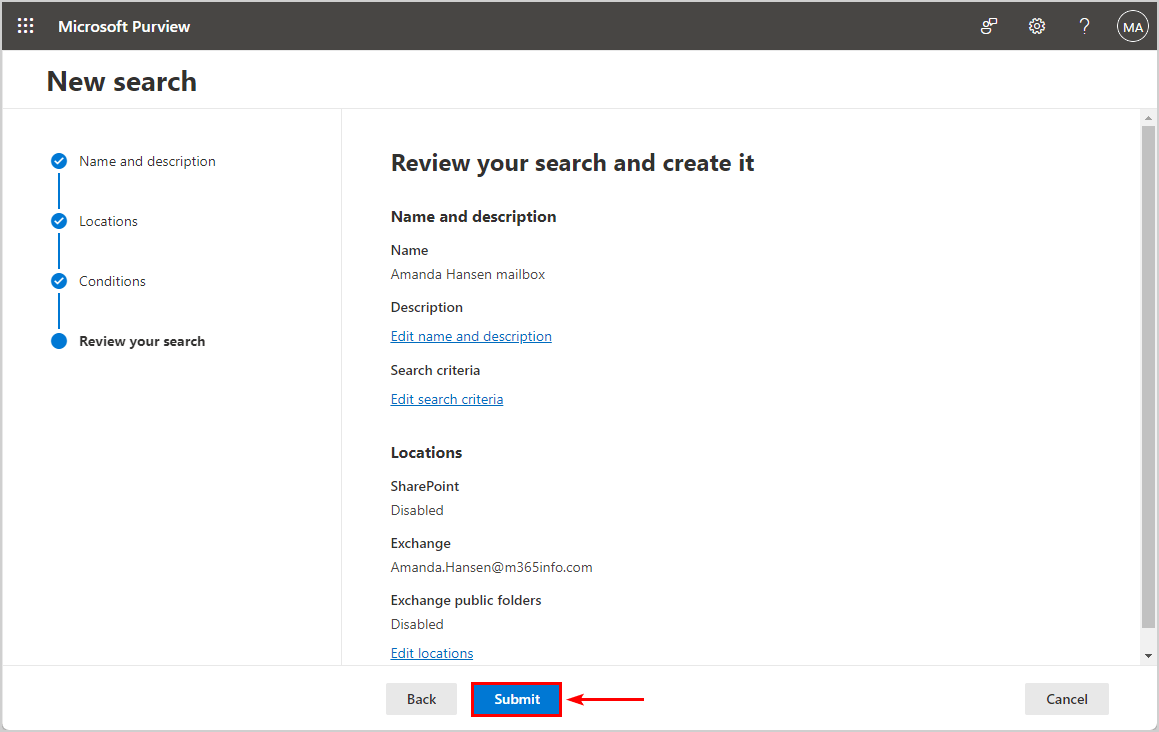
Click Submit
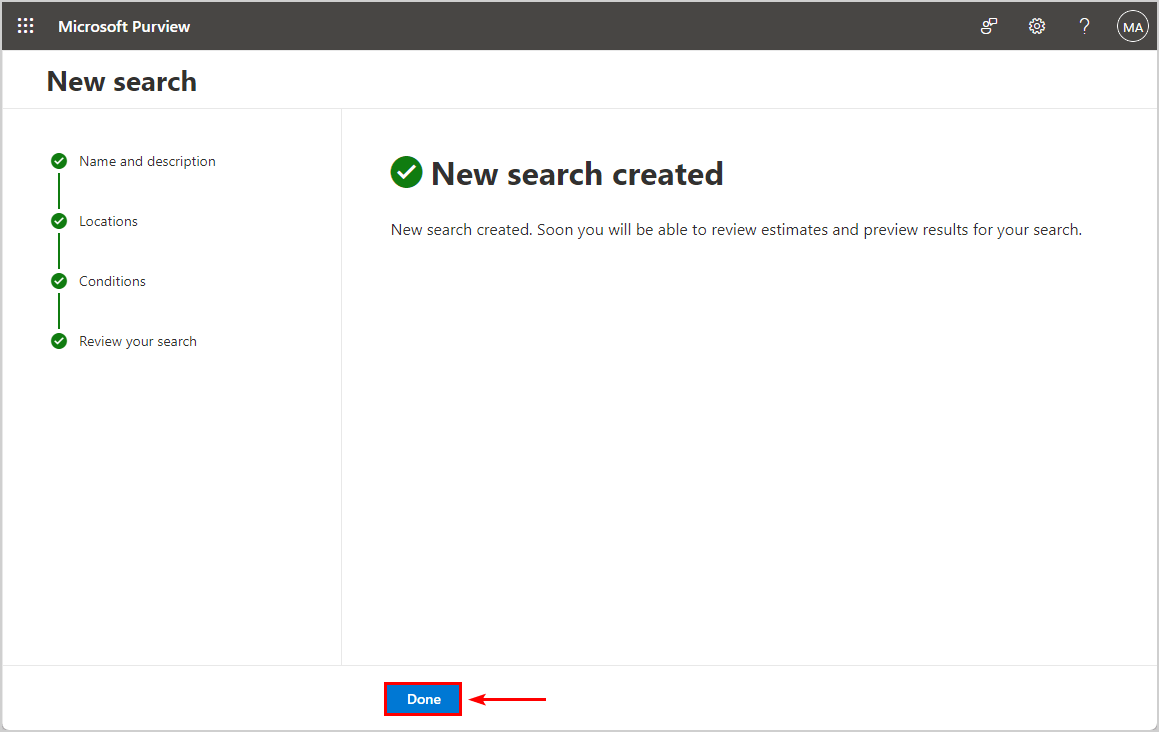
New search created.
Click Done
In the next step, we will import the PST file.
3. Export Microsoft 365 mailbox to PST file
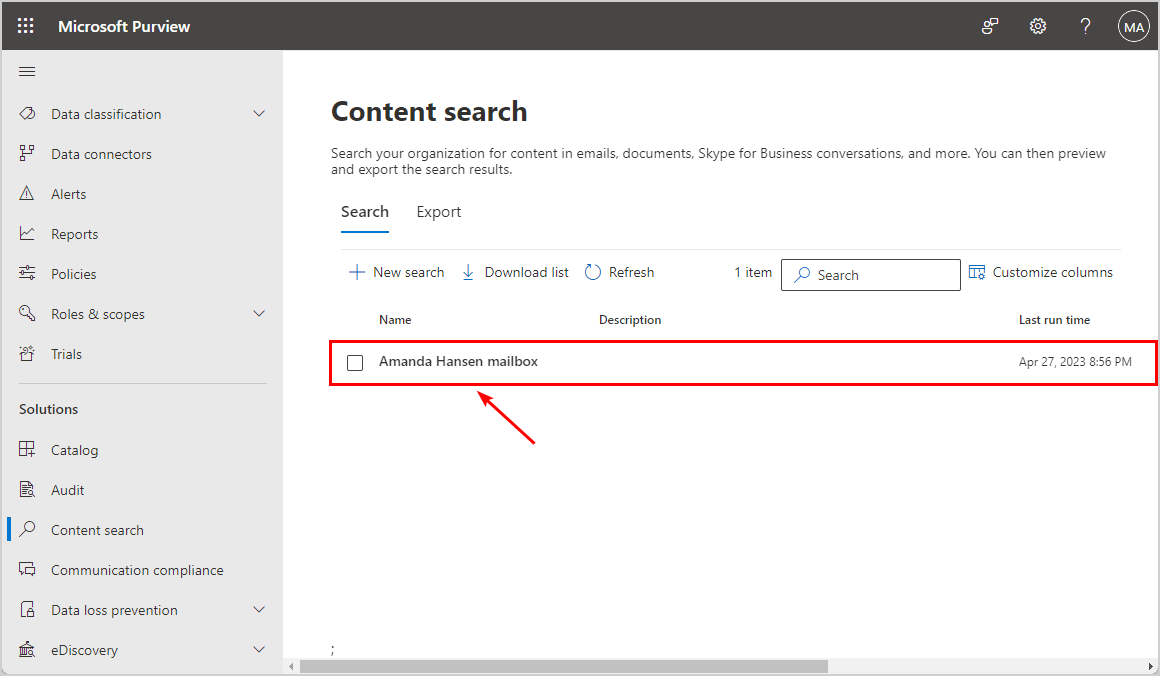
In the Content search list, you will see the name you created in the previous step.
Click on the name
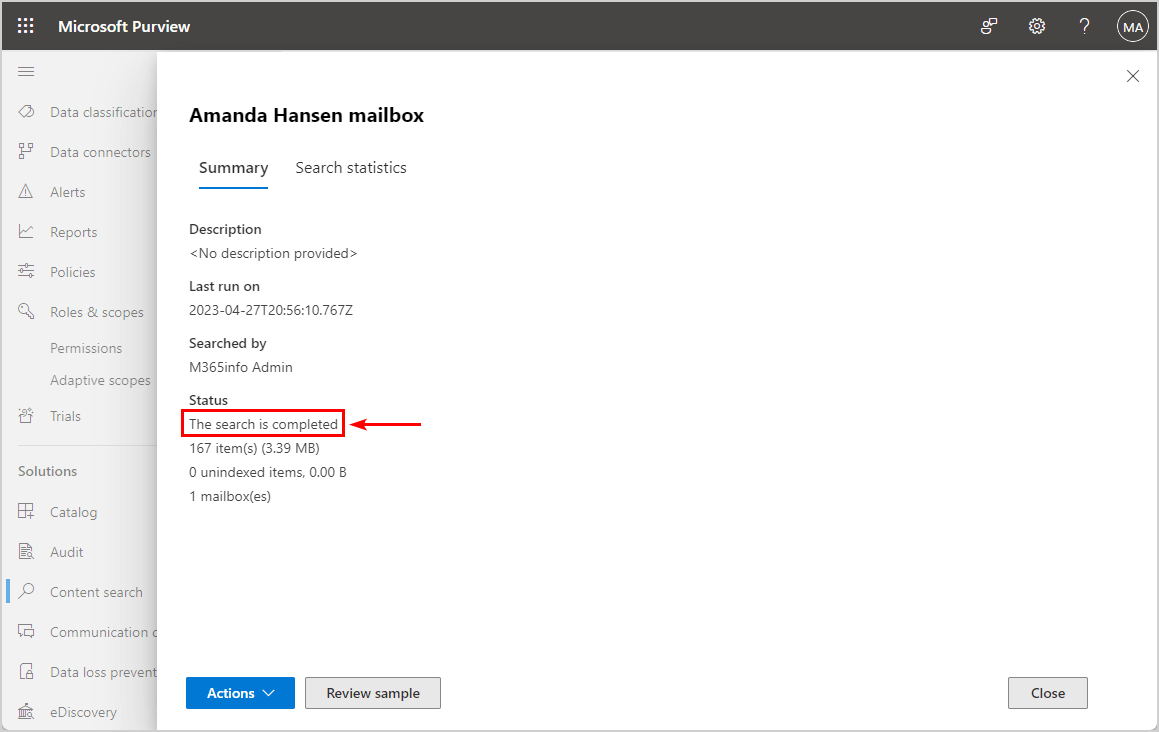
You will see that the Status search is completed.
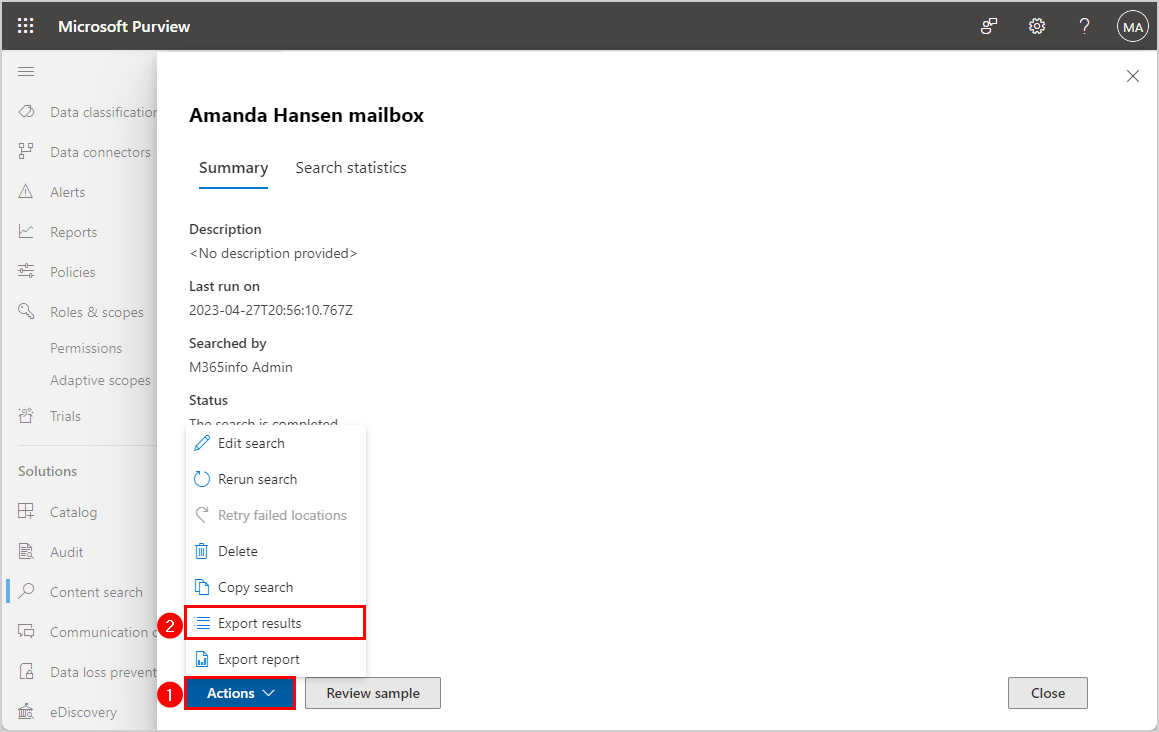
Click on Actions
Click Export results
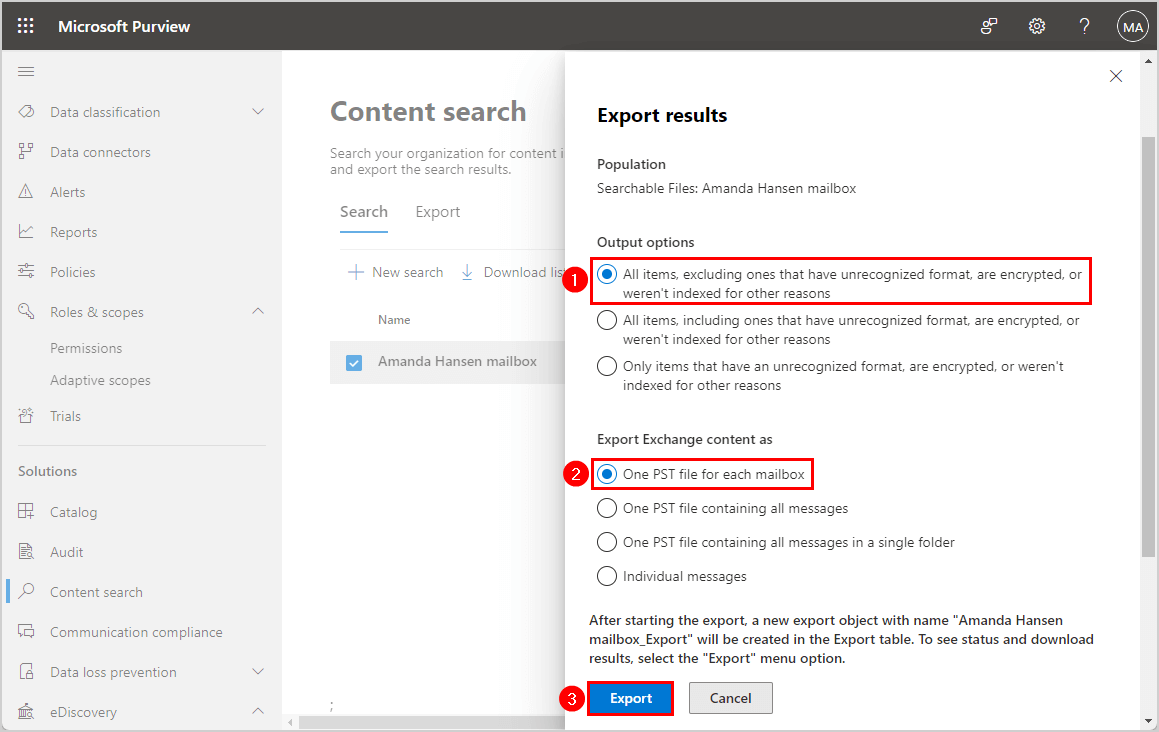
Select the output options that you like to have.
Select All items, excluding ones that have unrecognized format, are encrypted, or weren’t indexed for other reasons
Select One PST file for each mailbox
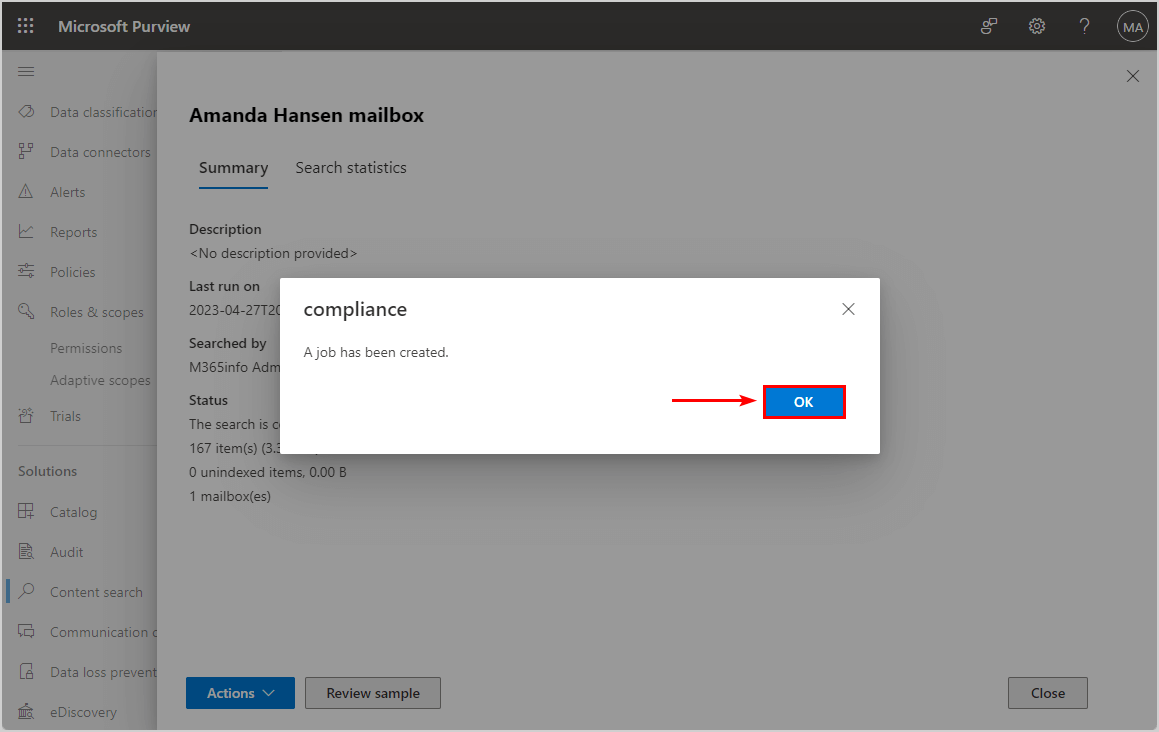
Click Export
A job has been created.
Click OK
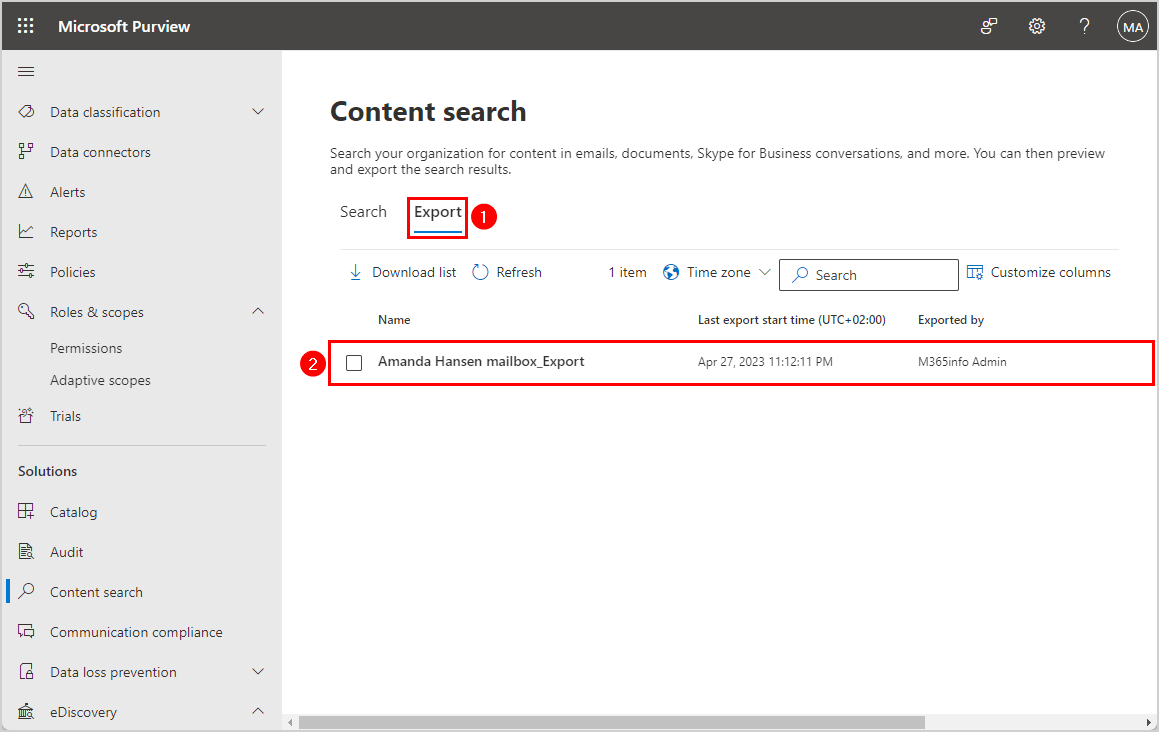
4. Download Microsoft 365 mailbox PST file
The last step is to download the Microsoft 365 PST file.
Click on the Export tab
Click on the name of the export job
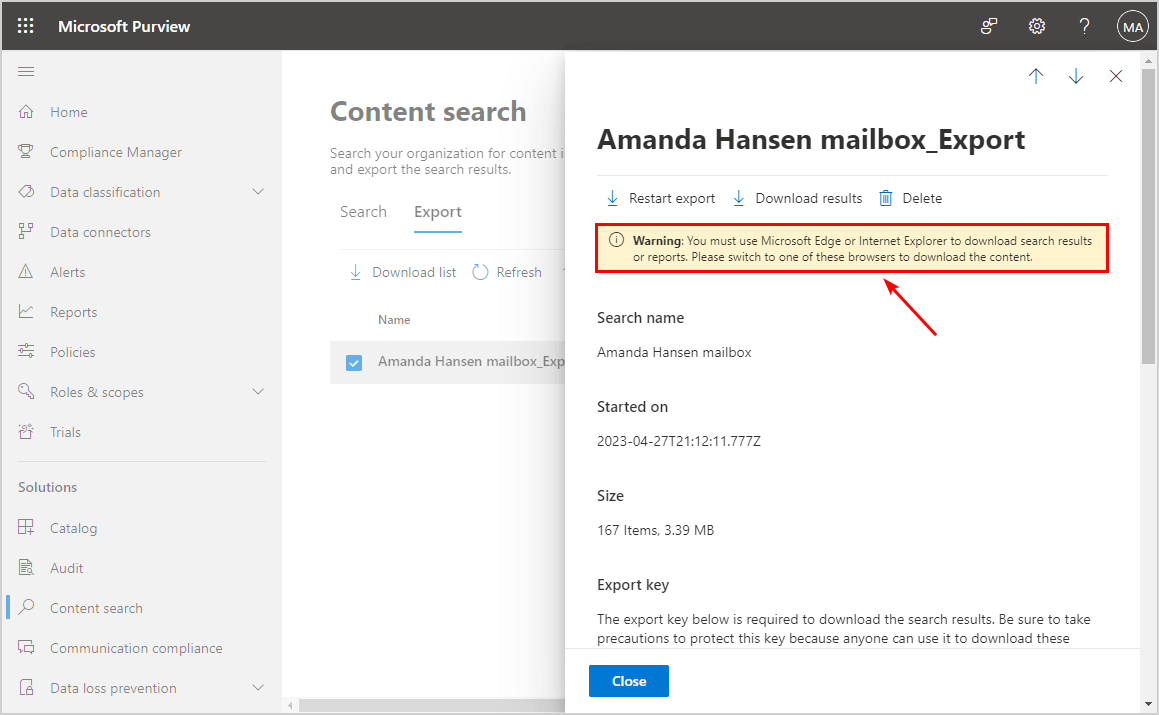
Click Copy to clipboard
Then click Download results
The application can’t start if you are not using a Microsoft browser, and you will see the below warning.
Warning: You must use Microsoft Edge or Internet Explorer to download search results or reports. Please switch to one of these browsers to download the content.
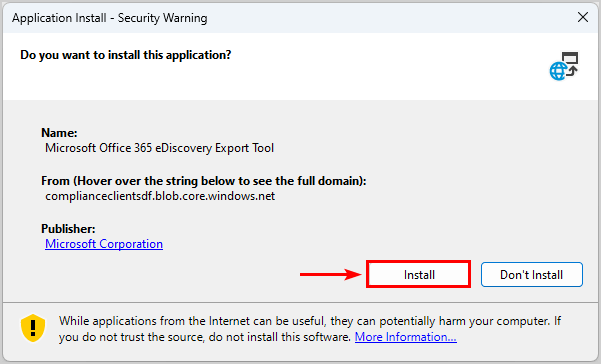
Install the Microsoft Office 365 eDiscovery Export Tool
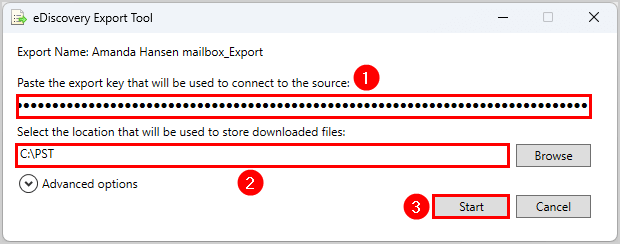
eDiscovery Export Tool opens.
Paste the export key that you copied in the previous step
Browse and select a location path for the PST file
Click Start
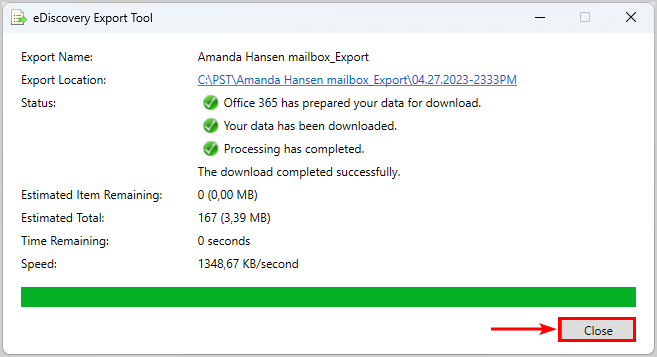
Wait until the status shows The download completed successfully.
Click Close
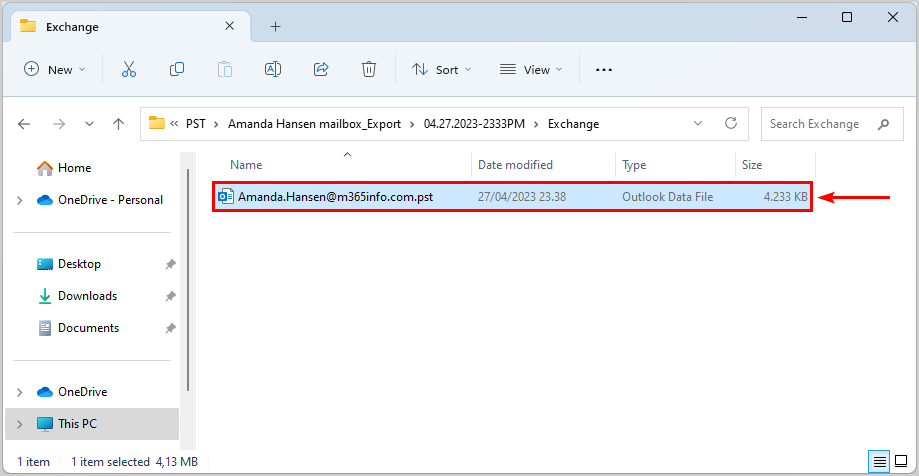
Find the PST file in the location path you selected. In our case, it is C:\PST. Open the Exchange folder, and you will find the .pst file.
Change PST file size export limit
The default PST file size export limit is 10 GB when you use the eDiscovery Export Tool. So if you export a PST larger than 10 GB, the tool will split the pst file into sequentially-numbered files. So if your file is 25 GB, it will split the PST file into 3 files, where the first 2 files are 10 GB and the last 5 GB.
Note: If you export a PST file larger than the desired maximum file size limit, the eDiscovery Export Tool will split the PST file into sequentially-numbered files.
You can change the default 10 GB PST file export size.
Follow the steps on the computer where you run the eDsicovery Export Tool to export PSTs.
You learned how to export Microsoft 365 mailbox to a PST file. First, assign the administrator account to the eDiscovery Administrator role group. Next, create a new content search to export Microsoft 365 mailbox results. As last, download the PST file to your computer with the eDiscovery Export Tool. Remember, that the default PST export file size is 10 GB, but you can always change the size limit in Registry Editor.
Did you enjoy this article? You may also like to Reset MFA for Microsoft 365 user. Don’t forget to follow us and share this article.
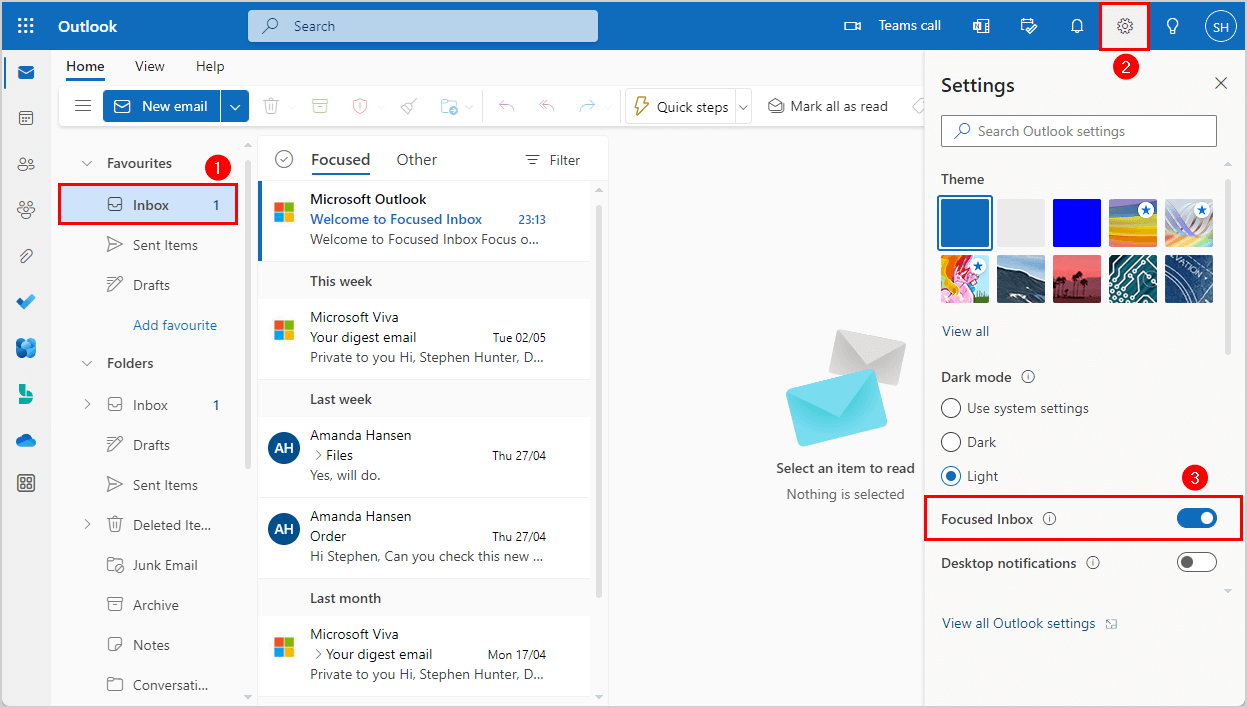
Manage the clutter feature in Microsoft 365 by using Exchange PowerShell. The mail items are not deleted but removed from the inbox mail folder to let users focus on important mail items.
Clutter is a feature in Outlook that moves less important emails out of your inbox and keeps you focused on what’s most important to you. We will show you how to enable and disable clutter for all users with PowerShell.
$AllMailboxes = Get-Mailbox -ResultSize Unlimited
$MailboxFolderStatisticsClutter =
ForEach ($Mailbox in $AllMailboxes) {
ForEach-Object { Get-MailboxFolderStatistics –Identity $Mailbox.UserPrincipalName } | Where-Object { $_.Name –Like "Clutter" } | Format-List Identity, ItemsInFolder, FolderSize
}
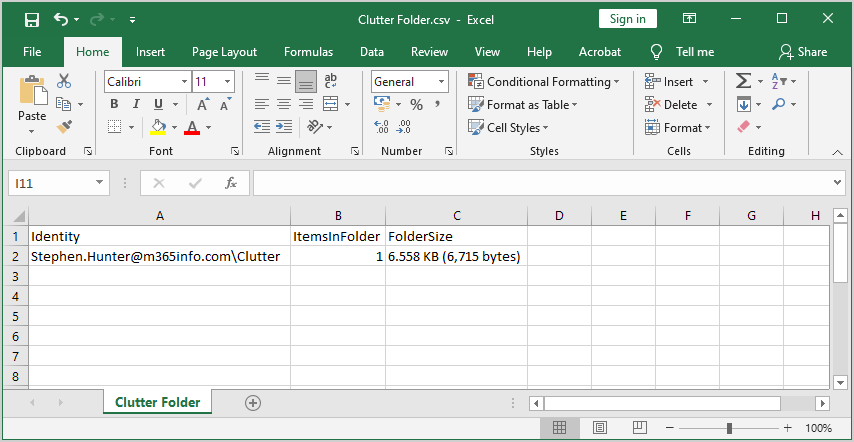
$MailboxFolderStatisticsClutter | Export-Csv "C:\TEMP\Clutter Folder - Number of mail items and size.CSV" –NoTypeInformation -Encoding UTF8
5. Use Exchange Online rule to bypass Clutter
When using clutter option, the Exchange server who manages the user mailbox, “decide” according to an internal algorithm to “move” (or not to “move”) a specific E-mail message to the clutter folder.
In some scenarios, the clutter algorithm can decide to classify E-mail messages as an E-mail that will be sent to the clutter folder, and we would like to override this decision.
To be able to “inform” Exchange server that we would like to prevent that clutter process for specific mail items, we can create an Exchange Online rule.
The Exchange rule is implemented by defining the characters of these specific emails, and asks Exchange to add a specific mail field to the E-mail message header.
This special mail filed is named X-MS-Exchange-Organization-BypassClutter.
We will need to add this mail field, and set the value of this mail field to “true”
For example:
X-MS-Exchange-Organization-BypassClutter = true
If Exchange Server “locates” this mail field, it “understands” that it needs to Bypass the clutter process.
The Exchange rule can be created manually or via PowerShell.
In the following section, we review two examples of such an Exchange rule that will bypass the clutter of specific mail items.
Create Exchange rule that will bypass the clutter for E-mail that include a specific text in the mail SUBJECT
If you want multiple users to access the same mailbox, without paying a license because it is under 50 GB, it’s best to have a shared mailbox instead. There are three ways to convert a user mailbox to shared mailbox. In this article, you will learn how to convert a user mailbox to a shared mailbox in Exchange Admin Center (EAC), Microsoft Admin Center, and PowerShell.
Sign in with a user account that has access permission
Note: If you want to store more than 50 GB, you must have Exchange Online plan 2 license assigned to the shared mailbox. And if you need the online archive, you need to assign the Exchange Online plan 1 license to it.
Convert user to shared mailbox in Exchange Admin Center
From December 2022, Microsoft announced that the classic Exchange Admin Center will be depreciated. Therefore, Microsoft recommends using the new EAC. We want to show you the steps to convert the user mailbox to a shared mailbox in the new Exchange Admin Center (EAC).
Note: The user mailbox must have an Exchange Online license assigned before you can convert it to a shared mailbox. Otherwise, you won’t see the option to convert the mailbox. If you’ve removed the license, you must add it back to convert the mailbox.
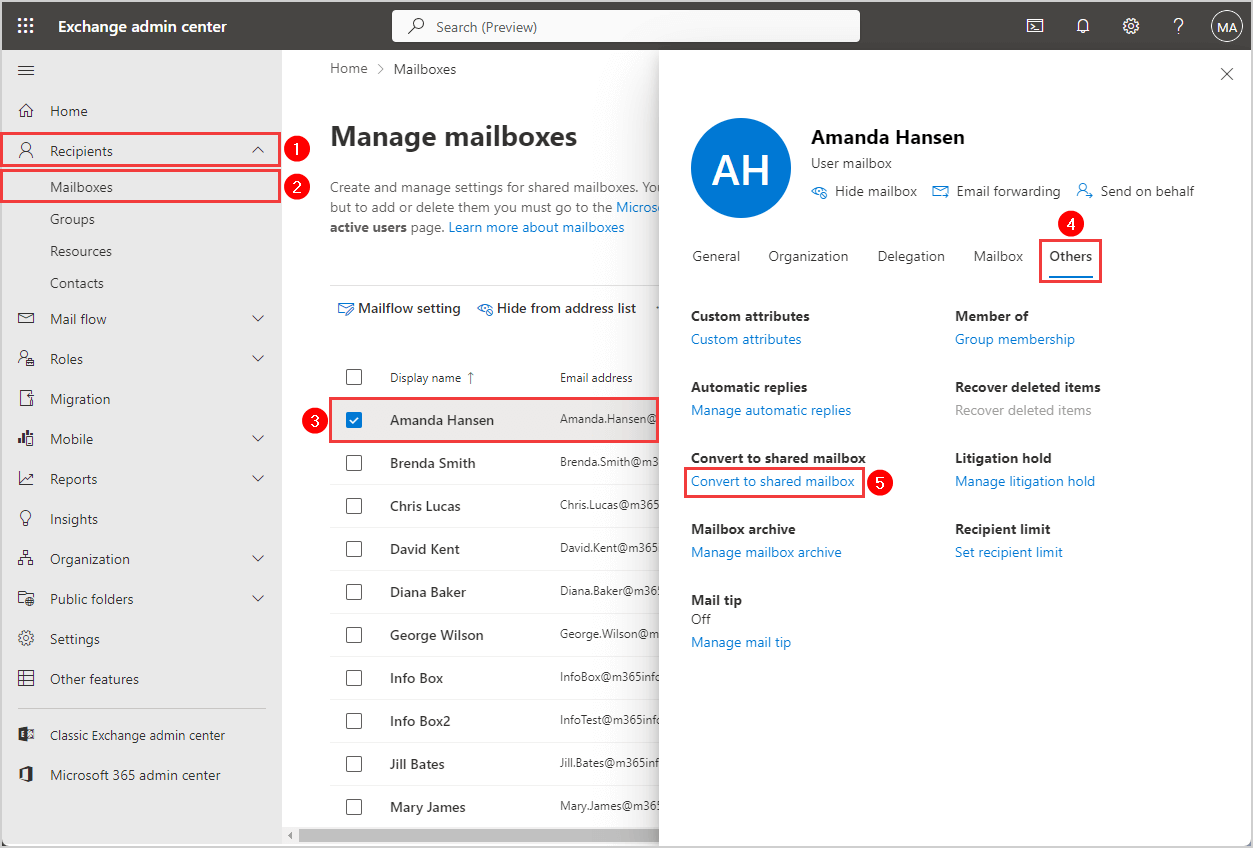
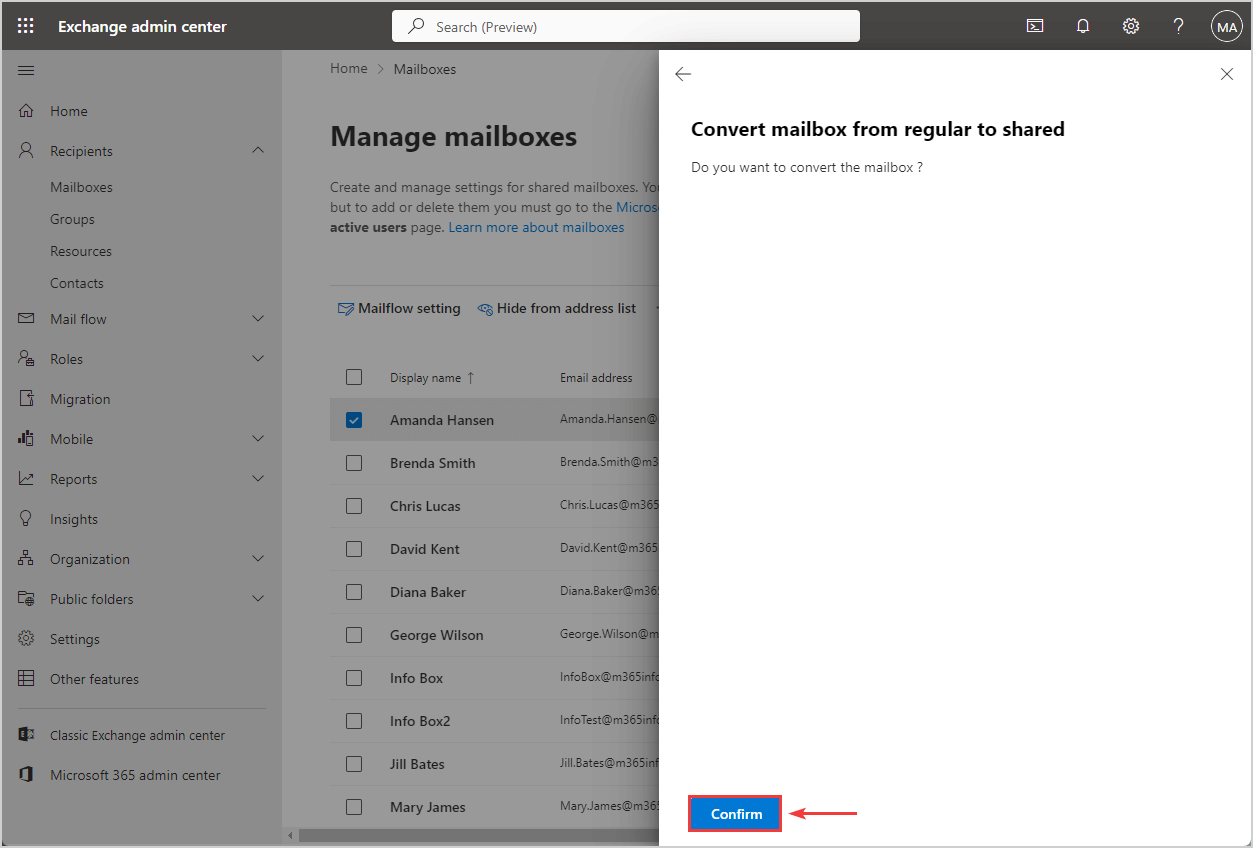
Follow the steps below to convert a regular user mailbox to a shared mailbox in EAC:
The mailbox is being converted from a regular to a shared mailbox. You successfully converted the mailbox!
Note: After converting the user mailbox to a shared mailbox, you can remove the license from the user’s account.
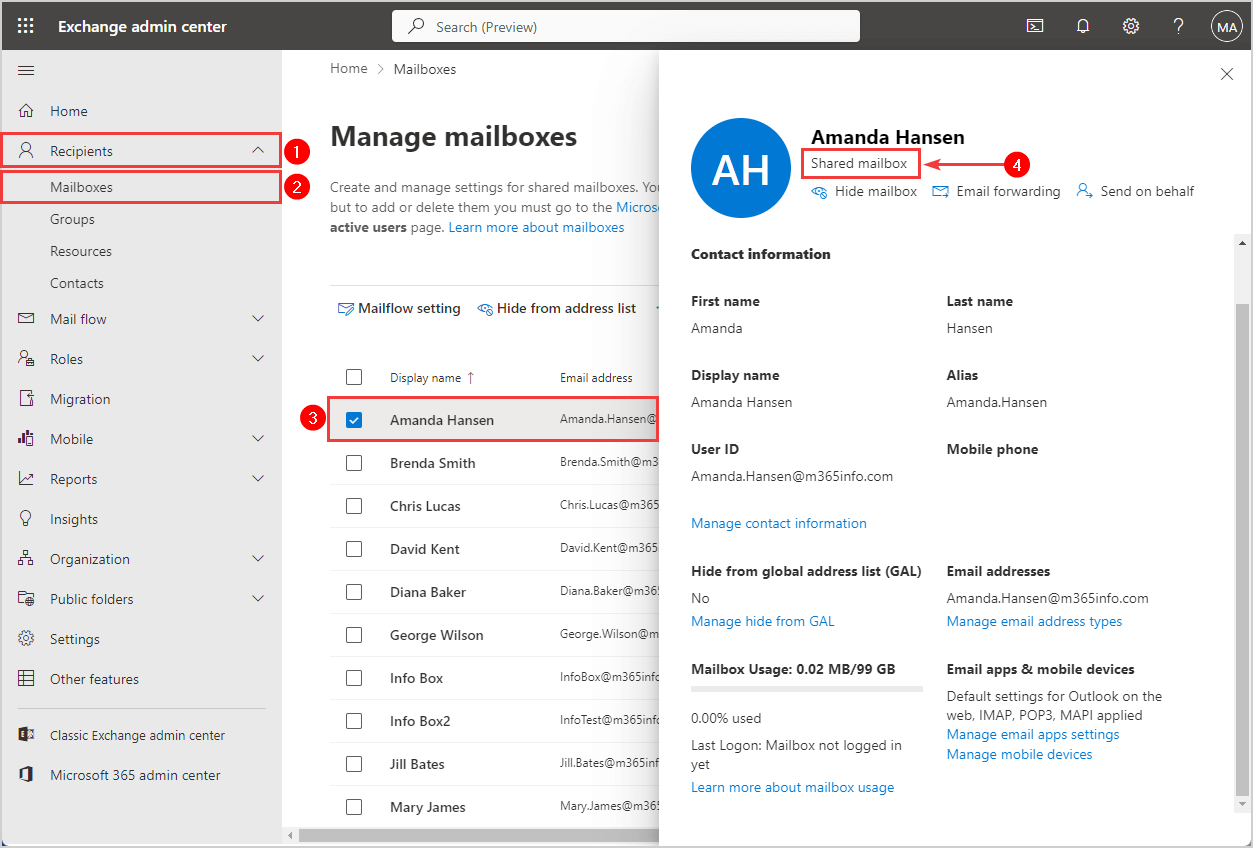
To verify that you converted to a shared mailbox, navigate to EAC > Recipients > Mailboxes. Click on the user, and you will see Shared mailbox under the user name.
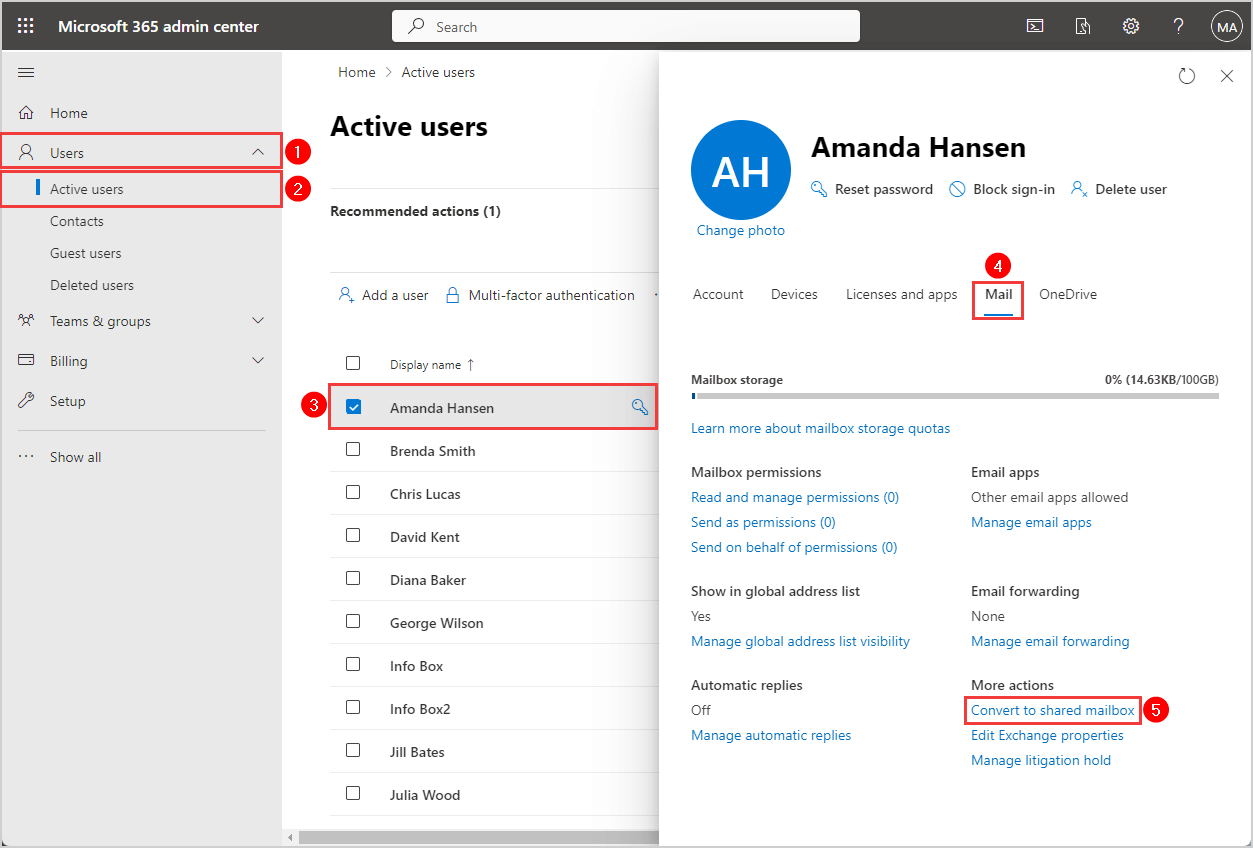
Convert user to shared mailbox in Microsoft 365 Admin Center
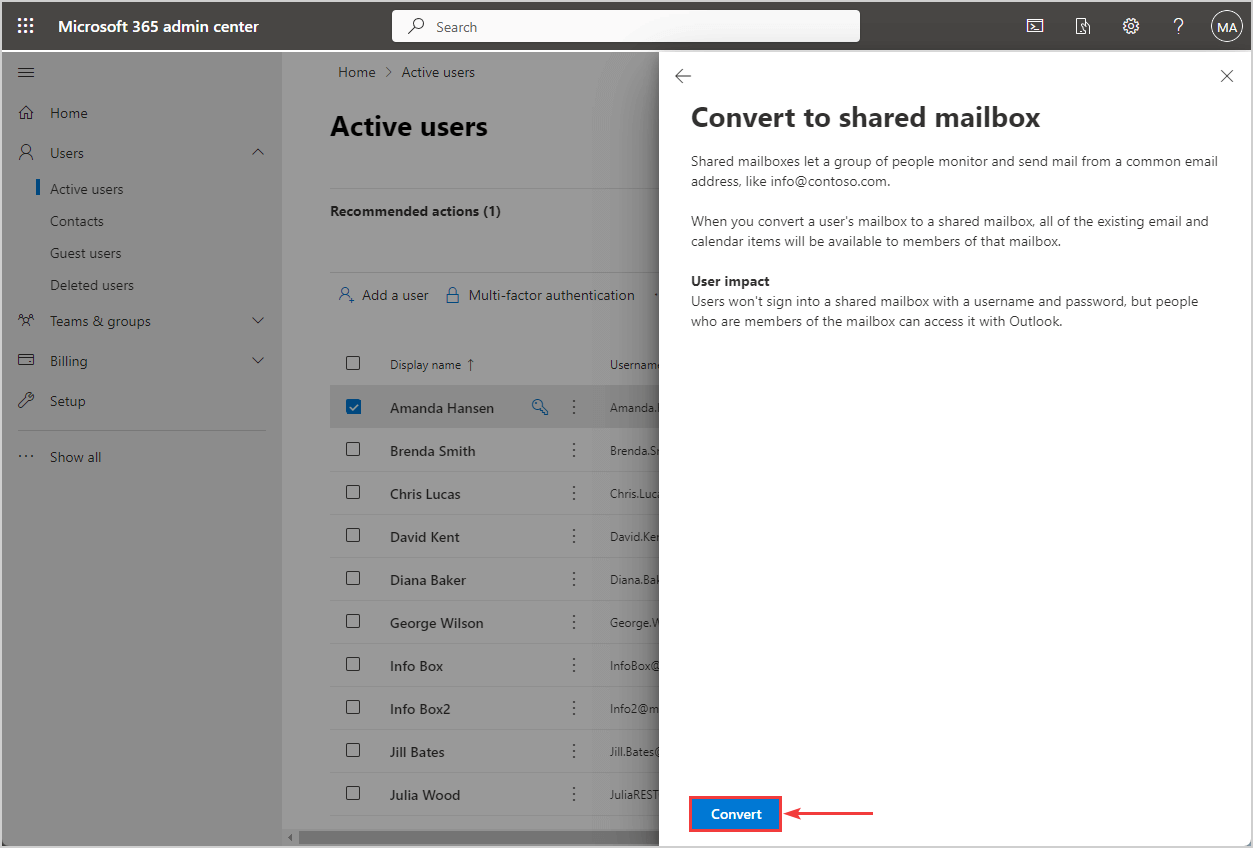
Follow the steps below to convert a regular user to a shared mailbox in Microsoft 365 Admin Center:
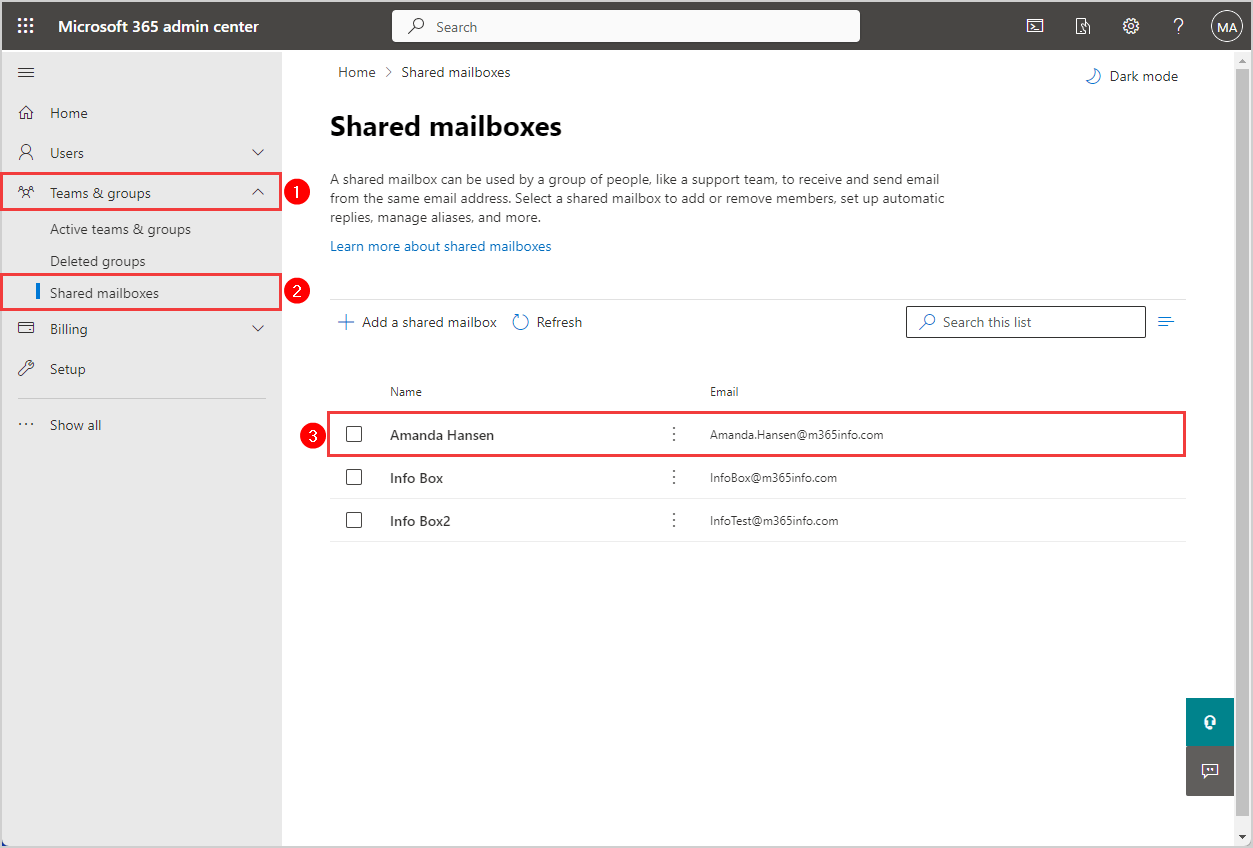
To verify that you successfully converted the user to a shared mailbox, navigate to Microsoft 365 admin center > Teams & groups > Shared mailboxes. Find the user in the shared mailboxes list.
You learned how to convert a user mailbox to a shared mailbox in three ways. It’s possible to do this in the Exchange Admin Center (EAC), Microsoft 365 admin center, or PowerShell Exchange Online. A shared mailbox doesn’t require having licenses, so remember to remove licenses or double-check them after you convert.
There are times that you want to find the Microsoft tenant name. It can be difficult to locate your organization’s primary domain name because there are many settings in the Microsoft portal. This article will show you how to find your tenant domain name in Microsoft 365 and Microsoft Azure Active Directory (AAD).
You learned how to find the tenant domain name in Microsoft 365 admin center and Azure AD. Now, you can easily locate your Microsoft 365 organization name anytime.
The organization name is what the users will see on the sign-in page. If your organization has an old domain tenant name or wants to rebrand itself, it’s best to change it. You can rename the primary domain name of your organization. In this article, you will learn how to change the tenant display name in Microsoft 365 admin center and Azure AD.
You learned how to change the tenant display name in Microsoft 365 admin center and Azure AD. It is better to rename the organization if it has rebranded itself or does not want to use the old name anymore.
You can easily enable or disable ActiveSync for all users and export a list of all mailboxes, including their ActiveSync status, to a single CSV file. In this article, you will learn how to enable or disable Exchange ActiveSync mailboxes in the Exchange admin center (EAC) and with Exchange Online PowerShell.
Exchange ActiveSync access to mailboxes in Exchange Server
Exchange ActiveSync enables mobile phone users to access their email, calendar, contacts, and tasks. Moreover, it allows users to retrieve this information even while working offline.
By default, ActiveSync is enabled for new user mailboxes. However, disabling ActiveSync on a mailbox restricts users from synchronizing their mailbox with a mobile device through ActiveSync.
We will show you two ways to enable or disable Exchange ActiveSync access for a mailbox:
Exchange admin center (EAC)
Exchange Online PowerShell
Enable or disable ActiveSync mailbox in Exchange admin center
Time needed: 10 minutes.
How to enable or disable Exchange ActiveSync in Exchange admin center (EAC)
Fill in your admin credentials and sign in Exchange admin center.
Click Menu > Recipients
Expand Recipients.
Go to Mailboxes
Click on Mailboxes.
Search and select the user mailbox
Select a user mailbox from the list to open the display pane.
The user mailbox display pane opens
Under the General tab, click on Manage email apps settings.
Disable Mobile (Exchange ActiveSync)
Select the toggle next to Mobile (Exchange ActiveSync).
Email app settings updated successfully
Click Save and close the display pane.
You can change the ActiveSync for every single mailbox. To apply these changes to multiple mailboxes, read the next step.
Bulk enable or disable ActiveSync mailboxes in EAC
Follow the below step to bulk enable or disable Exchange ActiveSync mailboxes:
Sign into Exchange admin center
Click Recipients > Mailboxes
Select multiple users from the mailbox list
Note: Select multiple mailboxes by clicking on the dot in front of each mailbox. You can also hold the Ctrl key and click on the name of each mailbox you want to change. To select a list of mailboxes after each other, you must hold the Shift key and click on the first mailbox and the last mailbox.
Click on Edit > App settings
The display pane opens. Click the drop-down arrow next to Mobile (Exchange ActiveSync). Select Enable or Disable. The changes will be applied to the selected mailboxes.
Click Save. You will get a notification message > Email app settings updated successfully. Close the display pane.
Enable or disable ActiveSync mailbox with PowerShell
Bulk enable or disable ActiveSync for users in a group
Let’s say that you have created groups in your organization. When you have a group of members in your organization, you can enable or disable Exchange ActiveSync for all these users in the group.
1. Run the below PowerShell command example to enable ActiveSync for the Sales Team.
Note: All the members in the group need to have a license. It will not enable ActiveSync for any member without a license.
ActiveSync enabled for user: Brenda.Smith@m365info.com
ActiveSync enabled for user: David.Kent@m365info.com
ActiveSync enabled for user: Susan.Brown@m365info.com
You can also bulk disable ActiveSync for the users in a group of your organization.
2. Use the below PowerShell command example to disable ActiveSync for the Sales Team.
$groupId = "Sales Team"
$members = Get-UnifiedGroup -Identity $groupId | Get-UnifiedGroupLinks -LinkType Members

foreach ($member in $members) {
    $smtpAddress = $member.PrimarySmtpAddress
    $casMailbox = Get-CASMailbox -Identity $smtpAddress -ErrorAction SilentlyContinue

    if ($casMailbox -ne $null -and $casMailbox.ActiveSyncEnabled) {
        Set-CASMailbox -Identity $smtpAddress -ActiveSyncEnabled $false
        Write-Host "ActiveSync disabled for user: $smtpAddress"
    }
    elseif ($casMailbox -eq $null) {
        Write-Host "User $smtpAddress does not have a license."
    }
    else {
        Write-Host "ActiveSync is already disabled for user: $smtpAddress"
    }
}
Note: All the members in the group need to have a license. It will not disable ActiveSync for any user mailbox without a license.
ActiveSync disabled for user: Brenda.Smith@m365info.com
ActiveSync disabled for user: David.Kent@m365info.com
ActiveSync disabled for user: Susan.Brown@m365info.com
Bulk enable or disable ActiveSync for multiple users
There is another way to enable or disable Exchange ActiveSync for multiple users, but you need the users’ mailbox names.
1. Use the below PowerShell command example to enable ActiveSync for multiple user mailboxes.
To verify you enabled or disabled Exchange ActiveSync, go to Exchange admin center > Recipients > Mailboxes. You must click on each user mailbox to check whether ActiveSync is enabled or disabled.
Or you can use the below PowerShell example to display ActiveSync for a single mailbox.
Get-CASMailbox -Identity "Amanda.Hansen@m365info.com" | ft Displayname, ActiveSyncEnabled
To check and display all Exchange mailboxes with their ActiveSync status, you must use PowerShell.
Get-CASMailbox -ResultSize Unlimited | ft DisplayName,ActiveSyncEnabled
The PowerShell output shows a list of ActiveSync enabled (True) or disabled (False) of all mailboxes.
PS C:\> Get-CASMailbox -ResultSize Unlimited | ft DisplayName,ActiveSyncEnabled

DisplayName              ActiveSyncEnabled
-----------              -----------------
Amanda Hansen                        False
Brenda Smith                         False
Chris Lucas                          False
David Kent                           False
Diana Baker                          False
Discovery Search Mailbox              True
George Wilson                         True
Info Box                              True
Jill Bates                           False
Julia Wood                            True
Kelly Test                            True
Mary James                            True
Project Pool 11                       True
Projector 21                          True
Projector 8                           True
René Gibs                            False
Room01                                True
RoomTest8                             True
Stephen Hunter                        True
Susan Brown                          False
Export list ActiveSync mailboxes to CSV
You can also export ActiveSync data of all mailboxes to a single CSV file. This way, you can easily search ActiveSync for all mailboxes.
You learned how to enable or disable Exchange ActiveSync to mailboxes in Exchange admin center (EAC) and Exchange Online PowerShell. In EAC, you can bulk enable or disable ActiveSync for all users. With PowerShell, you can also export a list of all mailboxes and their ActiveSync status to a single CSV file.
There is no need to manually assign or remove licenses for each user in Microsoft 365 admin center. Instead, an easier way to assign licenses for multiple users is with groups. In this article, you will learn how to assign Microsoft 365 licenses using group-based licensing in Azure AD (AAD).
Once you create a group with users in Azure AD, you can assign one or more product licenses. All the members of the group will have the same licenses assigned. Azure AD applies the same licenses when you add new members to a group. And when a member leaves a group, their licenses are automatically removed.
This licensing method eliminates using PowerShell to manage licenses for individual users based on organizational or department structure changes. It makes the process of assigning and removing licenses for multiple users at once more efficient.
To use group-based licensing, every user must have one of the following licensing:
Paid or trial subscription for Azure AD Premium P1 and above.
Paid or trial edition of Microsoft 365 Business Premium, Office 365 Enterprise E3 or Office 365 A3 or Office 365 GCC G3, Office 365 E3 for GCCH, or Office 365 E3 for DOD and above.
Create new group with members in Azure AD
We will create a group to assign the default Microsoft 365 licenses to all users. Then we will create another group to add paid Microsoft 365 licenses (e.g., Power BI or Visio) for certain users.
Follow the steps to create a new group, including members in Azure:
Sign in to Microsoft Azure with your admin credentials.
In the portal menu.
From the portal menu, click on Azure Active Directory.
You will be redirected to the Overview page.
Click on Groups.
Open the group you created.
Click on the security group type from the list.
Assign a new license to the group.
Click on Licenses.
Select Assignments.
Click on Assignments.
Select licenses to assign to the group.
Select licenses Microsoft 365 E5 Developer. Choose the license services for the group.
Click Save.
Click Save and close the license screen.
License assignments succeeded.
Wait a few minutes for the license changes to apply to all users.
There is another way to assign licenses to a group. You can follow the same steps we showed above or learn another way.
Follow the steps to assign licenses to the other group we created:
Go to Azure Active Directory
Click Licenses > All products
Select the checkbox Microsoft 365 E5 Developer
Click Assign
Click Add users and groups
Search and select M365_E5_EXO_P2
Click Select
Click on the tab Assignment options or below Next: Assignment options >
Select the assignment options you want to include
Click Next: Review + assign >
Note: For the other group, you can only include paid licenses such as Microsoft Power BI or Microsoft Visio.
Click Assign
You will get a notification that the licenses are assigned to the group.
Verify group-based licensing in Azure AD
Verify you created a security group type with licensed users in AAD.
Follow the below steps to find the group-based licensing:
Go to Azure Active Directory > Licenses
Click All products
Click on the license Microsoft 365 E5 Developer
You can see that we assigned 20 members with the license Microsoft 365 E5 Developer. In our example, 15 members of the group M365_E5_Default have all the license options, and 5 members from the group M365_E5_EXO_P2 have 1 license option (Exchange Online Plan 2) assigned.
Click on Licensed users
You will find a list of all the users with the Microsoft 365 E5 Developer license. Some users can have multiple licenses assigned, as you can see in the below picture.
Note: Some users have assigned the Microsoft 365 E5 Developer license manually (Direct), and some through the group-based licensing (Inherited).
Note: You can remove the direct license assignment from each user. To remove the inherited license, you must remove the user from the group.
Click on Licensed groups
It shows that the State is Active for both groups. The Enabled Services show how many services of the license (57/57) you assigned. For the group M365_E5_EXO_P2, we have only assigned the Exchange Online Plan 2 license (1/57).
You successfully assigned Microsoft 365 licenses with group-based licensing in Azure AD!
You learned how to assign Microsoft 365 licenses with group-based licensing in Azure AD. It’s easier to bulk assign Microsoft 365 licenses to all users when creating groups in AAD. This way, you can find and manage your users’ licenses.
It’s faster to set Employee ID for Azure AD users with PowerShell when connecting to McGraph correctly. In this article, you will learn how to get and set Employee ID for all Azure Active Directory users. We will also show you to export bulk users Employee IDs to a single CSV file.
2. Open Windows PowerShell as administrator and run the below cmdlet.
Connect-MgGraph -Scope User.ReadWrite.All
3. The sign-in to your account window opens, where you choose your admin account and enter the password. Then click on Sign in.
If you have enabled MFA, you will get a verification code sent as a text message or to your Authentication app on your phone. If your MFA is disabled, you will not do anything here.
Now you must go back to the PowerShell windows where you will see this output.
PS C:\> Connect-MgGraph -Scope User.ReadWrite.All
Welcome To Microsoft Graph!
4. By default, the module uses the Microsoft Graph REST API v1.0. To get the EmployeeId, you must run the Select-MgProfile command (beta version).
Select-MgProfile -Name "beta"
Now you are ready to get and set the EmployeeId of all Azure users with PowerShell commands.
Get one user Employee ID
Get the EmployeeID information of a single user by running the below PowerShell command.
It shows that the user Brenda Smith has an EmployeeId 2.
Set one user Employee ID
Let’s say that we want to change the Employee ID of a single user. In our example, we want to change the EmployeeId of Brenda Smith to number 22.
1. Run the below PowerShell command to get the UserId of a single user.
Get-MgUser -UserId "Brenda.Smith@m365info.com"
The PowerShell output in our example will look like this.
PS C:\> Get-MgUser -UserId "Brenda.Smith@m365info.com"

Id                                   DisplayName  Mail                      UserPrincipalName         UserType
--                                   -----------  ----                      -----------------         --------
d912b0fc-6f7e-4ec2-a9e4-854ed27a511a Brenda Smith Brenda.Smith@m365info.com Brenda.Smith@m365info.com Member
2. Copy the Id from your output and use it in the below PowerShell syntax. Then, type the new EmplopyeeId number you want to set.
Update-MgUser -UserId "Id number" -EmployeeId "new number"
3. Run the PowerShell command to change the EmployeeId of a single user. In our example, we want to change the EmployeeId of Brenda Smith to number 22.
You correctly set a new Employee ID for a single user. Next, we will show you how to get all users’ EmployeeId.
Bulk get users Employee ID
To get bulk users Employee ID, run the below PowerShell command.
Get-MgUser -All | ft UserPrincipalName, Displayname, EmployeeId
The PowerShell output shows the below result.
PS C:\> Get-MgUser -All | ft UserPrincipalName, Displayname, EmployeeId

UserPrincipalName           DisplayName     EmployeeId
-----------------           -----------     ----------
admin@m365info.com          M365info Admin
Amanda.Hansen@m365info.com  Amanda Hansen   1
Brenda.Smith@m365info.com   Brenda Smith    2
Chris.Lucas@m365info.com    Chris Lucas     3
David.Kent@m365info.com     David Kent      4
Diana.Baker@m365info.com    Diana Baker     5
George.Wilson@m365info.com  George Wilson
haji1@m365info.com          Haji
InfoBox@m365info.com        Info Box
infoRESTORE@m365info.com    Room01
Jill.Bates@m365info.com     Jill Bates
JuliaRESTORE@m365info.com   Julia Wood
KellyTest@m365info.com      Kelly Test
Ken.Walker@m365info.com     Ken Walker
Mary.James@m365info.com     Mary James
msadmin@m365info.com        M365info Admin
newuser@m365info.com        New User
Projector11@m365info.com    Project Pool 11
Projector21@m365info.com    Projector 21
Projector8@m365info.com     Projector 8
Rene.Gibs@m365info.com      René Gibs
Ricky.Lewis@m365info.com    Ricky Lewis
RoomTest8@m365info.com      RoomTest8
Stephen.Hunter@m365info.com Stephen Hunter
Susan.Brown@m365info.com    Susan Brown
Export bulk users Employee ID to CSV file
You can export all Azure users’ Employee IDs to a single CSV file. This way, you can easily search which Employee ID number each user has.
Run the below PowerShell command to export bulk users’ EmployeeId to a CSV file.
You learned how to set Employee ID for all Azure users with PowerShell. It’s important to connect to McGraph correctly to get and set an Employee ID for a single user. You can also get bulk users’ Employee IDs and export all information to a CSV file.
Most organizations want to create multiple users at once to save time. Therefore, you must create a CSV file with all the new users and upload it into the Azure AD portal. In this article, you will learn how to bulk create users in Azure AD with CSV file.
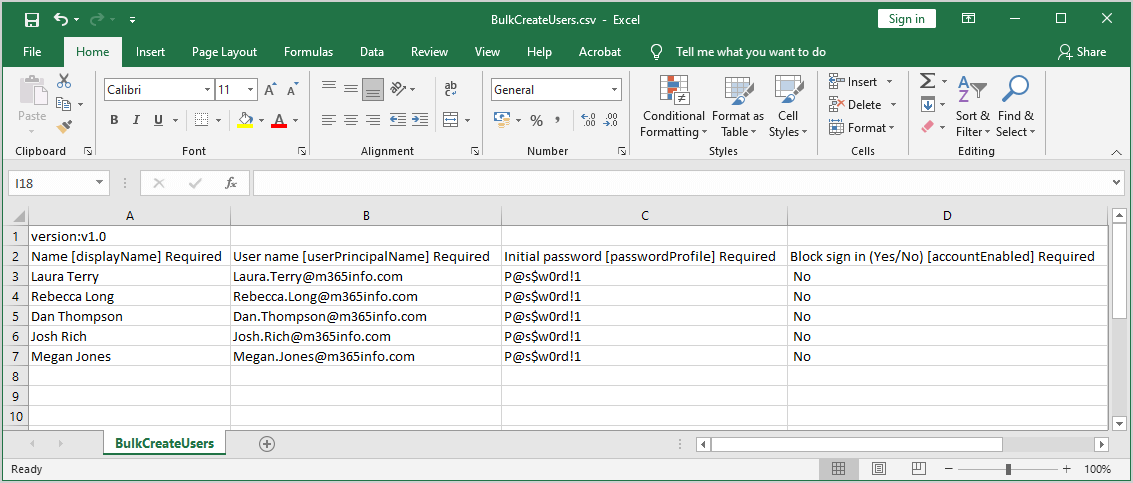
Row 1: Contains the version number and must be included in the upload CSV.
Row 2: Includes all the column headings. The format of the column headings looks like e.g., Name [displayName] Required.
Examples row: In the CSV file, we have included examples of acceptable values for each column. You must remove the row’s contents and replace the examples with your entries.
Requirements when you fill in the CSV file:
Do not remove or modify the first two rows of the BulkCreateUsers.csv file, or the upload can’t be processed.
Do not add new columns to the CSV file.
You must fill in the required columns with data.
Ensure no extra whitespace exists before or after any field, such as UserPrincipalName.
In the next step, we will show you how to edit the CSV file with an application like Microsoft Excel.
Edit CSV file in Excel
To save the Excel file as CSV comma delimited, you need to make Excel use a comma for the list separator.
Open Microsoft Excel
Click Options
In the Excel Options, you need to make some changes:
Click Advanced
Under Editing options > Clear System separators
Set Decimal separator to period (.)
Set Thousands separator to comma (,)
Click OK
Note: Close the Microsoft Excel application to save the changes.
Open the CSV file in Microsoft Excel and fill in the required data
Once you finish the required data, save the file as .csv.
Name the file
Save it as a CSV (Comma delimited) file
Click Save
In the next step, we will show you how to upload the CSV file in Azure AD.
Bulk create Azure AD users with CSV file
Time needed: 10 minutes.
How to bulk create users in Azure AD with CSV file.
Sign in to Microsoft Azure with your admin credentials.
In the portal menu.
From the portal menu, click on Azure Active Directory.
You will be redirected to the Overview page.
Click on Users.
You will be redirected to the Users preview.
Click on Bulk operations > Bulk create.
Upload your CSV file.
Browse the CSV file in your folder.
Select your CSV file.
Select the CSV file you created.
File uploaded successfully.
Click Submit.
View the status of bulk operation results.
Bulk operation in progress and succeeded.
You will get a notification when the bulk operation is completed.
Check Azure AD users bulk results
To see if the bulk operation succeeded, follow the below steps:
Go to Azure Active Directory > Users
Click Bulk operation results
Click on the File name BulkCreateUsers.csv
The status shows Completed with no errors.
It shows a list of all the new Azure users. The status shows Success for all 5 users we created in bulk.
Verify all users in Azure AD
Find the newly created users in Azure:
Go to the Azure Active Directory > Users
Select All users (preview)
All the new users you created in bulk are in the same list as the others. It also updates the total number of users (29). In our case, we bulk created 5 new users, and we started with 24 users.
You learned how to bulk create users in Azure Active Directory (AAD) with a CSV file. Now you can create multiple users for your organization in no time by uploading a CSV file into the Azure AD portal.
The catch all mailbox is a special mailbox that receives all the email messages that were sent to non-existing organization recipients. A catch all mailbox is an excellent solution to find out which messages are sent to your organization but were not received by the recipients. In this article, you will learn to configure catch all mailbox in the Exchange admin center (EAC).
The catch all mailbox in your Exchange Online server can benefit your organization. A catch-all mailbox collects any emails addressed to non-existent email addresses within the domain instead of bouncing them back to the sender as undeliverable. The catch-all mailbox routes any email sent to a non-existent or misspelled email address within the domain. This feature is particularly useful in preventing the loss of legitimate emails due to typos or misconfiguration.
An excellent way to understand the catch all mailbox is with an example outlined below.
Let’s say that the manager of our HR department has the following email address Amanda.Hansen@m365info.com. If someone sends an email message to this address Amanda.Heinz@m365info.com, the mail server (Exchange Online) will reject this message. The mail server will reply with a non-delivery report (NDR) to notify the source sender that there is no such recipient and that it could not deliver the message.
Microsoft sends a How to Fix It template in the NDR message.
To avoid the above scenario, you can configure the catch all mailbox that will accept all these email messages.
The Exchange administrator or another organization user will have access permission to that specific catch all mailbox. From time to time, they can look into the catch all mailbox and check for legitimate mail that was supposed to be sent to a specific recipient organization.
Catch all mailbox risks
The catch all mailbox is not a supported solution by Microsoft 365. Therefore, Microsoft has not published formal information about the catch all mailbox feature. It’s to avoid the fact that the catch all mailbox can increase spam emails in Microsoft 365 mail server.
Note: Exchange Online does not have the catch-all mailbox feature enabled by default.
Note: It’s important to understand that the catch all mailbox can’t be used or implemented in an Exchange Hybrid environment. But only on a “cloud only” environment, meaning the organization’s mail infrastructure is hosted only by Exchange Online, and no other mail infrastructure is involved.
Authoritative vs. Internal Relay domain
Before we go through the steps, let’s explain why you must change the domain default settings from Authoritative to Internal Relay.
When we register our public domain name in Microsoft 365, it’s considered an accepted domain. For this accepted domain, you can choose between two different authorities:
Authoritative: Email is delivered only to valid recipients in this Exchange organization. All email for unknown recipients is rejected.
Internal Relay: Email is delivered to recipients in this Exchange organization or relayed to an email server at another physical or logical location.
By default, the accepted domain is set to Authoritative. It means that the Exchange Online server has the authority of this accepted domain.
When someone sends an email from a registered public domain to a recipient’s email address, the Exchange Online server will first look into the Global Address List (GAL). Exchange automatically creates this built-in list and includes every mail-enabled object in the Active Directory.
Note: If the recipient’s email address does not appear in the GAL, the Exchange Online server will reply with an NDR message. It will inform the source sender that the recipient does not exist.
Internal Relay
To share the authority with the Exchange Online server and another mail server, you must configure Internal Relay for your accepted domain.
If someone sends an email from a registered public domain to a recipient’s email address, the Exchange Online server will go through the recipient list (GAL).
Note: If the recipient’s email address does not appear in the GAL, the Exchange Online server will forward the mail to the other mail server.
Transport rule
Each time Exchange Online gets a request for delivering an email message to a non-existing Exchange Online recipient, it will look for the other mail infrastructure MX records by default.
To change this behavior, we must set up a transport rule in Exchange Online that will enforce Exchange Online to deliver the email message to the designated catch all mailbox.
How to configure catch all mailbox in Exchange Online
To configure the catch all mailbox in Exchange admin center (EAC), we need to follow these steps:
Create a shared mailbox to catch all mailbox
Create a dynamic distribution group
Change accepted domain from Authoritative to Internal Relay
Create an Exchange Online transport rule
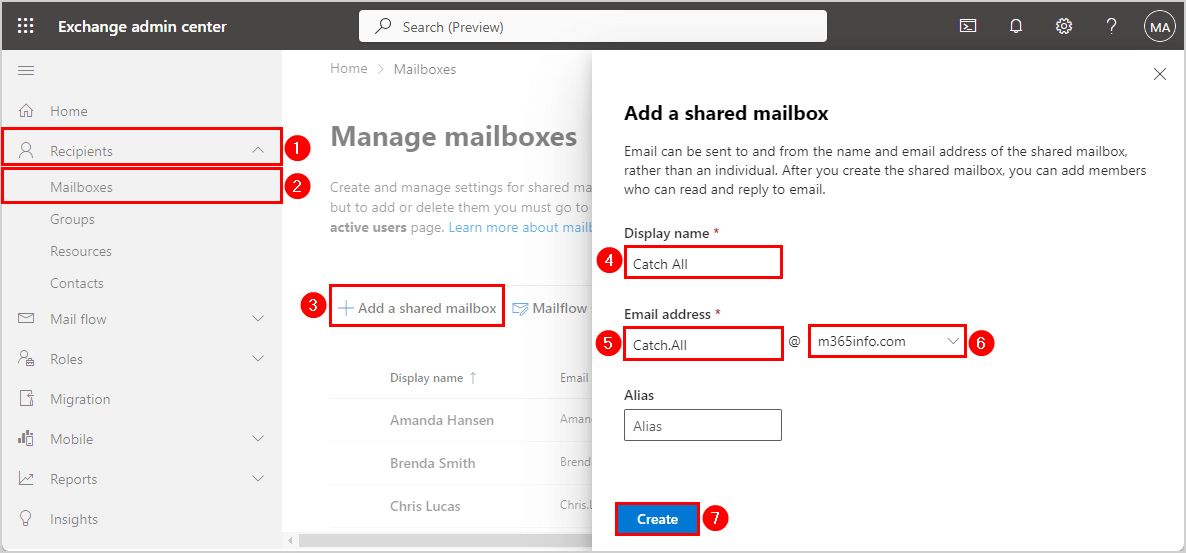
Step 1. Create shared mailbox
The first step is to create a shared mailbox to use as the catch all mailbox. It is better to receive the non-existing emails of your domain in one mailbox.
We recommend creating a shared mailbox because of the following reasons:
There are no licenses required
Share with other members
Assign Send as or Full Access permissions
If you already have a shared mailbox you want to use as the catch all mailbox, then you can skip this step.
Note: You will get a notification saying the shared mailbox was created. It may take a few minutes before you can add members. Close the pane.
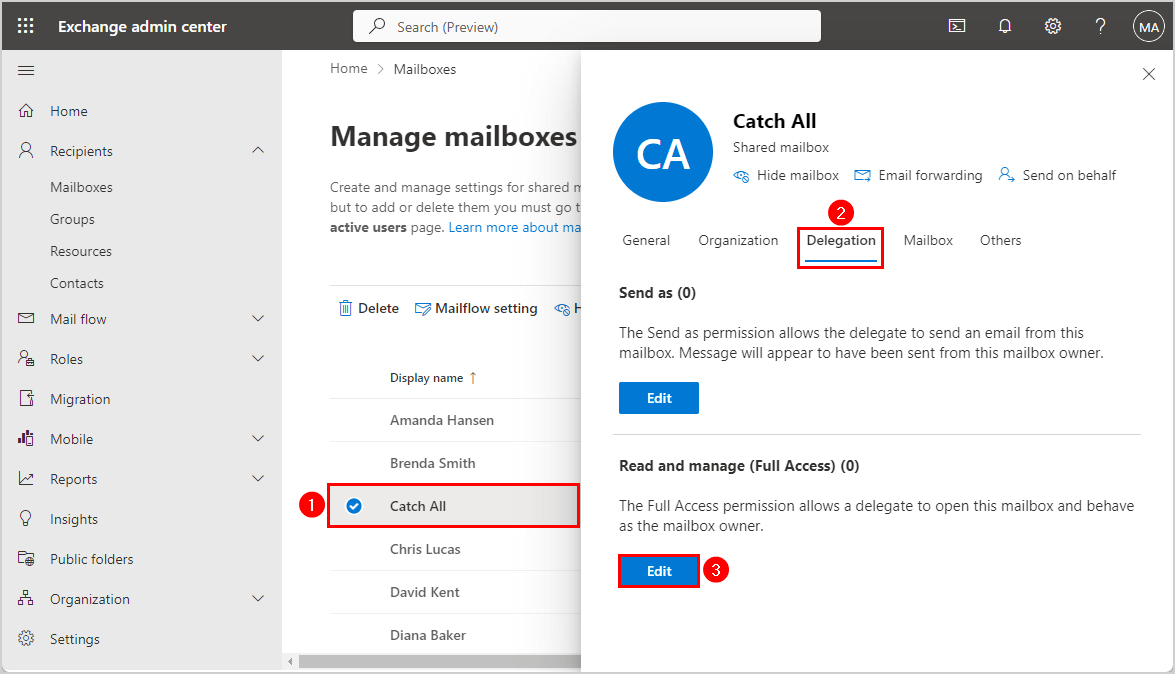
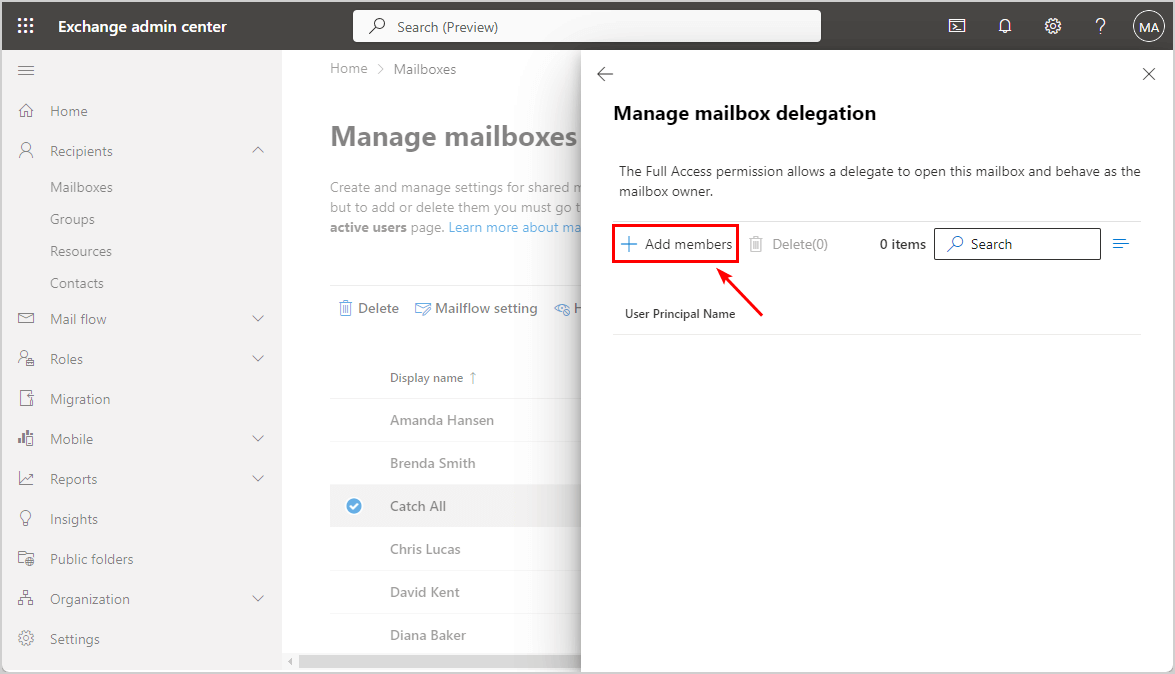
Add members and assign permissions to the created shared mailbox:
Click on the created shared mailbox (Catch All) from the list
Select Delegation
Go to Read and manage (Full Access) > Click Edit
Click Add members
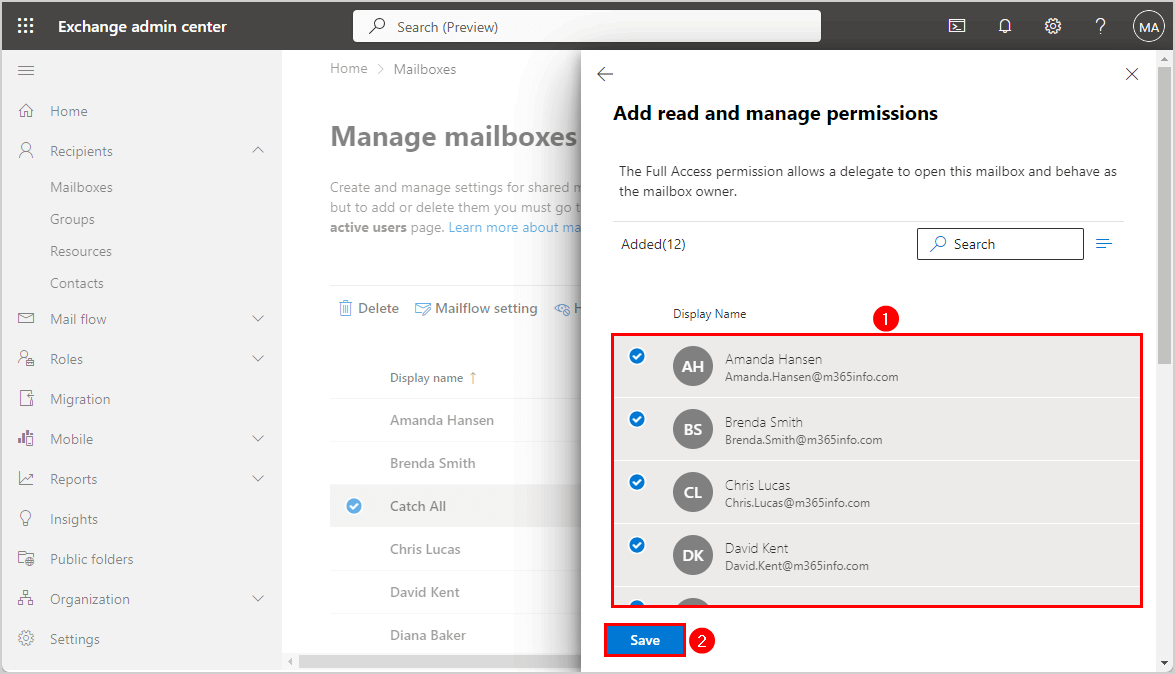
Select users
Click Save
Click Confirm
Close the pane
A notification will show that the mailbox permissions and selected users were added successfully. The changes are saved and will appear within minutes.
If you want to add Send as permission to users in the shared mailbox, you can follow the steps shown above.
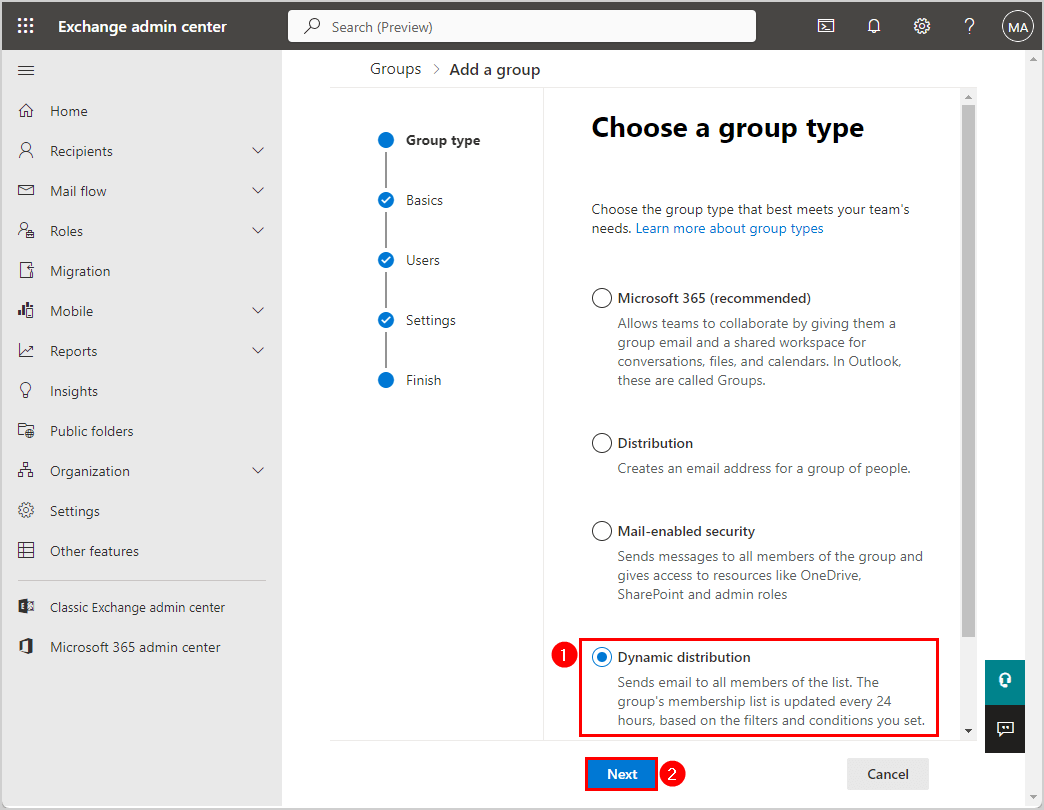
Step 2. Create dynamic distribution group
The next step is to create a dynamic distribution group including all the existing organization recipients. This is to let the catch all mailbox understand which email addresses already exist within the organization domain.
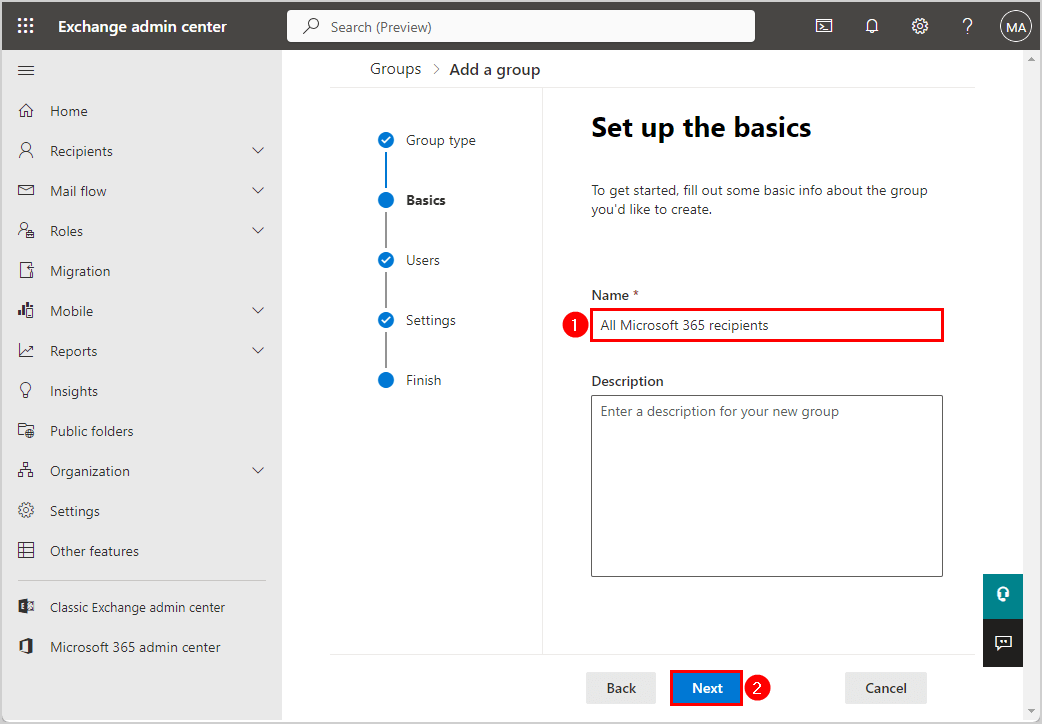
Fill in the Name, e.g., All Microsoft 365 recipients
Click Next
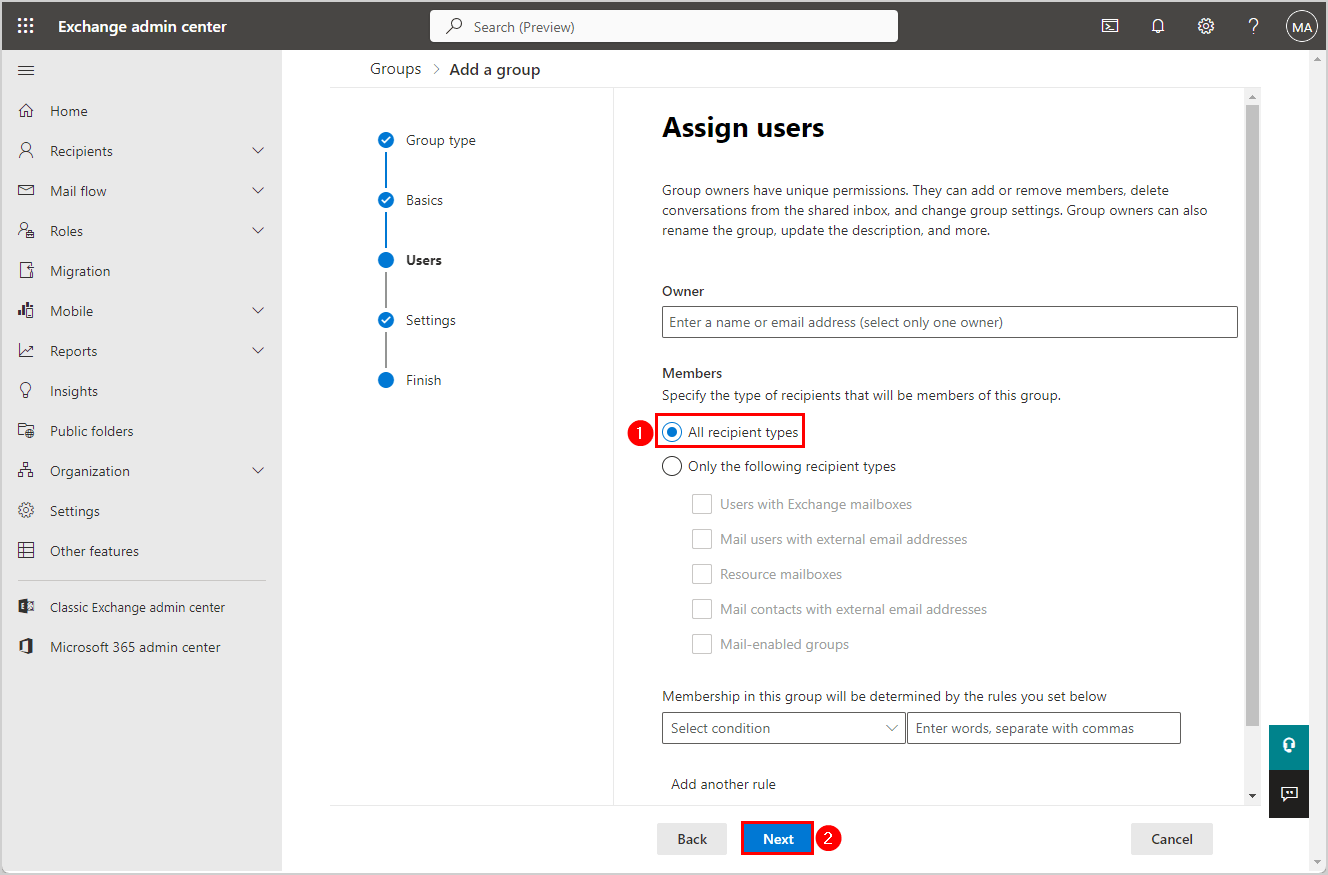
Assign users.
Select All recipient types
Click Next
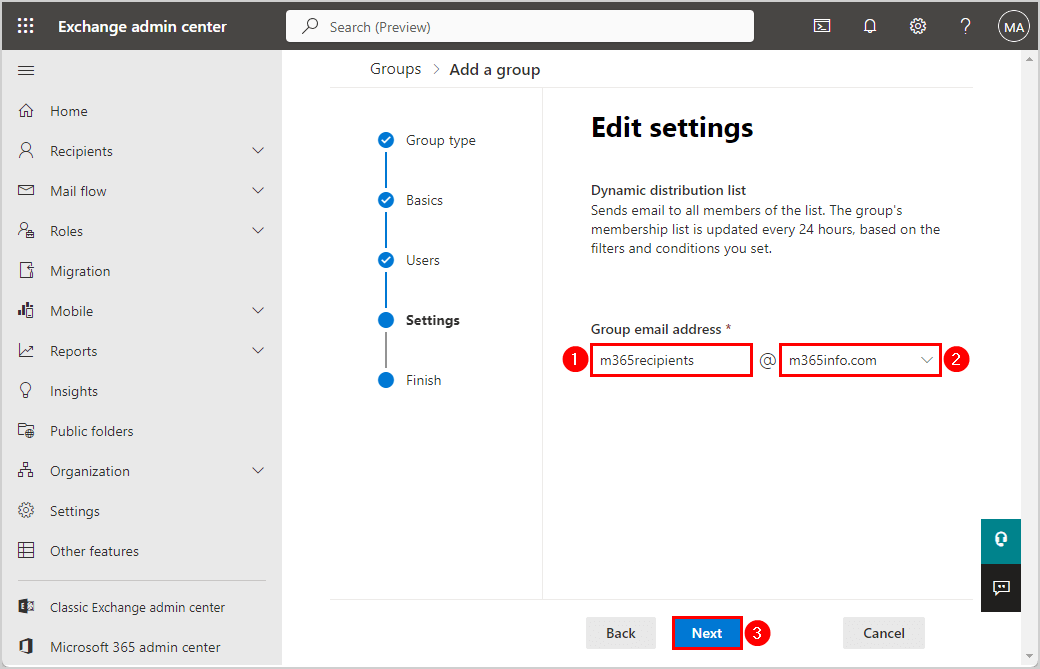
Edit settings.
Type the email address
Select the domain
Click Next
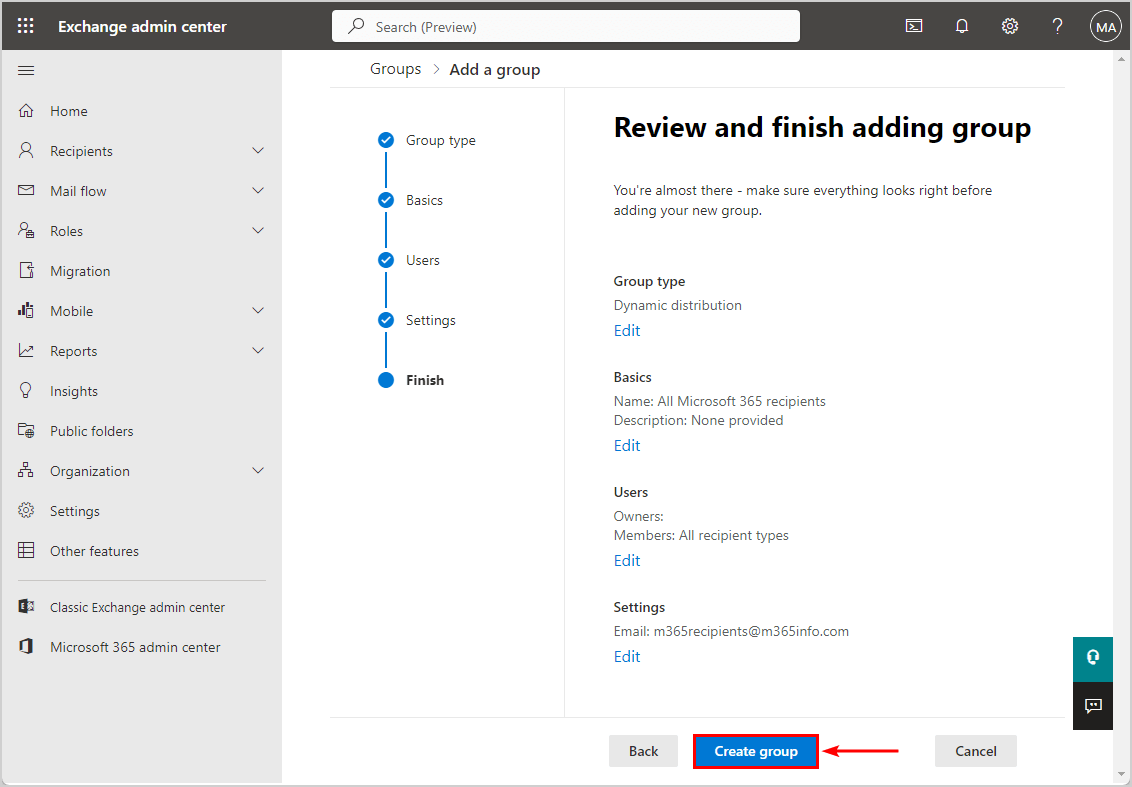
Review and finish adding the group.
Click Create group
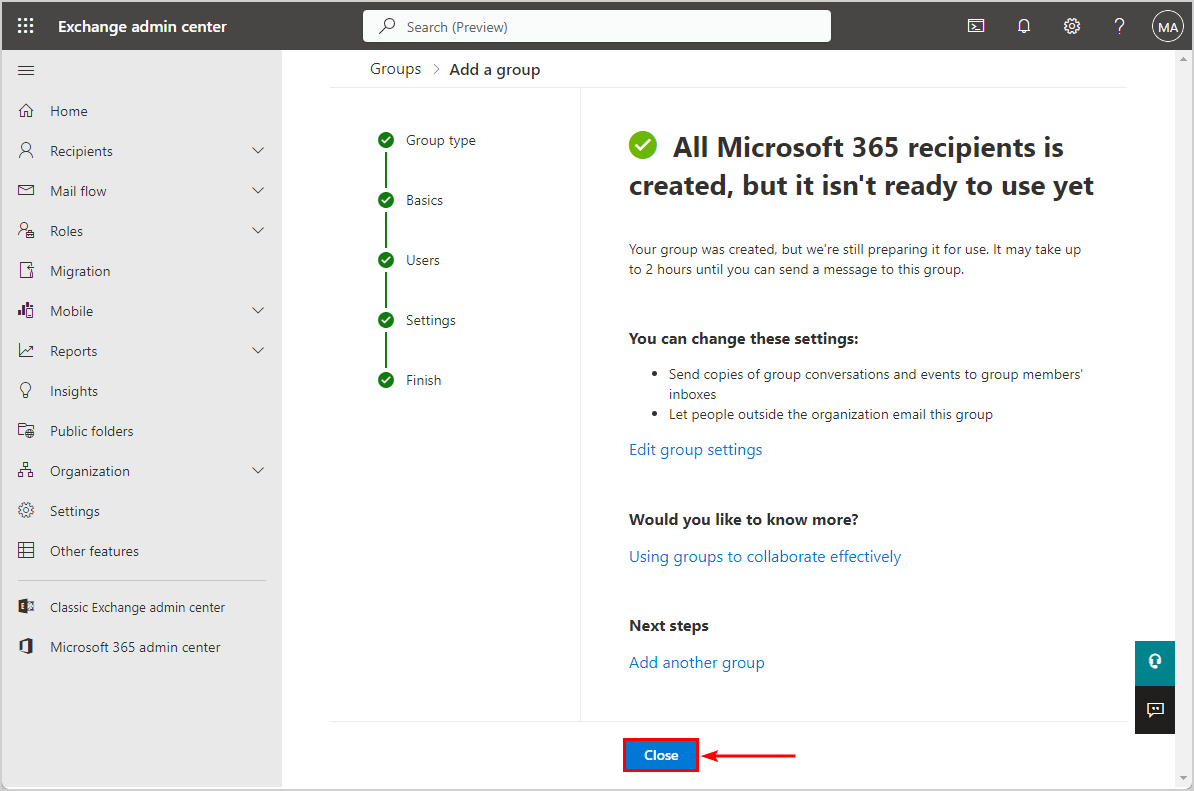
The group All Microsoft 365 recipients is created, but it isn’t ready to use yet.
Click Close
Note: It might take up to two hours to prepare the group for use.
Step 3. Convert domain to Internal Relay
Convert the accepted domain default settings from Authoritative to Internal Relay by following the steps below.
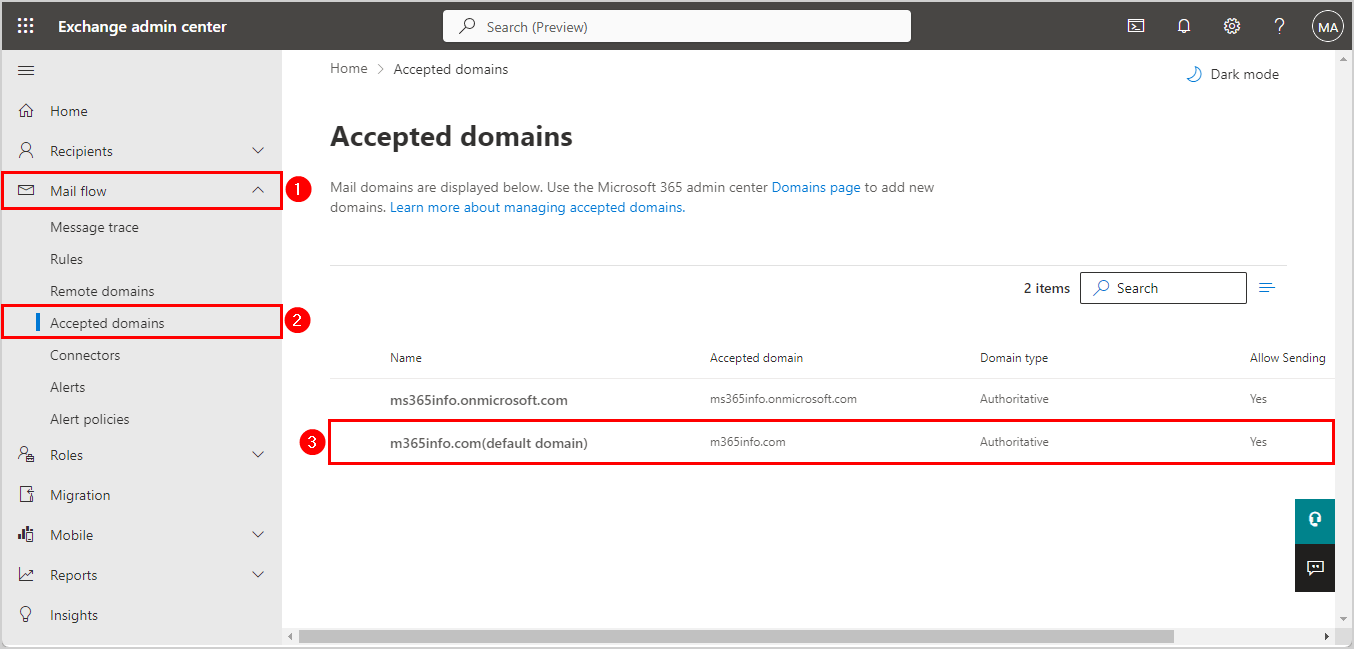
Go to the Exchange admin center
Click Mail flow > Accepted domains
Click on the default domain
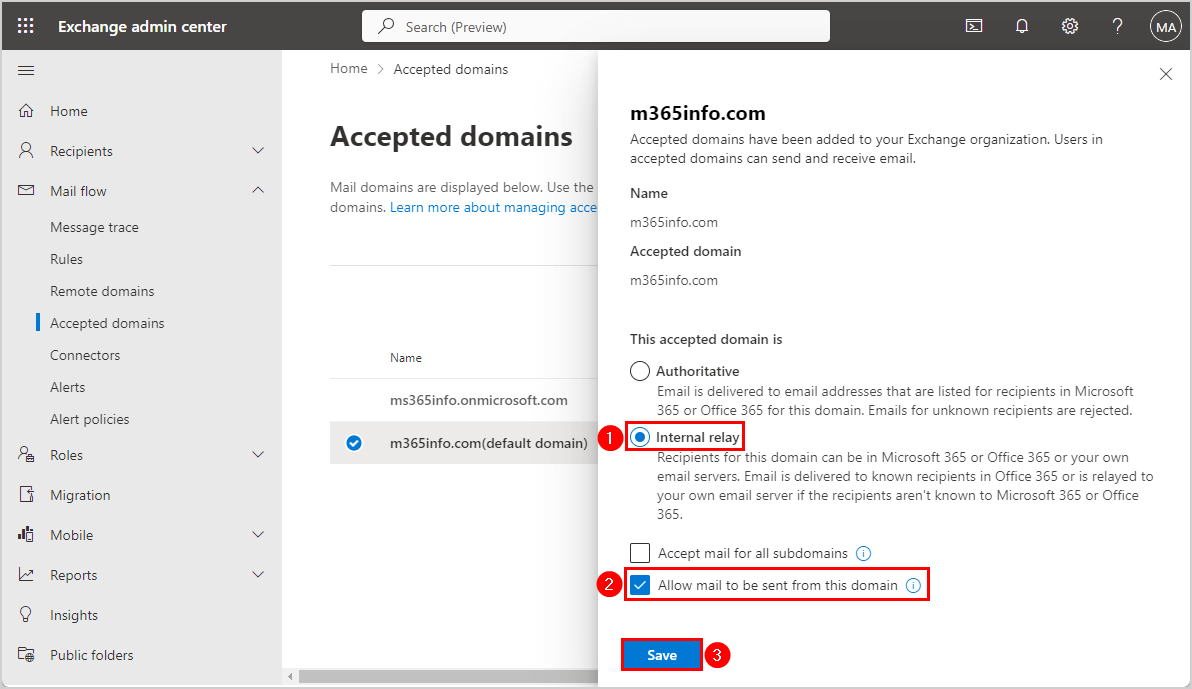
The accepted domain (m365info.com) pane opens.
Select Internal Relay
Select Allow mail to be sent from this domain
Click Save
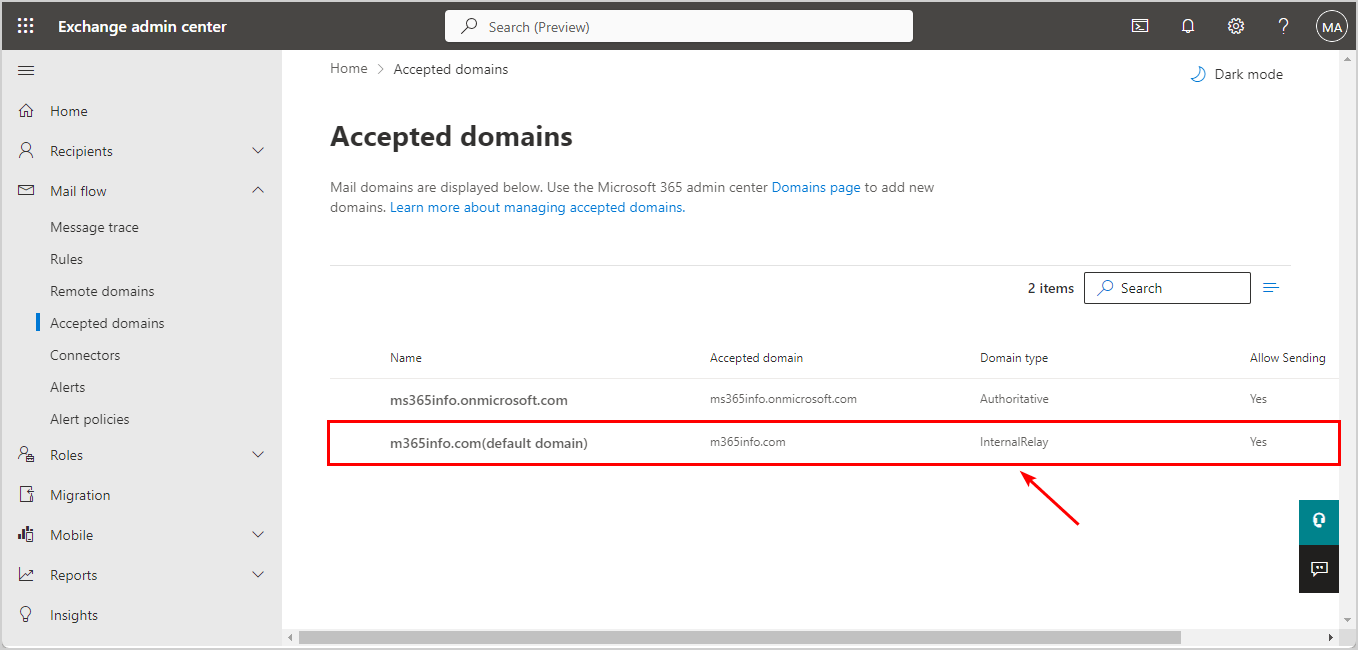
You can see that the accepted default domain type has changed to Internal Relay.
Note: An organization with multiple public domain names in Microsoft 365 will need to change the default settings from Authoritative to Internal Relay to each of the domains separately.
To configure the catch all mailbox, we need to create a new rule in the next step.
Step 4. Create mail flow transport rule
Time needed: 15 minutes.
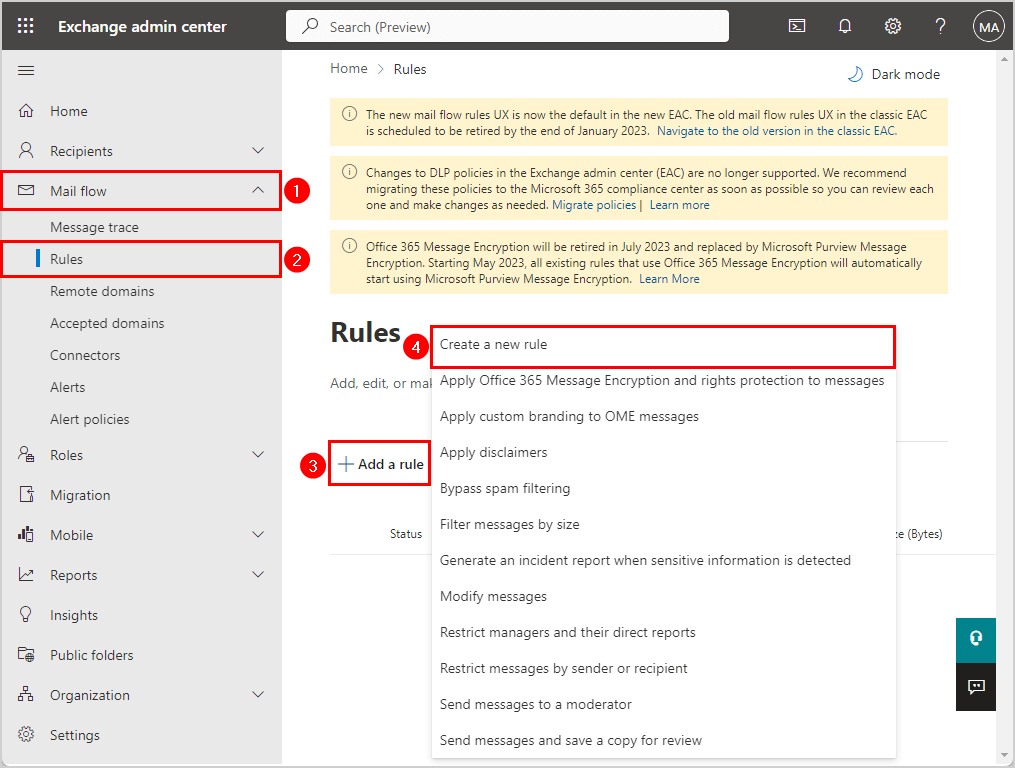
Create a new transport rule in Exchange admin center.
Click Mail flow > Rules Click Add a rule Select Create a new rule
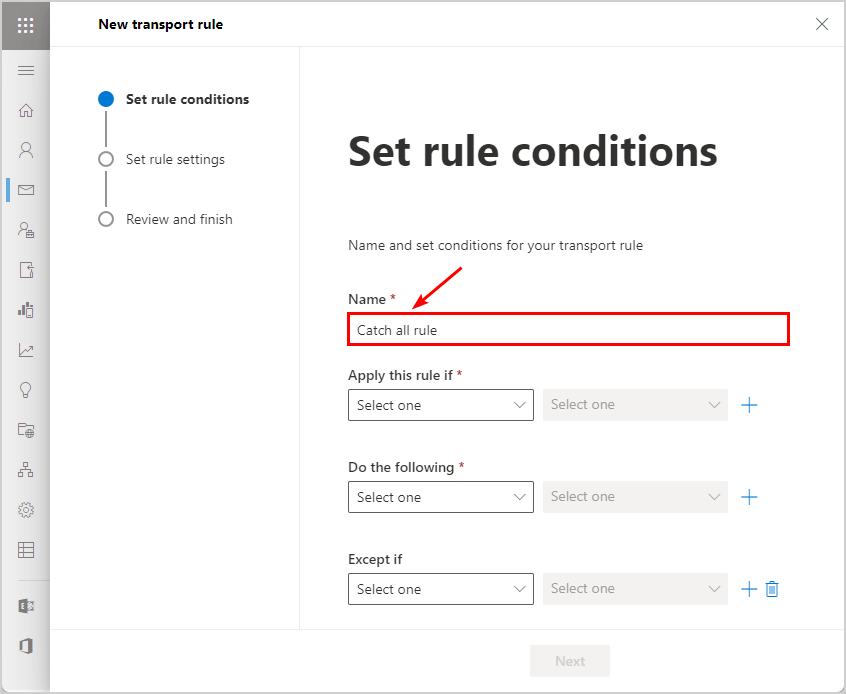
Set rule conditions
Type the name Catch all rule
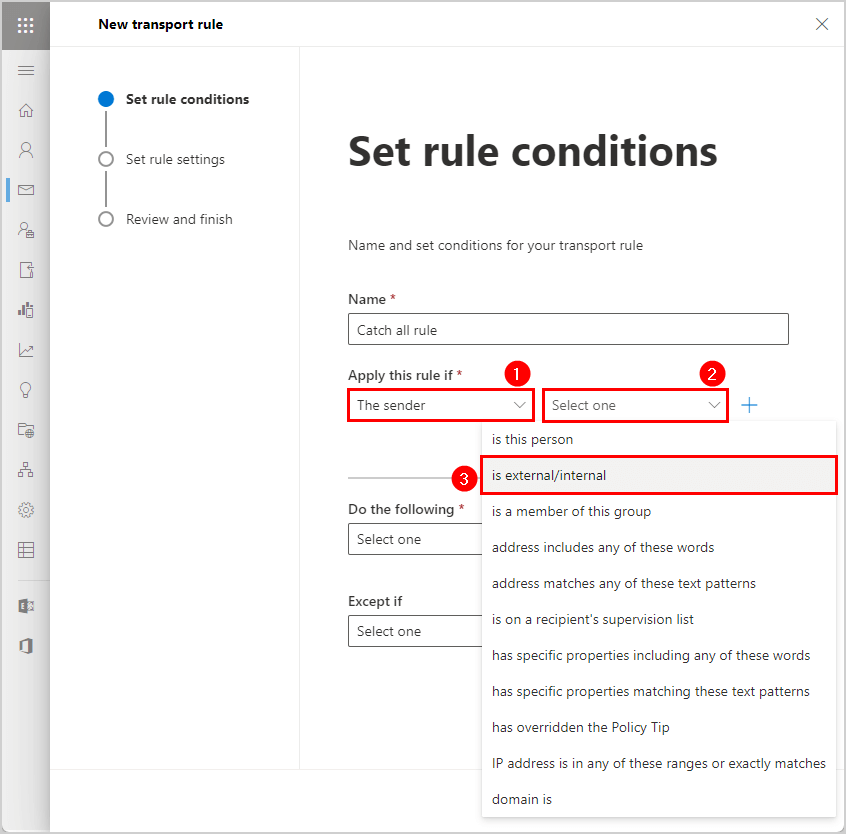
Apply this rule if
Select > The sender Select > is external/internal
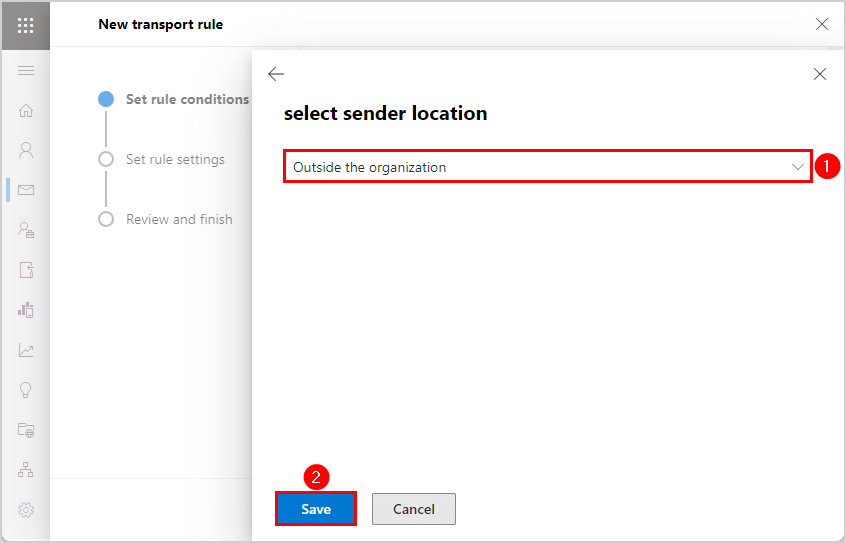
Select sender location
Select > Outside the organization Click Save
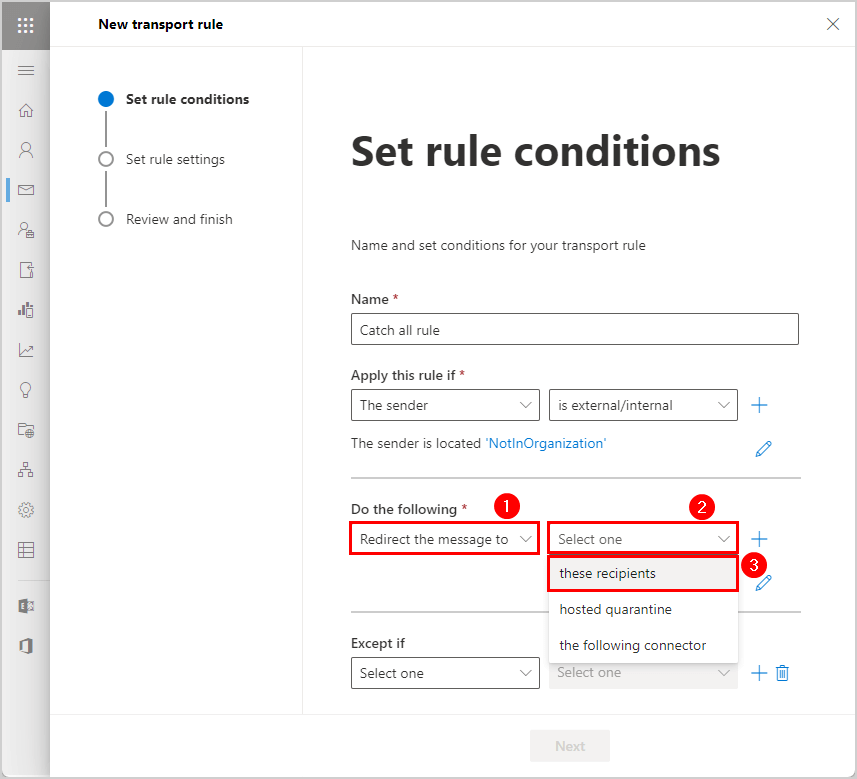
Do the following
Select > Redirect the message to Select > these recipients
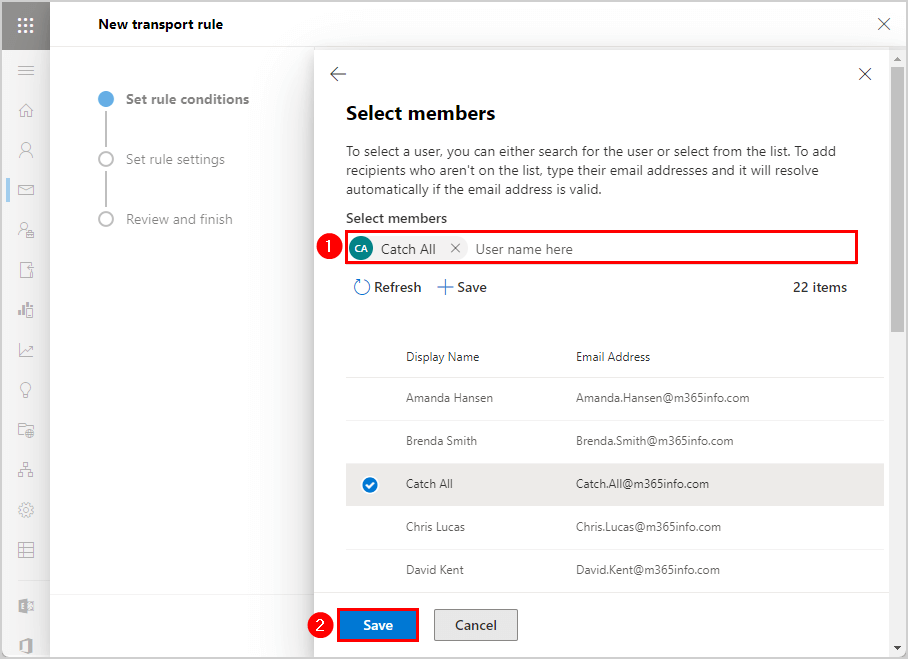
Select members
Search and select the created shared mailbox from the list Click Save
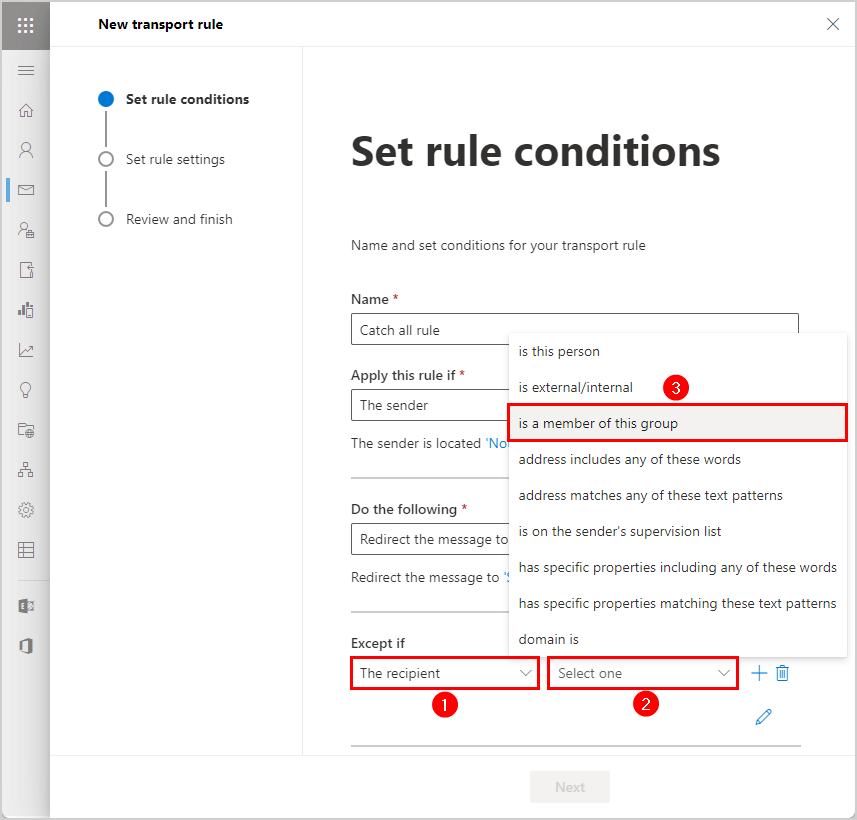
Except if
Select > The recipient Select > is a member of this group
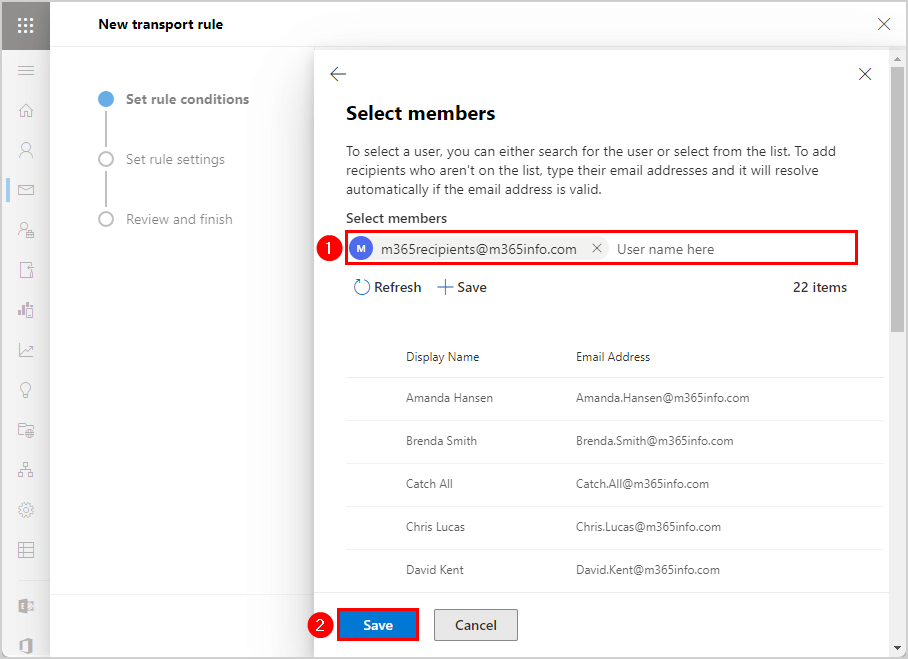
Select members
Select the created dynamic distribution group > All Microsoft 365 recipients Click Save
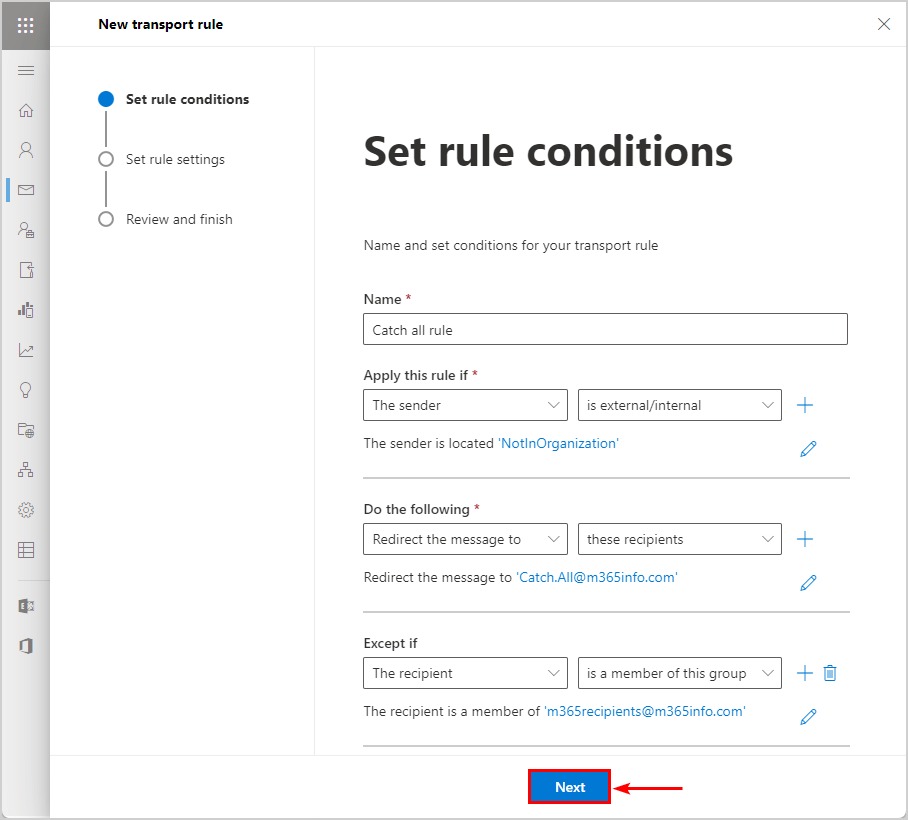
Name and set conditions for your transport rule results
Click Next
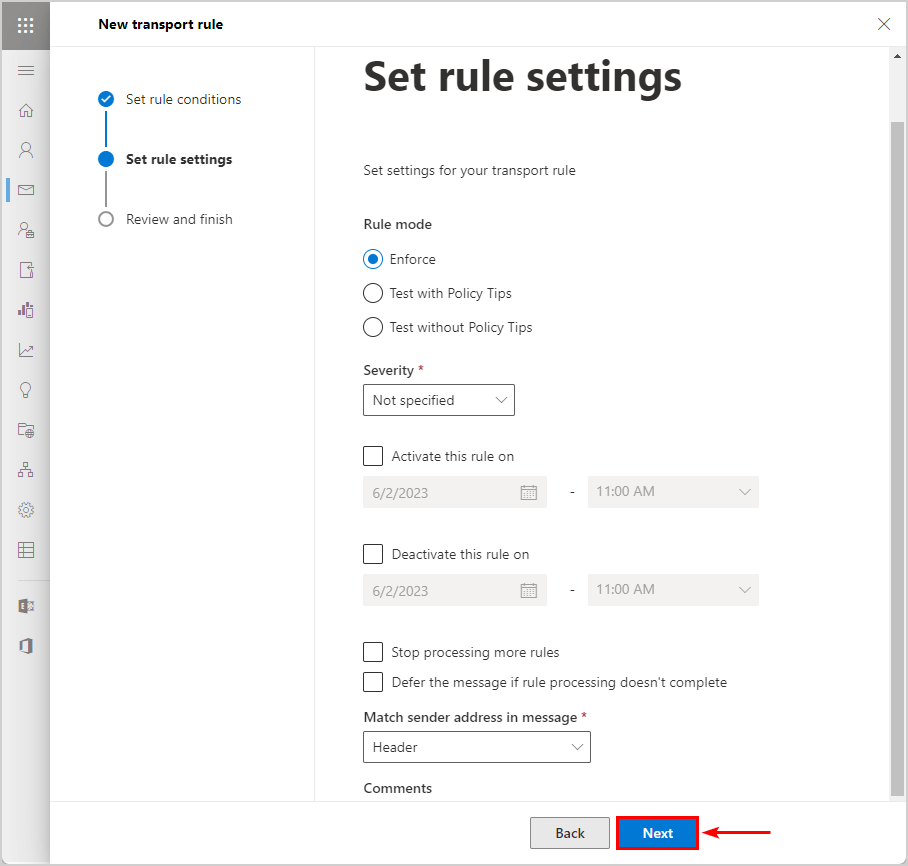
Set rule settings
Leave the default settings & click Next
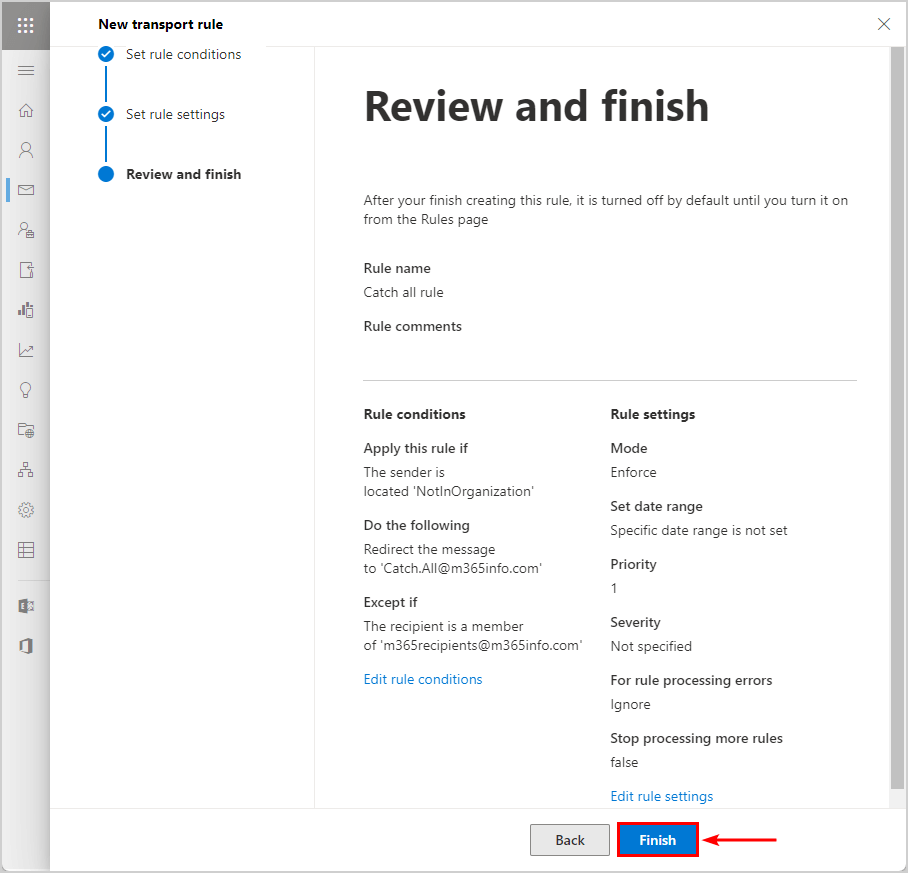
Review and finish
Click Finish
Transport rule created successfully
Click Done to close the pane
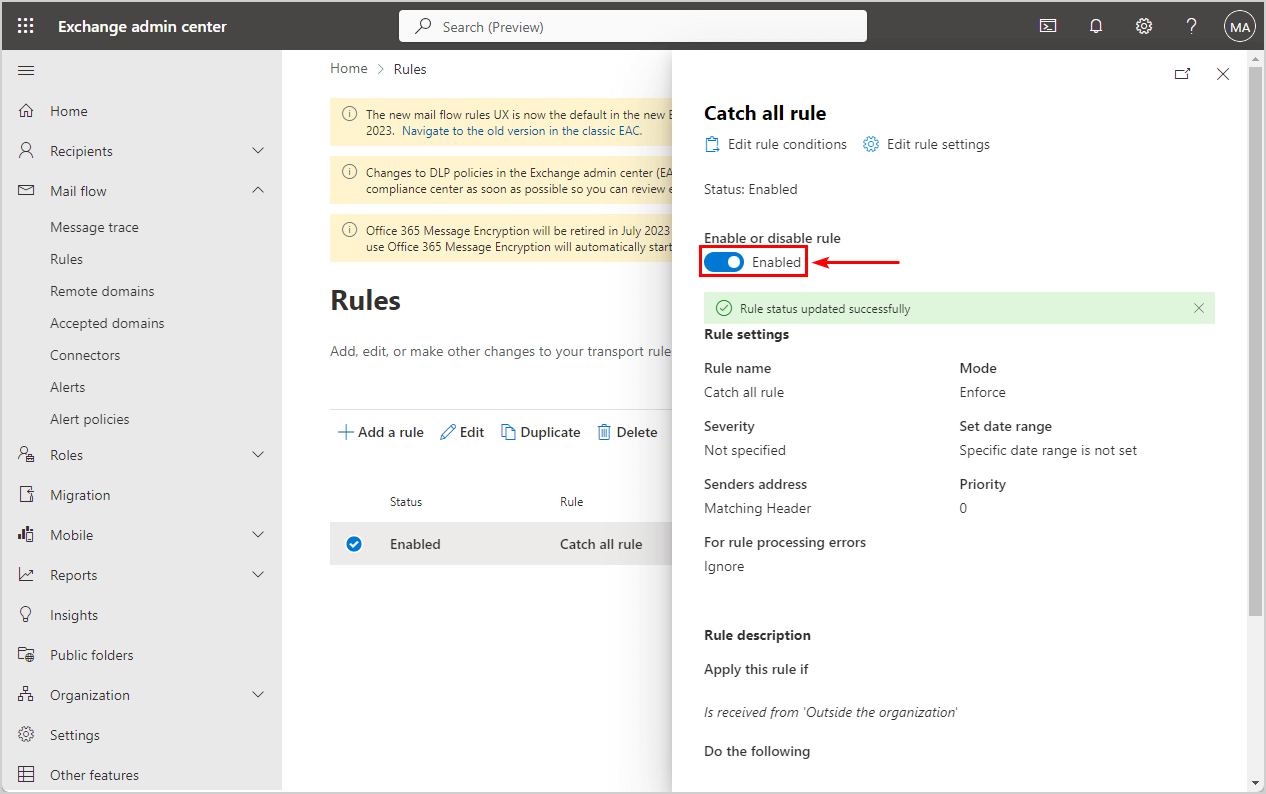
The transport rule is disabled by default. Therefore you must go to the Catch all rule you created. Select the new rule and set the toggle to Enabled. Wait a few minutes to update the changes.
You did configure the catch all mailbox rule, but we need to check if the catch all mailbox configuration works in the next step.
Verify catch all mailbox configuration
Email a non-existing recipient from the internal domain m365info.com.
Important: Give it 15 minutes before you test the Catch all mailbox rule, as it needs time to propagate the changes in the Exchange Online environment.
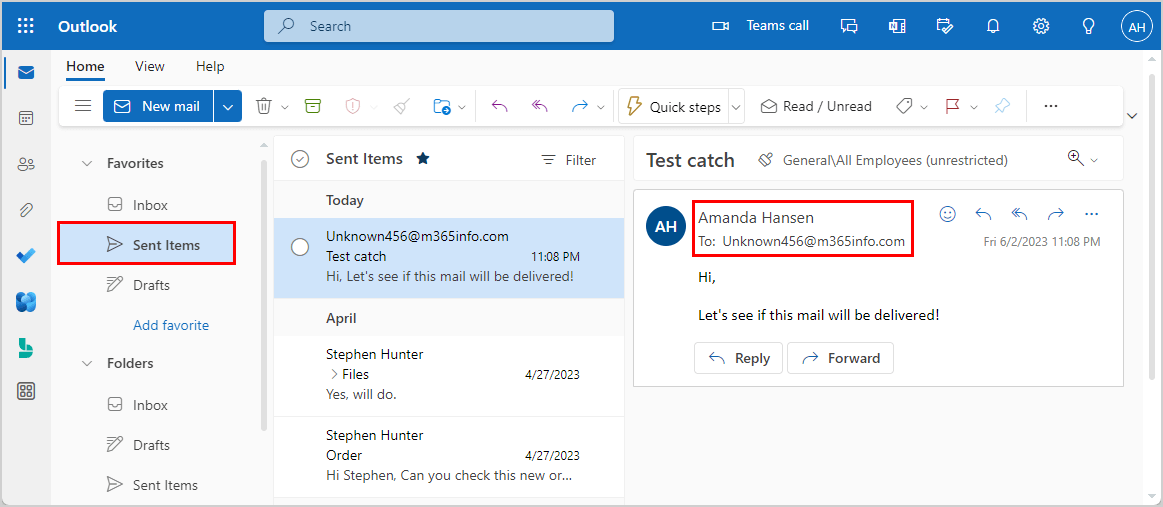
In our example, we will use Amanda’s (Amanda.Morgan@m365info.com) to send an email message to the following email address: Unknown456@m365info.com.
You can see the email Amanda sent to the non-existing recipient Unknown456@m365info.com, but it was redirected and delivered to the Catch All shared mailbox.
When we open the folder Catch All > Inbox, we see the email message was delivered. Even though the email address did not belong to anyone from the recipient list (GAL), the email message was sent with the help of the mail flow transport rule.
The below table shows where your email will be received if an internal (organization domain) or external (Hotmail, Gmail, or other domain) email address sends it.
From
To
Receive
Internal
Existing email address
Existing recipient
Internal
Non-existing email address
Catch all shared mailbox
External
Existing email address
Existing recipient
External
Non-existing email address
Catch all shared mailbox
You did successfully configure the catch all mailbox rule in Exchange admin center!
You learned how to configure a catch all mailbox for your organization in Exchange admin center. It solves the problem of missing important emails because of spelling errors. Remember that this is not a solution for every organization, as it can cause an increase in spam emails. But it’s an excellent way to control every message sent to the organization that didn’t reach the recipient’s mailbox.
After you set up a third-party spam filter in your organization or configure adjustments in Exchange Online, you want to check if the spam detection works. The best way to test your existing mail security infrastructure is to send spam mail and analyze the content. In this article, you will learn how to simulate spam mail.
In a modern mail environment, it is important to implement some security mechanism that will protect your mail infrastructure from spam mail and other threats.
Exchange Online Protection (EOP) is a cloud-based filtering service that protects your organization against spam, malware, and other email threats. EOP is included in all Microsoft 365 organizations with Exchange Online mailboxes.
If you want to implement a mail security gateway, you need to know if your mail security gateway is functioning correctly and what will happen otherwise.
So we will define a specific rule where our mail security gateway recognizes spam mail and sends a notification to a designated recipient.
How to simulate spam mail
We will show an example where user A (outside organization) sends a spam email message to recipient B (inside organization).
In our case, a user with a Gmail account will send spam mail to a recipient (Stephen.Hunter@m365info.com) in our organization.
Stephen has a user mailbox hosted in Microsoft 365 (Exchange Online server).
Note: To simulate the scenario of spam mail, the sender and the recipient must be recipients from different organizations. So you can’t test the spam mail option if the sender and the destination recipient belong to the same Microsoft 365 tenant, because the verification check is not implemented by the EOP server.
1. Send spam mail
You can easily create an email message that our system will identify as spam, and the implementation of simulating spam mail is straightforward.
All you need to do is create an email message that includes a predefined text string and send it to the destination recipient, which is protected by the mail security gateway.
The Apache SpamAssassin organization has developed a special procedure to implement this clever trick.
Send the email message to the recipient (Stephen.Hunter@m365info.com)
2. Receive spam mail
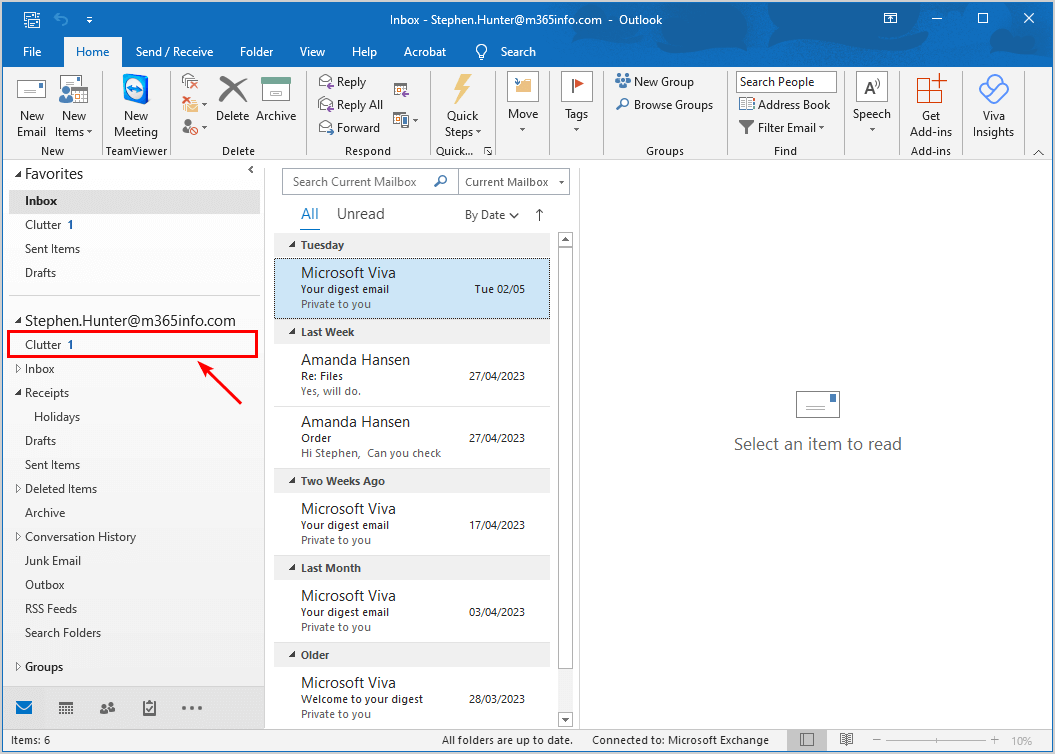
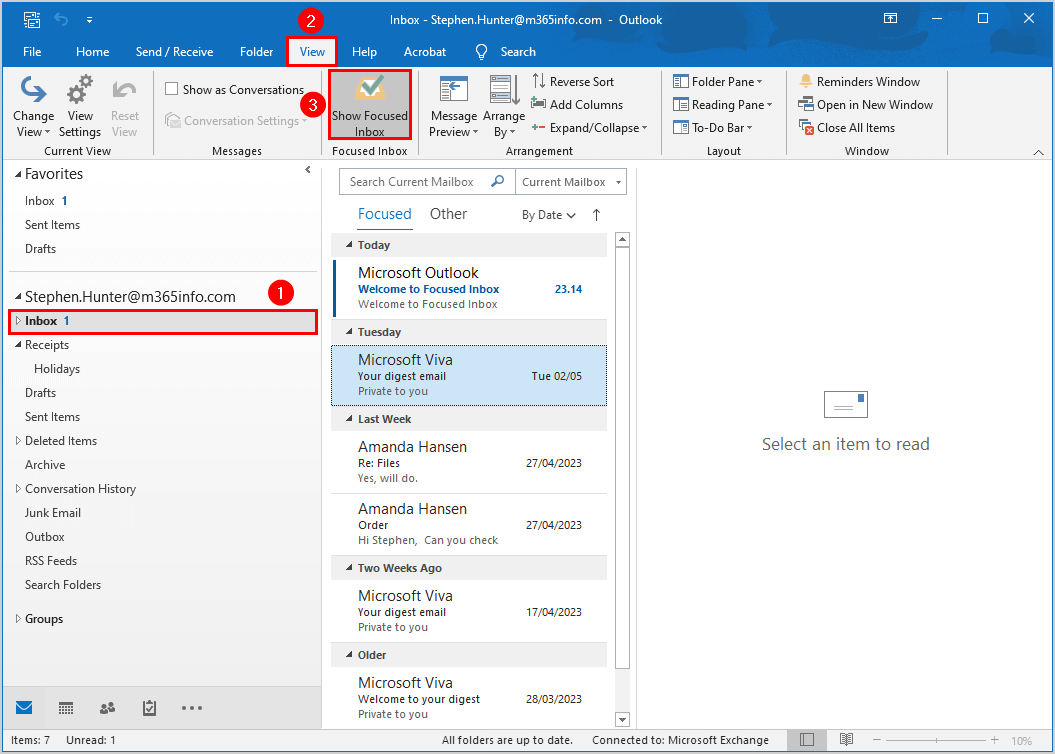
In the below picture, you can see the Outlook mail of Stephen.Hunter@m365info.com. When you open the Junk Email folder, you can find the email message you sent.
In a Microsoft 365 environment, the component that serves as a mail security gateway is the EOP (Exchange Online Protection) server. The EOP server examines and checks each email message sent to a Microsoft 365 recipient.
When the email message reaches the recipient’s mailbox, it will automatically be sent to the Junk Email folder because of the high value of the SCL.
3. View mail message header content
You need to understand how the Microsoft 365 EOP server stamps specific email messages as spam mail. In an Exchange based environment, the method for classifying email messages as spam is by defining a particular value in the SCL parameter.
EOP recognizes the text string in the email message and classifies the email message as spam mail by setting the value of the SCL (Spam Confidence Level).
See the below table that explains the SCL.
SCL
Definition
-1
Skipped spam filtering.
0, 1
Spam filtering determined the message wasn’t spam.
5, 6
Spam filtering marked the message as spam.
8, 9
Spam filtering marked the message as high confidence spam.
2, 3, 4, and 7
Not used by spam filtering.
When the email message reaches the recipient mailbox, because of the high value of the SCL, the mail will be sent to the Junk Email folder.
View the information of the mail header
To be able to see the information that is included in the email message, we will be using the OWA mail client. We will fetch the content of the mail header of the spam mail sent to Stephen.
Open the specific email message
Click on the three dots to open a selection pane
Select View > View message details
It shows the content of the specific mail header.
Select the content of the mail header
Copy the content by right-clicking and choose Copy (CTRL + C)
In the next step, we will use the copied content to analyze it.
4. Check with Microsoft Message Header Analyzer
We want to show how to use the Microsoft Message Header Analyzer for analyzing the mail header content. Of course, there are a couple of other free web-based tools that we can use to analyze a mail header.
In the below picture, you can see the different mail fields included within the mail header.
Go to the specific mail field header > Forefront Antispam Report Header
Look for the Spam Confidence Level
In this field, the Spam Confidence Level value of the email message is in our example 6. Indicating that the EOP (Exchange Online Protection) server has classified the email message as spam.
You learned how to simulate spam mail to test your organization’s spam filter. After you send and receive the spam mail, you can analyze it in the Microsoft Message Header Analyzer. The email message will display the Spam Confidence Level (SCL) classified as spam.
Did you enjoy this article? You may also like Reset MFA for Microsoft 365 user. Don’t forget to follow us and share this article.
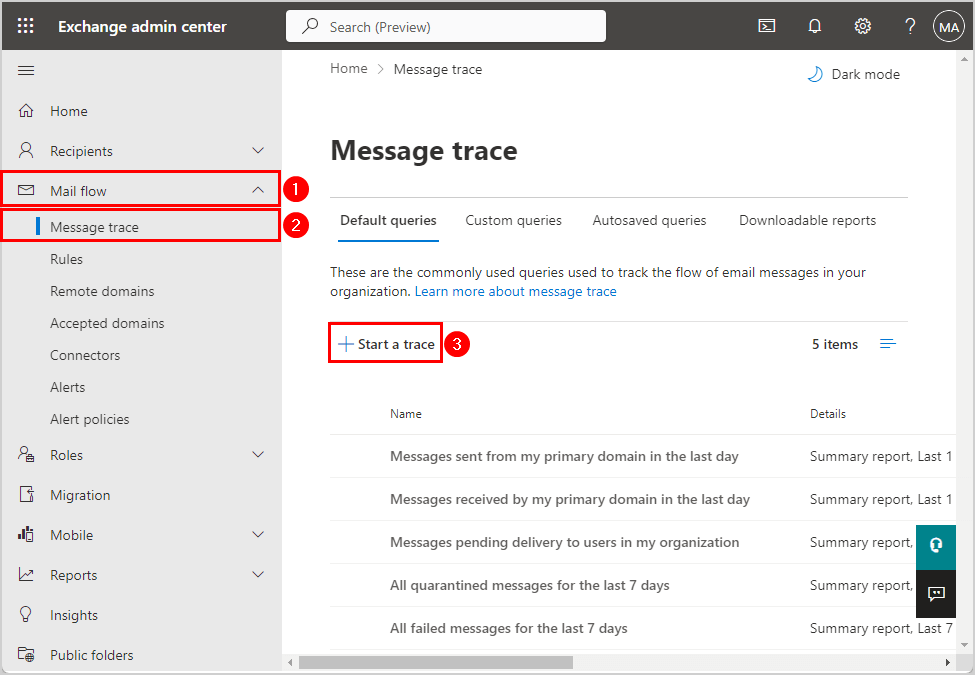
With the Get-MessageTrace PowerShell cmdlet, you can view information on each mail sent and received in Exchange Online in the last 10 days. You can also export information about all incoming and outgoing mails saved in Exchange Online. In this article, you will learn how to use the Exchange Online PowerShell Get-MessageTrace cmdlet.
In an Exchange Online (Microsoft 365) based environment, Exchange Online registers every incoming and outgoing mail.
There are two ways to view information on mail sent and received:
Exchange admin center
Exchange Online PowerShell
In this article, we will only use Exchange Online PowerShell and go through the PowerShell commands Get-MessageTrace and Get-MessageTraceDetail to query and export messages data.
Let’s start listing the advantages and disadvantages of the Get-MessageTrace PowerShell command.
Advantage:
To view and export information of Exchange Online messages.
Quickly and effectively retrieve information about messages registered in Exchange Online.
Disadvantages:
You can obtain information from the Exchange Online server within a maximum time range of 10 days. Exchange Online saves mail information for a period of 90 days, but you can’t fetch information that exceeds 10 days.
The information you can display on the PowerShell console or export to a file is very basic information that doesn’t include detailed information about the specific mail.
Note: Use the Get-MessageTraceDetail PowerShell cmdlet to get additional information for the last 10 days. However, the information is still basic, and the results are returned less quickly.
If you require information about a mail older than 10 days, use the PowerShell command Get-HistoricalSearch. Especially when searching for detailed information about a specific mail registered in Exchange Online.
The Get-MessageTrace PowerShell cmdlet can trace messages in Exchange Online.
The date range is an essential component when using the Get-MessageTrace PowerShell cmdlet. We will also show various types of examples to the user of Get-MessageTrace with different parameters and filters such as sender, recipient, subject, IP address, and more.
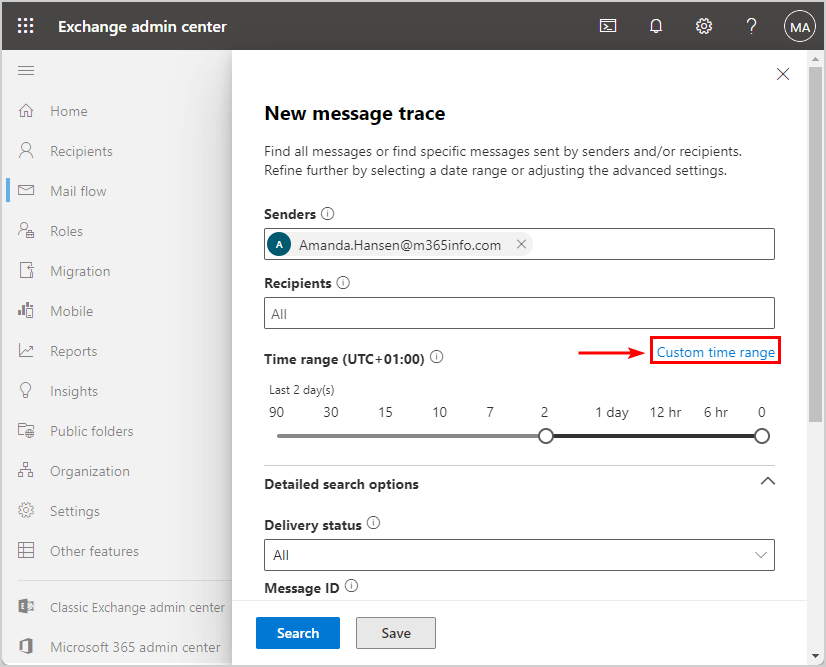
Date range
The most essential building block is the date range. Therefore it’s best to use a PowerShell parameter that defines the date range.
Note: When using the Get-MessageTrace command, you can only get data from the last 48 hours by default.
These PowerShell parameters define the required date range:
StartDate
EndDate
After we provide the information about the required date range, we can add additional blocks that help us to filter or narrow the search results.
We will show you some examples to narrow the search results:
Get information about mails related to emails sent from a specific sender or to a specific recipient.
Get information about mails related to emails with a specific subject or a specific status.
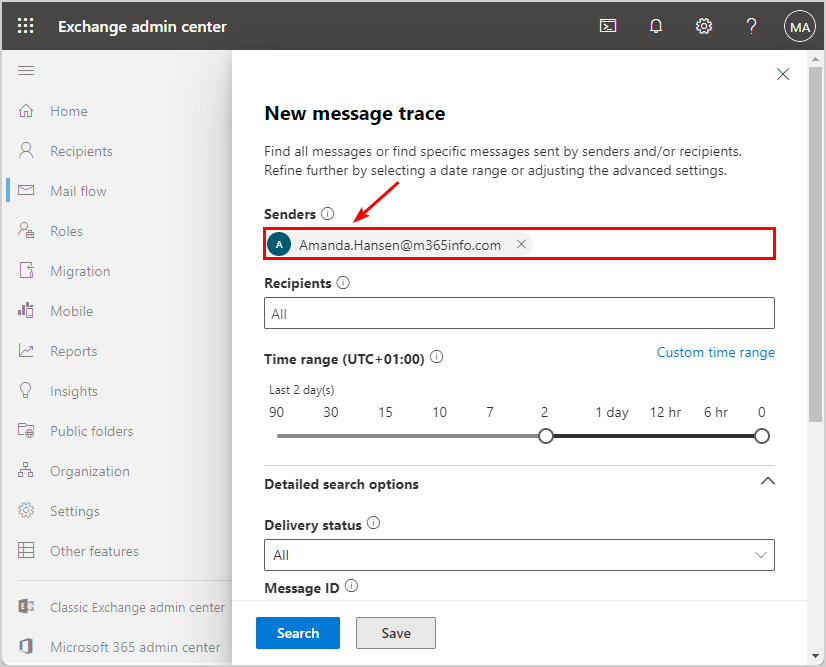
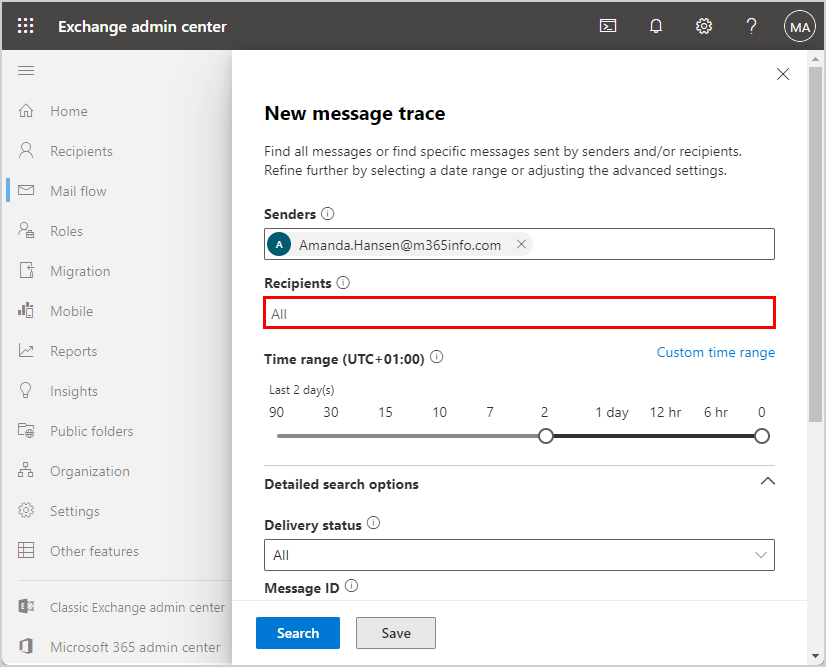
Sender vs. Recipient
In many scenarios, we filter or narrow the Get-MessageTrace PowerShell command result by adding filter parameters.
The filter parameters sender and recipient can be confusing, so it’s important to clarify the meaning of these terms.
Sender: The person that sends the email message.
Recipient: The person that receives the email message. It is related to the destination entity to which the email was sent.
The below picture shows an example of when Bob sends an email to Adele. Bob is defined as the sender (SenderAddress), and Adele is the recipient (RecipientAddress).
If you want to get information about all the available PowerShell parameters when using the Get-MessageTrace cmdlet, you can use the Get-Member PowerShell command in the next step.
Use Get-MessageTrace PowerShell command
Run the below PowerShell command example.
Get-MessageTrace | Get-Member
You will get the below PowerShell output example. Look at the different parameters listed under Name.
Run the PowerShell cmdlet Get-MessageTrace without parameters to show data from the last 48 hours.
Get-MessageTrace
PowerShell output result.
PS C:\> Get-MessageTrace
Received Sender Address Recipient Address Subject Status
-------- -------------- ----------------- ------- ------
15/06/2023 19.45.30 Stephen.Hunter@m365info.com amanda.hansen@m365info.com RE: مرحبا كيف حالك Delivered
15/06/2023 19.42.43 Amanda.Hansen@m365info.com stephen.hunter@m365info.com مرحبا كيف حالك Delivered
15/06/2023 11.54.24 info4@dienglg.top stephen.hunter@m365info.com If you need paper notebook,Im here for you FilteredAsSpam
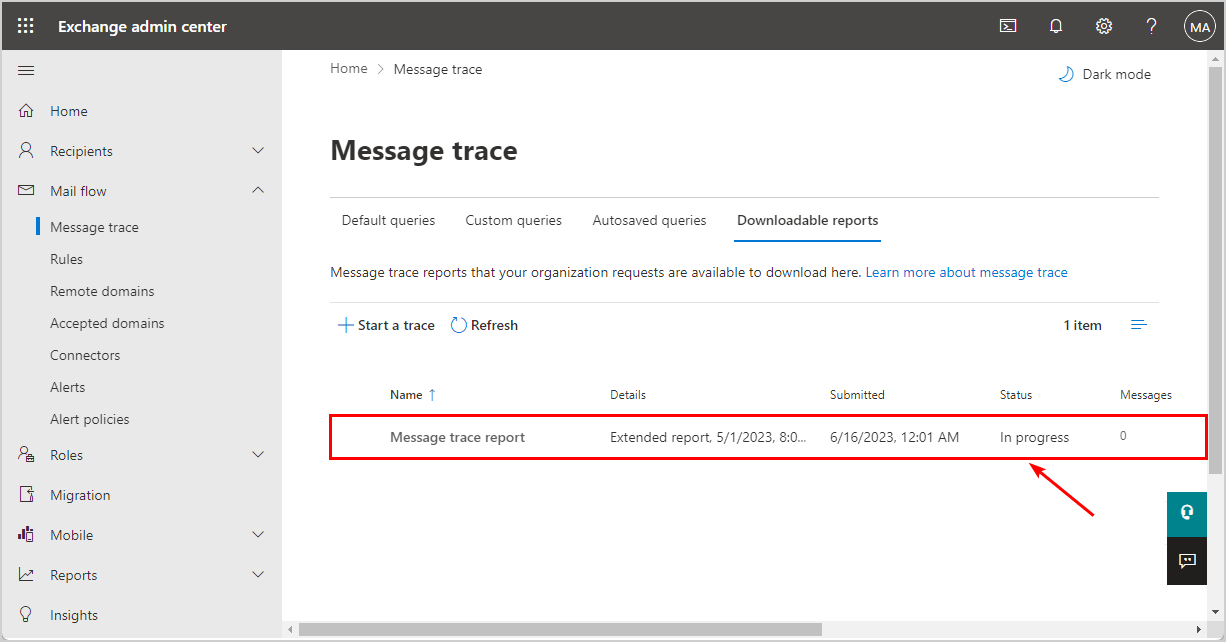
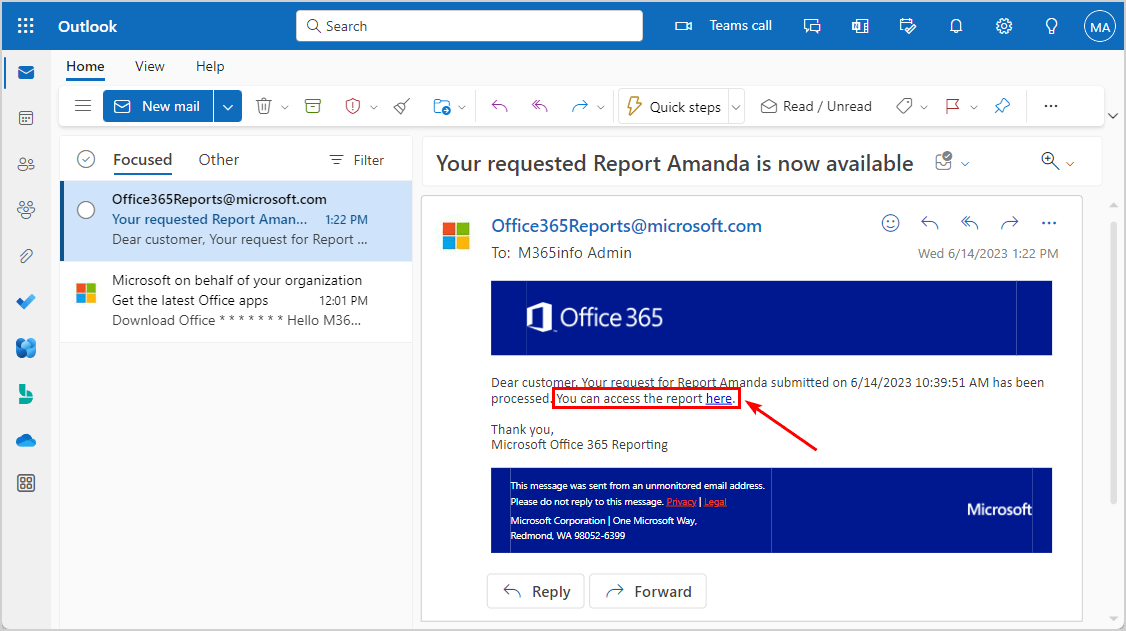
14/06/2023 11.22.44 Office365Reports@microsoft.com msadmin@m365info.com Your requested Report Amanda is now available Delivered
14/06/2023 10.01.30 ms-noreply@microsoft.com msadmin@m365info.com Get the latest Office apps Delivered
14/06/2023 08.56.40 postmaster@m365info.com office365reports@microsoft.com Undeliverable: Your requested Message trace report - 2023-06-14T08:25:07.136Z is now available Failed
14/06/2023 08.56.39 Office365Reports@microsoft.com msadmin@m365info.com Your requested Message trace report - 2023-06-14T08:25:07.136Z is now available Failed
14/06/2023 01.57.05 beata@defenderarchitect.com stephen.hunter@m365info.com Test your Junk mail! FilteredAsSpam
To get the data of the last 10 days, proceed to the next step.
Set specific date range
As mentioned, the most basic building block when using the Get-MessageTrace command is the required date range.
The date range is the space between the start date and the end date.
If you type a start date older than 10 days from today or a date range greater than 10 days, you will get the following error.
PS C:\> Get-MessageTrace -StartDate "05/01/2023" -EndDate "05/10/2023"
Write-ErrorMessage : |Microsoft.Exchange.Management.Tasks.ValidationException|Invalid
StartDate value. The StartDate can't be older than 10 days from today.
At C:\AppData\Local\Temp\tmpEXO_ewmxedgo.0pb\tmpEXO_ewmxedgo.0pb.psm1:1120
char:13
+             Write-ErrorMessage $ErrorObject
+             ~~~~~~~~~~~~~~~~~~~~~~~~~~~~~~~
    + CategoryInfo          : InvalidArgument: (:) [Get-MessageTrace], ValidationException
    + FullyQualifiedErrorId : [Server=DB9PR02MB7211,RequestId=60294da4-119d-8a23-c31c-d9a9895
   70a3a,TimeStamp=Wed, 07 Jun 2023 20:28:34 GMT],Write-ErrorMessage
Note: You will get an error if the StartDate is older than 10 days from today. Also, the date range between the StartDate and EndDate may not exceed 10 days.
When using the Get-MessageTrace command, there are two major syntax methods that we can use for defining the date range.
Manually type the specific dates (Start-Date and End-Date) in the format month, day, and year (mm/dd/yyyy).
Or use the PowerShell cmdlet Get-Date.
The second method which we prefer to use is the PowerShell function Get-Date.
As the name implies, the Get-Date PowerShell cmdlet will fetch the information about the current date and time. The information includes the second, minute, hour, day, month, and year.
When using the Get-MessageTrace cmdlet, the Get-Date PowerShell function defines the End-Date. You can define the Start-Date by using time units such as AddHours or AddDays and subtracting them from the current date.
In the following example, we define a date range of 10 days using the time unit AddDays and the value (-10).
This syntax tells PowerShell that we want to define a date calculated by subtracting 10 days from the current time we get from the Get-Date PowerShell cmdlet.
Get-MessageTrace data in specific date range
Get information about sent or received emails in a specific date range. Specify the dates by manually typing the StartDate and EndDate.
PS C:\2> Get-MessageTrace -StartDate 06/05/2023 -EndDate 06/10/2023

Received            Sender Address                             Recipient Address           Subject                                                                      Status
--------            --------------                             -----------------           -------                                                                      ------
09/06/2023 10.13.47 susanbernard@gmail.com                     amanda.hansen@m365info.com  This is a test                                                               Delivered
09/06/2023 10.04.16 susanbernard@gmail.com                     stephen.hunter@m365info.com Re: Test                                                                     Delivered
09/06/2023 10.01.37 Stephen.Hunter@m365info.com                susanbernard@gmail.com      Test                                                                         Delivered
09/06/2023 09.58.06 Amanda.Hansen@m365info.com                 stephen.hunter@m365info.com RE: Available                                                                Delivered
09/06/2023 09.56.06 Stephen.Hunter@m365info.com                amanda.hansen@m365info.com  Available                                                                    Delivered
07/06/2023 21.15.32 6157142326@pcdcva.onmicrosoft.com          projectpool11@m365info.com  All parties have Completed: Please DocuSign`M365info                         FilteredAsSpam
07/06/2023 12.32.00 631752352@pcdcva.onmicrosoft.com           chris.lucas@m365info.com    All parties have Completed: Please DocuSign:`chris.lucas@m365info.com        FilteredAsSpam
07/06/2023 06.55.21 6556232315@pcdcva.onmicrosoft.com          amanda.hansen@m365info.com  All parties have Completed: Please DocuSign: M365info`                       FilteredAsSpam
06/06/2023 21.30.03 6296142354@netorgft3171689.onmicrosoft.com projector8@m365info.com     Approved: Completed: Please DocuSign: M365info`                              FilteredAsSpam
06/06/2023 20.34.22 susanbernard@gmail.com                     stephen.hunter@m365info.com Test your Junk mail!                                                         FilteredAsSpam
06/06/2023 20.25.41 susanbernard@gmail.com                     stephen.hunter@m365info.com Just a test!                                                                 Delivered
06/06/2023 19.22.32 6226122326@netorgft3171689.onmicrosoft.com diana.baker@m365info.com    Completed: Please DocuSign - M365info 06/06/2023 12:22`                      FilteredAsSpam
05/06/2023 17.36.04 juliannaroland73@gmail.com                 kellytest@m365info.com      Good Day Beloved,                                                            FilteredAsSpam
05/06/2023 14.29.22 629572315@netorgft3171689.onmicrosoft.com  chris.lucas@m365info.com    Your document has been Completed: Please DocuSign: chris.lucas@m365info.com` FilteredAsSpam
Note: The time zone in Microsoft will be in Universal Time Coordinated (UTC). For example, the Central Standard Time (CST) is 5 hours behind UTC. So if an email were sent at 8:00 AM CST, it would show up as 13:00 PM. To ensure getting all messages of a specific date range with message trace, add or subtract the hours, depending on varying time zones of the Exchange server location and the user’s mailbox.
Next, we would like to show examples where we use the Get-Date PowerShell cmdlet as a baseline and add PowerShell time units such as AddHours, AddDays, and AddMinutes.
Get-MessageTrace data in last x minutes
Get information about sent and received emails in the last x minutes. We will show you an example of all Exchange email messages sent and received in the last 30 minutes.
It will get Exchange Online mail information for the last 30 minutes.
PowerShell output example.
PS C:\> Get-MessageTrace -StartDate (Get-Date).AddMinutes(-30) -EndDate (Get-Date)

Received            Sender Address              Recipient Address           Subject          Status
--------            --------------              -----------------           -------          ------
15/06/2023 19.45.30 Stephen.Hunter@m365info.com amanda.hansen@m365info.com  RE: مرحبا كيف حالك  Delivered
15/06/2023 19.42.43 Amanda.Hansen@m365info.com  stephen.hunter@m365info.com مرحبا كيف حالك      Delivered
Note: You may not exceed the time limit of 10 days. An error occurs when you type the number 15840 and above for AddMinutes.
Get-MessageTrace data in last x hours
Get information about sent and received emails in the last x hours. The example will display all Exchange email messages sent and received in the last 30 hours.
It will get Exchange Online mail information for the last 30 hours.
Powershell output example:
PS C:\> Get-MessageTrace -StartDate (Get-Date).AddHours(-30) -EndDate (Get-Date)

Received            Sender Address              Recipient Address           Subject                                     Status
--------            --------------              -----------------           -------                                     ------
15/06/2023 19.45.30 Stephen.Hunter@m365info.com amanda.hansen@m365info.com  RE: مرحبا كيف حالك                             Delivered
15/06/2023 19.42.43 Amanda.Hansen@m365info.com  stephen.hunter@m365info.com مرحبا كيف حالك                                 Delivered
15/06/2023 11.54.24 info4@dienglg.top           stephen.hunter@m365info.com If you need paper notebook,Im here for you  FilteredAsSpam
Note: You can’t exceed the time limit of 10 days, or you will get an error. Keep the number of Addhours below 264.
Get-MessageTrace data in the x days
Get information about sent and received emails in the last x days. You can display all Exchange email messages sent and received up to the last 10 days.
Note: Remember that you can’t exceed the time limit of maximum 10 days.
Date range using variables
If you want to avoid typing long and complex date values, you can use a method where you define the date range using variables.
The variables we define will contain the required date range. The Get-MessageTrace cmdlet defines the date range by using the variables defined in the previous step.
PS C:\> $DateEnd = Get-Date
$DateStart = $DateEnd.AddHours(-30)
Get-MessageTrace -StartDate $DateStart -EndDate $DateEnd

Received            Sender Address              Recipient Address           Subject                                     Status
--------            --------------              -----------------           -------                                     ------
15/06/2023 19.45.30 Stephen.Hunter@m365info.com amanda.hansen@m365info.com  RE: مرحبا كيف حالك                             Delivered
15/06/2023 19.42.43 Amanda.Hansen@m365info.com  stephen.hunter@m365info.com مرحبا كيف حالك                                 Delivered
15/06/2023 11.54.24 info4@dienglg.top           stephen.hunter@m365info.com If you need paper notebook,Im here for you  FilteredAsSpam
Get-MessageTrace clean results
When we use the Get-MessageTrace PowerShell cmdlet in Exchange Online without a specific filter, the output includes unnecessary information about systems and internal Exchange Online mail messages.
In the following example, we can see information about system emails irrelevant to our search.
PowerShell output example.
PS C:\> Get-MessageTrace -StartDate (Get-Date).AddDays(-5) -EndDate (Get-Date)
Received Sender Address Recipient Address Subject Status
-------- -------------- ----------------- ------- ------
15/06/2023 19.45.30 Stephen.Hunter@m365info.com amanda.hansen@m365info.com RE: مرحبا كيف حالك Delivered
15/06/2023 19.42.43 Amanda.Hansen@m365info.com stephen.hunter@m365info.com مرحبا كيف حالك Delivered
15/06/2023 11.54.24 info4@dienglg.top stephen.hunter@m365info.com If you need paper notebook,Im here for you FilteredAsSpam
14/06/2023 11.22.44 Office365Reports@microsoft.com msadmin@m365info.com Your requested Report Amanda is now available Delivered
14/06/2023 10.01.30 ms-noreply@microsoft.com msadmin@m365info.com Get the latest Office apps Delivered
14/06/2023 08.56.40 postmaster@m365info.com office365reports@microsoft.com Undeliverable: Your requested Message trace report - 2023-06-14T08:25:07.136Z is now available Failed
14/06/2023 08.56.39 Office365Reports@microsoft.com msadmin@m365info.com Your requested Message trace report - 2023-06-14T08:25:07.136Z is now available Failed
14/06/2023 01.57.05 beata@defenderarchitect.com stephen.hunter@m365info.com Test your Junk mail! FilteredAsSpam
13/06/2023 07.22.03 info8@dupiist.top stephen.hunter@m365info.com Professional Notebook manufacturer in China Delivered
12/06/2023 20.08.19 ocampofer18@gmail.com stephen.hunter@m365info.com Prueba FilteredAsSpam
12/06/2023 14.24.28 ryan.przybyl@hds-rx.com stephen.hunter@m365info.com spam filter test FilteredAsSpam
Suppose we want to clean the search result by removing the information about the system emails. In that case, we will add filters that will ignore specific emails.
In our example, we want to remove all the Sender Address emails with the word *microsoft.com* or a word that ends with *top.
PowerShell output example.
PS C:\> Get-MessageTrace -StartDate (Get-Date).AddDays(-5) -EndDate (Get-Date) | Where {$_.SenderAddress -notlike '*microsoft.com*' -and $_.SenderAddress -notlike '*top' }
Received Sender Address Recipient Address Subject Status
-------- -------------- ----------------- ------- ------
15/06/2023 19.45.30 Stephen.Hunter@m365info.com amanda.hansen@m365info.com RE: مرحبا كيف حالك Delivered
15/06/2023 19.42.43 Amanda.Hansen@m365info.com stephen.hunter@m365info.com مرحبا كيف حالك Delivered
14/06/2023 08.56.40 postmaster@m365info.com office365reports@microsoft.com Undeliverable: Your requested Message trace report - 2023-06-14T08:25:07.136Z is now available Failed
14/06/2023 01.57.05 beata@defenderarchitect.com stephen.hunter@m365info.com Test your Junk mail! FilteredAsSpam
12/06/2023 20.08.19 ocampofer18@gmail.com stephen.hunter@m365info.com Prueba FilteredAsSpam
12/06/2023 14.24.28 ryan.przybyl@hds-rx.com stephen.hunter@m365info.com spam filter test FilteredAsSpam
Get-MessageTrace combined with Group-Object results
In some scenarios, we are not looking for information about specific email messages but rather a high-level view of mails performed by a specific sender or recipient within a specific date range.
By using the PowerShell cmdlet Group-Object in addition to the Get-MessageTrace, we can get this high-level view of emails.
Note: The Group-Object cmdlet helps us to group information about a specific property and enables us to count the number of instances in each group.
Get information about most active organization senders
In the following example, we want to accomplish the following requirements:
We want to get information about the emails sent from all senders in the last 10 days.
We want to present the results grouped by each of the senders.
We want to count the number of email messages sent by each sender.
We want to present the results in descending order to view the users who sent the most mail items at the top.
To get the required information, we use the Group-Object cmdlet that performs three tasks:
Group the results by relating to the property SenderAddress.
Count the results for each sender (the number of mail items a specific sender sent).
Order the information presented in the Count column in descending order.
Use the PowerShell command Group-Object syntax to sort the most active organization sender.
Get information about most popular organization recipients
In the example below, we want to accomplish the following requirements:
We want to retrieve information about each email received by our users (or sent to our users) within the last 10 days.
We want to present the results grouped by each recipient (RecipientAddress).
We want to count the number of email messages that each recipient sent.
We want to present the results in descending order. It displays the users who send the largest number of mail items, which are the most active recipients.
To get the required information, we use the Group-Object cmdlet that performs three tasks:
Group the results by relating to the property (RecipientAddress).
Count the results for each recipient (the number of mail items sent to the specific recipient).
Order the information presented in the count column in descending order.
Use the PowerShell command Group-Object syntax to sort the most popular organization recipients.
Note: If you can’t see any results, no emails were sent from this user in the last 48 hours. By default, the Get-MessageTrace only shows data from the last 48 hours.
To get information about a specific sender in the last x days, you need to add parameters.
Our example displays information about all the emails sent by senders with the same domain name (m365info.com) for the last 10 days.
PowerShell output result.
PS C:\> Get-MessageTrace -StartDate (Get-Date).AddDays(-10) -EndDate (Get-Date) -SenderAddress *@m365info.com
Received Sender Address Recipient Address Subject Status
-------- -------------- ----------------- ------- ------
15/06/2023 19.45.30 Stephen.Hunter@m365info.com amanda.hansen@m365info.com RE: مرحبا كيف حالك Delivered
15/06/2023 19.42.43 Amanda.Hansen@m365info.com stephen.hunter@m365info.com مرحبا كيف حالك Delivered
14/06/2023 08.56.40 postmaster@m365info.com office365reports@microsoft.com Undeliverable: Your requested Message trace report - 2023-06-14T08:25:07.136Z is now available Failed
09/06/2023 10.01.37 Stephen.Hunter@m365info.com susanbernard@gmail.com Test Delivered
09/06/2023 09.58.06 Amanda.Hansen@m365info.com stephen.hunter@m365info.com RE: Available Delivered
09/06/2023 09.56.06 Stephen.Hunter@m365info.com amanda.hansen@m365info.com Available Delivered
Export email information sent from sender to CSV
Export information about emails sent from a specific sender to a file. You can create a dedicated file for each sender.
You can get information about all the mails performed by each sender that appears in Exchange Online.
The requirements that we need to fulfill include the following parts:
Show information about all the senders who sent emails in the last 10 days.
It saves and exports the information to a CSV (Comma Separated Value) file.
It will create and export a dedicated CSV file for each of the senders. For example, if the sender is Amanda.Hansen@m365info.com, the dedicated CSV file created for “Amanda” will include information only for emails sent from Amanda.Hansen@m365info.com.
To get the required information, we will use a PowerShell ForEach statement:
In the first phase, the ForEach statement will loop via the array of records in Exchange Online.
In the second phase, we export the required information to a separate CSV file based on the sender identity.
Note: If you can’t see any results, no emails were sent to this recipient user in the last 48 hours. By default, the Get-MessageTrace only shows data from the last 48 hours.
You can also see information about emails sent to a specific organization recipient in the last x days. But you need to add the parameters -StartDate and -EndDate.
In the following example, we want to get information about emails sent to all recipients with email addresses, including the domain name (m365info.com) in the last 10 days.
Our example displays all the emails sent to recipients with the same domain name (m365info.com) for the last 10 days.
PowerShell output example.
PS C:\> Get-MessageTrace -StartDate (Get-Date).AddDays(-10) -EndDate (Get-Date) -RecipientAddress *@m365info.com
Received Sender Address Recipient Address Subject Status
-------- -------------- ----------------- ------- ------
15/06/2023 19.45.30 Stephen.Hunter@m365info.com amanda.hansen@m365info.com RE: مرحبا كيف حالك Delivered
15/06/2023 19.42.43 Amanda.Hansen@m365info.com stephen.hunter@m365info.com مرحبا كيف حالك Delivered
15/06/2023 11.54.24 info4@dienglg.top stephen.hunter@m365info.com If you need paper notebook,Im here for you FilteredAsSpam
14/06/2023 11.22.44 Office365Reports@microsoft.com msadmin@m365info.com Your requested Report Amanda is now available Delivered
14/06/2023 10.01.30 ms-noreply@microsoft.com msadmin@m365info.com Get the latest Office apps Delivered
14/06/2023 08.56.39 Office365Reports@microsoft.com msadmin@m365info.com Your requested Message trace report - 2023-06-14T08:25:07.136Z is now available Failed
14/06/2023 01.57.05 beata@defenderarchitect.com stephen.hunter@m365info.com Test your Junk mail! FilteredAsSpam
13/06/2023 07.22.03 info8@dupiist.top stephen.hunter@m365info.com Professional Notebook manufacturer in China Delivered
12/06/2023 20.08.19 ocampofer18@gmail.com stephen.hunter@m365info.com Prueba FilteredAsSpam
12/06/2023 14.24.28 ryan.przybyl@hds-rx.com stephen.hunter@m365info.com spam filter test FilteredAsSpam
09/06/2023 10.13.47 susanbernard@gmail.com amanda.hansen@m365info.com This is a test Delivered
09/06/2023 10.04.16 susanbernard@gmail.com stephen.hunter@m365info.com Re: Test Delivered
09/06/2023 09.58.06 Amanda.Hansen@m365info.com stephen.hunter@m365info.com RE: Available Delivered
09/06/2023 09.56.06 Stephen.Hunter@m365info.com amanda.hansen@m365info.com Available Delivered
07/06/2023 21.15.32 6157142326@pcdcva.onmicrosoft.com projectpool11@m365info.com All parties have Completed: Please DocuSign`M365info FilteredAsSpam
07/06/2023 12.32.00 631752352@pcdcva.onmicrosoft.com chris.lucas@m365info.com All parties have Completed: Please DocuSign:`chris.lucas@m365info.com FilteredAsSpam
07/06/2023 06.55.21 6556232315@pcdcva.onmicrosoft.com amanda.hansen@m365info.com All parties have Completed: Please DocuSign: M365info` FilteredAsSpam
06/06/2023 21.30.03 6296142354@netorgft3171689.onmicrosoft.com projector8@m365info.com Approved: Completed: Please DocuSign: M365info` FilteredAsSpam
06/06/2023 20.34.22 susanbernard@gmail.com stephen.hunter@m365info.com Test your Junk mail! FilteredAsSpam
06/06/2023 20.25.41 susanbernard@gmail.com stephen.hunter@m365info.com Just a test! Delivered
06/06/2023 19.22.32 6226122326@netorgft3171689.onmicrosoft.com diana.baker@m365info.com Completed: Please DocuSign - M365info 06/06/2023 12:22` FilteredAsSpam
Get-MessageTrace of emails with specific status
The parameter -Status filters the results by the delivery status of the email. Valid values for this parameter are:
None: The message has no delivery status because it was rejected or redirected to a different recipient.
Failed: Message delivery was attempted but failed, or the message was filtered as spam or malware or by transport rules.
Pending: Message delivery is underway or was deferred and is being retried.
Delivered: The message was delivered to its destination.
Expanded: There was no message delivery because the message was addressed to a distribution group, and the membership of the distribution was expanded.
Get information about sent or received emails with a specific status.
There is another optional syntax that we can use for getting information about emails with a specific status.
PowerShell command example.
Get-MessageTrace -StartDate (Get-Date).AddDays(-10) -EndDate (Get-Date) | Where {$_.Status -eq "Failed"}
The PowerShell output shows all emails with the Status value Failed.
PS C:\Get-MessageTrace -StartDate (Get-Date).AddDays(-10) -EndDate (Get-Date) | Where {$_.Status -eq "Failed"}
Received Sender Address Recipient Address Subject Status
-------- -------------- ----------------- ------- ------
14/06/2023 08.56.40 postmaster@m365info.com office365reports@microsoft.com Undeliverable: Your requested Message trace report - 2023-06-14T08:25:07.136Z is now available Failed
14/06/2023 08.56.39 Office365Reports@microsoft.com msadmin@m365info.com Your requested Message trace report - 2023-06-14T08:25:07.136Z is now available Failed
Export information of emails with specific status to CSV
You can obtain information about the status of all emails sent and received within the past 10 days. Create a separate CSV file for each type of status.
The requirements that we need to fulfill include the following parts:
It saves and exports the information we get from the Get-MessageTrace command to a CSV (Comma Separated Value) file.
It will export a separate CSV file for each type of status; Delivered, Expanded, Failed, None, and Pending.
To fulfill this requirement, we will use a PowerShell ForEach statement.
In the first phase, the ForEach statement will loop via the array of records in Exchange Online.
In the second phase, we export the required information to a separate CSV file based on the specific mail status.
Note: If there are no emails for a particular status, it will export an empty CSV file.
Display information regarding the number of mail items sent to Distribution Groups
In this example, we want to obtain information about email addresses sent to the Distribution Group. We use the specific status Expanded when looking for a Distribution Group. Whenever an email is sent to a Distribution Group, Exchange performs the expand operation. So we will Group the result and then Count the result.
Note: If no data exists for the status Expanded, the PowerShell output will show nothing.
Get-MessageTrace of emails with specific subject
The Get-MessageTrace variable $Subject lets us get information about emails that include a specific subject or a specific string in the mail subject.
Let’s obtain information about emails sent and received with a specific subject in the last x days.
PowerShell command syntax.
Get-MessageTrace -StartDate <mm/dd/yyyy> -EndDate <mm/dd/yyyy> | Where {$_.Subject -like "*<string>*"}
Run the below PowerShell command example.
Get-MessageTrace -StartDate (Get-Date).AddDays(-10) -EndDate (Get-Date) | Where {$_.Subject -like "*test*"}
Our PowerShell output example shows all the emails with the subject word *test* in the last 10 days.
PS C:\> Get-MessageTrace -StartDate (Get-Date).AddDays(-10) -EndDate (Get-Date) | Where {$_.Subject -like "*test*"}

Received            Sender Address              Recipient Address           Subject                    Status
--------            --------------              -----------------           -------                    ------
14/06/2023 10.01.30 ms-noreply@microsoft.com    msadmin@m365info.com        Get the latest Office apps Delivered
14/06/2023 01.57.05 beata@defenderarchitect.com stephen.hunter@m365info.com Test your Junk mail!       FilteredAsSpam
12/06/2023 14.24.28 ryan.przybyl@hds-rx.com     stephen.hunter@m365info.com spam filter test           FilteredAsSpam
09/06/2023 10.13.47 susanbernard@gmail.com      amanda.hansen@m365info.com  This is a test             Delivered
09/06/2023 10.04.16 susanbernard@gmail.com      stephen.hunter@m365info.com Re: Test                   Delivered
09/06/2023 10.01.37 Stephen.Hunter@m365info.com susanbernard@gmail.com      Test                       Delivered
06/06/2023 20.34.22 susanbernard@gmail.com      stephen.hunter@m365info.com Test your Junk mail!       FilteredAsSpam
06/06/2023 20.25.41 susanbernard@gmail.com      stephen.hunter@m365info.com Just a test!               Delivered
Get-MessageTrace filters results by source or destination IP address
The IP address is the public IP address of the mail server that represents a specific domain name or specific recipient.
The Get-MessageTrace parameters -ToIP and -FromIP, allow us to retrieve information about emails sent from a specific IP address or sent to a specific IP address.
First, we will use the parameter -ToIP, which relates to the IP address of the mail server Exchange Online.
Parameter
Description
ToIP
The ToIP parameter filters the results by the destination IP address. For outgoing messages, the value of ToIP is the public IP address in the resolved MX record for the destination domain. For incoming messages to Exchange Online, the value is blank.
FromIP
The FromIP parameter filters the results by the source IP address. For incoming messages, the value of FromIP is the public IP address of the SMTP email server that sent the message.
ToIP – Get information about emails sent to the destination mail server with a specific IP address
Obtain information about emails sent to a mail server with a specific IP address.
In the following example, we want to obtain information about mail items sent in the last 10 days to a destination mail server with the IP address 10.0.0.2.
PS C:\> Get-MessageTrace -StartDate (Get-Date).Adddays(-10) -EndDate (Get-Date) -FromIP 80.71.142.100

Received            Sender Address              Recipient Address           Subject            Status
--------            --------------              -----------------           -------            ------
15/06/2023 19.45.30 Stephen.Hunter@m365info.com amanda.hansen@m365info.com  RE: مرحبا كيف حالك    Delivered
15/06/2023 19.42.43 Amanda.Hansen@m365info.com  stephen.hunter@m365info.com مرحبا كيف حالك        Delivered
09/06/2023 10.01.37 Stephen.Hunter@m365info.com susanbernard@gmail.com      Test               Delivered
09/06/2023 09.58.06 Amanda.Hansen@m365info.com  stephen.hunter@m365info.com RE: Available      Delivered
09/06/2023 09.56.06 Stephen.Hunter@m365info.com amanda.hansen@m365info.com  Available          Delivered
Extend Page or PageSize number results
When using the PowerShell command Get-MessageTrace to display information, there is a built-in limitation to the number of mails. The unit that specifies the displayed result limitation is called Page.
Note: By default, the Get-MessageTrace will only display 1 page. Each page unit includes 1,000 rows by default.
By default, the Get-MessageTrace command will display a maximum of 1,000 results, even though the search result includes more than 1,000 rows. Therefore we need to use a parameter that can help us to get a larger number of results.
Get-MessageTrace includes two parameters that relate to the subject of maximum displayed results:
Parameter
Description
Page
The Page parameter specifies the page number of the results you want to view. Valid input for this parameter is an integer between 1 and 1000. The default value is 1.
PageSize
The PageSize parameter specifies the maximum number of entries per page. Valid input for this parameter is an integer between 1 and 5000. The default value is 1000.
Extend default PageSize limitation
One way to extend the PageSize limit to 5,000.
PowerShell command syntax.
Get-MessageTrace -StartDate <mm/dd/yyyy> -EndDate <mm/dd/yyyy> -PageSize <number or records that each page includes>
As mentioned before, the Get-MessageTrace cmdlet provides us with basic information about a specific mail.
If we want more detailed information about a specific mail, we can add the PowerShell command Get-MessageTraceDetail.
We will add the MessageTraceDetail cmdlet to the original Get-MessageTrace command.
Note: Use the Get-MessageTraceDetail cmdlet to view the message trace event details for a specific message. These detailed results take more time than the Get-MessageTrace results.
Get message details for all sent and received emails in the last 3 days.
You have to wait a few minutes to see the results on the PowerShell console.
PowerShell output result.
PS C:\> Get-MessageTrace -StartDate (Get-Date).AddDays(-3) -EndDate (Get-Date) | Get-MessageTraceDetail

Date                   Event                Detail
----                   -----                ------
15/06/2023 11.54.24    Receive (with ext... Message received by: DU0PR02MB8289.eurprd02.prod.outlook.com. There was a delay of 1907 minutes prior to the message being received by Office 365.
15/06/2023 11.54.26    Spam                 No detail information available.
15/06/2023 11.54.27    Deliver              The message was delivered to the Junk Email folder.
14/06/2023 11.22.44    Receive              Message received by: DB3PR0202MB9154.eurprd02.prod.outlook.com using TLS1.2 with AES256
14/06/2023 11.22.45    Deliver              The message was successfully delivered.
14/06/2023 10.01.31    Receive              Message received by: DU0PR02MB8716.eurprd02.prod.outlook.com using TLS1.2 with AES256
14/06/2023 10.01.33    Deliver              The message was successfully delivered.
14/06/2023 08.56.41    Drop                 Reason: [{LED=550 4.3.2 QUEUE.TransportAgent; message deleted by transport agent};{MSG=};{FQDN=};{IP=};{LRT=}]
14/06/2023 08.56.39    Receive              Message received by: AS2PR02MB10153.eurprd02.prod.outlook.com using TLS1.2 with AES256
14/06/2023 08.56.40    Fail                 Reason: [{LED=550 5.1.10 RESOLVER.ADR.RecipientNotFound; Recipient msadmin@m365info.com not found by SMTP address lookup};{MSG=};{FQDN=};{IP=};{LRT=}]
14/06/2023 01.57.06    Receive              Message received by: DU0PR02MB8039.eurprd02.prod.outlook.com using TLS1.2 with AES256
14/06/2023 01.57.07    Spam                 No detail information available.
14/06/2023 01.57.08    Deliver              The message was delivered to the Junk Email folder.
13/06/2023 07.22.04    Receive              Message received by: GV1PR02MB7779.eurprd02.prod.outlook.com
13/06/2023 07.22.08    Deliver              The message was successfully delivered.
Next, we will show you how to export PowerShell information to a file.
Export Get-MessageTrace results to file
You can also export the information to a file format supported by PowerShell. PowerShell supports exporting output to the following file formats: Text, CSV, HTML, and XML.
When we export the command output to a file, we need to tell PowerShell the required format we want.
In addition to the PowerShell cmdlets that we use to define the specific file format, we can add a specific parameter that relates to the specific file format.
For example, when we wish to export PowerShell command output to a CSV (Comma Separated Value) file format, we can add additional parameters such as:
Parameter
Description
-NoTypeInformation
Prevents to add unnecessary information to the CSV file.
-Encoding UTF8
It ensures that non-English characters included in users or mailboxes can be exported across different systems, applications, and programming languages that support UTF-8 encoding
1. Create file name and path
It is required to name the file you export with PowerShell. The additional part is to choose a directory path. The path parameter defines the location where we want to save the file, such as C:\temp.
However, the path parameter is not mandatory. If we don’t provide a specific path, PowerShell exports the file to the folder from which we run the PowerShell command.
Note: By default, the PowerShell command will not create a specific folder specified in the path.
2. Export to file type format
We will show the PowerShell syntax to export information to various file types.
To export information to a file format in PowerShell, you need these two parts:
Type the Get PowerShell cmdlets that fetch specific information.
Define the specific file format, the path, and the filename.
Look at the below PowerShell examples to export information in three file formats; Text, CSV, and HTML.
Export information to Text File
PowerShell command example
Get-MessageTrace -StartDate (Get-Date).AddDays(-10) -EndDate (Get-Date) | Out-File "C:\Temp\All emails in the last month.TXT"
Export information to CSV File
PowerShell command example
Get-MessageTrace -StartDate (Get-Date).AddDays(-10) -EndDate (Get-Date) | Export-CSV "C:\Temp\All emails in the last month.CSV" –NoTypeInformation -Encoding UTF8
Export information to HTML File
PowerShell command example
Get-MessageTrace -StartDate (Get-Date).AddDays(-10) -EndDate (Get-Date) | ConvertTo-Html | Out-File "C:\Temp\All emails in the last month.HTML"
You learned how to use the Get-MessageTrace PowerShell cmdlet to view Exchange Online messages for up to 10 days old. It’s an excellent way to gather specific data from a time range and export to csv file.
The message trace report displays information about each incoming and outgoing mail sent over the last 90 days in Exchange Online. In this article, you will learn how to export a message trace report in Exchange admin center and with the HistoricalSearch PowerShell cmdlet.
Exchange Online has information about each mail flow transaction in our mail infrastructure that passes via the server and is kept for 90 days.
You can get message trace information for up to 90 days in the Exchange admin center and with Exchange Online PowerShell. We will show you how to export the message trace report to a CSV file with the HistoricalSearch PowerShell cmdlet.
Suppose you want to get faster results and export information on each mail sent and received in Exchange Online for up to 10 days, you can read the article Get Message Trace in Exchange Online.
Get-HistoricalSearch PowerShell cmdlet
First, we will look at the advantages and disadvantages of the Get-Historical PowerShell cmdlet.
Advantages:
Exchange Online server log files register detailed information about each mail transaction.
Exchange Online provides us with an extended time range of 90 days. It allows you to retrieve mail transaction information for a longer duration. There is no 10-day limitation like when using the PowerShell command Get-MessageTrace.
Disadvantages:
Exchange Online registers the request for information as a task and executes it after several hours.
The information you get can be overwhelming, and it’s not easy to read and understand.
The information is only available in a CSV report.
If you require information about a mail transaction older than 10 days, use the PowerShell command Get-HistoricalSearch. Also, when you want to investigate a specific mail transaction registered in the Exchange Online log file.
Message trace reports
You can view and export the log information using the message trace in the Exchange admin center.
There are 3 types of reports in the Exchange admin center.
Summary report:
Instant online access.
The information is displayed in an HTML window, but you export results.
Shows data of mail messages up to 10 days old.
The log data only includes essential information.
Enhanced summary report:
Export and download the information to a CSV (Comma Separated Values) file.
Shows data of mail messages up to 90 days old.
The log data includes more detailed information.
Extended report:
You can export and download the information to a CSV file.
Shows data of mail messages up to 90 days old.
The log data is very comprehensive and with more detailed information.
Note: With the PowerShell cmdlet Historical Search, you can only export the enhanced summary report.
Export extended message trace report in EAC
Requirements to export an extended message trace report in the Exchange admin center.
Fill in one of the following fields: Sender, Recipient, or Message ID.
To ensure all messages are returned, you need to specify the recipient.
You must select a date range of more than 10 days.
Time needed: 15 minutes.
Prepare message trace extended report in Exchange admin center:
Sign in to the Exchange admin center with your admin credentials.
Start a trace
Click on Mail flow > Message trace > Start a trace.
Add senders
Add a specific sender. Put an asterisk * before the domain name to include all organization senders.
Add recipients
Add a specific recipient and select it from the suggested results. Put an asterisk * before the domain name if you only want to include all organization recipients.
Custom time range
Click on Custom time range.
Start and End date
Change the Time Zone to your country. Choose a Start date and End date. The time range must be more than 10 days.
Report type
Select the Extended report and click Next.
Prepare message trace report
Change Report title (optional) Specify your email to be notified Click Prepare report.
Check message trace report status
Next, you can check the status of the message trace report in the Exchange admin center: Go to Mail flow > Message trace > Downloadable reports.
At first, the status shows Not started.
After a couple of minutes, the status changes to In progress.
It can take a couple of hours for the report to be completed. Once the report is finished, you will be notified by the email you provided. This email must have a license assigned, or you can’t access emails in Outlook.
Note: There is a limit of 250 historical searches you can submit in one day. The CSV file will not exceed 100,000 lines or results.
Export enhanced message trace report with PowerShell
You can also use the Exchange Online PowerShell cmdlet HistoricalSearch to export message trace results for up to 90 days. It can only export an enhanced summary report.
1. Start HistoricalSearch
Start a new historical search for messages less than 90 days old.
To use the PowerShell Start-HistoricalSearch cmdlet to create an enhanced message trace summary report, you need to fill in these parameters:
Date range: StartDate 05/01/2023 to EndDate 06/14/2023.
You can also check the progress of your report in the Exchange admin center under Downloadable reports. You will get a notification mail once the status changes to Done.
Use the PowerShell Get-HistoricalSearch cmdlet to check the status of a single JobId.
There are two ways to download the extended message trace CSV file report:
Click the hyperlink in the mail you get when the report is ready
Download the report in the Exchange admin center
Once the report is completed, you can open the mail and click here. It will open a new pane to download the report.
Or download the report in the Exchange admin center. Go to Mail flow > Message Trace > Downloadable reports.
Click on the report from the list so the pane opens up, and Download the report.
Open message trace report CSV file in Excel
Once you download the file, you can save it as .csv with UTF-8 encoding. If you immediately open the message trace report with an application like Microsoft Excel, the information will be incorrect.
The date and time information is not understandable, and the report looks unstructured. Also, all non-English characters are not readable and look like symbols. Luckily there is a way to fix this.
Before opening the message trace report, we need to make a few changes in Excel.
First, you need to make Microsoft Excel use a comma for the list separator:
Open Microsoft Excel
Click Options
Go to the Excel Options to save changes:
Click Advanced
Under Editing options > Clear System separators
Set Decimal separator to period (.)
Set Thousands separator to comma (,)
Click OK
Note: Close the Microsoft Excel application to save the changes.
Next, we are going to load the message trace report in Microsoft Excel:
Open the application Microsoft Excel
Select New blank workbook
Click on Data > From Text/CSV
Find and select Message trace report.csv
Click Import
Set the delimiter to Comma
Click Load
Microsoft Excel loads and formats the data from the CSV file. The message trace report results are structured and correct. Now you will also be able to read non-English characters like Arabic, Chinese, etc.
Sort and filter the columns by clicking on the arrows in the first row
You learned how to export a message trace report in Exchange admin center and with the HistoricalSearch PowerShell cmdlet. The message trace report shows detailed information about messages in Exchange Online for up to 90 days. This way, you can adjust the CSV file and search for specific details of messages.
A user gets an error message when accessing Outlook on the web. Even if the user tries different browsers and clears the browser cache, the same Outlook error 500 something went wrong keeps appearing. In this article, you will learn how to fix Outlook on the web error 500 repeating redirects detected.
When the user signs into Outlook on the web, the page will loop several times without any success, and the below error appears:
Error 500 Something went wrong. Repeating redirects detected. Click here to sign out.
The sign-in with the user credentials looks good because you see the click here to sign out text. But, a repeating redirect is detected in Outlook.
This is how it looks for the user on their web browser.
Even if the user signs out and tries to sign back in again, the below error can appear.
We couldn’t sign you in. Please try again.
Let’s have another look and let the user sign in to the Microsoft 365 portal. The sign-in is successful, and from there, the Outlook app can be clicked on. But, in the end, the same Outlook error 500 redirect appears.
Why is it that the user can sign into the Microsoft 365 portal successfully, but when opening Outlook on the web, an error 500 redirect appears?
Solution to Outlook error 500 repeating redirects detected
The Outlook on the web error 500 repeating redirect detected occurs when a Microsoft 365 user account is recently unblocked from sign-in. Unfortunately, the admin that unblocked the user account didn’t mention to the user that a waiting time of 30 minutes applies.
When you block a user’s sign-in and revoke their active sessions, and then unblock the account, there might be a delay before the user can sign in and access all Microsoft 365 services. During the restoration process of access, certain services like OneDrive may become available earlier than others, such as Outlook.
You learned how to fix Outlook error 500 repeating redirects detected. The solution to this problem is waiting 30 minutes after the user account is unblocked. After that, the user can sign in to Outlook on the web without any redirect error.
Did you enjoy this article? You may also like Reset MFA for Microsoft 365 user. Don’t forget to follow us and share this article.
When a Microsoft 365 user account is compromised, you must immediately block the user from signing in. Doing that will also sign out all the user sessions within 60 minutes. In this article, you will learn how to block a Microsoft 365 user sign-in using Microsoft 365 admin center and Microsoft Graph PowerShell.
You can block a user from signing in to all Microsoft 365 services in two methods:
Microsoft 365 admin center
Microsoft Graph PowerShell
Note: When you block someone, it immediately stops any new sign-ins for that account. If a user is signed in, they will be automatically signed out from all Microsoft services within 60 minutes.
Block user in Microsoft 365 admin center
First, we will show you the steps to block a sign-in in Microsoft 365 admin center for a single user. Then we will show you the steps to block multiple users sign-in.
Click Users > Active users Select the unblocked user from the list
The user pane opens.
Click Block sign-in
Block sign-in for user.
Select Block this user from signing in Click Save changes
The user is now blocked from signing in.
Close the pane
Note: The user will be automatically signed out of all Microsoft services within 60 minutes.
Block multiple Microsoft 365 users
To block multiple Microsoft 365 user accounts, follow these steps:
Go to Users > Active users
Select the users in the list
Click the More button
Click Edit sign-in status
Select Block users from signing in
Click Save
The selected users are blocked from signing in.
Note: The blocked users will not be able to sign in to any Microsoft services, and they will be signed out of all sessions within 60 minutes.
Verify blocked Microsoft 365 user sign-in
To verify you blocked the users, you can filter and find the blocked users in the list.
Go to User > Active users
Click Filter > Sign-in blocked
It shows a list of all the sign-in blocked users.
Block user with Microsoft Graph PowerShell
Another way to block a user sign-in is with Microsoft Graph PowerShell. You can use one of the below PowerShell scripts to block a single user or multiple users.
Block single Microsoft 365 user sign-in
Copy the below PowerShell script into PowerShell ISE or Visual Studio Code
Change the user principal name (UPN) of the account you want to block on line number 6
Run the below PowerShell script
# Connect to Microsoft Graph PowerShell
Connect-MgGraph -Scopes Directory.AccessAsUser.All
Select-MgProfile Beta

# Specify the user principal name (UPN) of the account you want to block
$upn = "amanda.hansen@m365info.com"

# Retrieve the user
$user = Get-MgUser -Filter "UserPrincipalName eq '$upn'"

# Check if the user is unblocked
if ($user.AccountEnabled -eq $true) {

    # User is unblocked, block the account
    Update-MgUser -UserId $User.Id -AccountEnabled:$false

    Write-Host "Account $($User.UserPrincipalName) blocked successfully." -ForegroundColor Green
}
else {
    Write-Host "Account $($User.UserPrincipalName) is already blocked." -ForegroundColor Cyan
}
The output shows that the user account is blocked.
Welcome To Microsoft Graph!
Account Amanda.Hansen@m365info.com blocked successfully.
If the Microsoft user account were blocked, the output would show that the account is already blocked.
Welcome To Microsoft Graph!
Account Amanda.Hansen@m365info.com is already blocked.
If you like to block multiple users, read the next step.
Block multiple Microsoft 365 users
Follow the below steps to block multiple Microsoft 365 users sign-in with Microsoft Graph PowerShell.
Create a .txt file and type the user accounts you want to block
Go to the C:\temp folder
Name the file
Save it as a .txt file
Click Save
Run the below PowerShell script
# Connect to Microsoft Graph PowerShell
Connect-MgGraph -Scopes Directory.AccessAsUser.All
Select-MgProfile Beta

# Specify the path to the text file containing user principal names (UPNs)
$upns = Get-Content -Path "C:\temp\Users.txt"

# Loop through each UPN in the array
foreach ($upn in $upns) {
    # Retrieve the user
    $user = Get-MgUser -Filter "UserPrincipalName eq '$upn'"

    if ($user) {
        # Check if the user is unblocked
        if ($user.AccountEnabled -eq $true) {

            # User is unblocked, block the account
            Update-MgUser -UserId $user.Id -AccountEnabled:$false
            Write-Host "Account $($user.UserPrincipalName) blocked successfully." -ForegroundColor Green
        }
        else {
            Write-Host "Account $($user.UserPrincipalName) is already blocked." -ForegroundColor Cyan
        }
    }
    else {
        Write-Host "Account $upn not found." -ForegroundColor Yellow
    }
}
The output blocks the Microsoft 365 user accounts in the .txt file.
It will not block these user accounts if:
The user account is already blocked
The user account does not exist
Welcome To Microsoft Graph!
Account Amanda.Hansen@m365info.com blocked successfully.
Account Amanda.Kent@m365info.com not found.
Account Brenda.Smith@m365info.com is already blocked
Account David.Kent@m365info.com is already blocked
Account Stephen.Hunter@m365info.com blocked successfully.
Verify Microsoft 365 user sign-in blocked
When the blocked user tries to log into Microsoft 365, they will see this warning below.
Your account has been locked. Contact your support person to unlock it, then try again.
You successfully blocked Microsoft 365 user sign-in!
You learned how to block sign-in for Microsoft 365 users. It can be done in Microsoft 365 admin center and with Microsoft Graph PowerShell. To block multiple users, it’s much faster to use a .txt file and run the PowerShell script.
The clutter feature in Microsoft 365 mailbox lets the users focus on important mail. The low-priority emails are not deleted but removed from the inbox mail folder to the clutter folder. You can always disable the clutter feature for all users and remove the clutter folder from Outlook. In this article, you will learn to manage Microsoft 365 clutter feature using PowerShell.
Clutter is a feature in Outlook that moves less important emails out of your inbox and keeps you focused on what’s most important to you. We will show you how to enable and disable clutter for all mailboxes with PowerShell.
Once a user turns off the clutter feature in Outlook, they can use the new Focused Inbox feature. This is a new email sorting, where your inbox will be divided into two tabs. You can always Manage focused inbox in Microsoft 365 using PowerShell.
Note: Close the Outlook application so the changes take effect. You must also sign in the next time you open the Outlook application or use Outlook on the web.
It will disable the clutter function in the Microsoft 365 mailbox. However, when you open the Outlook application, you will still see the clutter folder in the Outlook mailbox. In the next step, we will show you how to remove the clutter folder from Outlook.
Turn on Focused Inbox
You can’t delete the clutter folder in Outlook, as it is greyed out. The solution to this problem is to turn on the focused inbox in your Outlook.
Follow the steps to turn on Focused Inbox in the Outlook application:
Click on the Inbox folder
Click on the View tab
Click Show Focused Inbox
Turn on Focused Inbox in Outlook on the web:
Click on the Inbox folder
Click on Settings
Select the toggle next to Focused Inbox
You will immediately get a mail from Microsoft Outlook to welcome you to the focused inbox. From now on, messages won’t be moved to the clutter folder anymore. Instead, the less important emails that would have been moved to Clutter now go to Other.
Bulk disable clutter for all mailboxes
To disable the clutter option for all existing Exchange Online mailboxes in the PowerShell console, run the following command.
It will export the CSV to the C:\temp folder. Open the CSV file with an application like Microsoft Excel to see the results.
Export user mailboxes with clutter enabled to CSV file
Run the below PowerShell command to export a list of all user mailboxes with clutter. This way, you can easily search for user mailboxes that have enabled or disabled clutter.
It will export the CSV to the C:\temp folder, where you can open the CSV file with Microsoft Excel. You can easily see which Microsoft 365 mailboxes have clutter disabled.
Export mailboxes with clutter enabled to CSV file
Run the below PowerShell command to export a list of all mailboxes that have the clutter feature enabled.
It will export the CSV to the C:\temp folder, where you can open the CSV file with Microsoft Excel. You will only see a list of mailboxes with the clutter feature enabled.
It will export the CSV to the C:\temp folder, where you can open the CSV file with Microsoft Excel. You will see a list of folder item numbers and size.
5. Use Exchange Online rule to bypass clutter
When using the clutter feature, the Exchange server, which manages the user mailbox, decides according to an internal algorithm whether to move or not to move a specific email message to the clutter folder.
In some scenarios, the clutter algorithm can classify email messages as an email that will be sent to the clutter folder, and we would like to override this decision.
To inform the Exchange server that we would like to prevent that clutter process for specific mail items, we need to create an Exchange Online rule.
The Exchange rule is implemented by defining the characters of these specific emails and asking Exchange to add a specific mail field to the email message header.
This special mail filed is named X-MS-Exchange-Organization-BypassClutter.
We will need to add this mail field and set the value of this mail field to true.
For example:
X-MS-Exchange-Organization-BypassClutter = true
If Exchange Server locates this mail field, it understands it must bypass the clutter process.
The Exchange rule can be created manually or via PowerShell.
In the following section, we review two examples of such an Exchange rule that will bypass the clutter of specific mail items.
Create Exchange rule to bypass clutter (specific text)
Create Exchange rule to bypass clutter for emails that include a specific text in the mail subject.
You learned how to manage Microsoft 365 clutter using PowerShell. Once you enable the clutter feature for a user mailbox, you can display the information and export information to a CSV file. Remember that you can always disable the clutter function for all users with PowerShell and remove the clutter folder from Outlook.