Image may be NSFW.
Clik here to view.
In this article, we will learn how to implement, a configuration of Automatic Reply in Office 365. Most of the time, the “business need” for the Automatic Reply will is for some kind of an organization’s services, organization role or a specific organization department.
Example 1: using the option of Automatic Reply for Human resources department. The company wants to assign a dedicated email address that represents the Human resources department. When a candidate for a position, will send his resume to the mail address such as: Jobs@o365info.com, an Automatic Reply will be sent back and will inform the user that his mail was successfully accepted and so on.
Example 2: using the option of Automatic Reply for the Help desk department. We want to implement the following scenario: each time that an organization’s user will open a service request, an Automatic Reply will be sent back to the user.
Automatic replies (formerly Out of office assistant) versus Automatic respond.
Before we began, it’s important to emphasize that in this article we relate to the option of Automatic Reply\Respond and not, to the Exchange mailbox feature named: Automatic replies (the former term was – Out of office assistant).The option of Automatic Replies (Out of Office) is used for very specific scenarios, in which an Individual user (recipient) needs to inform his customer or the organization users, that he\she will not be available for a certain period of time (Vacation, etc.)
The reason for mentioning this feature is – that in the past, this feature was named: OOO (Out Of Office) and later was renamed to: Automatic Replies. The term “Automatic Replies” could cause a confusion when we want to relate to a scenario of Automatic Reply\Respond.
How to set the option of Automatic Reply\Respond in Office 365.
The Automatic Reply\Respond setting is “attached” to mail enabled object such as: Public folder (mail enabled public folder) or to a mailbox. A common thought is that the option of Automatic Reply needs to be configured by using Exchange rule (Transport rule). Although the Exchange server rules, allow to define a very sophisticated logic that will be enforced on incoming and outgoing mail, in the current time, there is not an option for using the Exchange Online rule for configuring Automatic Reply. In this series of two articles, we will review two optional scenario for configuring Automatic Reply:
1. Configuring Automatic Reply by using a Public folder
The option of using a dedicated Public folder, that will be configured with the “Automatic Reply\Respond option”, is suitable for a scenario in which need a simple “container” for email items, that will enable us to store mail items and additionally, will enable us to implement an Automatic Reply\Respond for each of mail that will be sent to the Public folder.
2. Configuring Automatic Reply\Respond by using an inbox rule (mailbox server side rule)
The option of using Automatic Reply\Respond by using an inbox rule, is suitable to a scenario in which we need to use a special mailbox such as: Shared mailbox that will serve as a “department mailbox” for a specific department, etc.
Using the option of: Shared mailbox, is suitable for scenarios in which we need to use additional folder beside the standard mail folder such as: calendar, contacts (People), Notes, etc.
For example: a Shared mailbox that will be created for the Help Desk department that will enable the members of the Help desk to store mail items or a service request, schedule a meeting, add contacts, etc., and will respond with an Automatic Reply for each mail (service request) that will be sent to the mail address of the Shared mailbox.
In this following article, we will review the required steps for implementing the use of a Public folder and the feature of Automatic Reply\Respond and in the next article, we will review: how to set the Automatic Reply\Respond by using an inbox rule in a Shared mailbox.
A quick reference for the article series
| Image may be NSFW. Clik here to view.  |
Setting up an Automatic Reply in Office 365 using Public Folder | Part 1/2 In this article, we will learn how to implement, a configuration of Automatic Reply in Office 365 using Public Folder. We will review all the required steps Beginning with the creation of Public Folder, configure the required email address, and set the Automatic Reply rule using the Public folder- Folder assistant, testing the permissions and the Automatic Reply process. |
| Image may be NSFW. Clik here to view. |
Setting up an Automatic Reply in Office 365 by using Shared mailbox | Part 2/2 In this article, we will learn how to implement, a configuration of Automatic Reply in Office 365 using a Shared mailbox. We will review all the required steps Beginning with the creation of Shared mailbox, assign the required permissions, set the Automatic Reply rule using inbox rule and testing the permissions and the Automatic Reply process. |
To be able to optimize the navigation in the article, you can use the collapse and expand option.
| Collapse All Headers |
Configuring Automatic Reply by using a Public folder
To make our example more real let’s use the following scenario: We got a request to the Human resources department to provide a “solution” that will enable Sarah (the Human-resource manager) to gather in one place, all the “apply for job resume\CV” that is sent to the Human-resource department.
The specific requirements that we will need to fulfil are as follows:
- If passable, we would like to avoid from purchasing a license for this purpose (using a dedicated mailbox).
- The email address of the new mailbox will be: jobs@o365info.com
- Each time that a mail will be sent to the E-mail address: jobs@o365info.com, an Automatic Reply\Respond will be sent back to the recipient. The Automatic Reply\Respond will include the predefined message such as:
Dear Sir\Lady
Your apply for the job was successfully accepted.
Our representative will contact you as soon as passable. - The Reply\Respond will include a signature + company logo
- Sarah (the Human resources manager), will have the required permission that will enable her to send a reply by using the E-Mail address: jobs@o365info.com (the ability of a recipient to send email using another recipient email address
- Sarah will need a permission to access the “dedicated store” that will contain the “apply for job resume\CV” or other option is: use an automatic forward option. For example, each mail is sent to the address: jobs@o365info.com, a copy will be sent also to Sarah’s mailbox.
Image may be NSFW.
Clik here to view.
Step 1: Creating a new Public folder
- Login to the Exchange Online admin center
- On the left menu bar, choose the menu: Public folder
Note – the basic assumption is that you already have a public folder infrastructure. In case that you need to start the public folder from scratch read the following article: Create a Public Folder Mailbox
- Click on the plus icon
Image may be NSFW.
Clik here to view.![Creating a new Public folder-001]()
- Add the public folder name, in our scenario we will use the name: JobsImage may be NSFW.
Clik here to view.![Add a name to the Public folder-002]()


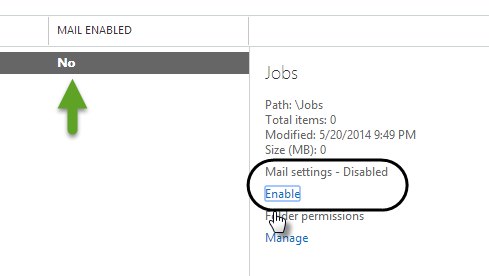
Step 2: configure the Public folder as mail enabled Public folder
By default, a new Public folder doesn’t have an email address. To be able to use the Public folder as a “recipient entity”, we will need to configure the Public folder as: “mail enabled”
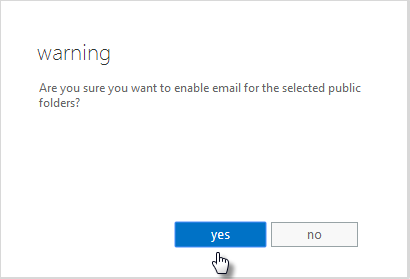
- Choose the new Public folder and click on the Enable option.Image may be NSFW.
Clik here to view.![Configure mail enabled public folder-003]()
- Click on the yes option.
Image may be NSFW.
Clik here to view.![Configure mail enable public folder-004]()
Step 3: configure an email address for the Public folder
The subject of the mail address of Public folder in Office 365, is a little problematic.
When we create a new Public folder, the email address that will be automatically assigned to the public folder is based on the “onmicorosft” domain. For example:
Image may be NSFW.
Clik here to view.
Technically, all we need to do is – “edit” the default email address and update this email address to the required public email address that we want to use such as: jobs@o365ibfo.com.
From my experience, there are some problems with this option. Many times after we change the default email address to the “Public email address” and save the changes, the email address reverts back to the original onmicrosoft email address.
We will review how to change the default onmicrosoft email address, and in case that you will have the problem that was mentioned, we will review additional option in the next step.
Option 1: Update default public folder email address
- Click on the Public folder name and Click on the edit iconImage may be NSFW.
Clik here to view.![Edit the Public folder email address 01]()
- On the left menu bar, click on the email address menu
- Choose the edit iconImage may be NSFW.
Clik here to view.![Edit the Public folder email address 02]()
- Edit the existing email address (jobs@o365info2.onmicrosoft.com in our scenario) and change it to the required email address (jobs@o365info.com in our scenario).
- Click ok to save the informationImage may be NSFW.
Clik here to view.![Edit the Public folder email address 03]()


Option 2: add an additional email addresses (Alias) to the Public folder
In case that you experience the problem, in which the Public folder email address reverts back to the “onmicorosft email address”, we can use the option of: add an additional email addresses.
In this step, we will need the add the required public email address ( jobs@o365info.com) ,and then set the “New email address” as a reply address.
- Click on the Public folder name and click on the edit iconImage may be NSFW.
Clik here to view.![Edit the Public folder email address 01]()
- On the left menu bar, click on the email address menu
- Click on the Plus iconImage may be NSFW.
Clik here to view.![Public Folder default Alias Email address -000]()
- Under the Email address type choose: SMTP
- In the *Email address box, type the “new email address” (jobs@o365info.com in our scenario)
Image may be NSFW.
Clik here to view.![Public Folder default Alias Email address -001]()
- We can see the new email address that was added
- Click on the save button
Image may be NSFW.
Clik here to view.![Public Folder default Alias Email address -002]()


After we have add the additional email address (jobs@o365info.com), we need to set the new email address as a Primary email address( reply address).
But now, we have to deal with additional obstacle.
By default, the option of set a reply address in a Public folder is not exists. I’m not sure about the exact reason for this issue but is probably relate to some kind of email address policy that is enforced on the Public folder by the Exchange Online.
The good news is that we can use a little trick to change this default and add the option to set a specific email address as a reply address when using Public folder. To “fix” this issue we will need to run a PowerShell command which will disable the default email address policy for the “jobs Public folder”. To be able to change this default setting, we will need to run the following PowerShell command:
Set-MailPublicFolder -Identity "\jobs" -EmailAddressPolicyEnabled $False
After running the required PowerShell command, we can go back to the Public folder properties.
- On the left-side menu choose the email address menu.
- Choose the edit icon
- Double-click on the “public email address that we add in the former step (jobs@o365info.com in our scenario)
Image may be NSFW.
Clik here to view.![Public Folder default Alias Email address -003]()
- Choose the option: Make this the reply address
Image may be NSFW.
Clik here to view.![Public Folder default Alias Email address -004]()


Now we can see that the email address: jobs@o365info.com is configured as the primary email address (in case that you are wondering how can we know that the email address is the primary email address, the answer is the primary email address prefix (the SMTP prefix) is written using capital letters + Bold.
Image may be NSFW.
Clik here to view.
Step 4: Assign Send As permissions
As mentioned before, we need to enable Sarah (the Human resources manager), to reply to emails that sent to the Jobs public folder, and that the mail that will be sent by Sarah, will look like a mail that was sent fork the jobs@o365info.com email address. In the next step, we will assign the Send As permission to Sarah.
- Click on the Public folder name
- Click on the edit icon
Image may be NSFW.
Clik here to view.![Configure send as permission for a public folder-001]()
- On the left side menu, choose the – delivery options
- Under the Send As section, Click on the Plus icon
Image may be NSFW.
Clik here to view.![Configure send as permission for a public folder-002]()
- Search for the recipient name that you want to assign him the send as permission (Sarah in our example)
- Choose the recipient name and click on the add button and ok
Image may be NSFW.
Clik here to view.![Configure send as permission for a public folder-003]()
- On the next window, click on the save button
(Later on we will test the send as permission that was assigned to Sarah)
Image may be NSFW.
Clik here to view.![Configure send as permission for a public folder-004]()


Step 5: creating the required “Automatic Reply” template + signature
In the following step, we will create the required “text” for the Automatic Reply rule and the required signature. For example: I have created the following signature and save it in a word document.

Step 6: creating a Public folder Automatic Reply rule
In this step, we will create an Automatic Reply rule that will be assigned to the Public folder: Jobs. Generally speaking, when we are creating an Automatic Reply rule for a “Mailbox object” the rule is described as: Inbox rule, and when we create an Automatic Reply rule for a Public folder, the configuration is created by using the Folder Assistant.
The settings configuration of the Automatic Reply rule for a Public folder is implemented by using the Outlook mail client (The Exchange Online management interface doesn’t include the option for configuring an Automatic Reply).
The “person” that makes the required setting need to have permissions (owner or Full access) to the Public folder for creating the required Automatic Reply rule.
In our example, we will login to Outlook by using the administrator account that creates the Jobs public folder (and configured as the owner of the job’s Public folder).
Display Public folder in Outlook 2013
When using Outlook 2013, the Public folder tree is not displayed by default (don’t ask me why). To be able to display the Public folder tree on the bottom Outlook tool bar, click on the tree point menu and choose Folders.
Image may be NSFW.
Clik here to view.
- Right click on the Jobs folder
Image may be NSFW.
Clik here to view.![Public folder- set the option of Automatic Reply -002]()
- Choose the Properties menu
Image may be NSFW.
Clik here to view.![Public folder- set the option of Automatic Reply -003]()
- Click on the Folder Assistant… button
Image may be NSFW.
Clik here to view.![Public folder- set the option of Automatic Reply -004]()
- Click on the Add Rule… button
Image may be NSFW.
Clik here to view.![Public folder- set the option of Automatic Reply -005]()
- Choose the option: Reply With and click on the Template button
Image may be NSFW.
Clik here to view.![Public folder- set the option of Automatic Reply -006]()
A “New mail window” will appear. This is not a standard mail, but instead a template that will be saved on the “server side” (Exchange Online).
In the following example, I have to copy the content of the required auto reply text and signature that I have prepared earlier. The template window doesn’t include a “save” menu\button. Instead, all we need to do is just close to the mail template and the data will be automatically saved in the Exchange Online server.
Image may be NSFW.
Clik here to view.![Public folder- set the option of Automatic Reply -007]()


- Click Yes to save the settings
Image may be NSFW.
Clik here to view.![Public folder- set the option of Automatic Reply -008]()
- Click OK to save the settings
Image may be NSFW.
Clik here to view.![Public folder- set the option of Automatic Reply -009]()
- Click Yes to save the Automatic Reply rule that was created.
Image may be NSFW.
Clik here to view.![Public folder- set the option of Automatic Reply -010]()
- We can see the new REPLY rule that was created.
- Click OK to save the Automatic Reply rule that was created.
Image may be NSFW.
Clik here to view.![Public folder- set the option of Automatic Reply -011]()


Step 7: creating a Public folder automatic Forwarding rule
In this step, we will configure an additional “inbox rule” that will automatically forward each of the mail that is sent to the Jobs Public folder to Sarah (the Human resources manager). Technically, in case that a user has permission to access the specific Public folder (job’s Public folder in our scenario) we can access the content of the Public folder, but this option is not suitable for our need because Sarah (the Human resources manager) prefers not to check every five minutes of a new mail arrived to the job’s Public folder but instead, to get a copy of each mail.
- Open Outlook and right click on the jobs public folder
- Right click on the Jobs folder
Image may be NSFW.
Clik here to view.![Public folder- set the option of Automatic Reply -002]()
- Chose the Properties menu
Image may be NSFW.
Clik here to view.![Public folder- set the option of Automatic Reply -003]()
- Click on the Folder Assistant… button
Image may be NSFW.
Clik here to view.![creating a Public folder automatic forwarding rule -02]()
- Click on the Add Rule… button
Image may be NSFW.
Clik here to view.![creating a Public folder automatic forwarding rule -03]()
- Click on the option box: Forward and then click on the To… button to select the required recipient name
Image may be NSFW.
Clik here to view.![creating a Public folder automatic forwarding rule -04]()
(In our scenario we will choose the name of Sarah).
Image may be NSFW.
Clik here to view.![creating a Public folder automatic forwarding rule -05]()
- Click Yes to approve the new forwarding rule.
Image may be NSFW.
Clik here to view.![creating a Public folder automatic forwarding rule -06]()


In the following screenshot, we can see that now we have two “inbox rules”.
REPLY- The inbox rule that is responsible for sending an Automatic Reply to each mail that will be sent to the job’s Public folder.
FORWARD TO… – The second rule is responsible for automatically forward each of the mail that we sent to the jobs Public folder to Sarah.
Image may be NSFW.
Clik here to view.
Step 8: testing the Public folder Automatic Reply rule + Send As permission
In the last step, we want to verify that all the configuration are working as it should. We need to test two different operations:
- Verify that the jobs Public folder is creating an Automatic Reply
- Verify that Sarah can use the option of “send as” by using the email address of the jobs Public folder (jobs@o365info.com)
Test 1: Verify that the jobs Public folder is creating an Automatic Reply.
The following test is very simple, all we need to do is just send email to the following email address: jobs@o365info.com
Image may be NSFW.
Clik here to view.
In the following screenshot we can see the Automatic Reply that was sent. We can see that the “sender” is jobs and that the email includes the content which we have use of the reply template.
Image may be NSFW.
Clik here to view.
Test 2: Verify that Sarah can use the option of “send as” by using the email address of the jobs Public folder
Technically, we can verify the use of “send as” permissions by using Outlook or OWA mail client. In case that we want to use Outlook for testing the send as permission option, we should be aware of the fact that by default, Outlook is using the Offline address book. The Offline address book includes a list of the organization recipient, but also includes the permission such as: “Send as” permissions.
Because it take 24 hours until the “new Offline address book” will be created and downloaded by the Outlook client, in case that we want to test the option of Send as permission right after we have provide this permission, we might get an error message such as: “you don’t the required permission”
Testing the Send As permission using OWA mail client
To be able to test the send as permission by using the OWA mail client, we will need to login using Sarah credentials (or ask for Sarah to use OWA).
- Choose the option of: New mail
- Click on the more (three dots) icon
- Choose the option: show from
Image may be NSFW.
Clik here to view.![Testing the send as permission-001]()
- By default, the from field includes the name of the mailbox owner (Sarah in our scenario).
We will need to remove the default owner named by right click on the From icon and click on the remove menu
Image may be NSFW.
Clik here to view.![Testing the send as permission-002]()


Now we can add the required email address: Jobs@o365info.com
in our example the target recipient” is: Sarah.
Image may be NSFW.
Clik here to view.
In the following screenshot, we can see that Sarah gets the mail and, the mail appears as mail that sent from a recipient named: Jobs.

A quick reference for the article series
| Image may be NSFW. Clik here to view. |
Setting up an Automatic Reply in Office 365 using Public Folder | Part 1/2 In this article, we will learn how to implement, a configuration of Automatic Reply in Office 365 using Public Folder. We will review all the required steps Beginning with the creation of Public Folder, configure the required email address, and set the Automatic Reply rule using the Public folder- Folder assistant, testing the permissions and the Automatic Reply process. |
| Image may be NSFW. Clik here to view. |
Setting up an Automatic Reply in Office 365 by using Shared mailbox | Part 2/2 In this article, we will learn how to implement, a configuration of Automatic Reply in Office 365 using a Shared mailbox. We will review all the required steps Beginning with the creation of Shared mailbox, assign the required permissions, set the Automatic Reply rule using inbox rule and testing the permissions and the Automatic Reply process. |

We really want to know what you think about the article
The post Setting up an Automatic Reply in Office 365 using Public Folder |Part 1/2 appeared first on o365info.com.