
The term Automatic Reply describes a scenario, in which every time that a mail is sent to a specific recipient, the recipient will Automatic Reply with a predefined answer (Template or a specific text).
In office 365 we can implement the feature of Automatic Reply by using a Public folder or, by using an inbox rule. In the former article ( Setting up an Automatic Reply in Office 365 using Public Folder |Part 1/2) we review how to implement the option of Automatic Reply by using a Public folder.
In the current article, we will review how implement the option of Automatic Reply by using an inbox rule, or if we want to be more specific: by using a Shared Mailbox inbox rule.
The use of Automatic Reply is implemented most of the time for a specific organization service.
Technically, the configuration of Automatic Reply could be implemented by using a “standard user mailbox” but our assumption is that we would like to avoid from purchasing an additional license. For this reason, the Shared mailbox is a perfect solution because In Office 365 environment (to be more specific in the Exchange Online environment), A shared mailbox is a “free mailbox” that we can create. In other words, we don’t have to purchase a license for a shared mailbox.
The only “problem” that we will need to deal with is that: the option of Automatic Reply is implemented by using an Inbox rule that can be created only by using the rich interface of Outlook mail client.
When we use a Shared mailbox, there is no “standard option” for creating an Outlook mail profile because the Shared mailbox is “attached” special system user account, and we cannot use this system user account for creating the Outlook mail profile.
Later on, I will show you a nice way to bypass this obstacle.
A quick reference for the article series
 |
Setting up an Automatic Reply in Office 365 using Public Folder | Part 1/2 In this article, we will learn how to implement, a configuration of Automatic Reply in Office 365 using Public Folder. We will review all the required steps Beginning with the creation of Public Folder, configure the required email address, and set the Automatic Reply rule using the Public folder- Folder assistant, testing the permissions and the Automatic Reply process. |
|
Setting up an Automatic Reply in Office 365 by using Shared mailbox | Part 2/2 In this article, we will learn how to implement, a configuration of Automatic Reply in Office 365 using a Shared mailbox. We will review all the required steps Beginning with the creation of Shared mailbox, assign the required permissions, set the Automatic Reply rule using inbox rule and testing the permissions and the Automatic Reply process. |
To be able to optimize the navigation in the article, you can use the collapse and expand option.
| Collapse All Headers |
Setting up an Automatic Reply in Office 365 | Real life scenario
To make our example more real, let’s use the following scenario: we got from the management the following request: We need to create a “special mailbox” for the Help Desk department. The mailbox will serve as a “service mailbox” for organization users who need to open a service request. The Help desk team will use the Shared mailbox as “additional mailbox” and, all the Help desk members will have Full Access to the Shared mailbox. The shared mailbox will be used for scheduling a meeting with users, add contacts, etc.
The specific requirements that we will need to fulfil are as follows:
- A dedicated mailbox will be created. If passable, we would like to avoid from purchasing a license to this mailbox to save the cost.
- The email address of the new mailbox will be: hd@o365info.com
- Each time that a mail will be sent to the “Help Desk” mailbox, the mailbox will “respond” with an Automatic Reply such as:
Thanks for reaching out to us!
This is an automatic email to let you know that your request has been received and is being reviewed.
We’ll get you an answer back shortly. For immediate answers, search our knowledge base at http://support.o365info.com
<Signature> - The Automatic Reply will include a signature
- All of the Help desk team members, will have the option to “send as” reply using the email address of jobs@o365info.com.
- All of the Help desk team members, will have Full access to the content of the Shared mailbox

Step 1: Creating a new security group for the Help Desk team
As mention in the “requirements section,” each of the Help Desk team members will have Full access permission to the Shared Help Desk mailbox + Send as Permissions.
Assigning permission to a group instead of assigning permission to user
Technically, we can assign the required permission to each of the Help desk team members separately, but a more proper way is to use the option of assigning permission to a “group”, instead of separately for each user. When use assign permissions to group, the ongoing management task is more efficient. For example: in case that a new member is joined to the Help desk team, all we need to be just add the user to the group, instead of going to each of the resources separately and assign the required permission for this user. Note – you can read more information about the subject in the article:
Effective management of permission in Exchange Online by using Security groups
Security group versus Distribution group
The additional information that we need to know is that in case that we need to assign permission to a “group” we will need to create the group as a security group. (We cannot assign permission such as Full Access permission to a distribution group only to a security group).
- Login to the Exchange Online admin center
- On the left menu bar chose the recipient menu and on the top menu bar choose the groups menu
- Click on the Plus sign and choose the option of: Security group
![Creating a new security group for the Help Desk team -001]()
- Fill in the information about the: Display name, Alias and Email address for the Security group(In our scenario, we will call the new security group: Help Desk and he Alias is: Help Desk)
![Creating a new security group for the Help Desk team -002]()
- In the next step, we will add some members to the security group. In our example: there are three members in the Help Desk: John, Bob and Alice.
![Creating a new security group for the Help Desk team -003]()


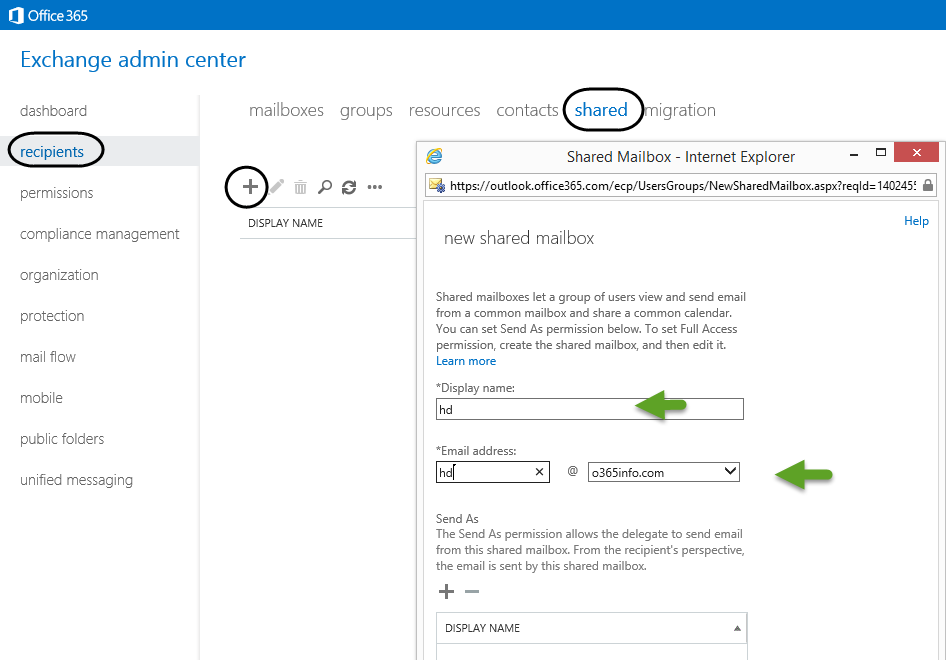
Step 2: Creating a new Shared mailbox
In this part we will create a new Shared mailbox
- Login to the Exchange Online administration center.
- On the left side menu, click on the recipient menu and on the top bar menu click on the shared menu
- In the *Display name box, type the name of the Shared mailbox (hd in our example)
- In the *Email address box, type the alias name of the Shared mailbox (hd in our example)
![Creating a Shared mailbox]()
- Choose the save option to finish the process.
Note – the default interface for creating a new shared mailbox includes the option to assign only send as permission. Only after we save the information and double-click on the name of the Shared mailbox, we can see the option for adding additional permission such as the Full Access permission.
- A warning window appears and informs us that no permission was assigned.
Click on the Yes option to finish the creation of the Shared mailbox (we will add the required permission on the next step)
![Creating a Shared mailbox-02]()

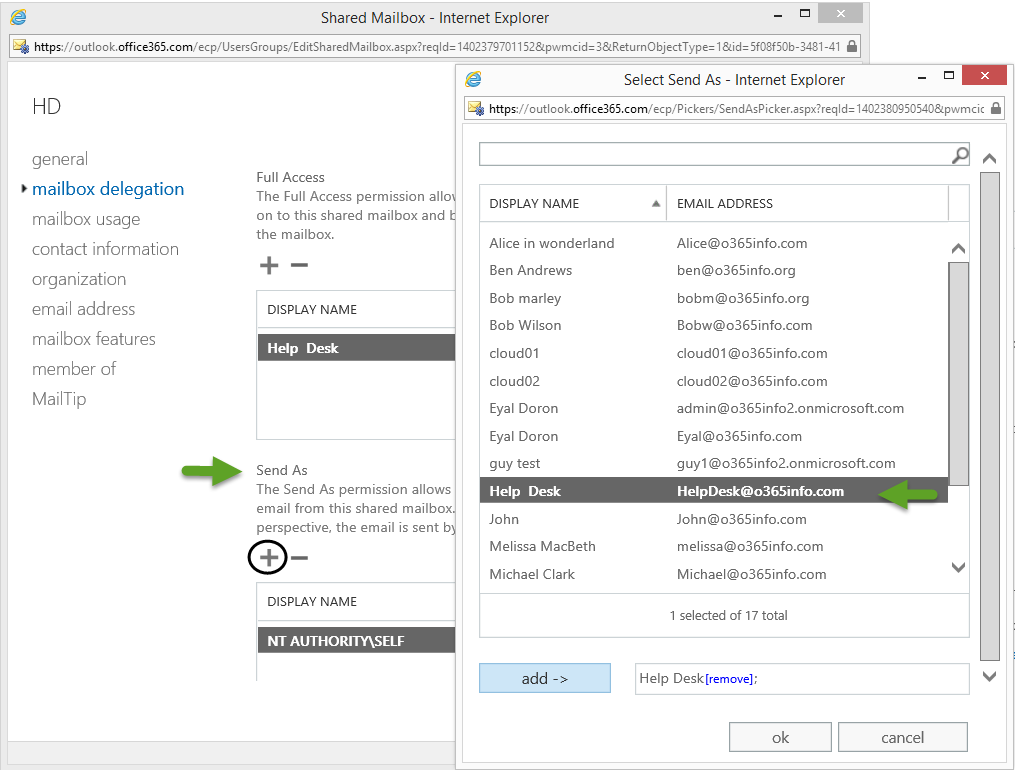
Step 3: assign permission to the Shared mailbox
The permissions that we need to assign are:
- Send As permission: we will assign the send as permission to the Help desk security group to enable the help Desk team members to reply to emails, using the email address of the Shared mailbox (hd@o365info.com in our example).
- Full Access permission: we will assign the Full access mailbox permission to the Help desk security group on the Help Desk Shared mailbox. This permission is required because, we want that each of the Help desk members will have access to the Help Desk Shared mailbox.
Assign Full Access permission to HD Security group.
When we assign a Full Access mailbox permission to an individual user, the option of AutoMap is automatically activated. The Automap feature will automatically add a mailbox which the user has permission to his Outlook mail profile without a need to manually add the “additional mailbox” to the Outlook profile.
In case that we assign Full Access mailbox permission to a security group (the Help desk group in our example), the AutoMap feature is not activated for each of the group members. For this reason, after we assign the required permission, we will need to manually add the Help Desk Shared mailbox to each of the Outlook mail profile of the Help Desk members.
Assign John Full Access mailbox permission by using the Exchange Online web interface
- Double-click on the Jobs shared mailbox.
- On the left menu bar choose the mailbox delegation menu.
- Under the Full Access section, Click on the edit icon
![Assign permission to the Help Desk security group to the Shared mailbox step 01a]()
- On the left menu bar, click on the mailbox delegation menu
In the following screenshot, we can see that we have two kinds of permissions: Send As permission and Full Access permissions.
![Assign permission to the Help Desk security group to the Shared mailbox step 01]()
- Under the Full Access section, click on the plus icon and add the required group (in our scenario – the Help desk)
![Assign Full Access permission to the Help Desk security group to the Shared mailbox step 02]()
- Under the Send As section, click on the plus icon and add the required group (in our scenario – the Help desk)
![Assign Send As permission to the Help Desk security group to the Shared mailbox step 03]()


Step 4: login to the Shared mailbox using Outlook mail client
The Automatic Reply process is implemented by creating an inbox rule. To be able to create the required inbox rule, we will need to use the Outlook mail client. Sound simple, but there is a “catch” in our scenario. The shared mailbox is not “attached” to a standard Office 365 user account and doesn’t have a “user password” (the shared mailbox is a special mailbox that doesn’t have a license, and the password is generated automatically by the Exchange Online).
So the problem that we are facing is: how can we create the required Outlook profile for the shared mailbox, so we will be able to the Automatic Reply inbox rule?
The solution for this problem is implemented by using a little trick: we will start to create an Outlook mail profile by using the email address of the shared mailbox, but the user credential that we will provide is not the shared mailbox credentials (which is not known to use and cannot be used), but instead we will provide the credential of a user who has a Full Access permission to the shared mailbox.
In our scenario, we will use the user credentials of John (John is a member in the Help desk security group that has Full Access permission to the shared mailbox).
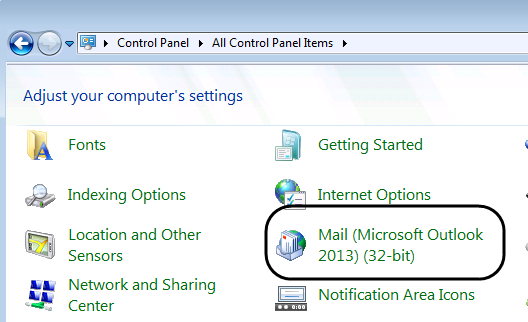
- Go to the control panel and choose the Mail icon.
![Creating a new Outlook mail profile for the shared mailbox step 01]()
- Choose the add option and provide a name for the new outlook mail profile (in our example: Shared mailbox)
![Creating a new Outlook mail profile for the shared mailbox step 02]()
- We will not provide a password (because we cannot use and doesn’t know what the shared mailbox user account password is).
![Creating a new Outlook mail profile for the shared mailbox step 03]()
- When the credentials windows will pop out, we will provide the user credentials of John.
![Creating a new Outlook mail profile for the shared mailbox step 04]()
- In the next screenshot, we can see that the process of creating the outlook mail profile for the Shared mailbox was successfully completed.
![Creating a new Outlook mail profile for the shared mailbox step 05]()
- When we login to the Outlook mail profile, we can see that the shared mailbox content (hd@o365info.com in our scenario).
![Creating a new Outlook mail profile for the shared mailbox step 06]()


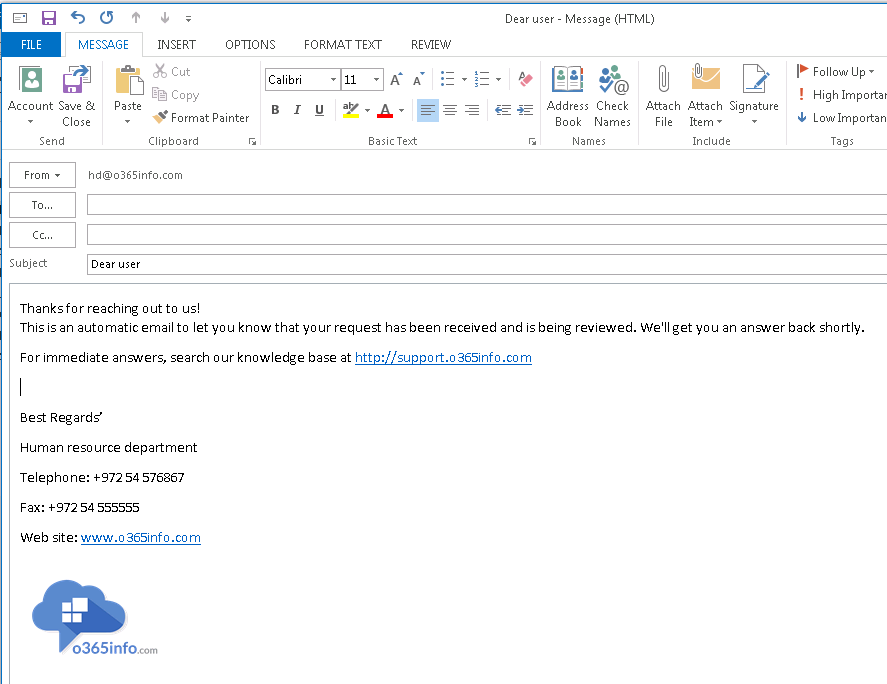
Step 5: configuring inbox rules for the Shared mailbox |Auto reply
In this step, we will create the required auto replay rule. As you remember, we want to use a predefined template that will be used for the Automatic Reply. Each time that an organization’s user will send a service required to the Help Desk shared mailbox, the Shared mailbox will generate an Automatic Reply answer.
- Choose the Rules menu and Manage Rules & Alerts …
![configuring inbox rules for the Shared mailbox -Auto reply 01]()
- Click on the New Rule… and choose: Apply rule on message I receive
![configuring inbox rules for the Shared mailbox -Auto reply 02]()
- Choose the option box: sent only to me
![configuring inbox rules for the Shared mailbox -Auto reply 03]()
- Choose the option box: have server reply using a specific message
On the bottom of the rule window, click on the link: a specific message
![configuring inbox rules for the Shared mailbox -Auto reply 04]()
As a result, a “New mail” will appear. This is the mail that will be used as a template for the Auto replay rule and will be saved on the “server side” (Exchange Online).
In our example, I use a predefined text that I have prepared that additional to include a signature, company logo, etc.
All we need to do is just: paste the content in the “New mail template” and to save the setting, click on the close menu (if you wonder, there is no “save” menu but instead, when we close the new mail message the information will be saved automatically).
We can even use a “predefined message subject”. In our example, the predefined message subject is “Dear user”
![configuring inbox rules for the Shared mailbox -Auto reply 05]()
In the following screenshot we can see that the information about the temple was updated.
Click on the Finish button to close the rule wizard.
![configuring inbox rules for the Shared mailbox -Auto reply 06]()
- We can see that a new rule was created.
![configuring inbox rules for the Shared mailbox -Auto reply 08]()


Step 6: add the Shared mailbox to the Outlook user profile
As mention before, because we assign the Full Access permission to a group (the Help Desk group) instead of assigning the permission to a specific user, the AutoMap feature will not be activated and for this reason we will need to add, the Help Desk Shared mailbox manually to the Outlook mail profile for each of the Help Desk team members.
In the following example, we will add, the Help Desk Shared mailbox to John Outlook mail profile (John is a member in the help Desk theme).
- Open Outlook and choose the File menu
- Choose the Info menu and then Account Settings and then again Account Settings…
![Add additional mailbox to Outlook mail profile 01]()
- Choose the recipient profile (John in our example) and the Change… icon
![Add additional mailbox to Outlook mail profile 02]()
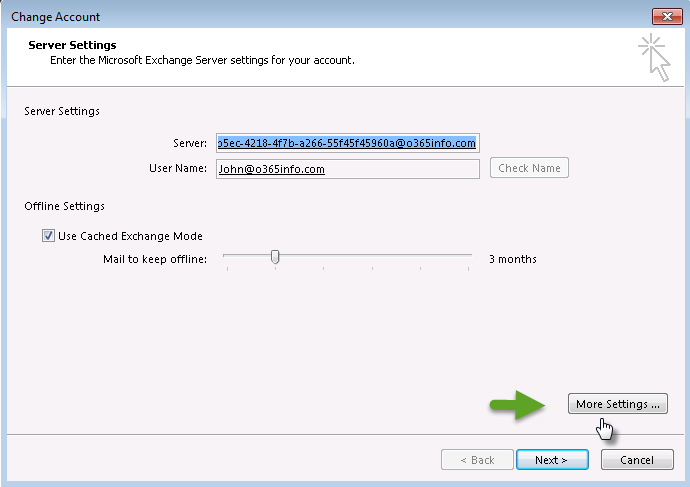
- Click on the More Settings … button
![Add additional mailbox to Outlook mail profile 03]()
- Choose the Advanced tab and click on the Add… option
![Add additional mailbox to Outlook mail profile 04]()
- In the Add mailbox window, Write down the Alias of the mailbox that you want to add (in our example the Shared mailbox alias is HD)
![Add additional mailbox to Outlook mail profile 05]()
- The process will take a couple of seconds and in the end, we can see that the mailbox was added.
![Add additional mailbox to Outlook mail profile 06]()
- Click on the Next button to finish the task
![Add additional mailbox to Outlook mail profile 07]()
In the following screenshot we can see that now, “John Outlook mail profile” included two mailboxes: John mailbox + the Shared mailbox (HD)
![Add additional mailbox to Outlook mail profile 08]()


Step 7: Verifying the shared mailbox settings
1. Testing the Send as permission
In the current section, we would like to verify that the Help Desk team members can use the option of “send as” and send email by using the email address of the Help Desk shared mailbox.
To verify the send as an option we will use John’s mailbox to verify if the permissions are assigned correctly.
- Open the Outlook and create a new mail
- In the new mail item window, click on the From icon
![Testing send as Permissions 01]()
- Click on the From button and in the “Send From other E-mail Address” type the name of the recipient whom you want to send email “on behalf” of him. In our example, John wants to send email using the email address of the Help desk shared mailbox (hd@o365info.com)
![Testing send as Permissions 02]()
- In the To… field we will use John email address (John send email to himself)
![Testing send as Permissions 03]()
- In the following screenshot we can see that John gets the mail and the mail was sent “by the hd” recipient.
![Testing send as Permissions 04]()


Tip: sent items | Shared mailbox and Send as permissions
When using the option of the shared mailbox the basic assumption is that when we are using the send as an option for sending email “on behalf” of the shared mailbox email address, the mail will be saved in the sent items mail folder of the shared mailbox.
At the current time, this logical assumption is not implemented by Outlook. Instead, the mail that was sent by the user who have Send As permission, we be saved in the sent item’s folder of the user who sent the email and not in the sent items folder of the shared mailbox.
The solution for this issue is implemented by updating the local desktop registry settings.
Instructions: adding the DelegateSentItemsStyle registry
- Click Start, click Run, type regedit, and then click OK
- Locate and then click the following registry subkey: HKEY_CURRENT_USER\Software\Microsoft\Office\14.0\Outlook\Preferences
- On the Edit menu, point to New, and then click DWORD Value
- Type DelegateSentItemsStyle, and then press Enter.
- Right-click DelegateSentItemsStyle, and then click Modify
- In the Value data box, type 1, and then click OK.
- Exit Registry Editor.
Additional reading
- Messages sent from a shared mailbox aren’t saved to the Sent Items folder of the shared mailbox in Outlook 2010
- Email that you send on behalf of someone is not saved in their Sent Items folder
2. Testing the Auto reply rule.
In the following section, we want to verify that the Auto reply rule is activated correctly. For the test purpose, we will use Sarah’s mailbox.
- Open the Outlook and create a new mail
- We will send the mail to the shared mailbox (HD is the alias of the Shared mailbox in our scenario)
![Testing Auto reply configurations 01]()
- In the following screenshot we can see that Sarah got an Automatic Reply using the template that as created in the former steps.
![Testing Auto reply configurations 02]()


A quick reference for the article series
|
Setting up an Automatic Reply in Office 365 using Public Folder | Part 1/2 In this article, we will learn how to implement, a configuration of Automatic Reply in Office 365 using Public Folder. We will review all the required steps Beginning with the creation of Public Folder, configure the required email address, and set the Automatic Reply rule using the Public folder- Folder assistant, testing the permissions and the Automatic Reply process. |
|
Setting up an Automatic Reply in Office 365 by using Shared mailbox | Part 2/2 In this article, we will learn how to implement, a configuration of Automatic Reply in Office 365 using a Shared mailbox. We will review all the required steps Beginning with the creation of Shared mailbox, assign the required permissions, set the Automatic Reply rule using inbox rule and testing the permissions and the Automatic Reply process. |

We really want to know what you think about the article
The post Setting up an Automatic Reply in Office 365 by using Shared mailbox | Part 2/2 appeared first on o365info.com.