Quantcast
Channel: o365info
Viewing all 373 articles
Browse latest View live

DKIM as standard that based upon the Public key infrastructure | Part 2#5

$
0
0

DKIM is implemented by using Digital signature. The “Digital signature” method is one of the main building blocks of the Public key infrastructure.

In the current article, I want to show you a fraction of Interesting and wonderful world of Public key infrastructure and, the way that the DKIM uses this infrastructure for implementing the concept of sender identity.

DKIM mail standard built on the Public key infrastructure

The DKIM standard is a mail security standard that enables us to implement a process, in which we can verify the identity of the sender + verify the data integrity of the content that’s included in the E-mail message.

The DKIM standard can provide these are capabilities by using methods and process from the world of Public key infrastructure.

The term “Public key infrastructure” is a very wide term that includes many different components, standard protocols, and algorithms.

The DKIM standard uses a very small fraction of Public key infrastructure that described
as Digital signature.

Regarding the subject of DKIM standard and Public key infrastructure, the main question that we can ask is:

Do we need to be familiar with Public key infrastructure in order to use the DKIM standard for protecting our mail infrastructure?

The straight answer is: “No”, especially in an Office 365 based environment that provide us a very easy and simple way for implementing the DKIM standard.

Although that the implementation of the DKIM standard in an Office 365 based environment can be activated in “one click”, my opinion is that we must understand quite well the subject of the Public key infrastructure and how does the DKIM standard uses this infrastructure.

The need to understand the “behind the scenes” of DKIM standard is because when we need to implement the DKIM standard in complex mail environment or, to a troubleshooting scenario in which the DKIM standard is involved, we must be equipped with broad knowledge about the Public key infrastructure and the specific characters of the DKIM standard and the Public key infrastructure features that he uses.

Most of the technical articles that include a description of the DKIM process assume that the reader is already familiar with the concept of Public key infrastructure, Digital signature, Certificate and so on.

However, in reality, most of us have a very superficial knowledge about Public key infrastructure.

When reading a technical article about DKIM standard that includes Public key infrastructure “buzz words”, the outcome is that we are left with a feeling frustration because we are not relay understand this “mambo jumbo” process.

The purpose of this article is to help you demystify the subject of Public key infrastructure and to provide better understanding regarding the way that DKIM standard uses the Public key infrastructure for implementing his main purpose – enable the receiver to verify the sender identity.

Q1: Do I have to read this information to be able to apply DKIM?

A1: No you don’t. If you want to know how to “activate” the DKIM signature for outgoing
E-mail in Office 365, you can jump to the article – How to enable outbound DKIM signing for your domain in Office 365 |Part 5#5

Q2: Does the Public key infrastructure is relevant only to DKIM infrastructure?

A2: No, the concept of – Public key infrastructure is used by many standards and protocols such as TLS, HTTPS and more.

Q3: Does the information that provided in the current article about the Public key infrastructure will help me to fully understand this infrastructure?

A3: No, in the current article, we will review only a fraction of the Public key infrastructure which relates to the process of Digital signature that serve as an essential component in the DKIM standard.

Q4: Does the description of “DKIM flow” in the current article, include all the specific details that involved in a standard DKIM flow?

A4: No, the current article will provide a high-level view description of the DKIM flow that doesn’t include an exact description of each detail that involved in the DKIM process \flow.

DKIM and the Public key infrastructure

The purpose of the DKIM standard is to enable both sides – sender and receiver, to use mail infrastructure in a secure manner.

  • The DKIM standard is used by the sender, as a tool for preventing a scenario, in which hostile elements will use his identity (his public domain name) when they attack “other organizations”.
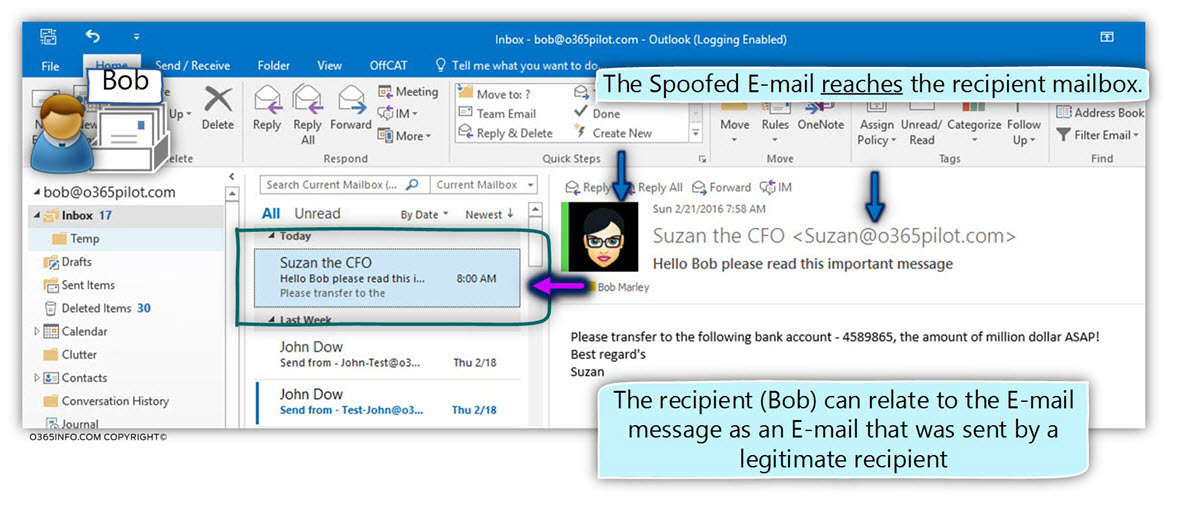
  • The DKIM standard is used by the receiver, as a tool for verifying the identity of the sender and by doing so, prevent a scenario in which hostile element will spoof or use a fake identity of a legitimate organization.

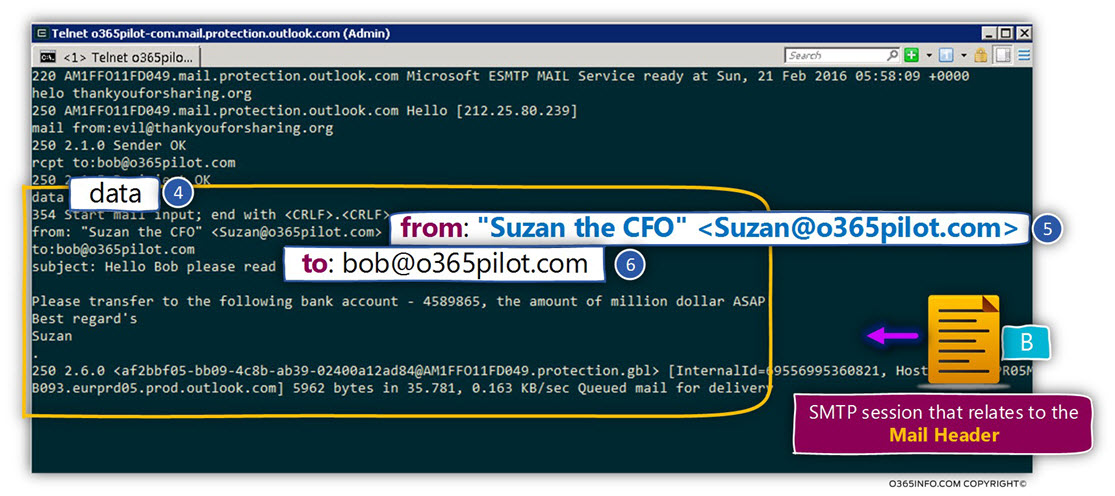
The DKIM standard enables the side that represents a specific mail domain to “stamp” his true identity into E-mail messages that leave his organization so, the “destination side”
(the receiver), will be able to verify if the E-mail message.

The receiver mail server will decide if the E-mail message was indeed sent by a trusted source or if the E-mail message was sent by a “sender” that his identity cannot be verified and for this reason, the E-mail item can be classified a suspicious or problematic.

The ability of the sender to proof his identity by using Digital signature

Sender side

The main ways of the “sender side” meaning, the mail infrastructure that uses DKIM standard is – to “stamp” each E-mail message with a “unique sign”, that will prove his identity and let the destination recipient be sure that a specific E-mail message was sent by “him” (by the mail server that represents a specific E-mail domain name).

This goal is accomplished by – using a Digital signature process that will. Digitally sign each E-mail message that leaves the organization mail infrastructure.

The receiver side

The main ways of the “receiver side” meaning, the mail infrastructure that accepts the
E-mail message is:

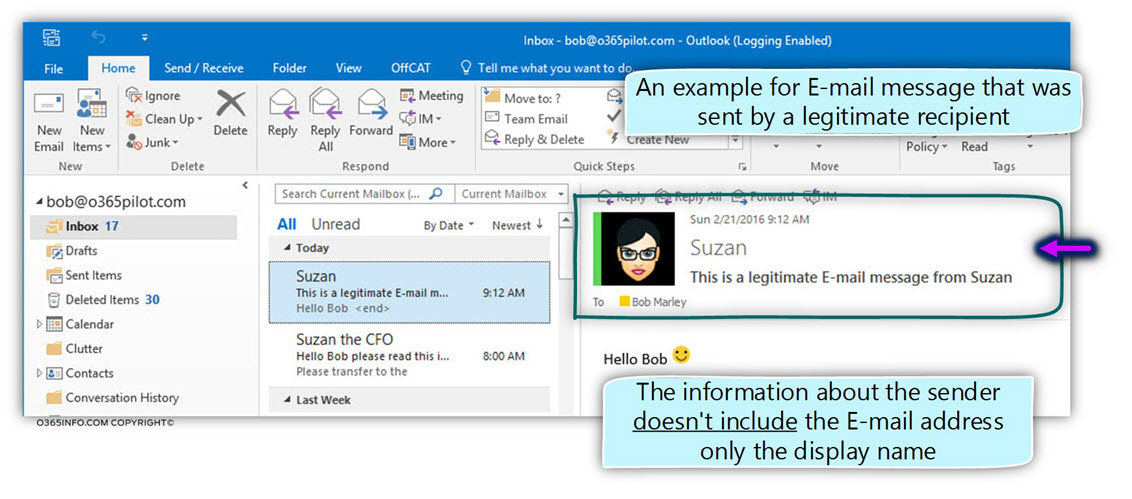
  1. Know with certainty, that an E-mail message that uses an E-mail address with a specific domain name was sent from a legitimate mail server that represents the domain name.
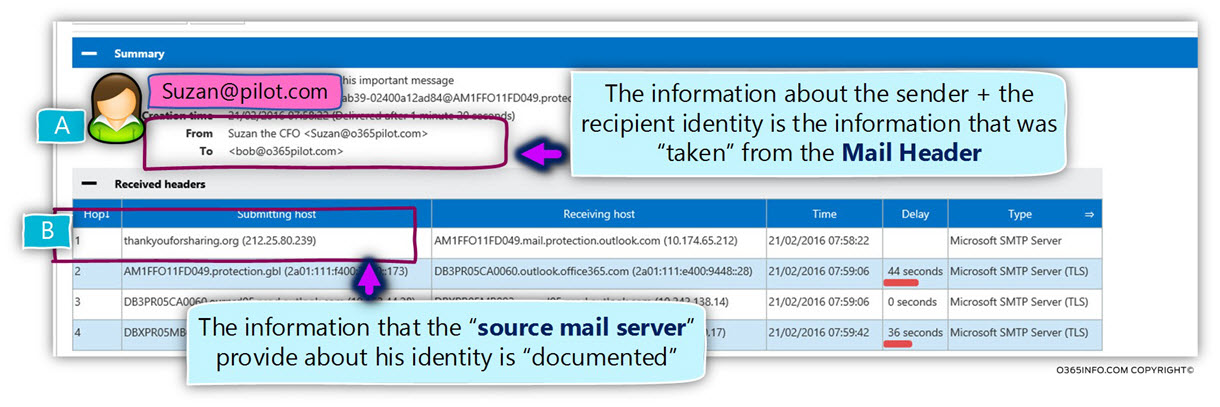
  2. Know with certainty, that the information that appears in the E-mail message header was not altered in any way.

This goal is accomplished by a process in which the receiver side opens the E-mail message that includes the Digital signature and implements a process of verifying the Digital signature.

DKIM is built upon a Public key infrastructure

The main purposes of Public key infrastructure and how does DKIM uses Public key infrastructure

As mentioned, the information about the Public key infrastructure that will be provided in the next sections is just a small fraction of the “big picture” that describe the true meaning of Public key infrastructure.

One of the main problems (or if you would like to use the politically term – “challenge”) is the ability to describe a specific component of the Public key infrastructure, without using technical terms that relate to additional or parallel components of the Public key infrastructure.

In other words, to the task of describing the Public key infrastructure “from scratch” meaning begging with the description of” the first layer” and then move on to the “second layer”, is almost impossible because each of the different layers is interlaced with each other.

Bottom line

Be patient!

At the begging, the information looks messy and unclear, but down the road, as we continue to read the information things will get clearer.

the non-imposable mission of describing each part of the Public key infrastructure

In this article, our main goal is not to provide a detailed information about each of the
Public key infrastructure components but instead, focus on the specific Public key infrastructure components meaning Digital signature, which is used when implementing DKIM.

The purpose of using Public key infrastructure in general

Generally speaking, the purposes of Public key infrastructure are:

  1. Data encryption – the ability to transfer data over a non-secure channel in a way that only the two parties that are involved in the communication process will be able to read the data.
  2. Identification – the concept in which a specific side needs to prove his identity with absolute certainty to the other side.
  3. Data integrity – the ability to ensure that the data that was sent over the communication channel to the “other side” is the original data, meaning the data has not changed or altered.

The DKIM uses these “three Public-key infrastructure building blocks”: Encryption, Identification, and Data integrity for accomplishing the goals if enabling the sender side to digitally sign email messages and, to the receiving side – to verify the identity of the sender.

DKIM – Using the Public key infrastructure building blocks

The concept of public key and private key pair

The term “key pair”, describe a set of the two encryption keys, that created based on a cryptographic algorithm.

One key described as Public key, and the second key described as Private key.

public and privaet - keys pair

The “key pair” (the Public key and Private key) is mathematically linked.

The concept of using Public and Private encryption keys, describes as “Asymmetric cryptography” because, we use different keys for encrypting and decrypting the data.

The concept of public key and private key pair

Symmetric cryptography

Technically speaking, there is an additional encryption method in which we use “symmetric cryptography” meaning – we use only one key for encrypting the information and the same key for decrypting the information.

The common term for this key is – Session Key because, in Public key infrastructure, we use this key to encrypt data in a specific session of for a specific time period.

Public key infrastructure

The term “Public key infrastructure” was created for describing a very complex and sophisticated infrastructure that included many components that use the “Key pair” (the Public key and the Private key) for various operations.

Public key infrastructure is a very complicated infrastructure

General note regarding the term – “Public key infrastructure”.

Despite the fact that we use a combination of Public key and a Private key and despite the fact that the “security infrastructure” uses many other components such as CA (Certificate Authority), certificate, HASH algorithm, Digital signature, Symmetric key and much more, the common term that is used for describing an infrastructure that uses Public + Private keys is – Public key infrastructure.

The purpose of Public-Private key

A reasonable (but wrong) assumption is that we use two sets of keys because, one of the keys was created for encrypting data and the other key, was created for decrypting
(remove the encryption) data.

The reality is a little complicated because the mathematical formula that we use for creating the special set of “keys”, provide each of the keys the ability to encrypt data and also decrypt data that was encrypted.

Each of the keys has a unique character:

  • The Public key as the name implies, is known to everyone.
  • The Private key is a “Secret Key” that is known only to the owner of the key pair.

The Private key should be kept in a secure manner and be accessible only for the “owner” of the key pair.

Versus this concept, the Public key should be published so, everyone will have access to
the Public key and the ability to read the value of the Public key.

public and privaet - keys pair -concept

As mentioned, booth of the keys (the Public Key and the Public Key) used for Encrypting data + Decrypting data.

When using a Public key infrastructure, the following rules are applied:

  • Data that was encrypted using the Public key can be decrypted only by using the Private key.
  • Data that was encrypted using the Private key can be decrypted only by using the Public key.

public and privaet - keys pair -concept-02

In a Public key infrastructure, we use the Key pair in the following manner:

The use of Public Key

1.  Encrypting data

Most of the time, we use the Public Key for encrypting a very specific data – the information about the Session key.

In a scenario in which we need to encrypt data that travel over a non-secure infrastructure between two parties, in a Public key infrastructure, we use a Session key for encrypting the data (in also for decrypting the encrypted data).

We will not get into the specific detail, but in general, the process of decrypting data by
using Public key is very resource intensive.

For this reason, we use the Public key as a “one-time process” for encryption the Session key that will be used for a specific session between the two parties that are involved in the communication channel (using the Session key is fewer resources intensive).

Using a Public Key for Encrypting data -01

2.  Decrypting information

In a Public key infrastructure, we use the Public key also for decrypting information meaning, remove the encryption from a specific data.

When using the option of Digital signature, the receiver, uses the Public key of the sender for decrypting the HASH value that appears in the Digital signature.

Using a Public Key for Decrypting data -02

The use of private key

1.  Encrypting information

When the sender needs to create a Digital signature, he uses the Private key for encrypting the HASH value that included in the Digital signature.

Using a Private Key for Encrypting data -03

2.  Decrypting information

In a Public key infrastructure, we use the Private key for decrypting data.

In a standard communication channel that uses the Public key infrastructure, one of the sides such as side B generates a Session key (encryption key that is used only for a specific session or for a limited amount of time) and encrypt the Session key by using the public key of side A.

When side A get the data (the encrypted Session key), side A will remove the encryption using his Private key.

Using a Private Key for Decrypting data -04

The use of the term “Encryption” in Public key infrastructure

In this section, I would like to review the term “Encryption” when relating to
a Public key infrastructure.

The process “Encryption” can be implemented by using a:

  1. Public key
  2. Private key
  3. Session key

In addition, the use of “Encryption” that is implemented in Public key infrastructure, can be classified into two major scenarios:

  1. Data encryption – using the encryption process for encrypting data that flows through the channel of communication between the two entities involved.
  2. Digital signature – encrypting the HASH value that included as part of a Digital signature.

The DKIM standard uses encryption only for the purpose of Digital signature.

When using a Digital signature, we don’t wish to transfer data in a secure manner (by encrypting the data) but instead, implement a concept which enables side B to identify and trust the identity of side A.

In the following diagram, we can see that the DKIM standard doesn’t need the “encryption type” that is used in a Public key infrastructure, for delivering data over a non-secure communication link (encrypting the data himself).

The DKIM standard uses only the “second form of encryption”, in which the encryption option is used for encrypting the HASH value.

Public key infrastructure - two type of data Encryption -What encryption is used by DKIM

Public key infrastructure | Data encryption | Type 1#2

In the following section, we will review the process of encrypting data that which is transferred through a communication channel between two parties.

As mentioned, this type of data encryption” is not implemented when using DKIM.

Although this part is not directly related to the DKIM implementation, it’s important that we will have general knowledge of this “Public key infrastructure part”.

In a Public key infrastructure, the data encryption process is implemented in the following way:

Side A and side B want to secure data that passes through a non-secure communication channel (such as public network, etc.).

To accomplish this goal, the following conditions must be met:

  1. Side A and side B will have to agree on a specific method (encryption key) that will be used for encrypting and decrypting the data which is transferred via the communication channel.
  2. Side A and side B will have to agree on a method that will enable them to share the encryption key.
  3. Each of the involved parties (side A or side B) that send data to the “other side”, will use the key for encrypting the data.
  4. Each of the involved parties (side A or side B) that get data from the “other side”, will use the key for decrypting the data.

Data encryption key.
In a Public key infrastructure, we use the same key for encrypting the data and also for decrypting the data.

The side that generates the session key.
One of the involved parties (side A or side B) is responsible for generating the “key” that’s described as Session key.

Deliver the session key in a secure manner.
This is the part which enables the involved parties (side A or side B) to share the Secret key so the side that generate the Session key (side B in our example) will be able to deliver the secret key to the “other side” over a non-secure infrastructure.

The side that generates the Session key (in our example side B), will use the Public key of side A for encrypting the “Secret Key” (the Session key) that will be used by both  involved parties (side A or side B).

Note – in reality, the scenario is more complicated because we need to find a way to enable each of the sides (side A and side B in our scenario) to verify the identity of each other, before the phase in which the sides exchange the information about the Session key.

Step 1#4

  • Side B generates a Session key (Secret Key).
  • Side B encrypts the Session key with the Public Key of side A.
  • Side B sends the encrypted data to side A.

Using a combination of session key public key and a private key for encrypting data -01

Step 2#4

  • Side A get the encrypted data.
  • Side A uses his Private key for decrypting the data. In this phase the term “data” realities to the value of the Session key.

Using a combination of session key public key and a private key for encrypting data -02

Step 3#4

When side A need to deliver data to side B, side A will perform that following steps:

  • Side A uses the Session key (the Session key that he got from the former phase) for encrypting the required data that he needs to send to side B.
  • Side A sends the encrypted data over the communication channel to the “other side”.

Using a combination of session key public key and a private key for encrypting data -03

Step 4#4

  • Side B gets the encrypted data.
  • Side B will use the Session key for decrypting the data

Using a combination of session key public key and a private key for encrypting data -04

Public key infrastructure | Digital signature | Type 2#2

An additional implementation of the term “Encryption” in Public key infrastructure is implemented when using Digital signature.

When side A creates a Digital signature, side A encrypts the HASH value using his Private key and the receiver (side B) use the Public key of side A for decrypting the information.

As mentioned before, the DKIM standard uses Encryption only for implementing Digital signature.

In the current article, we will mention the term “Encryption” many times.
In the context of this article, we use the term “Encryption” for describing the process which is implemented when using Digital signature.

The concept of HASH

In DKIM implementation, the sender (the mail server that represents the sender) uses a Digital signature that is attached to the E-mail message.

The purpose of this “Digital signature” is to enable the receiver (the mail server that represents the destination recipient) to implement a verification process in which he verifies the identity of the source recipient (the sender).

The Digital signature that the sender creates, is implemented by using the following steps:

  • Use a HASH function to collocate the HASH value of a specific E-mail header.
  • Get the HASH result.
  • Encrypting the HASH value using a Private key.

The question that can appear in our mind is: what is this “HASH” thing?

In this section, our main focus is to try to understand better the concept of “HASH“.

The term “HASH” defines is a mathematical function, that we use for processing a specific data and the outcome describes as HASH value or Message Digest.

The HASH value (the result) totally depends on the value of the “original data”.

Even if one bit of the “original data” is changed, in case that try to use again the HASH Function, the outcome meaning, the HASH value is totally different.

The Ingredients of the HASH process are as follows:

1.  The original data.
The is the text or the “source” that we want to HASH by using a HASH function. The “source” could be a single word or a text that includes hundreds of thousands or even millions of characters.

2.  The HASH function.
The HASH function is a mathematical formula that uses for generating the HASH value.

HASH function

3.  HASH value or a Message Digest

When we “feed” the HASH function with the specific data source, the HASH function will
“Grind” the data and describe the outcome as the HASH value or a Message Digest.

HASH function and Message Digest

One of the most interesting things about the HASH function is that the result, meaning the HASH value (the Message Digest value) is a fixed value.

In other words – the HASH value length is not realities in any way to the “length” (number of or characters) of the original text on which the HASH function was used.

The fixed size of the Message Digest

HASH function flow

In the following diagram, we can see the flow of the HASH function.

We take some text and “stuff it” to the HASH function “grinder”.
The HASH function “grinder” process, the data and the result are the HASH value that has a fixed length.
The “fix length” of the HASH value depends on the “type” of HASH function (HASH algorithm) that we use.

For example:

  • A HASH algorithm named- SHA-1, produces a 160-bit (20-byte) hash value.
  • A HASH algorithm named- MD5, produces a 128-bit (16-byte) hash value.

HASH function - The concept of Fixed sized HASH value

The HASH value

The HASH value that is produced by the HASH function is a very specific and unique value that “represent” the specific data\text that was “HASHED” by the HASH function.

In case that we make a very small change to the original data, such as – adding a space, comma or a period to the “source text”, if we use the HASH function again on the
“apparently same text”, the result will be totally different meaning the HASH value will be totally different.

Notice that the “length” of the HASH value will stay the same, but the HASH result will be a totally different result.

HASH function - The concept of altered original data and the different HASH result

HASH function and the “non-reversible concept”.

Another important concept of the HASH function could be described as “non-reversible concept”.

The meaning of this concept is:
in case that we have in our possession the HASH value, we can never use a process such as a “reverse engineering”, in which we generate the original data from the HASH value.

In other words – the HASH value could not be used in any way by any element in getting the “original data” that was hatched by the HASH function.

We can use a not very nice metaphor to demonstrate the concept of “non-reversible”:

HASH function - The concept of Non Reversible

The real purpose of using the HASH process

The main purpose of the HASH process is not to encrypt a specific data, but instead, provide us a mechanism, which we can use for verifying the integrity of the data.

For example – when we get a specific message, to be able to be sure that the message content that reaches to us is the “original content”, that was created by the sender. In other words, to be able to be sure that the message content was not altered or change in any way.

As mentioned, the HASH vale considers as “no reversible” meaning we cannot use the HASH value for “generating the original data.

In other words, side B cannot use the HASH value that sent from side A for “revealing” the original data that was sent.

Instead, the way that we use the HASH procedure is by comparing the “original HASH value” to a “computed HASH value” that is generated by the receiver (side B).

The process that we use for verifying the Data integrity of the message content, that sent to us, is by implementing a procedure in which the destination side (the receiver or side B in our example)

Take the text that was sent by the sender

  • Uses the same HASH function (the same HASH algorithm) on the “source data”.
  • “Write down” the HASH value.
  • Compare the HASH value that he got to the original HASH value that is included in the message that sent from side A.

In case that the “computed HASH value” is identical to the  “original HASH value,” we can assume that the data was not altered or change in any way.

In the following diagram, we can see the concept in which booth on the side (the sender and the receiver) will need to use the HASH function for computing the HASH value of a specific “block of text”.

The process of computing the HASH value by booth of the involved parties

In the following diagram, we can see the concept in which side B (the receiver) needs to compare the two different HASH values:

  • The “original HASH value” that was computed by side A and sent as part of the
    E-mail message.
  • The “HASH value” that was computed by side B.

The process of comparing the HASH value by the destination party

In case that the booth of the HASH value is equal – the meaning is that the data that he got is the original data (the data hasn’t changed or altered in any way).

The identity of the sender who sends the data

The use of HASH enables us to be trusted the “data integrity” meaning to be sure that the original data that was created by the “sender” was not altered.

But one important question that was not asked, up until now, is – how can we trust the “sender”?

How do we know that the sender is really who he claims to be?

In a Public key infrastructure, the answer for this “need” is implemented by using a Digital signature.

The Digital signature enables the sender to prove his identity to the receiver by encrypting the
HASH value that he sends using his private key.

Digital signature

Digital signature is a major component in Public key infrastructure.

Using a Digital signature, enables us to fulfill two major security needs:

  1. Data integrity
  2. Proof of identity

What is the purpose of Digital signature

In the former section, we have to review the subject of “HASH” and learn how we can use the “HASH Process” for verifying the integrity of a specific data that sent to us.

In addition, we show that the “HASH processdoesn’t provide a way for enabling us to verify the identity of the sender.

In Public key infrastructure, the “tool” that we use for using a mechanism which enables us to verify the identity of a specific sender is by implementing a process which includes the following steps

  • Side A (the sender) encrypt a specific “piece of data” using his Private key.
  • Side A (the sender) send a message that includes the encrypted piece of data to the other side (side B).
  • Side B (the receiver) tries to decrypt the encrypted piece of data by using the  Public key of side A.
  • In case that he manage to “crack” the encryption by using the Public key of side A, this is a Definite proof beyond doubt that the message was indeed sent by a legitimate sender (side A) because only the sender who has access to the Private key could have to encrypt the specific data in a way that could be decrypted by using the Public key.

In our scenario, the “piece of data” is the HASH value that is generated and attached to the E-mail message by side A.

In a Public key infrastructure, the combination of – HASH value that is encrypted by a privet key described as Digital signature.

What are the building blocks of a Digital signature

Generally speaking, the “trust concept” could be realized as:

  1. Two-way trust – side A need to be able to trust side B and vice versa.
  2. One-way trust – side B needs to be able to trust sides against A but not the opposite meaning side A doesn’t need to trust side B.

In a Public key infrastructure, the process of Digital signature is implemented most of the time as a One-way trust.

In other words, most of the time one of the sides such as side A need to be able to proof his identity to side against B so, side B could trust him,

This doesn’t mean that side B in our example should also proof his identity to the side A.

In the following diagram, we can see the concept of data that was encrypted by suing a Private key. Only the “real sender” meaning, the owner of the Private key has access to this key!

The owner of the Private Key

An example of using Digital signature in DKIM session

In the following section, we will review scenario that is implemented when using the DKIM standard in mail based environment.

In our scenario, recipient A wants to send an E-mail message to the recipient B.

To be able, the mail infrastructure that represents recipient B to trust the identity of recipient A, the mail server of recipient A will use DKIM for a digital sign the E-mail message.

When the E-mail message reaches to the mail server that represents recipient B, the mail server will verify if the “DKIM signature” is valid.
in case that the signature is valid, the mail server will forward the E-mail message to the recipient B.

Using DKIM for verifying the identity of the sender

Our goal

The main goal is to use a method, in which the hosts who will get the E-mail message that sent from side A, will be able to be certain beyond doubt that the message was sent by side A and the information were not altered or changed in any way.

Given that bout of the involved parties supports DKIM standard, the DKIM flow between the two of the sides will be implemented in the following way:

  • Side A uses a HASH function to HASH specific “piece of data”. In DKIM scenario, this “piece of data” relates to E-mail data fields such as – the sender E-mail message, the destination recipient E-mail address, the E-mail message subject and more.
  • The result is a HASH value.

The concept of Digital signature in a DKIM flow -01

  • Side A add to uses his Private Key for encrypting the HASH value.

The concept of Digital signature in a DKIM flow -02

  • The result is a Digital signature.
  • Side A “attached” the Digital signature to the E-mail message and send the information to the other side.

The concept of Digital signature in a DKIM flow -03

Side B gets the message. Side B has two main goals:

  1. To be able to know that the message was indeed sent by the recipient A.
  2. To be able to know that the information in the E-mail message is the “original information” meaning, the information was not altered or changed in any way.

To be able to accomplish these goals, side B (the mail server that represents recipient B) will implement two different actions:

  • Side B gets the E-mail message.

The concept of Digital signature in a DKIM flow -04

  • Side B gets the E-mail message and read the DKIM header that includes the host name of the TXT record that includes the public key of side A.
  • Side B will fetch the value of the Public Key by addressing DNS server and ask for information about the specific record.

The concept of Digital signature in a DKIM flow -05

  • Side B tries to decrypt (remove the encryption) of the HASH value in the message using the Public Key that he got from the former step.
  • In case that side B manage to complete the decryption process, side B can be certain beyond doubt, that the “originator of the message” is side A because, only the side A Public Key could have been open from the encrypted “piece of data” (the HASH value).

The concept of Digital signature in a DKIM flow -06

  • Side B will collocate the HASH value of specific E-mail fields that appear in the
    E-mail message.
  • Side B will “write down” the HASH value because later on, side B will perform a comparison of the HASH value that he got from the calculations.

The concept of Digital signature in a DKIM flow -07

  • Side B will perform a comparison process in which he compares the HASH value that he got from the calculations to the HASH value that appear in the E-mail message the was sent from side A.
  • In case that the HASH value that was calculated is equal to the HASH value that appears in the E-mail message, the meaning is that the mandatory requirement of Data integrity was fulfilled.

Side B (the mail server that represents recipient B) approve that the DKIM signature is a valid signature meaning – he trusts the identity of the sender (recipient A).

The concept of Digital signature in a DKIM flow -08

The next article in the current article series

In the next article – DKIM flow in Office 365 | Part 3#5, We will take a peek behind the curtain of the events that occurs in a standard DKIM flow.

Implementing DKIM in Office 365 | Article series index

Now it’s Your Turn!
We really want to know what you think about the article

The post DKIM as standard that based upon the Public key infrastructure | Part 2#5 appeared first on o365info.com.


DKIM flow in Office 365 | Part 3#5

$
0
0

The desired goal we seek to achieve is to implement a successful process in which the sender mail infrastructure for use DKIM to Digitally sign the outgoing E-mail message that will enable the destination recipient to successfully verify the DKIM data meaning sender identity.

The purpose of the current article is to take a peek behind the curtain looking at the events that occurs in a standard DKIM flow.

The scenario which we use for describing the DKIM flow is related to “Office 365 sender” meaning, an Office 365 customer whom his mail infrastructure is hosted by Exchange Online.

Although the scenario describes the Office 365 environment, most of the DKIM flow that will be reviewed, is relevant for any DKIM implementation.

Our DKIM scenario characters

In our scenario, there are two organizations that support the DKIM standard.

  • “Our organization” – an organization that is represented by the public domain name – o365pilot.comthat his mail infrastructure is hosted at Exchange Online (Office 365).
  • The “destination organization” – organization that is represented by the public domain name – o365pilot.com

Source recipient and destination recipient

  • In our scenario, the sender is a user named Suzan that uses the E-mail address – Suzan@o365pilot.com
  • The destination recipient is Justin that uses the E-mail address Justin@thankyouforsharing.org

The Exchange Online server who host the mail infrastructure of o365pilot.com was configured to support DKIM signature for the domain name – o365pilot.com
Each E-mail message which has an E-mail address that includes the domain name o365pilot.com will be digitally signed (DKIM Digital Signature).

Suzan, want to send E-mail message to her friend Justin that is working for a company named – “thank you for sharing” and his E-mail address is – Justin@thankyouforsharing.org

Suzan addresses her mail server, asking him to deliver her E-mail message to the destination recipient.

DKIM – Domain Keys Identified Mail in Office 365 – Outbound DKIM signing -01

The required pre-configuration for enabling the mail infrastructure supports DKIM standard

Before we begin with the detailed description of the DKIM flow in an Office 365 based environment, it’s important that we briefly review that required configuration setting that needs to be implemented on the mail infrastructure that needs to be configured to support DKIM standard.

In Office 365 based environment, we will need to “activate” the DKIM option that will be used for signing outgoing E-mail message using a DKIM Digital signature + publish a new CNAME record in the DNS server who host our domain name (o365pilot.com in our scenario).

Requirement number 1 – Public certificate

The DKIM signature is implemented via the use of a Public Key and Private Key.

In on-Premises mail environment, the need for this “Key pair” is obtained via the purchase
of a Public certificate.

In Office 365 based environment, the certificate is already created and can be used by every Office 365 customer.

In Office 365 we don’t need to generate this Public certificate or install this certificate on our Exchange Online mail infrastructure.

All we need to do is to use a public DNS record that will point to a TXT record that contains the value of the required public key that should be published.

DKIM – Domain Keys Identified Mail in Office 365 – Outbound DKIM signing -02

Requirement number 2 – Public DNS record

The information about the Public key value should be published in a public DNS server.
In a non-Office 365 environment, we need to create a TXT record that will serve as a “logical container” for the value of the Public Key.

In Office 365 based environment, we use the same concept, but in a different way-

We create a CNAME record that will redirect requests (DNS query) about the “standard DKIM record” to a special Office 365 DNS DKIM record that represents our specific domain name.

The “dedicated Office 365 TXT DKIM record” is created automatically when we enable the DKIM for our domain in the Exchange Online admin.

The “DKIM entity” that needs to digitally sign outgoing E-mail message describes as a “SELECTOR”.

In Office 365 based environment, we use two predefined host names who represent the Office 365 “selector entity”:

  • selector1
  • selector2

In the DKIM based environment, we address the “selector entity” by using his FQDN (Fully Qualified Domain Name).

The term FQDN includes the following parts – hostname + DKIM predefined sub domain name + the specific organization domain name.

In Office 365 based environment the DNS infrastructure that points to the required DKIM host records will include two different host names:

  1. The “standard DKIM host name”.
  2. Dedicated Office 365 DKIM host name for a specific domain name.

In Office 365 base environment, we need to “point” DKIM DNS query to the specific Office 365 host names.

To be able to point the requests to the specific Office 365 host names, we will need to use a “little trick” that will “forward” client request query about the “formal DKIM record hostname” to the Office 365 specific DKIM record host name.

The “trick” will be implemented by using a CNAME record.

For example, in an Office 365 based environment the FDDNs (the full host name) that represent the DKIM selectors for the domain – o365pilot.com are:

  • selector1._domainkey.o365pilot.com
  • selector2._domainkey.o365pilot.com

In a non-Office 365 environment, the same naming convention should be used, but the difference is that in a non-Office 365 based environment, we can choose any host name (the left part of the FQDN) that we want instead of “selector”.

In Office 365 based environment, we need to redirect DNS queries that use the “primary DKIM host name” to a special Office 365 DKIM host name record that is automatically created when we enable the option of DKIM in the Office 365 portal.

In our specific scenario, the additional Office 365 DKIM record name will be –
selector1-o365pilot-com._domainkey.o365info2.onmicrosoft.com

Note – if you want to get more information about the naming convention of the DKIM infrastructure in an Office 365 based environment, you can read the article – Outbound DKIM signing and DNS infrastructure | Building the required DNS records for Office 365 | Part 4#5

DKIM – Domain Keys Identified Mail in Office 365 – Outbound DKIM signing -03

DKIM and DNS infrastructure | “non-Office 365” environment

In the following diagram, we can see an example of the DKIM selector record that should be created.

In our specific scenario, the host name (the FQDN) of the TXT record is:

selector1._domainkey.o365pilot.com

DKIM and DNS infrastructure | Office 365 environment

In the following diagram, we can see an example of the required DNS setting in a scenario of Office 365 customers.

In Office 365 we need to create a CNAME record that will include information about two “DKIM hosts”.

The CNAME record will “redirect” queries about the hostname –

selector1._domainkey.o365pilot.com

For a special Office 365 DNS record that represents the DKIM selector of the domain – o365pilot.com.

In our specific scenario the host name is:

selector1-o365pilot-com._domainkey.o365info2.onmicrosoft.com

DKIM – Domain Keys Identified Mail in Office 365 – Outbound DKIM signing -04

The DNS server answers to the “receiver” (the mail server that represents the destination recipient) will include infrastructure about the an “additional host name”.

This name who appears in the DNS server answer is the host name of dedicated Office 365 record that was created when we enabled the DKIM option in the Office 365 portal.

The receiving mail server, will have to create a new DNS query and address the Office 365 DNS servers.

DKIM – Domain Keys Identified Mail in Office 365 – Outbound DKIM signing -05

DKIM flow in an Office 365 based environment | Outbound DKIM signing

Our DKIM flow begins when the organization user, addresses the mail server and asks him to deliver an email message to the destination recipient.

In a scenario, we enabled the option of Outbound DKIM signing in the Exchange Online server for our hosted domain – o365pilot.com

Each “outgoing E-mail message” that has an E-mail address that includes the domain name – o365pilot.com will by Digitally signed by the Exchange Online server.

DKIM – Domain Keys Identified Mail in Office 365 – Outbound DKIM signing -06

When the E-mail message that was sent by Suzan reaches her mail server (the Exchange Online mail server in our scenario), the mail server will start the following process:

  1. Use the HASH function to HASH the information that appears in the following mail fields:
  • From:
  • To:
  • Date:
  • Subject:
  • Message-ID:
  • Content-Type:
  • MIME-Version
  1. Encrypt the HASH value using his Private key

The Exchange Online will add a Digital signature. The Digital signature is implemented by encrypting the HASH value using the server Private key.

DKIM – Domain Keys Identified Mail in Office 365 – Outbound DKIM signing -07

  1. Add to the E-mail message the Digital signature
  2. Add to the E-mail message “DKIM information” such as the HASH algorithm that was used for HASHING the mail fields.
  3. Deliver the E-mail message

After the completion of this step, the mail server “pack” the E-mail message and deliver the E-mail message to her destination (the mail server that represents the organization thankyouforsharing.org)

DKIM – Domain Keys Identified Mail in Office 365 – Outbound DKIM signing -08

DKIM flow | Inbound DKIM validation

In the following section, we will describe the storylines of the process which is implemented by the mail server that represent the destination recipient.

The process in which the “receiver” validates the DKIM signature in the E-mail message described as – Inbound DKIM validation.

Note – In Office 365 based environment, the Exchange Online infrastructure is automatically configured to use “inbound DKIM validation”.

To be able to verify the DKIM signature, the destination mail server (in our scenario the mail server that hosts the recipient Justin@thankyouforsharing.org) will need to perform the following list of “operations”:

DKIM – Domain Keys Identified Mail in Office 365 – inbound DKIM validation -01

DKIM – Domain Keys Identified Mail in Office 365 – inbound DKIM validation -02

As we can see in the diagram above, the receiver has quite a few tasks ahead.

In the next sections, we will review each of this “tasks.”

Verify if the E-mail message includes a DKIM signature.

The first task that needs to be implemented by the receiving mail server is, to look “inside” the E-mail message and check if the E-mail message includes the DKIM signature.

In our specific scenario, the E-mail message includes a DKIM signature that was created by the Exchange Online server who represents the domain – o365pilot.com

DKIM – Domain Keys Identified Mail in Office 365 – inbound DKIM validation -03

The receiving mail server will need to read the “DKIM instructions” that attached to the
E-mail message.

The DKIM information includes the following parts:

  1. The HOST name of the DKIM selector – the term “DKIM selector” describes the entity that digitally sign the E-mail message.
  2. The information about the specific mail filed that their contact was HASHED by the sender.

The E-mail message includes additional part – the DKIM Digital signature.
The Digital signature includes a HASH value that is encrypted by the Private key of the sender (Exchange Online server who represents the o365pilot.com domain) and the HASHED value of a specific E-mail field.

The DKIM process that is implemented by the receiving mail server will need to verify two different security requirements

  1. The identity of the sender – verify the identity of the sender. This step will be implemented by using a procedure, in which the receiver mail server decrypts the encryption of the HASH value that appearing the Digital Signature.
  2. Data integrity – verify the E-mail message data integrity. This step will be implemented by using a procedure, in which the receiver mail server collocates a new HASH value and compares this HASH value to the HASH value that was sent by the sender (the mail server that represents the source recipient).

Part 1#2 | Implementing the DKIM sender identity verification phase

To be able to complete the phase of “verify the sender identity” the receiving mail server will need to get the sender Public key for decrypting the encrypted HASH value.
The purpose of the “decryption” is to be able to verify the identity of the sender.
The decryption can be implemented only by using the Public key of the sender.

A quick reminder

  • The value of the Public key is stored in a TXT record.
  • The TXT record that holds the Public key of the sender domain is hosted on the DNS server who represents the sender domain name (o365pilot.com in our scenario).
  • Only the owner of the sender domain could have published this information in the DNS that hosts the domain – o365pilot.com
  • Only the Public key that is part of the “key pair” can use for decrypting information that was encrypted by the Private key of the sender.
  • The E-mail message, include HASH values that were encrypted by using the Private key of the sender (the Exchange Online mail server that represents the domain name o365pilot.com).
  • To be able to get the information about the Public key, the receiver mail server will need to query DNS server with the hostname the described as the “DKIM selector” that represent the domain name o365pilot.com
  • The information about the DKIM selector appears in the E-mail message as part of the DKIM information.
  • The information about the “DKIM selector” includes only a “partial part” of the FQDN (fully qualified domain name) of the DKIM host.
  • The receiving mail server will “fetch” the “partial DKIM host name” and complete by himself, the “middle part” of the DKIM host name by adding the Sub-Domain name – _domainkey

DKIM – Domain Keys Identified Mail in Office 365 – inbound DKIM validation -04

In our specific scenario, the E-mail message includes the following DKIM information about
the DKIM selector:

d=o365pilot.com; s=selector1

  • The “d” letter stands for domain.
  • The “s” letter stands for the selector (the host name of the entity the Digitally sign the
    E-mail).

DKIM – Domain Keys Identified Mail in Office 365 – inbound DKIM validation -05

In the following screenshot, we can see an example of the E-mail message that was sent by the Exchange Online mail server that represent the domain o365pilot.com

The information about the entity that Digitally signed the E-mail message appears as part of the “DKIM information” that is attached to the E-mail header.

DKIM – Domain Keys Identified Mail in Office 365 – inbound DKIM validation -06

“Generated” the DKIM selector FQDN

The receiving mail server implemented a procedure in which he “build” the complete host name (FQDN) of the DKIM selector.

The “full host name” of the DKIM record is built from three parts:

Part 1#3 – the first part is the host name – represented by the “s” letter – in our specific example, the host name is – selector1

Note – versus non-Office 365 environment, in which the host name considers as the arbitrary name, in an Office 365 based environment, the host name defines by using a “fixed” host names – selector1 and selector2

In Office 365 environment, we need to define two different DKIM selectorsselector1 and selector2. In our specific scenario, we will relate only to the default DKIM selectorselector1

Part 2#3 – the second part of the DKIM host name defines as “Sub-Domain” and the value is
a “fix value”. The DKIM Sub-Domain name is _domainkey

If you look at the screenshot above, you will notice that the information of the Sub-Domain name doesn’t appear as part of the information about the DKIM host name.

This part is “added” automatically by the receiver mail server that adds this name to the information that he “pull” from the E-mail message header.

Part 3#3 – the third part of the DKIM host name is the domain name of the organization that signs the E-mail message. The domain is represented by the letter “d”. In our example, the domain name is o365pilot.com

DKIM – Domain Keys Identified Mail in Office 365 – inbound DKIM validation -07

Query DNS server for information about the DKIM host name

In this phase, the receiving mail server will need to access DNS server and “ask him” about the DKIM host name.

As mentioned, in DKIM implementation that DKIM host record is a TXT record that serves as a logical container for the value of the Public Key.

In a non-Office 365 environment, the DNS answer should be the “content” of the TXT record of the DKIM selector.

In Office 365 based environment, the receiver mail server will not get from the DNS server the required content, but instead, because the DKIM selector was configured by using a CNAME record, the DNS answer will be a “redirection” to an additional DKIM host name.

This “additional DKIM host name” is the dedicated DNS record that is created on the Office 365 DNS infrastructure when we enable the DKIM option for a specific domain.

The “additional DKIM host name” uses the “onMicrosoft domain name” and not the public domain name of the Office 365 tenants.

This process looks like a confusing process, but the explanation to this “redirection” procedure is that Office 365 consider as a hosted mail infrastructure and in reality, there is not a real option for providing a dedicated certificate for each of the Office 365 tenants and for each of the Office 365 tenant domain names.

Instead, Office 365 environment will use a “major DKIM selector entity” that will “represent all the Office 365 tenets.

Each Office 365 tenet will create a “dedicated DKIM selector record” that will apparently “lead” to his “dedicated DKIM selector” but in reality, the CNAME record will redirect the receiving mail server request to the special Office 365 record that is used to Digitally sign all the E-mail messages of each Office 365 tenant who activate the option of outbound DKIM signing.

The receiving mail server will query the pubic DNS looking for the host name –
selector1. _domainkey.o365pilot.com (the host name who appears in the E-mail message)

DKIM – Domain Keys Identified Mail in Office 365 – inbound DKIM validation -08

In Office 365 based environment, the published information about the DKIM host is implemented by using a CNAME record.

Note – if you want to get more information about the naming convention of the DKIM infrastructure in an Office 365 based environment, you can read the article – Outbound DKIM signing and DNS infrastructure | Building the required DNS records for Office 365 | Part 4#5

In our specific scenario, the CNAME record that was created for representing the DKIM selection of the domain name – o365pilot.com, includes the following two host names:

  1. selector1._domainkey.o365pilot.com
  2. selector1-o365pilot-com._domainkey.o365info2.onmicrosoft.com

Each of the DNS queries for the host name – selector1._domainkey.o365pilot.com, will be redirected to the Office 365 special DNS host name – selector1-o365pilot-com._domainkey.o365info2.onmicrosoft.com

DKIM – Domain Keys Identified Mail in Office 365 – inbound DKIM validation -09

When using a CNAME record, the “DNS answer” is – when you are looking for host A, please contact the host B.

The DNS will answer the receiver mail query by providing him a “redirection” to the hostname. – selector1-o365pilot-com._domainkey.o365info2.onmicrosoft.com

DKIM – Domain Keys Identified Mail in Office 365 – inbound DKIM validation -10

In the following screenshot, we can see an example of a process in which we use the NSLOOKUP command line tool, to query the DNS about a specific CNAME record.
When we ask the DNS server “what he can tell us” about a CNAME record of the host named- selector1._domainkey.o365pilot.com

The DNS “answer” is:

selector1-o365pilot-com._domainkey.o365info2.onmicrosoft.com

DKIM – Domain Keys Identified Mail in Office 365 – inbound DKIM validation -11

Query DNS server for information about the “New DKIM host name”

In the phase, the receiving mail server starts a second DNS query, but this time, looking for the “real DKIM host name” meaning:

selector1-o365pilot-com._domainkey.o365info2.onmicrosoft.com

DKIM – Domain Keys Identified Mail in Office 365 – inbound DKIM validation -12

Just a quick reminder – in DKIM implemented, the DNS record, serve as a logical container for the DKIM data.

Versus a “standard” DNS record in which we want to get the IP address of the specific host name when using a TXT record, we don’t wish to get the IP address of the Host name but instead, we wish to get the content that is included in the TXT record.

When the receiving mail server asks about the “content” of the TXT record, the “DNS answer’ will include all the content that is “stored” in the TXT record.

In a DKIM scenario, the content of the TXT record will include different DKIM parameters.

One of those “parameters” is the Public Key of the “sender domain” (o365pilot.com in our scenario).

DKIM – Domain Keys Identified Mail in Office 365 – inbound DKIM validation -13

In the following screenshot, we can see an example of a process in which we use the NSLOOKUP command line tool to query about the DNS TXT record that uses the host name-

selector1-o365pilot-com._domainkey.o365info2.onmicrosoft.com we can see that the DNS answer includes the content of the TXT record

DKIM – Domain Keys Identified Mail in Office 365 – inbound DKIM validation -14

The receiving mail server “fetch” the value of the Public Key that represents the DKIM selector of the sender domain (o365pilot.com in our scenario).

If we want to be more precise, we can see that the Information that provided by the TXT record include additional information such as – the HASH algorithm that was used by the sender mail server for generating the DKIM HASH value.

Later on, we will see how the receiver mail server uses this information for generating a “new HASH value” from the information that appears in the E-mail message.

Using the public key for decrypting the HASH value

In this part, the receiving mail server uses the Public key that he got for the purpose of trying to decrypt the encrypted HASH value that was created by the sender (the Exchange Online mail server that represents the domain name o365pilot.com).

In case that the receiving mail server manages to decrypt the encrypted HASH value, this is a sure sign of the sender identity.

In this phase the receiving mail server that host Justin (our destination recipient) can be sure that the E-mail message was indeed sent by Suzan or in other words, from a mail server that is authorized to represent the domain name – o365pilot.com

DKIM – Domain Keys Identified Mail in Office 365 – inbound DKIM validation -15

Recap

At the moment, the receiving mail server complete only the first part of the DKIM standard requirements in which he can trust beyond doubt that sender identity.

Now, the receiver mail server will need to complete the second part of the DKIM standard requirement in which he needs to verify the data integrity of the information that appears in the DKIM E-mail header.

Part 2#2 | Implementing the DKIM data integrity phase

In the section, we will review the steps that are implemented by the receiving mail server for verifying the Data integrity of the E-mail message.

The verification process will be implemented by using the following steps

  1. Read from the E-mail message headers, information about the E-mail fielded that was HASHED by the sender.
  2. Using a HASH function for HASH the value of this specific E-mail field.
  3. Compare the HASH value that he got to the HASH value that appears in the Digital signature of the sender

Regarding the question – how does the receiver mail server know what are the E-mail fields that are included in the HASH results, the answer is that this information is provided by the sender mail server as part of the E-mail message.

In the following diagram, we can see the E-mail fields that used by the DKIM process for implementing the data integrity requirement.

These specific E-mail fields are used by the sender mail server when using the HASH function, and the same E-mail fields should be “used” by the receiving mail server for calculating the HASH value.

DKIM – Domain Keys Identified Mail in Office 365 – inbound DKIM validation -16

In the following screenshot, we can see an example of a DKIM information that appears in the E-mail message.

The letter “h” represent the information about the E-mail header that their value is hashed.

DKIM – Domain Keys Identified Mail in Office 365 – inbound DKIM validation -17

Additional information that appears in the E-mail message header is the information about the
HASH algorithm that was used for calculating the HASH value by the “sender mail server”.

The reason that this information is mentioned is because the receiver mail server will need to use the same HASH algorithm for generating HASH value of his own.

The receiving mail server will use the HASH value that he calculates by himself to the HASH value that appears in the E-mail message.

In our specific example, the HASH algorithm is rsa-sha256 (represent by the letter “a“)

DKIM – Domain Keys Identified Mail in Office 365 – inbound DKIM validation -18

In the following diagram, we can see the logic of the process that will be implemented by the receiving mail server.

  1. The receiving mail server will use the HASH function for calculating the HASH value of the E-mail fields that was “marked”.
  2. The receiving mail server will compare the result of the HASH value that he got to HASH value that was sent by the sender in our scenario, the Exchange Online server that represent the domain o365pilot.com
  3. In case that the HASH value is equal, this is a sign that the information is “reliable” and didn’t modify in any way.

DKIM – Domain Keys Identified Mail in Office 365 – inbound DKIM validation -19

The “comparison test” that is implemented by the receiving mail server is designed for verifying that the data in the specific mail fields were not altered or changed in any way, in other words, to be sure that the data is the original data that was sent by the “sender mail server”.

If, for some reason, the “original data” that was created by the sender mail server was changed or altered, the HASH function that is implemented by the receiving mail server will produce a different HASH value.

DKIM – Domain Keys Identified Mail in Office 365 – inbound DKIM validation -20

Because all the DKIM test and verification process were successfully completed by the receiving mail server, we can be sure that the sender is the original sender and for this reason, we can trust his identity and safely deliver the E-mail message to the destination recipient.

DKIM – Domain Keys Identified Mail in Office 365 – inbound DKIM validation -21

The next article in the current article series

In the next article – Outbound DKIM signing and DNS infrastructure | Building the required DNS records for Office 365 | Part 4#5, we will review what are the required DNS record that we need to create for implementing outbound DKIM signing in Office 365 based environment and in addition, we learn that required naming convention that we need to use when creating this DNS record. .

Implementing DKIM in Office 365 | Article series index

Now it’s Your Turn!
We really want to know what you think about the article

The post DKIM flow in Office 365 | Part 3#5 appeared first on o365info.com.

Outbound DKIM signing and DNS infrastructure | Building the required DNS records for Office 365 | Part 4#5

$
0
0
In the current article, we will review what are the required DNS record that we need to create for implementing outbound DKIM signing in Office 365 based environment and in addition, we learn that required naming convention that we need to use when creating this DNS record.

The receiving mail server, verify the DKIM signature by a process, he queries DNS looking for a specific TXT record that contains the value of the sender Public key.
For this reason, we will need to create in advance this specific DNS record.

The task of creating the required DKIM DNS record in an Office 365 based environment is a little tricky because we will need to configure four host names, and we will need to know the “formula” (the naming convention) for the required DNS records host names.

Office 365 and domain names

Before we begin with the explanation about the structure of the DKIM records in an Office 365 based environment and the different possible scenario, it’s important to clarify some basic terms of the Office 365 world.

When we open a new Office 365 tenant, Office 365 automatically create a dedicated domain for the specific Office 365 tenant.

If we want to be more accurate, Office 365 will create a dedicated sub-domain that will be added to the Office 365 domain name – onMicrosoft.com

The dedicated Office 365 naming convention will be-

<Registered organization name>.onMicrosoft.com

For example- I have registered my organization name as o365info2

My Office 365 tenant domain name is:

o365info2.onMicrosoft.com

Most of the time, we will not use the “onMicrosoft.com” domain name, and instead, we will use our company or organization domain name.

In Office 365 environment, there are a couple of parallel terms that describe the domain name that the Office 365 customer register in Office 365.

The following terms: public domain, vanity domain or a custom domain relates to the domain name which the Office 365 customer own and which is “hosted” at the Office 365.

Office 365 can register one or more public domain in Office 365.

DKIM outbound signing and domains

In the context of DKIM and DKIM outbound signing.

  1. Office 365 will automatically use DKIM signing for each E-mail message that sent by Office 365 to “external recipient”.
  2. DKIM signing is not enabled by default for the public domain name who is registered with Office 365.

Sound confusing?
The truth is it’s really confusing!

Domain name in Office 365 base environment

The meaning of the “declaration” is that in an Office 365 environment the process of signing outgoing E-mail message using DKIM is implemented whether we like it or not.

In case that we didn’t enable or “activate” the option of outbound DKIM signing for our public domain, the DKIM signing will be implemented by adding to the E-mail message a host name of a DKIM selector that is based on the Office 365 onMicrosoft.com tenant name.

The process in which every outgoing mail will automatically sign using DKIM has advantages and disadvantages.

The advantage is, that the DKIM signature will enable the destination side (the receiving mail server) to validate the sender identity meaning our recipient identity.

The disadvantage for this “default behavior” is that in case that the receiving mail server using an additional E-mail standard named DMARC the fact that the DKIM Selector domain name
(onMicrosoft.com tenant name, domain) is different from the recipient E-mail address domain name could cause to a scenario in which the E-mail message will classify as “not aligned”.

Office 365 - Outbound DKIM signing - Outbound DKIM signing was not enabled for the public domain name -01

In case that we want to “activate” the outbound DKIM signing for our public domain name who was registered with Office 365, we will need to create a DNS record that will enable to perform the outbound DKIM signing process in a more effective way because when we create the required DNS record, the outbound DKIM signing will include a DKIM Selector name who uses our public domain name.

To be able to fulfill the requirement of using a dedicated DKIM selector name, we will need to use a solution that will be based on two different DKIM DNS records.

In the next section, we will review this subject

Office 365 - Outbound DKIM signing - Outbound DKIM signing was enabled for the public domain name -02

Recap

Q1: Do we have to activate outbound DKIM signing for our public domain name who is registered with Office 365?

A1: No, we don’t have but the best practice is investing the extra effort by adding to our DNS server the required “DKIM records” and activates the option of outbound DKIM signing for each of the registered public domain searches separately.

DKIM standard and the DNS infrastructure

The process in which the receiver mail server verifies the sender identity when using DKIM signature is implemented by using the public key of the sender domain.

The way that the receiving mail server uses for getting the information about the Public key of the sender is by looking for a specific TXT record that “hold” the information about the Public key of the sender domain.

For this reason, when we want to enable to Office 365 outbound DKIM signing for our public domain, we will need to publish the information about “our Public key” in the DNS server who hosts our domain name.

When the Exchange Online server will deliver an email message that was sent by our organization recipients to external recipient and sign the E-mail message using a DKIM signature, the destination mail server (receiving mail server) will need to create a DNS query in which he will ask the DNS to provide him the content of a TXT record that “contain” the information about “our Public key“.

DKIM infrastructure and DNS infrastructure relationships

The DKIM Text record

As mentioned, in DKIM scenario, the recipient uses the Public key of the sender, for implementing the process of verifying sender identity.

The information about the Public Key that should be used by the receiver mail server is published in DNS by using a TXT record.

We can relate to TXT record as a logical container that contains information.

Versus a standard DNS procedure is which most of the time the DNS client that address the DNS server ask about the IP address of a specific host name, when using a TXT record, the DNS client address the DNS server and request the “data content” that is stored in the specific TXT record.

Although the TXT record was created for providing information, the TXT record can also be represented by a hostname (FQDN if we want to be more accurate) because, in this way, the “client” can address the DNS server and ask for information that is stored is a specific TXT record.

In other words, the DNS server who hosts a specific domain can include many TXT records that use different host names.

The purpose of TXT record

In a DKIM implementation, the information about the Public Key of the sender (the mail server that creates the DKIM Digital signature) is published by using a TXT record.

The recipient will locate the required information by “fetching” the information from the E-mail message header that includes the host name of the TXT record.

Using the TXT record in DKIM infrastructure

Office 365, DKIM Public Key and the TXT record

In Office 365 environment, we don’t really have a dedicated Public key which was created exclusively for the cause.

The Office 365 infrastructure, provide us a “General Public key” that we can “borrow” and “attach” this Public Key to our specific public domain name when using outbound DKIM signing.

Outbound DKIM signing in Office 365 – Borrowing the Office 365 Public Key

The above concept seems a little confusing at first because apparently we let “someone else” to sign mail coming from our domain name.

The good news is that from the DKIM perspective and from the need to proof our sender identity perspective this process is totally legitimate and useful.

The process in which we let “Office 365” implement DKIM Digital signature for our domain name, considers as a legitimate process because we are publishing this information in the public DNS that hosts our domain name.

In other words, as the owner of a specific public domain name, we declare publicly about a specific Public Key that will be used for verifying DKIM signature that appears in an E-mail message that includes our domain name.

Office 365 is Authorized to use DKIM signing on ?E-mail message with my domain name

Now, let’s make it, even more, confusing – the DKIM implementation in Office 365 based environment for a hosted domain name (public domain name), is not implemented by publishing a TXT record that includes
the Public Key that should be used for verifying our sender identity.

The main reason for this is that we are not the owner of the Public Key but instead – Office 365 is the owner of this Public Key.

Technically, there are additional reasons such as the need to dynamically update existing Public Key with new Public Key value (Public Key rotation) and so on.

The “solution” that we use for solving this contradiction is by using a DNS CNAME record.

To be able to be compatible with the DKIM naming convention for the DKIM Selector host name, we will publish this “formal record” in the DNS that hosts our domain name.

This “formal DKIM host name” is not a real TXT record that includes the required information, but instead, a record that serves as a “router” that route the request of the DNS client (the receiving mail server) to the “right host name” meaning the HOST name of the Office 365 DKIM Selector that was created for representing the specific public domain.

(Later on, we will review the required syntax for the “special Office 365 DNS record)

The receiver mail server request for the TXT record that represent the domain will be redirected to Office 365

DKIM DNS record structure and naming convention

As mentioned when we want to prepare the required infrastructure for outbound DKIM signing in Office 365 we will need to publish two DNS records in the DNS server who hostess our public domain name.

The two DNS records will be “grouped together” by using a CNAME record.

The “first” DNS record will redirect hosts to the “second” DNS record that include the Public Key of the Office 365 infrastructure.

In the following section, we will review the structure and the naming convention of the “formal DKIM” DNS records that need to create.

Later on, we will review the information about the structure and the naming convention of the “special Office 365 DNS record” that needs to create when implementing outbound DKIM signing in Office 365 environment.

Standard DKIM selector record structure

The “standard DKIM record” was created for enabling the receiving mail server to get the Public Key of the sender server that create the DKIM signature.

The “source server” meaning the sender mail server that “stamp” the outgoing E-mail message defines as – DKIM Selector.

The receiving mail server that will get the E-mail message will look at the E-mail header for the host name of the DKIM selector that was supposed to sign the E-mail message.

The term DKIM Selector

The basic structure of a “standard” DKIM record that will appear in the E-mail message contains three parts and uses the following naming convention:

Host name + predefined sub domain name ( _domainkey) + public domain name.

Configuring DKIM in Office 365 – DNS record -01

1. Host name

The part of the “host name” could be any arbitrary name whom we choose.

Note – in an Office 365 base environment, we will have to use a predefined host name (we will review this subject later).

2. The second part described as “sub-domain“. This part is a mandatory part that will need to include as part of the DKIM selector full host name. The name whom we will need to add as a sub-domain is – name – _domainkey

3. The “last part” of the host name is the public domain name of the specific organization.

In the following diagram, we can see an example for an optional DKIM Selector record, that represents a domain named – o365pilot.com

In our specific scenario, we choose the host name – dkim the “middle part” is the “reserved sub-domain name” ( _domainkey) and the last part is the domain name.

Configuring DKIM in Office 365 – DNS record -02

The DKIM selector record in Office 365 – public domain name

The DKIM sector DNS record that we use in an Office 365 based environment for representing a specific public domain name is based on the standard naming convention that is used for the DKIM sector record.

The only difference is that in Office 365 we cannot choose the host name (we cannot use the arbitrary host name) and instead, we have to use the hostname selector1 and selector1.

In Office 365 based environment, we will need to define two DKIM selectors that will represent our domain name (selector1 and selector2)

Configuring DKIM in Office 365 – DNS record -03

In the following diagram, we can see an example for the “Office 365 DKIM selector” hostname that will be used for representing the domain name – o365pilot.com

Configuring DKIM in Office 365 – DNS record -04

The structure of two DNS DKIM selector records that are implemented in Office 365

As was mentioned, in an Office 365 base environment, we used two DKIM selector records.

The “standard” DKIM selector record will be used to redirect the DNS client request to the special Office 365 DNS record.

We need to use the “redirection mechanism” because in Office 365 consider as a hosted environment in which many different organizations share the same mail infrastructure meaning the Exchange Online infrastructure.

Two types of DKIM DNS records in Office 365 based environment-07

In a hosted environment such as Exchange Online, we cannot create a dedicated certificate or a Public Key and Private key for each of the different Office 365 tenant or for each public domain that is registered with Office 365.

The mechanism that enables us to use the “shared mail environment” and at the same time define DKIM infrastructure that is “attached” to our specific public domain name is implemented in the following way:

When we enable the option of outbound DKIM signing for our public domain, Office 365 will create a dedicated DNS record that will serve as the DKIM selector record for our public domain name. This “special record” will contain the value of the Public key that is used by Exchange Online when we use the option of outbound DKIM signing.

Our mission consists of two tasks:

Get the host name of the “special Office 365 DKIM selector DNS record” that will be used for our public domain name

Create in the DNS server who hosts our domain name CNAME record that will redirect requests to the “special Office 365 DKIM selector DNS record”.

The challenge that we need to deal with is getting the information about the host name of the Office 365 DNS record.

At the current time, Office 365 doesn’t provide any clue or shred of information about this “secret DKIM host name”.

the ?secret Office 365 DKIM selector DNS record -06

The way that we use for getting the information about the specific Office 365 DKIM selector record host name who will be created for representing our public domain name who was registered in Office 365 is by “generating the host name” based on instructions that describe the naming convention that should be used.

In the next section, we will review this naming convention.

The redirection process

An important concept that we need to be familiar with when we enable the option of outbound DKIM signing for our public domain name is the concept of “host names redirection” that is implemented by using a DNS CNAME record.

The DNS CNAME record enables us to implement a process of redirection.

The CNAME record serves as “logical container” for two different DNS records.

When a DNS client addresses the DNS server asking about hosts “A“, the DNS server answer includes redirection to the name of host “B“.

Configuring DKIM in Office 365 – DNS record -08

In Office 365 based environment, when the receiving mail server addresses the DNS server looking for information about the “DKIM selector HOST name” that appears in the E-mail message, the DNS server who has a CNAME record, will send an answer that will instruct the receiving mail server to look for “other host names”

In our scenario, the “other host name” is the Office 365 DKIM selector record that was created to represent our public domain name.

Configuring DKIM in Office 365 – DNS record -09

The way that we use for “building” the special Office 365 DKIM selector DNS record

The second DKIM record that we need to define is, the special or the dedicated Office 365
DKIM Selector DNS record that will be implemented as a TXT record that will include the value of the Public Key.

As mentioned, we will need to “know” what is the host name who will be used for this TXT DNS record base on a predefined naming conversation.

The structure of the “Office 365 special DNS record”, is based on two special terms:

Domain GUID and onMicrosoft domain name.

Configuring DKIM in Office 365 – DNS record -10

In case that the thought – “what wt.. is this terms?”
Do not worry, we will explain them in the next section

DomainGUID and ?onMicrosoft domain name

In the following diagram, we can see the structure of the “special Office 365 DKIM record”. We can see that the DNS record consisting of four parts:

Configuring DKIM in Office 365 – DNS record -11

In the following diagram, we can see an example of “Office 365 DKIM host name”

Configuring DKIM in Office 365 – DNS record -12

Part 1 – this is the reserved host name. In Office 365 we will need to define two DKIM record using the host name – selector1 and selector2

Part 2 – the second part defines as DomainGUID. The DomainGUID name appears as the left part of the Office 365 MX record.

In the following diagram, we can see an example for MX record that is used in Office 365 for the public domain o365pilot.com

The “left part” of the host name is the Domain GUID

Configuring DKIM in Office 365 – DNS record -13

How to get the information about our domain GUID in Office 365?

To be able to get information about the Office 365 MX records that represent a specific public domain name, we a use a couple of options.

Option 1 – using the Office 365 portal

When we log in to the Office 365 portal, on the left-side menu bar, we can choose the domain menu and then select a specific domain name such as o365pilot.com in our scenario.

To be able to view information about the DNS records that “belong” to the specific domain, we will choose the menu domain settings

How to get the information about our domain GUID in Office 365 -01

In the following screenshot, we can see information about the Office 365 MX records of the domain name – o365pilot.com

The DomainGUID name appears as the left part of the Office 365 MX record.

How to get the information about our domain GUID in Office 365 -02

Option 2 – using the nslookup tool

Another way that we can use for display information about the MX record of specific Office 365 domains is by using the nslookup command line tool.

We can use the following parameters to query the DNS server regarding the domain name.

Nslookup

Set q=mx

<Domain name>

How to get the information about our domain GUID in Office 365 -03

Note – using the option of nslookup is relevant only in a scenario in which the MX for the specific domain point to Office 365 (Exchange Online) infrastructure.

Part 3 – the third part is the DKIM sub-domain (reserved names). As mentioned, this name is the “reserved sub-domain name” (_domainkey).

Part 4 – the fourth part is the “onMicrosoft domain” name.
This is the domain name, is automatically generated for our Office 365 tenant in the first time that we create our Office 365 tenant.

Configuring DKIM in Office 365 – DNS record -14

How to get the name of the OnMicrosoft domain name?

To be able to get the name of our “onMicrosoft domain” name we can login to the Office 365 portal.
In the following screenshot, we can see an example to Office 365 tenant that include three registered domain names.

Two of the domain names consider as a “public domain” (other terms a vanity domain or a custom domain) name and one domain is the onMicrosoft Domain name(number 2).

How to get the name of the onmicrosoft domain name -01

The next article in the current article series

In the next article – How to enable outbound DKIM signing for your domain in Office 365 |Part 5#5, we will review the process of – How to enable outbound DKIM signing in Office 365 for our public domain name.

Implementing DKIM in Office 365 | Article series index

Now it’s Your Turn!
We really want to know what you think about the article

The post Outbound DKIM signing and DNS infrastructure | Building the required DNS records for Office 365 | Part 4#5 appeared first on o365info.com.

How to enable outbound DKIM signing for your domain in Office 365 |Part 5#5

$
0
0
In the current article, we will review the process of – How to enable outbound DKIM signing in Office 365 for our public domain name.
In Office 365 based environment, the process of signing outgoing E-mail using DKIM signature happens automatically for each of the Office 365 tenant domain names.

I emphasize the term “our public domain name” because, this “automatically DKIM signature”, is implemented by using the default Office 365 DKIM selector host name who “embeds” his host name as part of the E-mail message.

The Office 365 DKIM Selector name is based on a domain suffix that is different from the public domain name of the Office 365 recipients.
The scenario in which the DKIM Selector, host name uses a different domain name from the domain name that he represents could cause some issues when the receiving mail server uses an additional standard named DMARC.

The general concept regarding the subject of using outbound DKIM signing in Office 365 based environment is that every E-mail message that is sent by the Exchange Online server to external recipients will include a DKIM signature.

Finally, even if you don’t enable DKIM, Office 365 will still (eventually) enable DKIM signing for your domain using the default signing configuration. Suppose that fabrikam.com was enabled by Office 365, not by the admin of the domain (so the required CNAMEs do not exist in DNS). DKIM signatures will look like the following:

From: Second Example <second.example@fabrikam.com>

DKIM-Signature: v=1; a=rsa-sha256; q=dns/txt; c=relaxed/relaxed;

s=selector1-fabrikam-com; d=contoso.onmicrosoft.com; t=1429912795;

h=From:To:Message-ID:Subject:MIME-Version:Content-Type;

bh=<body hash>;

b=<signed field>;

In the example above, the selector and d= domain contain the values where the CNAME would point to had DKIM-signing for fabrikam.com been enabled by the customer.

Eventually, every single message out of Office 365 will be DKIM-signed. If you enable DKIM yourself, the d= domain will align with the domain in the From: address; if not, it will not align and instead will have your organization’s initial domain.
[Source of information – Manually hooking up DKIM signing in Office 365]

The above quotation could cause us to wonder about the purpose of – enabling the option of outbound DKIM signing for our public domain that is hosted in Office 365.

In other words, why should bother ourselves with complicated DKIM configuration settings, if the option of outbound DKIM signing in Office 365 based environment, will eventually be implemented without any need for intervention?

The simple answer is that technically; we don’t have to enable the DKIM signing for mail that is sent from our Office 365 tenants, but when using the “default Office 365 DKIM settings” for outbound DKIM signing, there is a drawback that I could be realized to a major drawback.

In case that we use the default Office 365 DKIM signing configuration, without creating a “custom DKIM settings” for our specific public domain name who was registered with Office 365, E-mail message that will be sent from our domain name, will include DKIM signature that will contain information about the default Office 365 DKIM signing selector host name.

This scenario, in which the E-mail message includes the host name of the DKIM signing selector that uses a different domain name, then the domain name that appears in the E-mail message, can be identified as a “problematic scenario” when an additional mail security standard named – DMARC is used by the “destination mail infrastructure”.

We will not get into a detailed description of the DMRAC standard, but briefly mention that, when there is an implementation of DMARC standard, the DMARC verification process will look at the E-mail message header and check if the DKIM Selector host is “aligned” with the sender E-mail address domain name.

For example, if the sender E-mail address is: Suzan@o365pilot.com, the DMARC standard will verify if the host name of the DKIM Selector includes the domain name – o365pilot.com

In case that the DKIM selector, host name is different (doesn’t include the domain name of the sender E-mail address) the DMARC standard “mark the E-mail message” as an E-mail message with a “problem”.

Attached a quotation that describes the DKIM process in this scenario:

DMARC introduces the concept of aligned identifiers. Briefly, it means the domain in the RFC5322.From header must match the domain in the “d=” tag in the DKIM signature for DKIM alignment, and/or match the domain in the RFC5321.MailFrom field for SPF alignment. (Please see sections 3, 15.5, and Appendix B.1 of DMARC for more details.)

DMARC doesn’t directly address whether or not an email is spam or otherwise fraudulent. Instead, DMARC requires that a message not only pass DKIM or SPF validation, but that it also pass alignment.
For SPF, the message must PASS the SPF check, and the domain in the From: header must match the domain used to validate SPF (must exactly match for strict alignment, or must be a sub-domain for relaxed alignment).

For DKIM, the message must be validly signed and the d= domain of the valid signature must align with the domain in the From: header (must exactly match for strict alignment, or must be a sub-domain for relaxed alignment). Under DMARC a message can fail even if it passes SPF or DKIM, but fails alignment.

[Source of information – DMARC – Frequently Asked Questions]

Bottom line

The best practice is to make the necessary efforts for creating the required the DKIM configuration settings for customizing Office 365 outbound DKIM signing for our specific domain name.

Note – in case that we host a couple of domain names in Office 365, we will need to create these “DKIM customization settings” for each of the public domain names.

What is going on behind the scenes, when we enable Outbound DKIM signing for our public domain in Office 365?

When we use the Office 365 portal admin for enabling outbound DKIM signing for our domain name, the following steps will be implemented:

  1. Office 365 will automatically create a DNS query, looking for a specific CNAME record that he expects to find “under” our public domain name.
  2. In case that Office 365 finds the specific CNAME records, Office 365 will automatically generate two “new TXT records” that will be used a predefined host name and will contain the value of the DKIM Public Key of Exchange Online. This two TXT record will be created on the Office 365 DNS infrastructure (the DNS server who host the OnMicrosoft domain name).
  3. In case that Office 365 doesn’t find the specific CNAME records he expects to find, an error message will appear and inform us, that we (as the public domain owners) need to create the required two CNAME records

The two DKIM Selectors “entities” in an Office 365 based environment

The subject of the DKIM Selectors “entities” in Office 365 could be a little confusing.

If you want to read more information about this subject, you can read the article – Outbound DKIM signing and DNS infrastructure | Building the required DNS records for Office 365 | Part 4#5

In short, because Office 365 considered as “hosted environment”, will need to implement a process, in which we redirect DNS requests for the “formal DKIM selector record host name” to the – dedicated\ special Office 365 DKIM selector.

When I use the term ” dedicated\ special Office 365 DKIM selector record”, I mean – the Office 365 records that contains the DKIM Public Key, which need to be used by the receiver mail server, for verifying the Exchange Online DKIM signature.

Office 365 uses to two of DKIM selectors that can implement Outbound DKIM signing

How to enable DKIM signing for your domain if it is hosted in Office 365

In the following section, we will review the required steps for activating the outbound DKIM signing in Office 365 (Exchange Online) for a public domain.

The correct flow of the task that we need to implement is:

  1. Verify the required information about the following DKIM Selector hosts names:
  • The “standard” DKIM Selector record Host name, that will represent our public domain name.
  • The “special” Office 365 DKIM Selector record, that will serve as a logical container for the value of the DKIM Public Key.
  1. Create the required two CNAME record in the DNS server who hosts our public domain name.
  2. Enable (“activate”) the outbound DKIM signing option in Office 365 (Exchange Online) for the specific public domain.
  3. Test the outbound DKIM signing – this step could be considered as optional because, there is not a mandatory need for checking the process of outbound DKIM signing. Even though, it’s highly recommended to test a scenario of “outgoing E-mail message” so we will be able to be sure that the outbound DKIM signing configurations was configured properly.

Our specific scenario characters

Our task is to enable the option of outbound DKIM signing to an E-mail message that will be sent by our organization recipients.

In other words, we want that each E-mail message that uses an E-mail address that includes our organization domain name – o365pilot.com, will be included DKIM signature (the DKIM signature that will be implemented by the Exchange Online server who represents our domain name).

Our DKIM scenario -Implementing Outbound DKIM signing in Office 365

Despite the need for implementing the task in a specific order that was mentioned above, I would like to start with a common mistake in which we start the process by trying to activate the outbound DKIM signing for a specific domain is the Office 365 admin portal.

In our scenario, we will try to activate the outbound DKIM signing for the domain name – o365pilot.com

Note – this step could not be completed because, we haven’t created the required DNS record. We will try to enable outbound DKIM signing, get an error message, “jump” to the phase in which we add the required DNS record and then “jump back” to complete the outbound DKIM signing configuration settings.

In the following screenshot, we can see the list of the public domain name that was registered with Office 365 and in addition, the OnMicrosoft domain name.

In our specific scenario, we want to enable the outbound DKIM signing for the domain name – o365pilot.com.

We can see that by default, the status of the DKIM signatures is: Disabled

Activating the option of Outbound DKIM signing in Office 365 -01

When we try to activate the outbound DKIM signing, the following error appears:
CNAME record does not exist for this config. Please publish a CNAME record first

The meaning of this error is that the required CNAME record was not configured.

We will need to create the required CNAME records in our DNS (the DNS that hosts our public domain name) and only after we complete this phase, we can try to activate
the outbound DKIM signing for the specific domain.

Activating the option of Outbound DKIM signing in Office 365 -02

Step 1#4 |Planning and creating the required set of DKIM selector DNS record

To be able to complete this task, we will need to configure sum of four host names who will be added to the DNS server that hosts our domain name.

The “four hosts name” will be added to our domain by creating two CNAME records.
Each CNAME record includes information about two hosts names.

In this phase, we “write down” this host name that we will add in the next step to our DNS server.

Q1: Why do I need to write down four host names?

A1: In the Office 365 environment, we need to “declare” about two DKIM Selectors host names.
This DKIM selector hosts names are based on the formal DKIM naming convection that needs to be used for publishing information about a DKIM selected that represent specific domain names.

This two DKIM Selector hosts name, will be “attached” Intermittently to each of the E-mail messages that will be sent by our organization recipients.

In a standard DKIM implementation, the DKIM Selector, host record is implemented as a TXT record that will hold the information about the value of the DKIM Selector Public Key.

Because Office 365 considered as a “hosted environment”, the use of the DKIM Selector record is a little different.

Office 365 infrastructure will use a set of two “dedicated TXT records” that will be used for “contain” the value of the DKIM Selector Public Key.

The “standard DKIM Selector, host record” that we will be published, will redirect DNS queries requests to the “special Office 365 DKIM Selector record”.

For each of the registered public domain in Office 365, we will need to create two CNAME records.

The planning phase of DNS record for outbound DKIM signing -01

Each CNAME record, will include two host names:

  1. The standard \ formal DKIM Selector, host names record, that will represent our domain name and will appear in the outgoing E-mail messages.
  2. The “special” Office 365 DKIM Selector record. This record is the actual TXT record that contains the value of the DKIM Selector Public Key.

The planning phase of DNS record for outbound DKIM signing -02

When the receiving mail server looks for the DKIM Selector, host name who appears in an
E-mail (E-mail that was sent by our organization recipient), the DNS query for the DKIM Selector, host name, will be redirected (by the CNAME record) to the “special Office 365 DKIM host name” record.

The planning phase of DNS record for outbound DKIM signing -03

The sum of the records that we need to “write down” and later configure this record in our pubic DNS is “4”

The planning phase of DNS record for outbound DKIM signing -04

Write-down the information about the outbound DKIM signing records for the domain o365pilot.com

1#2 – Write-down the host names of the “formal DKIM host name” records.

The two DKIM Selector records that will represent our domain name are:

selector1._domainkey.o365pilot.com

selector2._domainkey.o365pilot.com

The two formal DKIM Selector DNS records in Office 365 -01

Given that we complete the required configuration setting in which we add and published the required DNS record, each E-mail message that will be sent from our organization recipients that use E-mail address with the domain name o365pilot.com, will include the DKIM signature.
The DKIM signature will include the following DKIM Selector host names:

selector1._domainkey.o365pilot.com

Or

selector2._domainkey.o365pilot.com

Note – In case that you wonder from where I got this “Host names”, you can read more detailed information in the article – Outbound DKIM signing and DNS infrastructure | Building the required DNS records for Office 365 | Part 4#5

In a nutshell, the formula that we use for generating the “formal” DKIM Selector, host name in Office 365 environment is based on the following naming convention:

The structure of DKIM DNS record for a public domain name in Office 365 -02

2#2 – Write-down the host names of the “special Office 365 DKIM host name” record.

The second set of DKIM Selector records that we need to “write down” is, the special Office 365 records that will be implemented as the TXT record.

This TXT record will contain the value of the Exchange Online DKIM Public Key, which will be used by the receiver mail server for decrypting the HASH value of the DKIM signature.

In a DKIM scenario in which the receiver mail server needs to verify the DKIM signature, the receiver mail server will need to find the DKIM Host name that is “attached” to the E-mail message and create a DNS query for this host name to be able to “fetch” the value of the DKIM Public Key from this TXT record.

In an Office 365 based environment, this request will be, “answered” by the DNS server by redirecting the receiving mail server to “other DKIM Selector record”.

The DNS uses the CNAME record, for redirecting the receiving mail server to the required Office 365 TXT DKIM Selector host record.

In our specific scenario, this FQDN of the special Office 365 TXT DKIM Selector hosts records is:

selector1-o365pilot-com._domainkey.o365info2.onmicrosoft.com

selector2-o365pilot-com._domainkey.o365info2.onmicrosoft.com

In the following diagram, we can see the structure of the two “special Office 365 TXT DKIM Selector hosts record” that we need to “write down” for later use when we have created the CNAME record.

The two special Office 365 DKIM selector DNS records -03

Note – In case that you wonder from where I got this “Host names”, you can read more detailed information in the article – Outbound DKIM signing and DNS infrastructure | Building the required DNS records for Office 365 | Part 4#5

In a nutshell, the formula that we use for generating the “special Office 365 TXT DKIM Selector hosts record” is based on the following naming convention:

The structure of special Office 365 DKIM DNS record -04

Pay attention to the subject of the “dash” character that needs to be used for creating the Office 365 DKIM Selector host name.

A common mistake is to use the common “dot” character, instead of the “dash” character.

The structure of special Office 365 DKIM DNS record -05

The following diagram, describe the “DNS flaw” that will be implemented by the receiving mail server that will try to verify the DKIM signature that will be “attached” to E-mail message that will be sent by
o365pilot.com recipients.

In our specific scenario, the host name of the DKIM Selector that represents the domain name
o365pilot.com is – selector1._domainkey.o365pilot.com
When the receiving mail server queries the DNS server regarding this host name, the DNS “answer” will be a redirection to the “special Office 365 TXT DKIM Selector hosts record”.

Step 1#2 - The DNS query flow for the DKIM host name in Office 365 environment

When the receiving mail server query again the DNS server, but now, regarding the “special Office 365 TXT DKIM Selector hosts record”, the DNS “answer” will include the content of the Office 365 TXT record that contains the value of the DKIM Selector Public Key.

Step 2#2 - The DNS query flow for the DKIM host name in Office 365 environment

Step 2#4 |Creating the required two CNAME required for Outbound DKIM signing using GoDaddy DNS

In the following section, we will demonstrate how to create the required two CNAME records for a domain name that is managed via the GoDaddy DNS management interface.

In our specific scenario, we will add the required CNAME DKIM record for the domain name – o365pilot.com

Creating the required CNAME DNS required for DKIM – Office 365 – using Godaddy -01

In the DNS management, we will choose the option of – Add Record

Creating the required CNAME DNS required for DKIM – Office 365 – using Godaddy -02

We will click on the small black arrow

Creating the required CNAME DNS required for DKIM – Office 365 – using Godaddy -03

We will choose the option of CNAME (Alias) record

Creating the required CNAME DNS required for DKIM – Office 365 – using Godaddy -04

In our specific scenario, the CNAME record will include the following hosts names:

In the “upper section” named – HOST:, we will add the host name:

selector1._domainkey

It’s important to understand that because this host name is hosted “under” the domain name – o365pilot.com, the FQDN (Fully qualified Host name) will be

selector1._domainkey.o365pilot.com

In other words, don’t add the “full host name” to the upper part, but only the “partial host name” with Outlook the domain part.

The host name in the “upper part”, will be used for redirected requests to the dedicated Office 365 DKIM Selector record that includes the Office 365 DKIM Public Key.

In the “bottom section” named – POINTS TO:, we will add the following host name:

selector1-o365pilot-com._domainkey.o365info2.onmicrosoft.com

Creating the required CNAME DNS required for DKIM – Office 365 – using Godaddy -05

We will need to repeat this process for cratering an additional CNAME record that will use for redirecting DKIM request to additional Office 365 host named – selector2

To add an additional record, we will click on the button – ADD ANTOTHER

In the “upper section” named – HOST:, we will add the host name:

selector2._domainkey

In the “bottom section” named – POINTS TO:, we will add the host name:

selector2-o365pilot-com._domainkey.o365info2.onmicrosoft.com

Creating the required CNAME DNS required for DKIM – Office 365 – using Godaddy -07

We will save the new CNAME records that were added.

Creating the required CNAME DNS required for DKIM – Office 365 – using Godaddy -08

In the following screenshot, we can see the result, two new CNAME record was created.

Creating the required CNAME DNS required for DKIM – Office 365 – using Godaddy -09

Verifying the information about the DKIM CNAME record

After we complete the step of creating the required “DKIM records”, it’s important that we will verify that the required CNAME record was successfully created + published.

We can use a couple of methods for getting information about the CNAME record.

In the next example, we will use a useful web site named- mxtoolbox, that include a collection of web-based tools.

We will use the mxtoolbox for getting information about the DKIM CNAME record that we have created in the former step.

In our specific scenario, the DKIM Selector host name whom we use for publishing our DKIM infrastructure is – selector1._domainkey.o365pilot.com

We will add this host name (selector1._domainkey.o365pilot.com) in the Box named: Domain name and click on the CNAME lookup

Verifying the information about the DKIM CNAME record -02

In the following screenshot, we can see the result.
The mxtoolbox CNAME lookup tool accesses public DNS server and retrieves the required information.

In our specific example, we can see that the host name – selector1._domainkey.o365pilot.com is “mapped” (redirected) to the host name:

selector1-o365pilot-com._domainkey.o365info2.onmicrosoft.com

Verifying the information about the DKIM CNAME record -03

Step 3#4 | Activating (enabling) the Outbound DKIM signing for our domain name

In this phase, we assume that the required DNS records were already created.

To activate (enabling) the option of outbound DKIM signing for our domain name, all we need to do is – to select the required domain name and choose the Enable menu

Activating the option of Outbound DKIM signing in Office 365 -04

In the following screenshot, we can see that the outbound DKIM signing is Enabled

Activating the option of Outbound DKIM signing in Office 365 -05

How to verify that the “special Office 365 TXT DKIM selector hosts record” was created?

In this phase, we have already activated the option of outbound DKIM signing and Theoretically, Office 365 should have created two special TXT records that will contain the value of
the DKIM Selector Public Key.

My personal preference is to verify that this TXT record was successfully created and published.

To be able to verify the information about the special TXT records that will contain the value of the DKIM Selector Public Key, we can use the nslookup command line tool.

In the following screenshot, we can see an example of the nslookup syntax the we use for getting information about the content of a specific TXT record.

In our scenario, I query the DNS about the TXT record that has the host name:

selector1-o365pilot-com._domainkey.o365info2.onmicrosoft.com

How to verify that the special Office 365 TXT DKIM selector hosts record was created

Step 4#4 | verging the process of Outbound DKIM signing

In this section we want to verify that the Office 365 DKIM infrastructure is “working properly and that E-mail messages that sent by our organization users will be digitally signed by
using a DKIM signature.

Testing and analyzing DKIM scenario in Office 365 | Outbound DKIM signing

In the following section, we will test the “outbound DKIM signing” that was configured for our domain – o365pilot.com

To be able to verify the DKIM flow, we will use a scenario with the following characters:

Our organization mail infrastructure (Exchange Online), was configured to implement outbound DKIM signing for the public domain name – o365pilot.com

We have a business partnership with an organization named – thankyouforsharing.org

The mail infrastructure of thankyouforsharing.org support only “inbound DKIM” meaning, the mail server that represents thankyouforsharing.org knows how to verify E-mail message that includes DKIM signature, but is not configured to support outbound DKIM signing.

We would like to verify if an email message that are sent from our domain includes the required DKIM signature and if the DKIM signature is successfully verified by the mail server that represents the thankyouforsharing.org recipients.

In addition, we would also like to check the “opposite flow direction”, in which our mail server (Exchange Online) gets an E-mail message that includes DKIM signature from an external sender.

In this case, we would like to test the ability of our mail server to implement the incoming DKIM verification test.

To be able to analyze the “DKIM flow”, we will simulate a scenario in which our organization recipient sends an E-mail message to thankyouforsharing.org recipient and vice versa.

We will “fetch” the E-mail message header content and analyze this content using the ExRCA message analyzer.

To be able to verify that the outbound DKIM signing was configured correctly and implemented correctly, we will use the following two scenarios:

Verifying Outbound DKIM signing in Office 365 for a specific domain name -00

Scenario A – testing the outbound DKIM signing for a o365pilot.com recipient

In this scenario, the sender is Suzan, an organization’s user who uses the E-mail address – Suzan@o365pilot.com.

Suzan wants to send E-mail message to the external recipient named Justin, that uses the E-mail address – Justin@thankyouforsharing.org

Verifying Outbound DKIM signing in Office 365 for a specific domain name -01

When looking at the E-mail message header content, of the mail that Justin got, we can see the following information:

Authentication-result section

In the section named – Authentication-result section (A), we can see that the DKIM test result is – dkim=pass (signature was verified).

The meaning is that the mail server (receiving mail server) that represents the destination recipient (Justin), implemented the DKIM verification process for “our mail” (“Our mail” is the E-mail message that was sent by Suzan).

The receiving mail server mail server verifies the DKIM signature and approves that the DKIM signature is valid.

In other words – that he can “trust” Suzan as a valid sender.

DKIM-Signature

When looking at the section named – DKIM-Signature (B), we can see information about the host name of the DKIM Selector that “signed” the E-mail message.

In our specific scenario, the HOST name of the “our DKIM Selector” is:
d=o365pilot.com; s=selector1

If we want to be more precise, the receiving mail server will “translate” this host name to
the “full host name” – selector1._domainkey.o365pilot.com

Verifying Outbound DKIM signing in Office 365 for a specific domain name -02

Scenario B – testing incoming DKIM signing

Testing the specific scenario, consider as optional because our main goal was to verify the process of outbound DKIM signing that needs to be implemented by our Exchange Online mail server.

Just to be on the safe side, we would like also to test what happened when the external sender sends an E-mail message that includes DKIM signature to one of our organization recipients.

In other words, we would like to verify that our Exchange Online server “know” how to implement an “inbound DKIM check”.

In this scenario Justin an external sender sends an E-mail message to one of our organization recipient named – Suzan.

Verifying Outbound DKIM signing in Office 365 for a specific domain name -03

The mail infrastructure of Justin (the mail server that hosts the domain thankyouforsharing.org) is configured to support DKIM only for inbound E-mail.

When looking at the E-mail message header content of the mail that Suzan got, we can see the following information:

Authentication-result section

In the section named – Authentication-result section (A), we can see that the DKIM test result is – dkim=none (message not signed).
The meaning is that the mail server that represents the sender, the recipient (Justin), doesn’t support outbound DKIM signing.

Verifying Outbound DKIM signing in Office 365 for a specific domain name -04

Implementing DKIM in Office 365 | Article series index

Now it’s Your Turn!
We really want to know what you think about the article

The post How to enable outbound DKIM signing for your domain in Office 365 |Part 5#5 appeared first on o365info.com.

Submit a request for removing your mail server IP from Office 365 black list

$
0
0

In case that your organization experiences a scenario in which your mail server IP address appear in the Office 365 block list and E-mail messages sent from your mail server is rejected by the Office 365 mail infrastructure (Exchange Online), you can use the Office 365 “delist portal”, which enable you to submit a request for removing your mail server IP address from the blacklist.

Regarding the major questions such as:

  1. Can I be certain that my mail server IP address will be removed from the Office 365 blacklist?
  2. What is the time period required to remove the mail server IP address from the Office 365 blacklist?

At the current time, there is not a lot of information regarding this question and another question that relates to this issue.

The only think that can be assumed is that in case that our mail server IP address Registered mistakenly (false positive) in the Office 365 blacklist, there is high chance in which our request will be accepted, and the IP address will be removed from Office 365 blacklist

Just a short quotation from the O365 Anti-Spam IP Delist Portal

Please note that before submitting this request, it is the sender’s responsibility to ensure that any further mail originating from the IP in question is not abusive or malicious.

How to submit a request for removing my mail server IP address from the Office 365 blacklist?

Submit a request for removing your mail server IP from Office 365 black list -01

The post Submit a request for removing your mail server IP from Office 365 black list appeared first on o365info.com.

How can hostile element execute Spoof E-mail attack and bypass existing SPF implementation? | introduction | 1#2

$
0
0
In the current article series, we will learn about a structured vulnerability of the SPF mail standard, which can be easily exploited by a hostile element that can bypass the existing “SPF wall” that was built for protecting our organization recipients from Spoofing or Phishing attacks.

Besides of the part in which we point out the structured vulnerability of the SPF mail standard, I would like to go into the “next level”, and demonstrate how to execute a Spoof E-mail attack that bypass existing SPF implementation.

The current article series include two articles.
The next article is – How to simulate Spoof E-mail attack and bypass SPF sender verification? | 2#2

The well know dilemma – should I reveal in public the SPF vulnerability? | Black hat versus white hat

Before we continue, I would like to relate to the most basic resistance that can appear in the mind of the reader: How do you dare to publish such information that can be used by a hostile entity to hurt and damage my organization?

The simple truth is that the most of the time, this “hostile entity” is a professional person that has a wide knowledge and a defined path for the why he should use for executing Spoofing or Phishing attacks, and how to deal with existing sender identity verification standard such as SPF.

In other words, the “hostile entity” doesn’t need my help, and my support in revealing the structured vulnerability of the SPF mail standard. I can assure you that he already knows about this “SPF blind spot”, and the chance is that if he decides to attack your organization, he will use it!

As a person which was appointed to serve and protect our organization’s assets and our users, we should have the integrity and the courage to admit that there are many threats and risks, that could hurt us.

Instead of “closing our eyes” and ignore the vulnerability of our mail infrastructure, it looks to me that the best state of mind should be – move on to the more constructive and mature question such as – given that I am aware of this existential threat to my mail infrastructure, what can I do to provide better protection to my organization and my users?

SMTP as Innocent protocol | Spoof E-mail and SPF as a partial solution

I describe the SMTP protocol as “Innocent protocol” because the main purpose of the SMTP protocol is to transfer email messages from host A to Host B in the quickest and most effective way.

When source Host (A) address destination Host (B), and asks to start an SMTP session, the basic assumption of the destination Host (B) is that Host A Is really who he claims to be.

This default assumption is being exploited by hostile elements, which disguise their real identity by presenting the identity of a seemingly legitimate host \ recipient.

Over time, this “identity problem” reaches the awareness of organizations, that look for a solution that will enable them to verify the sender’s identity, and be sure that the sender is really who he claims to be.

One of the most popular and well-known mail security standards that were invented to address the need for verifying the sender identity is – the SPF (Sender Policy Framework).

The SPF standard is based on a very simple verification test; in which we verify if a specific mail server is authorized to send or represent specific domain names.

The “specific domain name” is the domain name that appears in the E-mail address of the sender who addresses our mail server.

The problem is that the SPF mechanism has an inherent weakness because that the sender verification procedure, is implemented by verify the sender identity that appears on the
Mail envelope but, not the sender identity that can appear in the Mail header.

This Inherent weakness is exploited by a hostile element that could easily bypass our existing SPF wall, and perform Spoof E-mail attack.

Attached a quotation from the SPF organization site:

The Sender Policy Framework (SPF) is an open standard specifying a technical method to prevent sender address forgery. More precisely, the current version of SPF — called SPF v1 or SPF Classicprotects the envelope sender address, which is used for the delivery of messages. See the box on the right for a quick explanation of the different types of sender addresses in e-mails.

(There are other solutions that protect the header sender address or that do not care at all about who sent the message, only who originally wrote it.)

[Source of information – Sender Policy Framework Related Introduction]

I assume that most of us are not aware or, only have partial knowledge about terms such as
Mail envelope , Mail header and the SMTP method in which the sender is using “multiple sender identities”.

If you have the required patience, I promise you that after reading the current article, you will understand better these concepts.

For the sake of full disclosure – my opinion is that the SPF stand is a very important and considers as necessary mail security standard, that must be adopted by every organization that uses mail infrastructure.

My main purpose is to bring to your attention the “blind spot” of the SPF standard and make you understand that you will probably need to use an additional mail security standard and mechanism, together or side by side with the SPF standard.

So what is the solution for this SPF “blind spot”?

I would like to expand this question to wider range questions:

Q: Is there or, what is the “perfect solution” that I can use for providing complete protection for my organization from Spoofing or Phishing attacks?
A: The good news is that there is such a thing as a “perfect solution” and when this solution is applied, we can be sure that your organization has a very good protection from Spoofing attacks.

The less good news is that there is no magic formula or a simple “red button” that we can use for creating a “transparent dome of energy” that will protect our organization from any type of “bad guy” and at the same time, enable our user to “do their thing” regularly and transparently without any interference.

The solution of our distress is – a combination or a “cocktail” of different mail security standard that enables us to verify the sender identity, such as DKIM, DMARC, Exchange Online Spoof E-mail rules, user awareness program, etc.

The implementation of such combination will enable us to build a strong and thick “protection wall,” that will protect our mail infrastructure and our users from most of the risks and the hostile elements that are outside the wall and looking for a way to enter.

Our main tasks are:

  • Acknowledged the risk of Spoofing or Phishing attacks and the fact that while one way or another, we experienced the danger of the above.
  • To be familiar with each of the possible solutions and the characters of each of the possible solutions (advantages, disadvantages, etc.).
  • Decide what is the best combination of solutions that will best feet our organizational DNA and our organization-specific business need.
  • Implement the existing protection mechanism, and have the required patience for the required time that is needed to adopt and assimilate this solution (learning mode phase, test phase, dealing with a false-positive scenario, etc.).

In the following diagram, we can see an example of the concept which I describe as a “security cocktail”.
The meaning of this term is a scenario, in which we use a combination of two or more mail standard or another mechanism such as Exchange rule that will complement each other.

For example, in case that your mail infrastructure is based on Exchange architecture, we can use an Exchange rule that will identify the un-authenticated recipient who uses E-mail address with our domain name + implementing the SPF sender verification standard, that will identify a scenario in which recipient who uses E-mail address with our domain name sends E-mail via an unauthorized mail server.

Another option could be using the DMARC mail standard that relies on the DKIM + SPF standard, and provides a very good protection for most of the possible scenarios of Spoofing attacks.

To recap – don’t look for any easy and simple solution that will that magically will solve all of your problems. Be familiar with the existing risks and the existing solutions for this risk.

What should I need to do for protecting my mail infrastructure from Spoof mail attacks -00

The structure of the current article series

The article series – “How can hostile element execute Spoof E-mail attack and bypass existing SPF implementation” includes two articles.

The current article our main focus will be:

  1. The data structure of SMTP session and E-mail message.
  2. The way that the SPF verification process is implemented.
  3. The theoretical way that hostile element can use for bypassing existing SPF implementation.

In the next article, we will review the “how to part” in which we simulate a scenario of a hostile element, that executes a Spoof E-mail attack and manages to bypass our existing SPF infrastructure.

The data structure of SMTP session and E-mail message

Meta Data and E-mail message

Most of the time, when we use the term E-mail message, we relate to the E-mail message content such as the text that is included in the E-mail message or the attachment in the E-mail message.

In reality, each E-mail message includes an additional layer of information, which can be described as metadata or as the “data about the data”.

The metadata that consider as part of the E-mail message, include many details and information about the specific E-mail message and a documentation of the journey that the
E-mail message undergoing begging with the source mail server, and ending with the destination mail server that hosts the destination recipient.

The concept of Meta Data and E-mail message -01

Mail envelope & Mail header as a logical container for E-mail message meta data

The SMTP protocol defines two types of “logical containers” that will hold the metadata that relates to a specific E-mail message:

The Mail envelope and the Mail header.

Mail Envelope & Mail header as a logical container for E-mail message meta data -02

  • The Mail envelope is used by the mail servers who represent the sender and the recipient.
  • The Mail header is used by the mail client (by the user).

E-mail message structure - Mail Envelope & the Mail -03

The information that is saved in the Mail Envelope

The Mail envelope includes the following type of information:

  1. Hold Information about the “source mail server” that represents the sender – for example, the IP address of the mail server that Initializes the SMTP session or information about a specific security standard that the source mail server support such as DKIM.
  2. Hold Information about all the mail servers who were involved in the mail flow.
  3. Hold Information about the sender + recipient identity – the E-mail address of the sender and the E-mail address of the destination recipient\s.

The information that is saved in the Mail Envelope -04

Mail structure – Mail Header & Mail Body

The “mail component” of E-mail message includes two parts:

1. Mail header – this is an “additional container” that holds meta data information. If you’re wondering, why do we need to use an additional logical container for the metadata in addition to the Mail envelope component, the simple answer is that very similar to the real-life scenario, the
Mail envelope considers as a “temporary vehicles”, which is used for “transporting” the E-mail message from point A to Point B.

After the E-mail, message is accepted by the destination mail server that represents the recipient, the mail server reads the information that appears in the Mail envelope copy most of the information in the Mail header part and then, “tearing apart” the Mail envelope.

2. Mail Body – the mail body is that part which includes the text and the attachment\s that was added to the E-mail message by the person who wrote the E-mail message.

Mail structure - Mail Header & Mail Body -01

The Mail header includes the following type of information:

1. Hold Information about the characters of the specific E-mail message – for example, character set of the specific E-mail message, MIME type etc.

2. Hold Information that was copied from the Mail envelope. As mentioned, the Mail envelope is removed by the mail server before the E-mail message is delivered to the destination recipient.

3. Hold Information about different security checks that was performed by the “destination mail server” meaning, the mail server that represents the destination recipient.
Most of the time, the mail servers who represent the destination recipient perform a security check that designed to identify “problematic mail” such as Spoof E-mail, E-mail that includes malware, spam mail and so on.

The information about the “security check results, ” such as the SCL (spam confidence level) value is saved to the Mail header.
Another example is a scenario in which the mail server is configured to perform validation of the sender identity using standard such as – SPF, DKIM, DMARC and so on. The results of this sender identity test, will also be written to the Mail header.

4. Hold Information about the sender + recipient identity – the information about the sender
E-mail address and the destination recipient E-mail address.

Note – in a common scenario, the sender \ recipient identities (E-mail address) of the Mail header, will be copied from the Mail envelope.

The other optional scenario is a scenario in which the Mail envelope will include the sender \ recipient identities that the sender \ recipient identities that is specified in the Mail header.

The purpose of the Mail Envelope ? - Serve as a logical container for meta data -02

The major type of identities in mail based infrastructure

Along this article, we mention the term “identity” many times.
Without going into depth technical discussion, it’s important to define the meaning of this term when relating to mailing infrastructure.

When relating to mail infrastructure, the simple definition of the term “identity” could be translated into:

  1. E-mail address
  2. IP address
  3. User credentials
  4. Certificate

Regarding the subject of – mail infrastructure and the SPF standard, the main identities that we will relate to being mostly the E-mail address identity and the IP address identity.

When we say that senders want to send E-mail to a destination recipient, we relate to the E-mail address of the sender and the E-mail address of the destination recipient.

Another type of “identity” is the identity of the mail server that sends the E-mail message on behalf of a specific recipient. In this case, we relate to the identity of the mail server by as the IP address that is used by the mail server.

Note – if we want to be more accurate, there is an additional type of identity that is derivative of
E-mail address identity, which is – the domain name identity. The domain name identity is “taken” from the “right part” of the E-mail address.
Note – relating to mailing infrastructure, there are other types of “identities” such as user credentials and certificate. In the current article, we will not relate to this type of “identities” because this subject is beyond the scope of our article.

The major type of identities in mail based infrastructure -03

The need to verify the identity of the sender

One of the most basic security needs in mail infrastructure is – the need to verify beyond doubt or verify with certainty, the identity of the involved parties in the mail flow session.

Note – It’s important to emphasize that many mail infrastructures don’t support, security mail standard for verifying the identity of “external host” (sender or mail server) that address their organization.

If we want to be more accurate, when we say that we need to verify a specific identity, most of the time, the side that has had the interest to implement this procedure is – the “receiving side” meaning the mail infrastructure of the destination recipient.

When “external entity” address the mail server that represents a specific domain (specific recipient), and Introduces herself using a specific “identity” (specific E-mail address or specific IP address), the mail infrastructure that represents the destination recipient needs to know that the sender Is really who he claims.

For example, the basic of a Spoof E-mail or a spoofing and Phishing attacks is based on the concept in which a hostile element address the mail server of a specific organization, and “claims” that he is a legitimate organization recipient.

The be able to know if this “entity” is a real, legitimate recipient versus a hostile element that camouflages itself by using the identity of a legitimate user, the mail server will need to implement some kind of “identity check” for verifying the identity of the sender.

One of the most popular methods for verifying the sender identity is the SPF standard. When using the SPF standard, the mail server that represents the destination recipient will verify the identity of the “source mail server” meaning, the mail server that represents the sender by verifying of the IP address of the source mail server IP appear in an “authorized list”.

Note – the “authorized list” is implemented by an SPF record (a TXT record), that is published on the public DNS infrastructure, and include a list of IP address for the mail servers that are authorized to send E-mail on behalf a specific domain name.

The different identities in a simple mail flow

To illustrate this “identities” concept, let’s use the following diagram.

In our scenario, side A wants to deliver an email message to side B.

1. The first identity (number 1) is the E-mail address that represents the user\ recipient who wants to send the E-mail message. In our scenario, the identity of this user is – angelina@thankyouforsharing.org

2. The second type of identity (number 2), is implemented in a scenario in which the “original sender” wants to send the E-mail message on behalf of other senders.

A classic scenario is a scenario of the assistant and the manager in which the assistant wants to send E-mail to an external recipient on behalf of her manager.

In our specific example, the manager identity is – Brad@thankyouforsharing.org

3. The third identity (number 3) is the identity of the mail server that represents the sender.

We relate to the source mail server identity by specifying the mail server IP address.

4. The fourth identity (number 4) is the identity of the mail server that represents the destination recipient.

We relate to the destination mail server identity by specifying the mail server IP address.

In case that the destination mail server supports SPF, the verification process of the sender identity is implemented by a verifying that the source mail server IP address is registered as an authorized IP for a specific domain name (the domain name that appears in the E-mail address of the sender).

In our specific scenario, the SPF verification process will check if the specific mail server is authorized to send E-mail for the domain name – thankyouforsharing.org

5. The fifth identity (number 5) is the E-mail address that represents the destination recipient. In our example, the destination recipient is represented by the E-mail address – Bob@o365pilot.com.

Note – in a real-life scenario, the mail flow could be more complicated and include additional mail servers.

The term identity in mail based infrastructure -04

The mail fields that contain the values of sender and recipient identities

In the current section, I would like to review that specific “mail fields” that is used by the SMTP protocol for representing the “identities” of the sender and the recipient E-mail address.

As mentioned, a standard E-mail message includes two parts – the Mail envelope and
the Mail header.

Each of these components, uses different “mail fields” for representing the identity of the sender and the recipient.

Mail envelope

(RFC 5321 | https://tools.ietf.org/html/rfc5321)

Source sender MAIL FROM
Destination recipient RCPT TO
Mail header

(RFC 5322 | http://www.rfc-base.org/txt/rfc-5322.txt)

Source sender FROM
Destination recipient TO

Mail envelope – the “mail fields” that hold the value of the sender and the recipient

  1. The sender identity – the Mail envelope uses a “mail field” named – MAIL FROM for “holding” the information about the sender identity (the sender E-mail address).
  2. The recipient identity – the Mail envelope uses a “mail field” named – RCPT TO for “holding” the information about the recipient identity (the destination recipient E-mail address).

Sender identity & recipient identity - Mail envelope -01

Mail header – the “mail fields” that hold the value of the sender and the recipient

Regarding the “mail component”, the part which holds the information about the sender and recipient identities is the Mail header.

  1. The sender identity – the Mail header uses a “mail field” named – FROM for “holding” the information about the sender identity (the sender E-mail address).
  2. The recipient identity – the Mail header uses a “mail field” named – TO for “holding” the information about the recipient identity (the destination recipient E-mail address).

Sender identity & recipient identity - Mail header -02

The relationship between the Mail envelope infrastructure and the Mail header infrastructure

The method in which we use two sets of different identities (Mail envelope identities and Mail header identities) can be regarded as confusing.

For now, let’s suffice basic answer that this “separation” was created by the SMTP protocol for answering the needs of various business scenarios.

In some scenario, the information about the sender and recipient identities in the Mail envelope will be identical to the information in the Mail header and in some scenario, not.

Mail envelope versus Mail header ?-Sender identity & recipient identity -identical or not -03

The common scenario – the identities in the Mail envelope are identical to the identities in the Mail header.

The most common scenario is a scenario in which we use only one set of the sender and the destination recipient identities.

For example, when a user writes a new E-mail address, his E-mail address configured automatically in the MAIL FROM mail field, and the E-mail address of the destination recipient is configured in the RCPT TO mail field.

Given that the destination mail server complete all the security checks and he is willing to accept the E-mail message, the information about the sender and the recipient identities will be copied from the Mail envelope to the Mail header.

  • The information from the MAIL FROM field will be copied to the Mail header field named – FROM.
  • The information from the RCPT TO field will be copied to the Mail header field named – TO.

Mail envelope versus Mail header ?- Sender identity & recipient identity - The common scenario -04

Another scenario – the identities in the Mail envelope is not identical to the identities in the Mail header.

In this scenario, there are different “set of identities” that represent the source, sender and different “identities” that represent the destination recipient.

To be able to demonstrate such case, let’s use the following scenario:

  • Suzan is the personal assistant of John.
  • Suzan was asked by John to send E-mail message to one of his customers.

When Suzan creates a new E-mail message, the information about Suzan identity will be saved in the Mail envelope in the MAIL FROM field.

The information about John’s identity, will be defined in the FROM field.

In this scenario, the information stored in the MAIL FROM field in the Mail envelope, will not be copied to the Mail header because the FROM field is already “populated” with the E-mail address of John.

Mail envelope versus Mail header ?- Mail header include Sender identity & recipient identity -01

The “additional” identities that involved in the SMTP mail flow

In the current section, I would like to briefly review three additional “identities”, that are involved in the SMTP mail flow.

The source mail server’s identity | The HELO \EHLO command

As mentioned, the “main identity” of the “source mail server” is the server IP address.

Additional types of identity that the source mail server can provide when he Initializes SMTP session with another mail server is – the host name + domain name which the mail server represents.

The information that the source mail server can provide is not a mandatory requirement but instead optional.

In case that the source mail server wants to provide this type of identity (his HOST name, the domain name that he represents or a combination of a host name + domain name which described as FQDN), the mail server can provide this information after the SMTP command HELO (or EHLO).

Additional identities that are involved in the SMTP session? - The HELO Host identity -02

The Reply-to identity

The second type of “identity” that can be included in E-mail message is the mail field
named – REPLY-TO.

As the name implies, the purpose of this mail field is, to include information about a specific
The E-mail address that we want that the destination recipient will use if he “hit” the reply button.

By default, this mail field is empty and the default value (E-mail address) that will be used in case that the destination recipient use the reply option is – the E-mail address that appears in TO mail field.

Additional identities that are involved in the SMTP session? - The Reply-To identity -03

The RETURN-PATH identity

The third type of “identity” that can be included in E-mail message is the mail field
named – RETURN-PATH.

The purpose of this mail field is to contain the E-mail address, that will be used by the destination mail server to inform the “sender” about a problem such as non-existing recipient, etc.
By default, the value (the E-mail address) of the mail field RETURN-PATH is not determined by the source sender or by the source mail server but instead, by the destination mail server.

When the destination mail server gets the E-mail message, he will “extract” the E-mail address from the MAIL FROM field, and copy this E-mail address to the RETURN-PATH mail field that will be saved as part of the Mail header.

Most of the time, even if the source sender specifically states the value of the E-mail address of the RETURN-PATH mail field, the destination mail server will ignore this information, and will use the E-mail address that appears in the Mail envelope section in the MAIL FROM

Additional identities that are involved in the SMTP session? - The Return-Path identity -04

A description of a standard SMTP mail flow and the use of mail envelope and mail header

In the current section, I would like to “wrap” the information that we have reviewed in the former section of the current article, so we will be able to understand better how the different components are operating in a standard SMTP session.

Let’s describe a standard SMTP session in which sender A want to send an E-mail message to the recipient B.

  • The source mail server addresses the destination recipient mail server and asks his permission to start an SMTP session (by using the SMTP command HELO or EHLO).
  • The destination mail server, is willing to accept the request for the SMTP session.
  • The source mail server delivers the information that is kept in the Mail envelope.
  • The destination mail server looks at the information, and finds the required information about the sender identity (E-mail address) and the recipient identity (E-mail address).
  • Based on the information that appears on the Mail envelope , the destination mail server can perform a variety of security check and sender identification checks.
    For example, verify if the source mail server IP address appears as blacklisted, verify if the source mail server is authorized to represent the specific domain name and so on.
  • The destination mail server adds to the Mail header information about all the security test and their result.
  • The destination mail server copies most of the information that appears Mail envelope to the Mail header

Standard SMTP mail flow process - The mail envelope and the Mail - 1-2 -01

Regarding the mail fields that “contain” the information about the identity of the sender and the recipient, one of the two possible scenarios can occur:

Case 1

In case that the information that was sent from the source mail server doesn’t include values for the mail fields – FROM and TO, the destination mail server will implement the following procedure:

  • Copy the E-mail address in the MAIL FROM field to the Mail header FROM
  • Copy the E-mail address in the RCPT TO field to the Mail header TO
  • Copy the E-mail address in the MAIL FROM field to the Mail header RETURN-PATH

SMTP mail flow process - The mail envelope and the Mail header - Case 1 -02

Case 2

In case that the information that was sent from the source mail server includes values for one or for all of the following mail fields – FROM or TO, the destination mail server will implement the following procedure:

In case that one of the mail fields that “belong” to the Mail header (FROM or TO) include a specific value (E-mail address), the information will not be copied or in other words, will not be overwritten by the value that appears in the Mail envelope.

Reading the mail fields that “belong” to the Mail header (FROM or TO) and doesn’t include a specific value (E-mail address), the information will be copied from the Mail envelope mail fields respectively.

SMTP mail flow process - The mail envelope and the Mail header - Case 2 -03

The end of the process will include the following task that will be implemented by the destination mail server:

  • The destination mail server will remove the Mail envelope (the Mail envelope is not part of the E-mail message that is sent to the recipient).
  • The destination mail server will deliver the E-mail message to the destination recipient

Standard SMTP mail flow process - The mail envelope and the Mail - 2-2 -04

SPF verification process – common scenario

In the following section, I would like to briefly review the SPF verification process that is implemented by the destination mail server will.

To demonstrate the SPF verification process, let’s use the following scenario:

  • Suzan is the source sender who uses the E-mail address – Suzan@thankyouforsharing.org
  • Bob the destination recipient who uses the E-mail address – Bob@thankyouforsharing.org

The source mail server that represents Suzan, address the mail server that represents the destination recipient – Bob.

In our scenario, the Mail envelope includes information about the sender (MAIL FROM), and about the destination recipient (RCPT TO) but the Mail header fields (FROM and TO) are empty.

SPF verification process - common scenario - Part 1-2 -02

Given that the destination mail is configured to use SPF for verifying the sender identity, the mail server will perform the following tasks:

  1. “Fetch” from the sender address (MAIL FROM) the part which represent the sender domain name. In our scenario the domain name – thankyouforsharing.org
  2. “Write down” the IP address of the source mail server.
  3. Addresses DNS server and check if the domain thankyouforsharing.org have an SPF record (a TXT record). In case that such record exists “read” the content of the SPF record.
  4. Verify if the IP address of the source mail server appears as one of the IP addresses in the SPF record.
  5. In case that the IP address of the source mail server appear in the list, the SPF verification test considers as “successful”. The meaning is that the source mail server is authorized to send E-mail message to thankyouforsharing.org recipients.

SPF verification process - common scenario - Part 2-2 -03

The more complicated scenario, and the vulnerability of SPF verification method

In the following section, I would like to review the way that a hostile element can use for implementing a spoofing or Phishing attacks to attack our organization + bypass the SPF verification check that is implemented by our mail server.

The attack is based on the following building blocks:

1. The SMTP standard | using multiple sender identities

The SMTP protocol includes an option in which the “source” meaning the element that sends the E-mail message to the destination recipient can provide two different identities:

  • The identity of sender A will appear on the MAIL FROM mail field (the mail field that appears in the Mail envelope).
  • The identity of sender B will appear in the FROM mail field (the mail field that appears in the Mail header).

2. SPF sender verification process | The MAIL FROM mail field and the FROM mail field

  • The SPF sender verification process is implemented only for the identity (the E-mail address) of the sender who appears on the MAIL FROM
  • The SPF sender verification process is NOT implemented only for the identity (the E-mail address) of the sender who appears on the FROM

The meaning is that the SPF standard has a “blind spot” because, the “FROM” identity is not checked or verified by the SPF verification test.

The major problem is that hostile element that knows about this “Deadly Cocktail”, can very easily exploit this “blind spot” that the SPF standard have.

The DNA of Spoof E-mail attack that exploits the SPF “blind spot”

The exploits of the SPF “blind spot” is implemented by the hostile element in the following way:

When executing a Spoofing or Phishing attacks, the main purpose of the hostile element is to Cause the other party to perform and do something for him (to transfer money to a bank account, click on a web link and so on).

To convince the destination recipient whom he wants to attack to “do” the specific action, the hostile element needs to conceal his true identity and present himself as a legitimate user \ recipient. In other words, provide an E-mail address which the destination recipient can trust.

To succeed in executing spoofing or Phishing attack, even when the mail infrastructure that represents the destination recipient uses sender verification procedures that are implemented by the SPF standard.

Spoof attack - The main purpose of the hostile element -01

In order to actualize this “SPF bypass mechanism”, the hostile element performs the following steps:

  1. Purchase a dummy domain name – I use the term “dummy domain” because there is no real meaning of the domain name. The purpose of the dummy domain name is to serve as a decoy for the SPF sender verification process that will be implemented by the mail server that represents the destination recipient.
  2. Configure the required SPF record in the DNS server who hosts the dummy domain name.
  3. Add the required information meaning the IP address of the mail server that he uses for performing spoofing or Phishing attack.

Exploit the blind spot of SPF verification process - Part 1 -3 -02

The Spoof E-mail attack is implemented in the following way:

The hostile element creates an E-mail message, that includes two senders E-mail addresses.

  • The first E-mail address (MAIL FROM) uses the “legitimate domain name” (the dummy domain name). In our specific example, the MAIL FROM E-mail address is the “red domain” E-mail address.
  • The second E-mail address (FROM) uses the domain name of the recipient, whom he wants to attack. In our specific example, the FROM E-mail address is the “green domain”
    E-mail address.

Exploit the blind spot of SPF verification process - Part 2 -3 -03

Given that the mail server that represents the destination recipient support SPF, the sender verification process will be implemented by verifying the “red E-mail address” (the E-mail address that uses the dummy domain name).

Given that the hostile element

  • Create the required SPF record
  • Uses mail server that is IP address appears in the SPF record (the mail server that sends the E-mail message using the dummy domain name)

The SPF sender dainty verification will complete successfully.

The destination mail server removes the Mail envelope , including the MAIL FORM address and leaves the “green E-mail address” (the FROM E-mail address).
From the destination recipient point of view, the E-mail message was sent by the sender with the “green E-mail address”. The destination recipient is not aware that the “first E-mail address” that appears in the Mail envelope was removed.

Exploit the blind spot of SPF verification process - Part 3 -3 -04

The demonstration of how the hostile element bypasses the SPF verification check

To be able to demonstrate the way that hostile element can use for bypassing the SPF sender verification check, let’s use the following scenario:

A hostile element plans to attack (execute Spoofing \ spear Phishing attack) company named – o365pilot.com

The hostile element did the homework, and finds the required information about the persons who hold a key role in the organization:

  • The company CIO is Bob that uses the E-mail address Bob@o365pilot.com
  • The company CFO is Suzan that uses the E-mail address Suzan@o365pilot.com

The hostile element is planning to send Spoof E-mail to Bob that apparently delivered from Suzan.

The hostile element knows that the mail infrastructure of o365pilot.com implements an SPF sender verification check for each incoming mail.

To be able to bypass the SPF sender verification check, the hostile element uses a dummy domain name named – thankyouforsharing.org
The hostile element creates the required SPF record that will use for publishing information about the authorized mail server of the domain name – thankyouforsharing.org

The hostile element creates a new email message that includes two sender’s E-mail address:

  • evil@thankyouforsharing.org
  • suzan@o365pilot.com

The destination recipient whom the hostile element wants to attack is Bob the company CEO.

How the hostile element bypasses the SPF verification check - Scenario description 1 of 3 - 01

The hostile element mail server will address the mail server that represents the destination recipient by starting an SMTP session, and ask him to deliver the E-mail message to the destination recipient.

The destination mail server will perform the SPF sender verification test for the E-mail address that appears in the MAIL FROM.

In our scenario, the mail server will try to verify the SPF record of the domain – thankyouforsharing.org

Given that the SPF record was configured correctly, the SPF sender verification test is completed successfully, and the mail server that represents the destination recipient “declares” that the sender can be trusted (that the sender is a legitimate sender).

How the hostile element bypasses the SPF verification check - Scenario description 2 of 3 - 02

The destination mail server will copy the E-mail address that appears in the MAIL FROM
(evil@thankyouforsharing.org) to the mail field – RETURN-PATH.

The destination mail server will remove the Mail envelope that includes the information about the E-mail address – evil@thankyouforsharing.org

The mail server will forward the E-mail message to the destination recipient (Bob).
Bob sees the E-mail message as E-mail message that was sent from suzan@o365pilot.com

How the hostile element bypasses the SPF verification check - Scenario description 3 of 3 - 03

The next article in the current article series

In the next article –How to simulate Spoof E-mail attack and bypass SPF sender verification? | 2#2, we will learn how to simulate Spoof E-mail attack and bypass SPF sender verification.

Now it’s Your Turn!
We really want to know what you think about the article

The post How can hostile element execute Spoof E-mail attack and bypass existing SPF implementation? | introduction | 1#2 appeared first on o365info.com.

How to simulate Spoof E-mail attack and bypass SPF sender verification? | 2#2

$
0
0
In the current article, we will demonstrate how to simulate Spoof E-mail attack that will bypass existing SPF sender verification procedure that is implemented by the mail server that represents the recipient whom we want to attack.

The current article series include two articles.
The former article is – How can hostile element execute Spoof E-mail attack and bypass existing SPF implementation? | introduction | 1#2

Disclaimer

For the avoidance of any doubt, the purpose of this demonstration is should not be applied in any form or manner whatsoever for exploiting and attack organizations.

The only purpose of this article is – to provide you a way that could be used for verifying your existing mail infrastructure so you will be able to be aware to existing vulnerability in your mail infrastructure and find the required solutions for mitigating and blocking the “holes” that can and probably will be exploited by a variety of hostile elements.

THIS CODE AND ANY ASSOCIATED INFORMATION ARE PROVIDED “AS IS” WITHOUT WARRANTY OF ANY KIND, EITHER EXPRESSED OR IMPLIED, INCLUDING BUT NOT LIMITED TO THE IMPLIED WARRANTIES OF MERCHANTABILITY AND/OR FITNESS FOR A PARTICULAR PURPOSE. THE ENTIRE RISK OF USE, INABILITY TO USE, OR RESULTS FROM THE USE OF THIS CODE REMAINS WITH THE USER.

How to simulate Spoof E-mail attack and bypass SPF sender verification | Step by Step

Implement the required necessary arrangements

To be able to achieve the two main goals:

  • Succeed in simulated Spoof E-mail attack
  • Succeed on bypass SPF sender verification check

We have made these preliminary preparations:

  1. Purchase a dummy domain name – the purpose of the dummy domain name is to serve as a decoy for the SPF sender verification process that will be implemented by the mail server that represents the destination recipient.
  2. Configure the required SPF record in the DNS server who hosts the dummy domain name.
  3. Add the required information meaning the IP address of the mail server that he uses for performing Spoofing or Phishing attack.

In the following screenshot, we can see an example for the SPF (a TXT record) that was created for the “dummy domain name” –thankyouforsharing.org

The IP address that appear is the mail server IP address that is used by the hostile element for sending the Spoof E-mail to the destination recipient.

Simulating Spoof E-mail attack and bypassing the SPF verification check -01

Our spoof E-mail attack simulation scenario characters

To be able to demonstrate the way that hostile element can use for implementing Spoof E-mail attack + bypassing the SPF sender verification check, let’s use the following scenario:

A hostile element plans to attack (execute Spoofing \ spear Phishing attack) company named – o365pilot.com

  • The recipient whom the hostile element seeks to attack is Bob, the company CEO that uses the
    E-mail address bob@o365pilot.com
  • The fake identity that the hostile element will use is the identity of Suzan the company CFO that uses the E-mail address suzan@o365pilot.com
  • The hostile element knows that the mail infrastructure of o365pilot.com implements an SPF sender verification check for each incoming mail.
  • To be able to bypass the SPF sender verification check, the hostile element uses a dummy domain name named – thankyouforsharing.org
  • The hostile element will use an E-mail message that includes two senders E-mail address:
    • evil@thankyouforsharing.org
    • suzan@o365pilot.com

Using an SMTP Telnet session for executing the Spoof E-mail attack

In the following section, we will review how to run a simulation of Spoof E-mail attack in which we use an SMTP telnet session for executing the attack.

The telnet client that we use

Technically, we can use the built-in windows telnet client, but this telnet client is a little limited and not so convent.

Personally, I would like to work with a dedicated telnet application. There are a variety of free telnet clients. In our specific scenario, I use a very nice telnet client named – conemu

The two parts of the SMTP telnet session

It’s important to me to emphasize the “two parts” of the SMTP telnet session:

  • The first part (A), is the part in which we sue the SMTP commands that are related to
    the Mail envelope part.
  • The first part (B), is the part in which we sue the SMTP commands that are related to
    the Mail header

The set of two identities that we use in the SMTP telnet session

To be able to bypass the SPF sender check, we will use a set of two identities:

  • Dummy E-mail address identity – evil@thankyouforsharing.org (the E-mail address that belongs to the Mail envelope).
  • The spoofed E-mail address –bob@o365pilot.com (the E-mail address that belongs to the Mail header).

In the following screenshot, we can see the “complete SMTP telnet session” that simulates the Spoof E-mail attack:

Simulating Spoof E-mail attack and bypassing the SPF verification check -03

  • The purpose of the first part is to “occupy” the destination mail server with “non-useful” information that will help us to present ourselves as a legitimate organization.
  • The purpose of the second part is to send the Spoof E-mail that includes the information about the spoofed sender.

Simulating Spoof E-mail attack and bypassing the SPF verification check -03-B

In the following section we will provide, a “step by step” description of the SMTP telnet commands that we use:

0. Addressing the destination mail server

Using SMTP telnet session for communicating the destination mail server

To be able to address the “destination mail server” meaning, the mail server that represents the domain which we want to attack (In our example, the mail server that represent the domain o365pilot.com), we need to know the host name or the IP address of the destination mail server (the host name that appears in the MX record for the specific domain name).

The telnet commands that we use for starting an SMTP session with another mail server is:

Telnet <Mail server Host name \ IP address> 25

Simulating Spoof E-mail attack and bypassing the SPF verification check -02

1. Initialize the SMTP session

The first command that we use is the HELO command which we use for initializing the session with the remote mail server.

Technically speaking, we don’t have to provide any additional info besides the HELO command, but in our scenario, our main purpose is to present ourselves as a legitimate mail server that represent the domain name – thankyouforsharing.org

For this reason, we will specify the domain name after the helo command.

The command syntax that we use is

helo thankyouforsharing.org

2. Provide the sender identity

In this part, we provide the sender identity (the sender E-mail address) by using the
command: MAIL FORM

Note – notice that the sender identity is related to the “dummy domain” that we use. This is not the sender identity that we want to provide to the end user, but instead, just a temporary identity that will mislead the destination mail server that performs the SPF verification test.

The command syntax that we use is

mail from: evil@thankyouforsharing.org

3. Provide the recipient identity

In this part, we provide the recipient identity (the sender E-mail address) by using the command: RCPT TO:

In our specific scenario, we want to send Spoof E-mail to the destination recipient Bob

The command syntax that we use is

rcpt to: bob@o365pilot.com

Simulating Spoof E-mail attack and bypassing the SPF verification check -04

In this stage we have “finished” the Mail envelope phase.

Technically speaking, to be able to send the E-mail message to the destination recipient, we don’t need to provide additional “identity information”.

The purpose of this phase is, to provide the required information for “building” the Mail header part meaning, the sender and the recipient identities + the information that will appear in the E-mail message that will be sent to the destination recipient.

Just a quick reminder, in the mail header phase, we use the command FROM for specifying the sender identity, and the command TO specifying the destination recipient identity.

4. Initializing the Mail header section

To be able to “signal” the destination mail server that we want to start the Mail header phase, we use the command –

data

5. Providing the spoofed identity of the sender

In this step, we provide the “apparently identity” of the company CFO – Suzan

To make the spoof identity look like a reliable and trusted identity in the eyes of the destination recipient, we will provide two separated parts of “Susan’s identity” –

Suzan display name + Suzan E-mail address

  • The display name of the spoofed sender is the string that appears between the quotation marks.
  • The spoofed E-mail address of the sender, is the E-mail address between the angle brackets.

The command syntax that we use is

from: “Suzan the CFO” <Suzan@o365pilot.com>

6. Providing the identity of the destination recipient

Technically speaking, there is no mandatory need for providing the E-mail address of the destination recipient. The reason that we provide the E-mail address is that when using telnet session, if the TO the field is empty, the information about the recipient displayed as – “Undisclosed recipients

The command syntax that we use is

to: bob@o365pilot.com

In this phase, we will define the E-mail message subject + the mail content

Simulating Spoof E-mail attack and bypassing the SPF verification check -05

7. Providing the E-mail message subject

To be able to define the E-mail content message that will include subject + the text that we want to send, we use the command subject: + the required text.

In our specific scenario, we will use the subject command + the following text

subject: Hello Bob, an important message,

8. Add a space between the subject in the mail body

To be able to add the required mail text that will appear in the E-mail message, we need to add a space between the subject command and the text that we will add.
Use the

ENTER

key for creating the required space.

9. Providing the E-mail message text

In our specific scenario, we will add the following text string

Please transfer to the following bank account – 4589865, the amount of million dollar ASAP!

10. “Ending” the SMTP session with the mail serve

To be able to “end” the SMTP session, we use the point character.

.

Simulating Spoof E-mail attack and bypassing the SPF verification check -06

The result of our Spoof E-mail attack

In the following screenshot, we can see the Spoof E-mail that was sent to our
destination recipient – Bob. Notice that the E-mail message looks like a legitimate E-mail message.

Simulating Spoof E-mail attack and bypassing the SPF verification check -07

To only “hint” to the fact that the specific E-mail message is not a “standard E-mail message” (Spoof E-mail in our scenario) is that way that Outlook client use for displaying the information about the sender identity.

When we look in depth in the “top part” of the E-mail message, we can notice that the information about the sender includes the E-mail message of the sender.

Simulating Spoof E-mail attack and bypassing the SPF verification check -08

This not the “normal behavior” when the sender is a legitimate recipient.

In the following screenshot, we can see an example of an E-mail message that was sent from the “real user”. When the E-mail message is a legitimate E-mail message, the mail client such as Outlook or OWA will display only the display name of the sender.

Simulating Spoof E-mail attack and bypassing the SPF verification check -09

If you are wondering how did Outlook “notice” that he E-mail message was sent by a “standard organization recipient” the answer is that when we use the telnet session, we provide the spoofed E-mail address, but we didn’t provide any user credentials.

For this reason, the recipient is identified as Anonymous (the information is saved in a mail field named – X-MS-Exchange-Organization-AuthAs).

When Outlook or OWA mail client recognized a scenario in which the sender considers as Anonymous, the information about the sender will include the E-mail address of the source sender.

Analyzing the information of the Spoof E-mail by using email analyzer

In the following section, we will review that way that we can use for analyzing the information that was saved in the Mail header of the Spoof E-mail that was sent to Bob.

The process in which we analyze the “evidence” that was saved in the Mail header could be considered as a reverse engineering process of a forensic process in which we use the existing evidence for draw conclusions about the events that happened in the past

The information that is saved in the Mail header, includes many important details and “hints” that we can use for understand better the events that occurred during processing of the Spoof
E-mail attack simulation.

Technically, we can analyze the information in the E-mail message header by using a simple text editor such as notepad, but the most preferred option is to use a mail analyzer.

In our specific example, we will use the Microsoft web tool the ExRCA (Exchange remote connectivity analyzer) for analyzing the information that was saved in the mail header.

How to “extract” the mail header information from the E-mail message?

They get the information this is “stored” in the E-mail message (the Spoof E-mail that was sent to the recipient Bob), we need to choose the specific E-mail message, choose the File menu
and then the option –  Properties.

Simulating Spoof E-mail attack and bypassing the SPF verification check -10

  • Select the information that appears in the – internet header
  • Copy the information (we can use the key combination COPY + C).

Simulating Spoof E-mail attack and bypassing the SPF verification check -11

We will access the ExRCA (Exchange remote connectivity analyzer) website by using the following URL address: https://testconnectivity.microsoft.com/

  • Select the tab – Message Analyzer
  • In the empty text box, paste the information that was copied in the former step (we can use the key combination COPY + V).
  • Click on the Analyze headers button

Simulating Spoof E-mail attack and bypassing the SPF verification check –analyzing the result by using EXRCA -01

At the top of the screen, we can see the basic information about the identity of the sender and the recipient.

In the summary section (A), notice that the information about this “identities” is the information that we have provided in the second phase of the telnet session, which we described as the “Mail header phase”.

As mentioned, the mail server removes the Mail envelope that includes information about the sender identity that stored in the MAIL FORM field.

I our specific scenario, the E-mail address that we use in the MAIL FORM field was – evil@thankyouforsharing.org.

The information about this E-mail address was removed in the mail header will include information about the sender E-mail address that appears in the TO mail field.

The “sender information” that appears, is the information that is seen by the destination recipient (Bob). In other words, from Bob’s perspective, the E-mail address was sent by Suzan the company CFO.

In the received header section (B), we can see information about the mail server that was involved in the mail flow.

The information about each of the mail servers includes the IP address of the mail server and in case that the mail server provides his “name” (the term “name” could be translated to host name, domain name of the FQDN).

In our specific scenario, the mail server that we use for simulating the Spoof E-mail attack provides his name – thankyouforsharing.org

The information about the mail server host name, was provided by us in the SMTP telnet session, in the begging of the session when we use the HELO command.

Simulating Spoof E-mail attack and bypassing the SPF verification check –analyzing the result by using EXRCA -02

Phishing Confidence Level

The value of the PCL (Phishing Confidence Level) is – 0.
The meaning is that the E-mail message was not recognized as phishing or spoof E-mail.

Authentication-Results

In the section named – Authentication-Results, we can see the following information:

spf=pass (sender IP is 212.25.80.239) smtp.mailfrom=thankyouforsharing.org

The meaning of this information is that, from the point of view of the destination mail server that performs the SPF sender verification test, the check completes successfully (spf=pass).

Just to remind you, one of our main goals in this “Spoof E-mail attacks simulation” was to prove that we can bypass existing SPF protection implementation.

The mail server (the mail server that hosts the recipient whom we want to attack) “inform” us, that he checks the E-mail address that appears in the MAIL FORM field that in our scenario was – evil@thankyouforsharing.org

(smtp.mailfrom=thankyouforsharing.org)

Notice that when using the SPF sender check, the verification is regarding the “domain name”, and not for the “hole E-mail address”.

Simulating Spoof E-mail attack and bypassing the SPF verification check –analyzing the result by using EXRCA -03

Received-SPF

In the section named – Received-SPF, we can see an additional information:

We can see that the destination mail server (the mail server that host Bob) informs us that the mail server that represents the domain name thankyouforsharing.org, consider is a legitimate mail server – thankyouforsharing.org designates 212.25.80.239 as permitted sender.

Pass (protection.outlook.com: domain of thankyouforsharing.org designates 212.25.80.239 as permitted sender) receiver=protection.outlook.com; client-ip=212.25.80.239; helo=thankyouforsharing.org;

Simulating Spoof E-mail attack and bypassing the SPF verification check –analyzing the result by using EXRCA -04

As we have already learned, the destination mail server removes the Mail envelope after he finishes the required procedure for accepting the E-mail message.

So theoretically, there is no information about the sender who was mentioned in the Mail envelope (the MAIL FROM field).

This assumption is correct, apart from one exception: the RETURN-PATH field.

The SMTP standard definition that the responsibility of the destination mail server is – to “fetch” the E-mail address that appears in the MAIL FORM field and copies this E-mail address to the RETURN-PATH field.

The destination mail server “wipe out” information that appears in the Mail envelope, but one thing that the destination mail server does before he removes the Mail envelope is – copy the information that appears in the MAIL FORM field with an additional mail field named – RETURN-PATH.

The purpose of this mail field is to hold the E-mail address that will be used in case that the
E-mail message could not be sent to the destination recipient.

In case that the destination mail server will need to notify the “source sender” about some problem, the NDR message will be sent to this E-mail address (the E-mail address that was registered as the RETURN-PATH).

In our scenario, the E-mail address (the “dummy E-mail address”) that appear in the mail envelope was evil@thankyouforsharing.org

The destination mail server copied this E-mail address, and the result is that this E-mail message populates the field RETURN-PATH.

In other words – the only “evidence” that we have for the “trick” that was implemented by the hostile element is the information that is stored in the RETURN-PATH field.

Simulating Spoof E-mail attack and bypassing the SPF verification check –analyzing the result by using EXRCA -05

X-MS-Exchange-Organization-AuthAs – authentication versus non authentication sender

The last detail that I would like to review is the part in which we classify the source sender as “know recipient” or anonymous sender.

In our scenario, the hostile element spoofs the identity of a legitimate organization user by presenting himself as suzan@o365pilot.com

Despite the fact that we manage to “bypass” the SPF sender verification mechanism, and manage to send the E-mail message to the destination recipient mailbox, the sender didn’t provide user credentials.

For this reason, the sender was classified as Anonymous.

This information about this “observation”, can help us to identify and detect E-mail message that manage to bypass our “SPF wall”

Simulating Spoof E-mail attack and bypassing the SPF verification check –analyzing the result by using EXRCA -06

Now it’s Your Turn!
We really want to know what you think about the article

The post How to simulate Spoof E-mail attack and bypass SPF sender verification? | 2#2 appeared first on o365info.com.

How does sender verification work? (How we identify Spoof mail) | The five hero’s SPF, DKIM DMARC, Exchange and Exchange Online protection | Part 9#9

$
0
0

The process of “sender verification”, enables us to distinguish between a legitimate sender versus an attacker who spoof his identity and prevent a possible Spoof mail attack.

In the current article, we will review in details three sender verification standard – SPF, DKIM, DMARC and in addition two sender verification methods that can be implemented in Exchange and Exchange Online based environment.

The five hero’s SPF, DKIM DMARC, Exchange and Exchange Online protection

SPF, DKIM and DMARC are public mail standard that was created for the purpose of verifying sender identity.

Additional options that are available for us:

  1. Using Exchange server rule that will identify an event in which hostile element uses the organization Identity to attack organization users hosted by the Exchange.
  2. Using the Exchange Online protection option of Phish filter.

How does the SPF standard protect us from Spoof E-mail scenario?

The SPF standard is based on a concept in which we draw a conclusion about the sender, by verifying information about “his mail server.”

If we want to be accurate, when using SPF, we relate to the “right part” of the E-mail address meaning the domain name.

The mail server that represents the sender should be considered as an “authorized mail server” for a specific domain name (the domain name that appears in the E-mail address of the sender).

The sender verification process that is implemented by the destination mail server
(the mail server that represents the destination recipient) is performed by verifying the “integrity” of the sender mail server.

The mail server that represents the “sender” should be considered as an “authorized mail server” for the specific domain name.

The information about the authorized mail server that can send E-mail on behalf of the domain is published in the SPF record (a TXT record), which include a list of IP address or host names of the mail server that are authorized to send E-mail on behalf of the domain.

SPF - The concept of authorized (legitimate) mail server the represent the sender

The sender identity “store”

When using SPF, the sender identity that is checked, is the E-mail address that appears in the mail envelope in the MAIL FROM field.

SPF - fetching the information about the sender identity from the mail header – MAIL FROM field

SPF sender verification processes flow

The SPF sender verification protocol, uses the following mechanism for verifying the identity of the sender:

When the E-mail message reaches to the destination mail server, the mail server “fetch” from the mail envelope (MAIL FROM field) the information on the sender E-mail address.

The destination mail server relates to the domain name of the E-mail address (the right part of the E-mail address).

In our specific example, the domain name of the sender is o365info.com

The mail server addresses the DNS server who hosts the domain name o365info.com and looks for information on the SPF record that is hosted “under” the o365info.com domain name.

The SPF record is implemented as a TXT record that includes relevant information about the mail server that is authorized to send an E-mail message on behalf of the domain o365info.com .

In our specific example, the mail server verifies if the IP address of the “source mail server” (the mail server that represents the sender) appear in the SPF record.

  • Case 1 – in case that the IP address of the source mail server, appear as listed on the SPF record, the SPF verification test result is – “Pass” meaning; the sender is a legitimate sender because his mail server is considered as a legitimate mail server.
  • Case 2 – in case that the IP address of the source mail server, doesn’t appear as listed on the SPF record, the SPF verification test result is – “Fail” meaning; the sender is not a legitimate sender because his mail server is not a legitimate mail server.

The sender verification process that is implemented by the SPF standard -01

SPF | The scenario in which E-mail message is classified as Spoof E-mail

In the following diagram, we can see the logic of the SPF verification process regarding the scenario of Spoof mail:

In case that the mail server IP address that send the E-mail message on behalf of the sender doesn’t appear in the SPF record for the specific domain, the conclusion that the E-mail message is a Spoof mail (spoof sender).

SPF standard ? - What is the scenario in which E-mail is classified as Spoof E-mail

Disadvantage of SPF standard

The SPF method has a significant disadvantage that relates to the mail field that is verified in the SPF verification process.

  • The SPF verification process “fetch” the E-mail address that appears in the mail envelope in the MAIL FROM
  • The SPF verification process, doesn’t relate or check the E-mail address that appears in the mail header in the FROM

This method can be easily exploited by hostile elements, that can bypass the SPF verification mechanism by providing two different identities.

  1. The identity that in the MAIL FROM field will be a legitimate identity.
  2. The identity that in the FROM field will be a spoofed identity.

The SPF standard process is configured to verify the sender information that is stored in the MAIL FROM field only. In other words, the SPF sender verification process, will not relate to sender information stored in the FROM field. This is a built-in weakness that can be exploited by hostile elements. If you want to read more information about this vulnerability, you can read the articles:

How does the DKIM standard protect us from the Spoof mail scenario?

The DKIM method for verifying the mail sender identity legitimacy is implemented by a method, in which an “authorized entity” digitally signs the E-mail message that is sent from the sender.

The Digital signature is based on existing PKI (public-key key infrastructure).

Using the options Digital signature enables the “other side” (the mail server that represents the destination recipient in our scenario) to be sure that the information (the E-mail message) was sent by a trusted authority.

Because the E-mail message was sent by a trusted authority (the mail server, they represent the sender), the destination mail server can be sure that the sender is a legitimate sender (the sender is who he claims to be).

DKIM standard - Digitally signing the E-mail message

The “authority” the digitally sign the sender E-mail message, is usually the mail server that delivers the E-mail message on behalf of the sender.

In DKIM infrastructure, the entity that sign the E-mail message described as DKIM selector.

DKIM standard - The concept of DKIM selector

The information that is signed by the DKIM selector, includes a couple of mail fields, but in the context of our topic, the main thing that we ought to know is – that the mail field named FROM that contain the sender identity (the sender E-mail address) is digitally signed.

DKIM - fetching the information about the sender identity from the mail header - FROM field

Note – if you want to read more detailed information on the DKIM standard and the implementation of DKIM in Office 365 based environment, you can read the article series –
DKIM – Domain Keys Identified Mail | Basic introduction | Part 1#5

DKIM sender verification processes flow.

The DKIM sender verification protocol, use the following mechanism for verifying the identity of the sender:

The E-mail message that was sent from the source mail server includes.

  • The digital signature of the data that includes the E-mail address of the sender.
  • Information about the name (FQDN) of the mail server that signed the E-mail message meaning the DKIM selector.

When the E-mail message reaches to the destination mail server, the mail server “fetch” from the mail header (FROM field) the information on the sender E-mail address.

To be able to get information about the “authority” that digitally signed the E-mail message, the destination mail server relates to the domain name of the E-mail address
(the right part of the E-mail address).

In our specific example, the domain name of the sender is o365info.com

The mail server “fetch” from the mail header, the host name of the DKIM selector that signed the E-mail message.

The destination mail server addresses a DNS server who hosts the specific domain name and looks for information on the DKIM record that is hosted “under” the o365info.com domain name.
The DKIM record is implemented as a TXT record, that includes relevant information about the host name of the DKIM selector.

In a DKIM scenario, the mail server will look for information about the host name of the DKIM selector.

In case that the DKIM record includes the host name of the DKIM selector that appears in the
E-mail message, the mail server “know” that he is authorized authority, and that he can be trusted.

Now, to the destination mail server, move on to the next phase, in which he needs to verify the Digital signature that appears in the E-mail message.

The Digital signature verification process is implemented by a quite complicated process, in which the destination mail server calculates by himself, the HASH value of the mail field (including the mail field FROM that contain the sender E-mail address), and compare the HASH value that he got to the HASH value that appears in the E-mail message.

  • Case 1 – in case that the HASH value is identical, the meaning is that the data was not altered in any way, and then we can be sure the sender is a legitimate sender.
  • Case 2 – in case that the HASH value is not identical, the meaning is that the data was altered, and for this reason, we cannot be sure the sender is a legitimate sender.

The sender verification process that is implemented by the DKIM standard -01

DKIM | The scenario in which E-mail message is classified as Spoof E-mail.

From the DKIM process point of view, the verification test includes two “tests” that must be completed successfully.

Test 1 – In case that the DKIM selector that appears in the E-mail message doesn’t appear in the DKIM record that is hosted under the sender domain name, the verification process considers as failed meaning the E-mail considers as Spoof mail.

Test 2 – In case that the HASH value of the digital signature is not valid (not identical), the verification process considers as failed meaning the E-mail considers as Spoof mail.

DKIM standard -What is the scenario in which E-mail is classified as Spoof E-mail

How does Exchange protect us from Spoof E-mail scenario?

Let’s start with a declaration – by default; Exchange is not configured to “protect us” from a scenario of Spoof mail (spoofed sender).

We can even say that the Exchange server is “indifferent” for Spoof E-mail attacks or to the identity of the sender.

Although the Exchange server is indifferent towards the sender identity legitimacy, we can use an Exchange powerful option that will help us to identify legitimate senders in a specific scenario in which we want to verify the identity of the sender that uses the domain name that is hosted by the Exchange organization (domain name that the Exchange considered authoritative for).

The “Exchange verification test” is implemented by using a combination of “two parts”:

  • Information that is saved in the E-mail message header.
  • Exchange rule.

Using an Exchange rule, we can define a logical condition, which will enable us to identify a scenario of a spoof sender (spoof mail).

When we use the term “Spoof mail” the meaning is a very specific scenario – a scenario in which hostile element is using “our user identity,” and try to attack one of our organization users.

The Exchange rule condition that we define is based on the following logic-

Each entity that uses our organizational identity (the E-mail address that includes our domain name), is supposed to be a legitimate entity, that is hosted by our Exchange server.

Each legitimate entity that addresses the Exchange server should provide user credentials, so the Exchange server will be able to know that this is a legitimate and trusted entity.

For example, when we open our Outlook, and access the data that are stored in our mailbox, our user credentials “transferred” in the background on the Exchange server.

The information about the fact that “entities” provide or didn’t provide user credentials, is registered as part of the mail header.

  • In case that the entity provides user credentials, the entity authentication status is – internal.
  • In case that the entity didn’t provide user credentials, the entity authentication status is – Anonymous.

The “trick” that we can use, is based upon a procedure in which we “fetch” the information on the authentication status of senders, that their E-mail message includes our domain name.
For example – in our specific example, the hostile element presents himself uses the E-mail address – John@o365info.com (a false identity).

John is a “real” Exchange recipient, that has an Exchange mailbox, etc.

The Exchange mail server that considers as authoritative for the domain name –o365info.com is expecting that the sender will provide user credentials because this is the “right” way that legitimate recipient use for accessing their private data that is stored in the Exchange mailbox.

In our scenario, the element is a hostile element that doesn’t have John’s credentials (user name + password).

For this reason, his authentication status is – Anonymous but, at the same time, uses the E-mail address of “John.”

This is our sign of that fact, that this is probably spoofed sender (Spoof mail).

The sender verification process that is implemented in Exchange based environment -01

The be able to “tell” Exchange server that we want to identify events of Spoof mail in which the sender authentication status is – anonymous, and the sender E-mail address includes our domain name; we can create an Exchange rule that will monitor such events and “do something” when he identifies such as event.

It’s important to emphasize that this option is available only for organization that uses Exchange mail infrastructure, and this is not a formal or public standard, but instead, a “gimmick” that we can use in our favor as a Spoof mail deduction mechanism or, as an additional layer for implementation of existing mail sender verification standard such as SPF.

Exchange based environment - Sender verification process is not a standard of a built-in feature

Exchange rule | The scenario in which E-mail message is classified as Spoof E-mail

The event of “Spoof mail” will be described by a combination of two conditions, which should happen at the same time.

The sender needs to use E-mail address that includes the organization domain name, and considers as an anonymous sender (sender that didn’t provide user credentials).

When does E-mail message considered as Spoof E-mail in Exchange based environment -02

How does Exchange Online protect us from Spoof E-mail scenario?

The feature of the Phish Filter (and Phish Filter Policy), is a relatively new feature that is available for Exchange Online customer meaning Office 365 customers.

The Phish Filter option is an EOP (Exchange Online protection) feature.
In Office 365 based environment, EOP serves as a “mail security gateway”.

The purpose of the Phish Filter is to enable Office 365 customers, to detect a common scenario of Spoof mail, in which the attacker provides two different identities – the sender identity that appears on the MAIL FROM field (the mail envelope) + the sender identity that appears in the FROM field (mail header).

Note – If you want to read more information about this method that is used by hostile elements, for bypassing existing sender verification mechanism such as SPF you can read the article –
How can hostile element execute Spoof E-mail attack and bypass existing SPF implementation? | introduction | 1#2

The Phish Filter detects a Spoof mail event based on a very simple verification test:

When a sender addresses the Exchange Online mail server (if we want to be more accurate, the Exchange Online protection), and use two sets of sender identities, the Exchange online Phish Filter Policy, will verify if the sender information in the MAIL FROM field is identical to the sender identity in the FROM mail filed.

In the case that the identities are different, this is a sign that something is “wrong” with the specific E-mail message.

The sender verification process that is implemented in Exchange Online based environment -01

Exchange Online Phish Filter Policy | The scenario in which E-mail message is classified as Spoof E-mail

The event of “Spoof mail” will be described as – a scenario in which the E-mail address that arrears in the MAIL FROM field is “not aligned” meaning, different from the E-mail address that appears in the FROM field.

In this case, the E-mail message will be considered as High-risk E-mail message, and a warning notification will be added to the original E-mail message.

When does E-mail message considered as Spoof E-mail in Exchange Online based environment -02

How does DMARC protect us from Spoof E-mail scenario?

The DMARC standard is a special stand because he doesn’t include a “Standalone mechanism” or protocol for implementing sender verification, but instead, relies upon another sender authentication protocol – SPF and DKIM.

The “job” of the DMARC standard regarding the sender verification process is

  1. To check if – a specific E-mail message was verified by one of the sender verification standards – SPF or DKIM.
  2. To check if the result from the verification test is passed or failed.
  3. To implement an additional layer of sender verification described as alignment.

DMARC relies upon other sender authentication protocol – SPF and DKIM

In case that we use one of this sender authentication protocols, the DKIM “expands” the verification process that is implemented by each of these protocols.

In other words, the DMARC is implementing more “stricter sender verification tests” versus the sender verification standard – SPF or DKIM.

The technical term that is used by the DMARC for describing the “additional layer” of sender verification described as – alignment.

For example, in case that we use the SPF or DKIM, from the DMARC point of view, it’s not enough that the SPF or DKIM verification test is successful, but in addition, the DMARC “dictate” additional condition, which needs to successfully implement.

DMARC and the Aligned concept

The DMARC standard and the SPF alignment

In a scenario, in which our mail infrastructure is using the SPF standard for implementing sender verification, each of the incoming mail will be “stamped” by the SPF verification test as fail or pass.

Note – in reality, the SPF standard includes additional status code, but in the current time, we would like to simplify the description. For this reason, we will relate only the to fail of pass status code.

When we use the DMARC standard, the first test that will be performed by the DMARC is – to verify if the SPF status is fail or pass.

In case that the SPF status is pass, the DMARC will continue to the next test, in which the DMARC verifies the required “SPF alignment”.

The SPF alignment test is implemented by verifying if the E-mail address of the sender that appears on the MAIL FROM field (the information that appears in the mail envelope) is identical to the E-mail address that appears in the FROM field (the information that appears in the mail header).

The sender verification process that is implemented by the DMARC standard - DKIM alignment -02

Case 1 – DMARC SPF alignment test pass

In the following diagram, we can see an example in which the E-mail message includes two sender identities. In our example, the sender identity that appears in the MAIL FROM is identical to the sender identity that appears in the FROM field.

In this case, the SPF alignment test was successfully completed, and the DMARC stamps
the E-mail message with the status code – dmarc=pass

DMARC - Performing SPF alignment process - comparing the sender identity in MAIL FROM field - FROM field -01

Case 2 – DMARC SPF alignment test fail

In the following diagram, we can see an example, in which the E-mail message includes two sender identities. In our example, the sender identity that appears in the MAIL FROM is different from to the sender identity that appears in the FROM field.

In this case, the SPF alignment test was not successfully completed, and the DMARC stamps
the E-mail message with the status code – dmarc=fail

The sender verification process that is implemented by the DMARC standard - SPF alignment -02

The DMARC standard and the DKIM alignment

In a scenario in which our mail infrastructure is using the DKIM standard for implementing sender verification, each of the incoming mail will be “stamped” by the DKIM verification test as fail or pass.

When we use the DMARC standard, the first test that will be performed by the DMARC is – to verify if the DKIM status is – fail or pass.

In case that the DKIM status is pass, the DMARC will continue to the next test, in which the DMARC verifies the required “DKIM alignment”.

The DKIM alignment test is implemented by verifying if the DKIM selector domain name, is identical to the domain name of the sender who appears in the FROM field (the information that is saved in the mail header).

The sender verification process that is implemented by the DMARC standard - DKIM alignment

Case 1 – DMARC DKIM alignment test pass

In the following diagram, we can see an example of the information about the DKIM selector name that signed the E-mail message. The information about the DKIM selector hostname is saved as part of the E-mail message.

In our scenario, the DKIM selector name includes the domain name – o365info.com

In the FROM field, we can see that the sender E-mail address uses also the domain name – o365info.com

In this case, the DKIM alignment test was successfully completed, and the DMARC stamps
the E-mail message with the status code – dmarc=pass

DMARC - Performing DKIM alignment -Comparing DKIM selector domain name to sender E-mail address domain name -01

Case 2 – DMARC DKIM alignment test fail

In the following diagram, we can see an example of the information about the DKIM selector name that signed the E-mail message. The information about the DKIM selector hostname is saved as part of the E-mail message.

In our scenario, the DKIM selector name includes the domain name – outlook.com

In the FROM field, we can see that the sender E-mail address uses also the domain name – o365info.com

In this case, the DKIM alignment test was not successfully completed, because the DKIM selector domain name is not identical to the sender domain name.

The DMARC stamps the E-mail message with the status code – dmarc=fail

DMARC - Performing DKIM alignment -Comparing DKIM selector domain name to sender E-mail address domain name -02

Additional reading

Dealing with Spoof and Phishing mail attacks | Article series index

Now it’s Your Turn!
We really want to know what you think about the article

The post How does sender verification work? (How we identify Spoof mail) | The five hero’s SPF, DKIM DMARC, Exchange and Exchange Online protection | Part 9#9 appeared first on o365info.com.


Using sender verification for identifying Spoof mail | SPF, DKIM, DMARC, Exchange and Exchange Online |Part 8#9

$
0
0

Spoof mail attack is implemented by a hostile element the try to spoof sender identity.

The way for dealing with a Spoof mail attack is, by implementing a procedure, which check and verify the sender identity (verify of the sender consider as a legitimate sender of a spoofed sender).

Using SPF, DKIM and DMARC, Exchange and Exchange Online for verifying sender identity

In the current article, we will review the way that the sender verification process is implemented by the following infrastructures:

  1. Mail sender verification standards – SPF, DKIM and DMARC.
  2. Exchange based environment – by using the sender authentication status.
  3. Exchange Online (EOP) based environment – by using the feature of Phish filter

Our main focus in this article is to understand the “identity concept” of the sender, and the specific mail fields that are used for “storing” the sender identity.

In the next article our main focus we will review the “flow” of the sender verification process that is implemented by each of the different methods.

The major public mail standard for sender verification + the available option in Exchange based environment.

A general classification of the available sender verification methods that we can use could be:

1. Public mail standard that deals with sender verification.

In this “group,” we can relate to three major popular standards:

  • SPF (Sender Policy Framework).
  • DKIM (DomainKeys Identified Mail).
  • DMARC (Domain-based Message Authentication, Reporting & Conformance).

What are the existing protection mechanism that we can use for verify the sender identity -01

2. Exchange based environment

In this group, we can relate to a solution that can help us to implement a sender verification process, by using information about the sender, that includes his authentication status + his domain name (the domain name that appears on the E-mail address).

The “Exchange method” can be used only for a scenario of incoming mail in which the sender E-mail address includes our domain name.

In this case, we can verify the sender identity by checking his authentication status.

Internal or anonymous sender

The method which we use for deciding if the sender is “valid” is – by looking at the value that is “stored” in the X-MS-Exchange-Organization-AuthAs mail field.

Using the above mail field is relevant to any Exchange based environment, including Office 365 that is based on Exchange Online.

The concept behind this method is implemented by looking at the status of the authentication information about the recipient – the information that is stored in the X-MS-Exchange-Organization-AuthAs mail field.

The basic assumption is that recipient whom their E-mail address includes our organization domain name should appear as authenticated recipient, meaning, users who provide their user credentials.

In case that the status of the recipient whom his E-mail address includes our domain name is “anonymous.” This is a sign that there is some “problem” with the sender identity.

3. Exchange Online based environment (EOP – Exchange Online protection) | Phish filter

EOP (Exchange Online protection) includes a method, which described as Phish filter.

The mechanism of the EOP Phish filter, is based upon a concept in which the EOP server verifies the sender information that appears in the MAIL FROM and in the FROM field.

  • In case that the information is identical, the sender considers as “valid sender”.
  • In case that the information is not identical the sender considers as “non-valid sender.”
Note – Booth of this method can be implemented only for “incoming mail.”
In other words, we cannot use this method for “protect” our recipient’s identity in a scenario in which our recipient sends an E-mail message to external recipients.

What are the existing protection mechanism that we can use for verify the sender identity -02

How exactly we define the “sender”?

1. SPF and DKIM standard

SPF and DKIM standard, define the “sender identity” by relating to the E-mail address of the sender.

If we want to be more accurate, the SPF standard relates to the “right part” of the E-mail address meaning, the domain name, and the DKIM standard, relates to the “whole E-mail address.”

  • The SPF standard relates to the sender E-mail address that appears in the MAIL FROM mail field (the information that appears on the mail envelope).
  • The DKIM standard relates to the sender E-mail address that appears in the FROM mail field (the information that appears in the mail header).

SPF and DKIM standard define sender as an E-mail address

2. DMARC

The DMARC standard relies on the SPF or the DKIM standards, as the mechanism for implementing sender verification.

The added value to the DMARC standard regarding the subject of verifying sender identity is implemented by using an additional “layer” of tests that relate to the sender verification. In other words, the DMARC standard performs more stringent verification tests.

For example, when we use the DMARC standard, the DMARC will check if the E-mail message passes the SPF check. Even if the SPF check status is “pass,” the DMARC Will performs an additional test described as “alignment,” in which he checks if the E-mail message that appears in the MAIL FROM field is equal to the E-mail address that appears in the FROM field

What is the sender identity that is verified - Public sender verification mail standard

3. Exchange based environment | Recipient authentication status.

In Exchange based environment, we can use an additional “peace of information,” that appears on the E-mail message (mail header) that tells us if the recipient considers as authenticated recipient or not.

One of the “forms” of Spoof mail attack is realized, is when the attacker, use “our organizational identity” (an E-mail address that includes our domain name) for attacking our users.

In this case, we can use the information that is stored in the X-MS-Exchange-Organization-AuthAs mail field for identifying an event of a Spoof mail attack “(spoof sender).

Our basic assumption is that each of our users should provide his user credentials.

In a scenario of Spoof mail attack, the hostile element that uses the identity of one of our organization users, doesn’t provide ant credentials.

For example – if the sender E-mail address includes our organization domain name + the sender considers as a non-authenticated user (anonymous), this is a “sign” for a Spoof E-mail.

What is the sender identity that is verified - Exchange based environment -01

4. Exchange Online – Phish Filter

The term “Phish Filter,” describe a specific filter that is used by the EOP server for identifying a possible event of Spoof mail. This is a Spoof E-mail identification mechanism, that exists for Office 365 customers or for a customer who uses EOP (Exchange Online protection) as a standalone version.

The Phish Filter mechanism that is implemented by EOP acts similar to the DMARC alignment concept, that is implemented relating to SPF.

The EOP Phish Filter verifies that the E-mail address (sender identity) that appears in the MAIL FROM field is identical to the sender identity that appears on the FROM field.

What is the sender identity that is verified - Exchange Online based environment using Phish Filter Policy -02

Where is the sender identity being stored and how does the sender identity verification process is implemented?

1. SPF standard

The SPF sender identity verification is implemented in the following way:

The mail server that represents the destination recipient, “fetch” the domain name from the
E-mail address of the sender, who appears in the MAIL FROM field.

The destination mail server verifies the sender identity, by verifying if the source mail server is authorized to send E-mail on behalf of the specific domain.

The verification process is implemented by using a dedicated SPF record (TXT record) that includes the IP address of the authorized mail server\s for a specific domain.

2. DKIM standard

The DKIM sender identity verification is implemented in the following way:

The mail server that represents the destination recipient, “fetch” the E-mail address of the sender, who appears on the FROM field.

The destination mail server verifies the sender identity by verifying the digital signature that appears in the mail header.

Where is the sender identity is stored - SPF and DKIM -01

3. DMARC

The DMARC standard relies on the SPF or the DKIM standards as the mechanism for implementing sender verification.
The purpose of the DMARC standard is to – verify the results that were accepted by performing the sender verification by the SPF or DKIM.

In case that the results are “OK” (the sender verification status is “pass”), the DMARC sender verification process “move on” to the next step which describes as “alignment.”

Regarding the SPF result – DMARC verifies if the E-mail address that appears in the MAIL FROM field is identical to the E-mail address that appears in the FROM field.

How does the DMARC alignment is implemented - SPF -02

Regarding the DKIM result – DMARC verifies if the DKIM selector domain name is identical to the domain name of the sender.

How does the DMARC alignment is implemented - DKIM -03

Note – the DMARC standard includes additional features and components that extend the management of sender verification tasks.

For example – the DMARC DNS record, include “instruction” to “another mail infrastructure”, in case that they identify E-mail messages that include our domain name as spoof E-mail.
The “instruction” includes our recommendation regarding “what to do this E-mail message” such as ignore, quarantine or block.

4. Exchange based environment | recipient authentication status.

The “sender” that addresses Exchange server could be

  1. Any sender from any organization that asks to send E-mail message recipient hosted on the Exchange server
  2. An Exchange user whom his mailbox is hosted on an Exchange

In a scenario in which the “sender” use E-mail address, that includes the domain name that is hosted on the Exchange server, the basic assumption is – that this is an “Exchange user” that has an Exchange mailbox, and for this reason, this “user” should prove his identity by providing user credentials.

The information about the authentication process is saved by Exchange in a dedicated mail field named – X-MS-Exchange-Organization-AuthAs

  • If the user provides his credentials, the authentication status of the recipient is “internal.”
  • If the user didn’t provide his credentials, the authentication status of the recipient is “anonymous.”

In a scenario in which a sender “claim” that he belongs to the Exchange organization, meaning that he uses the E-mail address, that includes the domain name that is hosted at Exchange but the sender doesn’t provide his credentials; this is a sign that the sender is probably a spoofed sender.

In other words, the status of the sender who is saved in the
X-MS-Exchange-Organization-AuthAs
field appears as anonymous.

How does the sender identity verification process is implemented -Exchange based environment -01

5. Exchange Online – Phish Filter

EOP (Exchange Online protection) includes a built-in filter mechanism (Phish Filter) which was created to identify an event of an E-mail message that has a high chance of being Spoof mail.

The EOP Phish Filter work in a similar way as the DMARC alignment concept that is implemented relating to SPF.

The EOP Phish Filter verifies that the E-mail address (sender identity) that appears in
the MAIL FROM is identical to the sender identity that appears on the FROM mail field.

If there is a difference, the E-mail message will be “stamped” using a warning message that will notify the user, that this E-mail message could be a Spoof mail.

How does the sender identity verification process is implemented -Exchange online based environment -02

Major differences between sender verification mail standard and Exchange based solutions.

As mentioned, when we go to the “Spoof E-mail attack war,” there is a variety of weapons to choose from.

Some of these “weapons,” are public mail standards that can be adapted by any mail infrastructure, and some of them can be used only in the case that the mail infrastructure is based on Exchange mail server or Exchange Online (Office 365 customers).

The major differences between the Exchange based solutions versus the “public mail standard” are:

1. DNS configuration settings

When we use the Exchange based mechanism for identifying an event of Spoof E-mail, there is no need for using additional configurations such as DNS records.

2. Incoming mail flow

The Exchange based solution’s mechanism for identifying an event of Spoof mail can be implemented only regarding scenarios of – incoming mail.
The meaning is – events in which hostile element try to “attack” the Exchange recipient.

Using the SPF, DKIM and DMARC for protecting ourselves from a scenario in which hostile element uses our identity.

Just as short reminder, the problem of “Spoof mail” can be realized in two main flavors:

  • Case 1 – a scenario in which hostile element attacks our user by sending them
    Spoof mail.
  • Case 2 – a scenario in which hostile element, uses our organizational identity (E-mail address that includes our domain name) for attacking other organizations.

When using a public mail standard such as SPF and DKIM, we have the ability to “announce” other organizations, if a specific E-mail message in which the sender uses our domain name, is a legitimate E-mail message or not.

For example, when using SPF, we can inform other organizations, which are the authorized mail server that can send an E-mail message on behalf of our domain name.

In addition, some mail stand such as SPF and DMARC enables us to instruct another mail infrastructure “what to do” in case that the E-mail message that sent seemingly by one of our recipients didn’t send from an authorized mail server.

The Exchange and the Exchange Online options don’t include a mechanism that can be used in such scenarios of outbound mail.

Verifying sender identity - The mail standard versus the Exchange method

What is the best option for identifying of Spoof E-mail?

Without knowing you personally, I’m pretty sure that after reading all the above information, the following question could appear in your mind:

Q: What is the bottom line? Which is the “right tool” for my organization?

A: The answer that I have included a couple of parts:

Better something than nothing

It’s better to start with the implementation of at least one mail sender verification standard versus “not doing anything,” and leave your organization mail infrastructure exposed to a variety of risk and dangers.

Using a specific sender verification mechanism versus a combination of more than one mechanism

Theoretically, we can be satisfied with only one ” chosen” mail standard or mechanism
such as – SPF, DKIM or one the Exchange option.

In reality, the “true” solution, will need to be based on more than one standard because, the different standard completes each other, and each of them covers other or different type Spoof mail scenarios.

Baby step | Step by step

The best practice is to start with a simple sender verification standard, and only after we feel comfortable, “move on” to the next step in which we implement an additional standard.

My opinion is that the simplest option is – to start with the implementation of the SPF standard because the SPF standard can be described as a relatively easy standard to implement.

In case that your mail infrastructure is based on Exchange infrastructure, it’s recommended also to add the “additional layer,” in which we use Exchange rule, that identifies an event in which incoming mail includes the sender who has our E-mail address but doesn’t provide user credentials.

Note – if you want to read more information about the way for how to implement the “Exchange option” using a Spoof E-mail rule, you can read the article – Detect spoof E-mail and send an incident report using Exchange Online rule (Learning mode) |Part 2#12

Using a combination of mail sender identification options ? -The Lego concept

So, what is the best combination of sender identification standard \options?

The answer is – that there is no specific “cocktail” that can be described as the “best cocktail”.

For example – a reasonable question could be-

Q1: Why not to use all the available options?
Q2: Can we use the concept of more the better?

A: The answer is “Yes,” and “No.”

Theoretically, it’s better to use all the available options that we can use for identifying events of Spoof E-mail, but we should not forget that each of these “standard” or “mechanism” requires its own resources.

The resource that will need to be allocated to:

  • Learning and implementing the required configuration settings for each of the “sender verification solutions”
  • The ongoing tasks such as – monitoring the events of a Spoof mail that were “captured” by the specific standard – the need to review and examine the E-mail items that was identified as Spoof mail and the need to decide what to do with this E-mail item.

What about the option of using more than one sender identification option

The secret location of the sender E-mail address

As mentioned, the mail standard that verifies the sender identity verifies the information about the E-mail address of the sender.

The SMTP protocol defines two mail fields, that were created for storing information about the identity of the sender’s meaning, the E-mail address of the sender.

  • One type of “information” about the sender, is kept in a mail field named – MAIL FROM that is “located” in the mail envelope.
  • One type of “information” about the sender, is kept in a mail field named – FROM that is “located” in the mail header.

The mail envelope considers as a “temporary data store” that serves as a “logical container” for data, in the phase of the SMTP session in which two mail servers communicate.

The mail envelope concept is very similar to a “psychical mail envelope.”
After the E-mail, the message is accepted by the destination mail server that represents the destination recipient, and after the destination mail server reads all the required information that is stored in the mail envelope, the mail envelope is “destroyed.”

In this phase, two optional questions can appear in our mind:

Q1: Why do we need to use two different mail field for storing the information about the sender identity (the sender E-mail address)?

Q2: Why are you telling me all of this information? How this information related to the topic in question?

A1:

The main purpose of the “sender information” that appears in the mail envelope
(MAIL FROM) is to serve as a “return mail” address.
“Return mail” address used by the destination mail server, in a scenario in which the E-mail message could not be sent to the destination recipient, and the mail server will need to “return the mail” to his original sender.

The main purpose of the “sender information” that appears in the mail header
(FROM) is to inform the destination recipient, who is the sender that “wrote” the E-mail message.

In some scenarios, the sender who appears in the MAIL FROM (the mail envelope) can be different from the sender identity that appears in the FROM field (the mail header).

Where is the information about the sender is located

A2: The reason that I tell you this “boring information” is, because the mail standard – SPF and DKIM use this the information stored in this field (MAIL FROM and FROM) for getting the information about the sender identity, and implementing the sender verification procedure.

Note- the SPF standard process is configured to verify the sender information that is stored in the MAIL FROM field only.
In other words, the SPF sender verification process, will not relate to sender information stored in the FROM field. This is a built-in weakness that can be exploited by hostile elements. If you want to read more information about this vulnerability, you can read the article – How can hostile element execute Spoof E-mail attack and bypass existing SPF implementation? | introduction | 1#2

The E-mail message components – mail envelope, the mail and the mail header

In the following diagram, we can see the structure of a standard E-mail message that includes the two parts: mail envelope and the mail.

E-mail message structure - Mail Envelope - the Mail -01

In the next diagram, we can see the structure of “mail component”, which includes also two parts: the “mail part” that includes the mail body, and the mail header.

Mail structure - Mail Header - Mail Body -02

Mail envelope – the “mail fields” that hold the value of the sender and the recipient

The mail envelope uses the following fields for storing information about the sender identity and the destination recipient identity:

  1. The sender identity – the Mail envelope uses a “mail field” named – MAIL FROM, for “holding” the information about the sender identity (the sender E-mail address).
  2. The recipient identity – the Mail envelope uses a “mail field” named – RCPT TO, for “holding” the information about the recipient identity (the destination recipient E-mail address).

Sender identity - recipient identity - Mail envelope -03

Mail header– the “mail fields” that hold the value of the sender and the recipient

Regarding the “mail component”, the part which holds the information about the sender and recipient identities is the Mail header.

The mail header, uses the following fields for storing information about the sender identity and the destination recipient identity:

  1. The sender identity – the Mail header uses a “mail field” named – FROM, for “holding” the information about the sender identity (the sender E-mail address).
  2. The recipient identity – the Mail header uses a “mail field” named – TO, for “holding” the information about the recipient identity (the destination recipient E-mail address).

Sender identity - recipient identity - Mail header -04

Dealing with Spoof and Phishing mail attacks | Article series index

Now it’s Your Turn!
We really want to know what you think about the article

The post Using sender verification for identifying Spoof mail | SPF, DKIM, DMARC, Exchange and Exchange Online |Part 8#9 appeared first on o365info.com.

The questions that we will need to answer before we start the project of – building a defense system that will protect us from Spoof mail attacks | Part 7#9

$
0
0

The planning stage of the “defense system” that protects our mail infrastructure, and our users from Spoof mail attack, need to begin with a definition of some framework.

This framework will serve as a “logical container,” that defines the specific structure and the characters of our defense system, that will need to deal with the Spoof mail attack.

Creating the required framework for the Spoof mail attack defense system

The main question is – how do we build this “framework”?

My recommendation is – by using a process of “Questions and Answers,” that relates to a different aspect of the defense system such as: what type of protection mechanism we want to use, what is the policy that we want to enforce regarding an event of Spoof mail and so on.

My goal of the current article is – to offer you some of the questions that need to be asked, regarding the required results and the structure of the defense system that we want to build for dealing with the problem of -Spoof mail attack.

The good news and the less good news regarding the Spoof mail attack defense solutions

The infrastructure for Spoof mail attack is rooted in the character of the SMTP protocol, which doesn’t include a built-in mechanism that verifies the identity of the sender.

The good news is – that there are solutions, which complete the “missing part” of the SMTP protocol by providing us the ability to verify the identity of the sender, and by doing so, prevent a scenario of Spoof mail attack.

The less good news is – that we will need to deal with a couple of “major obstacles” in the path for providing our organization a “good protection” from the threat of Spoof E-mail attacks.

The “major obstacle” is composed of the

  1. The need to decide about the “right solution” for our specific organization needs.
  2. The “technical side,” which deal with the characters of the specific sender verification solution that we will choose, the structure of combining two or more sender verification solutions, the management of the sender verification solutions and so on.

The famous headache syndrome that is caused by the need to get all the necessary decisions

The major areas for which we will have to take decisions.

The difference between a good and whole solution, versus half-baked or partial solution, that needs as an answer to the threat of Spoof mail attack and Phishing mail attacks, depends on our ability predict the obstacles that standing in front of us, and the different decisions that we will need to make regarding the “optimal solution,” that will operate in an optimal way and will best fit our specific organization needs and structure.

The major obstacles on the path for providing our organization a good protection from Spoof E-mail attacks

The definition of Spoof mail

Let’s start with very basic but, a very important question that we need to ask ourselves.

Q1: How do we define a scenario of Spoof mail?

A1: The simple answer is – an event in which hostile element uses a fake identity, a scenario in which hostile element says that he is entity X while, in reality, he is an entity Y.

Q2: How can we identify an event in which the sender spoofs his identity?

A2: The simple answer is – by using a sender verification mail standard, that can help us to verify the sender identity, so we will be able to distinguish between a legitimate sender versus non-legitimate mail sender (the hostile element that spoofs his identity).

Well, the reality is not so simple!

The famous phrase – “If it looks like a duck, swims like a duck, and quacks like a duck, then it probably is a duck,” relate to a scenario in which a specific animal, have all the characters and the signs of a duck, and for this reason, we can assume that it probably is a duck.

It is easy to identify duck

The problem is that regarding a scenario, a Spoof mail (spoof sender), in which we need to provide a “bold statement” regarding the integrity of the E-mail message sender’s meaning, decides if the sender is legitimate or not, the answer is not so simple!

Before our declaration that we should need to Immediately stop all the Spoof mail attacks, I would like to ask two additional questions:

Q3: When we say that “a specific E-mail message was identified as Spoof mail,” can we be sure 100% that the E-mail message is indeed Spoof mail?

Q3: When we identify a specific E-mail message that looks like a Spoof mail, can we be sure 100% that we really want to “destroy” this E-mail message?

What do I want to do to a Spoof mail-02

What is my point?

My point is, that in many scenarios, we will not be able to be sure in 100% percent that a specific sender is a legitimate sender or instead, a hostile element that spoofs his identity.

To be able to demonstrate the existing challenges that we will need to deal with when we want to classify a specific E-mail message is “good E-mail message” or, “bad E-mail message,” let’s use the following example:

Our organization is implementing a specific sender verification mail standard such as – SPF.

Each E-mail that is sent to our organization will go through an inspection process, which we will try to verify the sender identity, and based on the result, decide if the sender identity is a legitimate identity or considered a spoofed identity.

When the E-mail message rich our mail server, two scenarios can realize:

  • Scenario 1 – the sender organization didn’t publish SPF record (doesn’t support SPF).
  • Scenario 2 – the sender organization publishes SPF records.

Scenario 1 – the sender organization didn’t publish SPF record (doesn’t support SPF).

This scenario (scenario B in the diagram) can be described as – dead end because we (our mail server) have no option to verify the sender identity. The sender can be a legitimate sender, but at the same time, can be a hostile element the spoof the identity of a legitimate sender.

Q1: So how do we know whether to “approve” or “reject” the E-mail message?

A1: The simple answer is that – we have no way or a “sign”, that can help us to make the right decision.

Case 1 – in case that we decide to reject the E-mail message because the sender organization doesn’t support SPF, we take the risk of the false-positive event.

The meaning is – a scenario in which we mistakenly identified a legitimate E-mail message as Spoof mail and for this reason, blocks or reject the E-mail message.

Case 2 – in case that we decide to accept the E-mail message, although the sender organization doesn’t support SPF, we take the risk of a false-negative event.

The meaning is – a scenario in which we accept a non-legitimate E-mail message
(spoofed E-mail) that manages to bypass our “defense wall,” and reach the mailbox of one of our recipients.

Scenario 2 – the sender organization publishes SPF records.

In the scenario in which the sender verification process was successfully implemented (A.2), and the sender identity appears as a legitimate identity, we are happy!

But, what about a scenario in which the “Sender verification failed” (A.1)?

Can we be sure beyond all doubts, that the specific E-mail message was sent by a “hostile element” that tries to execute a Spoof mail attack and use spoofed identity?

The obvious answer is – yes; this is the classic scenario, in which our defense system successfully manages to identify the “bad guy.”

And as usual, the reality is not so simple.

One of the most popular reasons for the result of “sender verification failure” is – a scenario in which the “sender organization” did not commit fully and properly all the required configuration settings.

For example – a scenario in which the sender organization didn’t add all the required information about the mail server that represents his domain to the SPF record.

And again, we face the same dilemma:

Case 1 – in case that we decide to reject the E-mail message because the SPF verification test failed, we take the risk of a false-positive event.

The meaning is – a scenario in which we mistakenly identified a legitimate E-mail message as Spoof mail and for this reason, block the E-mail message.

Case 2 – in case that we decide to accept the E-mail message, although the SPF verification test failed, we take the risk of a false-negative event.
The meaning is – a scenario in which we accept a non-legitimate E-mail message
(spoofed E-mail) that manages to bypass our “defense wall,” and reach the mailbox of one of our recipients.

How do we define a scenario of Spoof mail

Choosing the “right” sender verification standard for our organization

The well-known public standards, that can be used for implementing the process of sender verification are: SPF and DKIM.

The DMARC is an additional mail standard, that serves as an extinction or enhancement to SPF and DKIM sender verification standard.

Each of this standard, uses a different method for verifying the sender identity, each of this standard has his advantages and disadvantages, and each of these standards is implemented and managed differently.

As part of the process of building our defense infrastructure, we will need to decide about the specific ingredients which will be included in our defense infrastructure.

An example of a question that we will need to answer could be:

Q1: Should we adopt a specific sender verification mail standard or a combination of more than one sender verification mail standard?

Q2: What are the weak points and strong points of each sender verification mail standard?

Q3: In case that our mail environment (such as Exchange based environment) provides another solution for the need of “sender verification,” should we use this solution or use only public mail standard?

Q4: In case that we decide to use a combination of two or more sender verification standards, is there a specific standard that it’s recommended to adapt in the begging and down the road, adapt the “additional sender verification standards”?

How should we react to a scenario of as Spoof mail -01

What are the factors, that influence our decision regarding the question of – “what to do with mail identified as Spoof mail?“

Regarding the question of- what to do with an E-mail that was identified as Spoof mail, I would like to relate to two different aspects:

1. The specific type \ direction of the Spoof mail attack

The Spoof mail attack can be implemented as:

  • A scenario in which hostile element attacks our organization by sending Spoof mail to our users.
  • A scenario in which hostile element uses our identity, to attack other organizations.

2. The specific action that we would like to “do” regarding Spoof mail

The specific action that can be executed for E-mail message that was identified depending on three main factors:

  • The specific scenario of the Spoof mail attacks as mentioned above.
  • The specific mail infrastructure that we use – the action that we can choose from depend on the mail infrastructure that we use.
  • The level of tolerance that we have regarded false-positive events and false-negative.

The level of certainty regarding a Spoofed E-mail message

  • Although our natural tendency is for “black-and-white and white answers” regarding the scenario of Spoof mail attack, the reality is a bit more complicated because even when our defense systems identify a specific email message as a “Spoof mail,” we can never be sure in the 100 % that the E-mail message is a relay a Spoofed E-mail message.
  • The reason for this “uncertainty” is because there is always a reasonable chance, that in a scenario, in which our defense system identifies a specific E-mail message as “Spoof mail”, the reason is a technical problem or a miss configuration of the “other side” (the source mail system that represents the sender).

What is our level of certainty regarding a Spoofed E-mail message

The Spoof mail attack, and the specific system that is attacked

As mentioned, the Spoof mail attack can be realized in two major ways:

Case 1 – a scenario in which the hostile element attacks our organization users.

Case 2 – a scenario in which hostile element uses our organizational identity, and attacks other organizations.

The need for differentiating these two scenarios is – because we will need to use “different set of instructions” regarding the question – “what to do with a Spoof mail” in each of these scenarios.

Two major scenarios of Spoof mail attack

For example:

Case 1 – In the scenario in which the hostile element attacks our organization users, the answer regarding “what to do with a Spoof mail” is our decision because, the E-mail message is “trying to enter” to our protected compound, and we as the “gatekeeper,” we can decide what to do with the “spoofed E-mail message.”

Our decision regarding the required action depends on another question – what is our tolerance level regarding a scenario of false-positive events.

In other words – are we willing to take the chance, that in some scenarios, a legitimate E-mail message will mistakenly identify as Spoof mail, and for this reason, will be blocked or deleted?

In case that we are not willing to take the chance of false-positive events, we will need to decide about “another action” instead of just destroy the “Spoofed mail.”

Why should we do to Spoof mail

Case 2 – in a scenario in which hostile element uses our organizational identity, and attacks other organizations, the main different is that in this scenario, we don’t really have control of the “action” that will be taken by the “other side.”

  • We don’t know if the other side uses a protection mechanism of sender identity verification.
  • In case that the other side uses a protection mechanism, in which he verifies the sender identity, we don’t really know what is the specific sender verification standard that he uses.
  • Even if the “other side” uses the same sender verification standard that we use, we cannot “enforce” the other side to do a specific action regarding a spoofed mail that uses our organizational identity.

It’s important to mention that some of the sender identification standards such as – SPF and DMARC, enable us to “instruct the other side” regarding the question of – “what to do to
an E-mail message that was recognized as spoofed E-mail message.”

Assuming that we could instruct the “other side” what he should do in such a scenario (a scenario in which hostile element uses our organizational identity to attack the specific organization), the answer regarding – “what our instructions will be”, depend on another question – what is our tolerance level regarding a scenario of false-positive events.

In other words – are we willing to take the chance, that in some scenarios, a legitimate E-mail message that sent by our users, will mistakenly identify as Spoof mail, and for this reason, will be blocked or deleted?

For example, in case that we instruct the “other side” to delete E-mail message that uses our domain name, and was “marked” as Spoof mail, the risk is, that the specific E-mail message is a legitimate E-mail message, and the reason that the verification check considers as “fail” is, because some technical issue.

What do we want to do with Spoof mail?

The obvious answer to this question is – delete each E-mail message that was identified as Spoof mail because the E-mail message is sent by a hostile element!

The real answer to this question is not so simple because, in reality, there are a couple of factors that affect our decision.

In this section, I would like to review some of the options for “action” that are available for us, in case that we use Exchange or Exchange Online mail server, regarding the E-mail message that was identified as Spoof mail.

The specific action that we will choose depends on our business and organization needs.

Case 1 – a scenario in which the hostile element attacks our organization users.

In this case, we have 100% control over the “actions” that we want to execute in a scenario in which our defense system identifies a specific E-mail message as Spoof mail.

The specific action that we use depends on the “mail security gateway” that we use.

In Exchange based environment (Exchange on-Premises or Exchange Online), the enforcement of our desire policy regarding Spoof mail is implemented by using an Exchange rule.

Using the Exchange rule, enable us to choose the required action from a large space option.

For example, we can choose one of the following “actions”

  • Delete the E-mail message
  • Send the E-mail message to user quarantine – the term “user quarantine” defines a restricted space, which Exchange users can access and decide if they want to accept or reject the E-mail message.
  • Send the E-mail message to administrative quarantine – the term “administrative quarantine” defines a restricted space, which only Exchange users can access and decide if they want to accept or reject the E-mail message.
  • Mark the E-mail message as spam – in this scenario, we don’t block the E-mail message, but instead mark the E-mail message as a suspicious E-mail message.
  • Forward the E-mail message to approval – a process in which the “suspicious E-mail message” sent to a designated person that needs to check the E-mail message and decide if he approves to release the E-mail message or not.

How should we react to a scenario - our defense mechanism identifies a E-mail message as Spoof mail -01

In case that you think that in after you have decided on the required action, your “headaches” ended, there are additional answers that we will need to provide.

For example:

The Forensics phase

Lest relates to a “non-wanted” scenario, in which a Spoof mail manages to bypass our defense systems, and the attacker manages to execute Phishing mail attacks.

In this phase, we will need to implement a postmortem procedure, in which we will need to collect evidence and trials of the attack.

We will need to analyze the Information that was collected, and provide a report that will need to answer – how our defense systems were breached? Is their option to find the specific hostile element the perform the attack? And so on.

To be able to provide these results, we will need to use forensics procedure, in which we collect evidence from the “crime scene.”

This lead us to a very basic question – what do we want to do in the event, in which our system identifies a specific E-mail message as Spoof mail?

Q1: Should we block the E-mail message, but in parallel, send a copy of the “spoofed E-mail” to a designated person?

Q2: Should we allocate a dedicated mailbox that will store the copy of the “spoofed E-mails”?

Q3: Who are the “persons” that will have access to the mailbox that will store the “spoofed E-mails”?

Another part of this equation relates to the question – should we need to notify the involved parties about an event in which a specific E-mail message was blocked because the E-mail message was classified as a Spoof mail attack?

How should we react to a scenario - our defense mechanism identifies a E-mail message as Spoof mail -02

Case 2 – a scenario in which hostile element uses our organization identity and attacks other organizations.

In this scenario, the approach to the question – what to do with an E-mail message which was identified as Spoof mail, is totally different because, in reality, we cannot enforce the “other side” to do something but instead, only to “recommend” to do something.

For example

SPF standard, and the guideline to the other side regarding Spoof mail.

In case that we use the SPF standard, part of the information that we add to the SPF record, include a “recommendation” to the other side, that relates to a scenario in which the SPF verification check that is implemented by the other side failed.

We can choose between two options:

Soft fail – when choosing this option, we are “telling” to the other side, that in case that E-mail message that uses our domain name, failed test of the SFP; we recommend to the other side, not to block \ delete the E-mail message but instead, mark the E-mail message as a “problematic E-mail message”.

Hard fail – when choosing this option, we are “telling” to the other side, that in case that E-mail message that uses our domain name failed test of the SFP; we recommend to the other side, to block \ delete the E-mail message.

DMARC standard, and the guideline to the other side regarding Spoof mail.

The DMARC standard provides a couple of “actions” which we recommend the “other side” to use in case that E-mail message that uses our organizational identity failed the test of the DMARC (E-mail message that was identified as Spoof mail).

Monitor – a “neutral action” in which we recommend to the other side “to do nothing” in a scenario in which E-mail message that was sent by our users, was classified as Spoof mail.

Quarantine – in this case, we recommend to the other side to “isolate” the “suspicious E-mail message,” in a scenario in which E-mail message that was sent by our users, was classified as Spoof mail.

Reject – in this case, we recommend to the other side to block \ delete the E-mail message, in a scenario in which E-mail message that was sent by our users was classified as Spoof mail.

required action we advise the other side when they identify Spoof mail that uses our organizational identity

Dealing with Spoof and Phishing mail attacks | Article series index

Now it’s Your Turn!
We really want to know what you think about the article

The post The questions that we will need to answer before we start the project of – building a defense system that will protect us from Spoof mail attacks | Part 7#9 appeared first on o365info.com.

Dealing with the threat of Spoof and Phishing mail attacks |Part 6#9

$
0
0

In the following article, we will review the solution and the methods that we can use for dealing with the threat of – Phishing mail attacks and his derivative Spoof mail attack.

What are the Ingredients that are needed for successfully dealing with the threat of attacks and Phishing and spoofing mail attacks?

To be able to succeed in this task, we will need to acknowledge the simple truth about our enemies – they are professionals, that are familiar with every blind spot and weakness that we have, and they will use it because they are highly motivated.

Modern spoof mail attack and phishing mail attacks are very sophisticated attacks, that consist of a couple of “parts,” and exploit the weakness of our mail infrastructures and the weakness of our users (the human factor that is exploited by that attacked that uses the social enginery method).

In a scenario where a political candidate declares that – he has the solutions to all the existing problems, and he can solve all the problems in a short time, do not believe him!

The same logic goes relating to the subject of protecting our organization from spoof mail attacks and Phishing mail attacks. There is no such thing as a “single solution” that will deal with this sophisticated attack or a solution that will identify and block 100% of these attacks.

An unrealistic expectation to find simple solution to that threat of - Spoof mail attack and Phishing mail attacks

The “solution” that we are looking for, realized as a combination of solutions or, a “logic fan of solutions” that will deal with each of the different parts of the Phishing mail attacks and its derivative Spoof mail attack.

Logic fan of solutions that will deal with each of the different parts of the Phishing mail attacks

The first and the most important step is – the need for “acknowledgment.”

  1. The acknowledgment of the fact that – Spoof mail attack and Phishing mail attacks are sophisticated and include many “moving parts.”
  2. The acknowledgment of the fact that – we must learn to think like the attacker, and understand the DNA and the characters of Spoof mail attack and Phishing mail attacks.
  3. The acknowledgment that – the “solution” will be a combination of technical solutions, guidelines, educations and so on.

Dealing with a Spoof mail attack and Phishing mail attacks effectively ?- The right state of mind-02

Before we get into the specific details, and the different options that we can use for dealing with Spoof mail attacks and Phishing mail attacks, just a quick reference to the “structure” that we need to use:

The phishing mail attack is exploiting the weakness of human factor by:

  1. Using a spoofed identity of a trusted sender
  2. Using a social engineering method for convincing and seduce the victim (our users) to “do something.”

The first thing that we will need to deal with is – the phenomenon of “Spoof E-mail.”
Luckily, at the current time, there are a couple of mail standard that we can use for implementing and enforcing a process, in which we will be able to identify most of the Spoof E-mail scenarios.

The second thing that we will need to deal with is – our user’s education. Allow our users to be aware of the risks and characteristics of Phishing mail attack, so they will have the ability to recognize Phishing mail.

The third thing that we will need to deal with is – the “way” or the method in which the Phishing mail attack is actualized.

The “channels” which are used by the attacked the executable Phishing mail attacks to attack his victims are

  1. Using a malware file – seduce the victim to open seemingly innocent file (malware).
  2. Using a Phishing website – seduce the victim to download + open seemingly innocent file (malware), provide personal information (password, bank account, etc.) or deposit a sum of money to the bank account of the attacker.

To be able to mitigate these risks, we will need to find a protection mechanism, that could identify and block the specific malware and in addition, find a protection mechanism that could identify and block the “problematic URL’s” (links that lead our users to Phishing websites).

Dealing with a Spoof mail attack and Phishing mail attacks ?- How - General directions-03

Dealing with a Spoof mail attack and Phishing mail attacks effectively

As we know, there is no “single solution” that could help us to deal with the challenge of Phishing mail attacks and his derivative Spoof mail attack.

Instead, the solution can be described as a “collection” or, a combination of different solutions and methods that will need to be implemented.

Dealing with Phishing mail attacks -The different part of the defense plan

A- Dealing with the part of “Spoof mail attack”

As we know, the Spoof mail attack is one of the main characters of Phishing mail attack.
For this reason, we need to implement a solution in which our mail infrastructure will use a mechanism of a sender verification process.

Each time that a sender addresses our mail infrastructure, our mail infrastructure will implement a verification check, so we will be able to be sure that the sender is really who he claims to be.

In other words, using a protection mechanism, that will identify (and block) E-mail message that has a spoofed sender identity. A scenario in which hostile element prettied to be one of our legitimate users or legitimate sender from another organization.

The good news is that at the current time, there are a couple of mail security standard that was created for the purpose of verifying sender identity such as – SPF, DKIM and DMARC.

Note – we will review the main characters of this sender verification solutions in the article – Using sender verification for identifying Spoof mail | SPF, DKIM, DMARC, Exchange and Exchange Online |Part 8#9

Note – if you want to read more information about the implementation of DKIM in Office 365 based environment you can read the article – Outbound DKIM signing and DNS infrastructure | Building the required DNS records for Office 365 | Part 4#5

In addition, in case that your mail infrastructure is based on Exchange architecture, we can use additional option for verify sender identity by, identify authenticated versus non- authenticated (anonymous) senders who use our organization domain name.

Note – if you want to read more information about the implementation of sender identity verification by using the Exchange Online rule that will identify non- authenticated (anonymous) sender you can read the article – Detect spoof E-mail and send an incident report using Exchange Online rule (Learning mode) |Part 2#12

Dealing with a Spoof mail attack and Phishing mail attacks - Sender identity verification -01

B- Dealing with the part of malware and Phishing websites

In this part, we are dealing with the “channels” which are used by the attacker to executing his specific attack.

Just a quick reminder, the Phishing mail attack “channels” are – malware file or a Phishing website.

Dealing with a Spoof mail attack and Phishing mail attacks effectively ? -Technical solutions - E-mail content

Using a spam mail filter

For the sake of full disclosure, I don’t think that a spam mail filter is very usefully for identify Phishing mail because Phishing mail is not a spam mail.

Only in a scenario in which the Phishing mail has also characters of spam mail, the spam mail filter can identify such as E-mail message.

Another scenario in which spam filter can be useful is – in a scenario that the specific Phishing mail attack was recognized as a Phishing mail attack, and specific characters of the E-mail message (the signature) appear in the signature database of a “well know problematic E-mail messages.”

Bottom line

It’s recommended to use a spam mail filter, but we should not relate to the spam filter as the “ultimate solution” for Phishing mail attacks.

Dealing with E-mail attachments

Many times, the Phishing mail attack is implemented by an E-mail message that includes malware attachment that appears as an Innocent file.

Phishing mail attack is implemented by E-mailthat include malware that appear as Innocent

Let’s assume that the attacker (the part that relates to social engineering) convinces the victim (our user), to open the file that is attached to the E-mail message, what can we do in this scenario?

1. Implementing malware mail filters.

The purpose of the malware mail filters as the name implies is to detect a malware that appears as an E-mail attachment.

Case 1 – Phishing mail attack that includes Zero-day attack malware

The major disadvantage of the “standard malware mail filters” is his inability to cope with
Zero-day attack. The term Zero-day attack, describe a “new attack” that wasn’t recognized, classified, and was registered on the well-known attack database (have no signature).

The standard malware mail filter can detect E-mail malware, based on a signature database that includes a “documentation” of malware signatures. For this reason, the standard malware mail filters cannot deal with a zero-day attack.

In simple words, cannot detect “new malware” that his specific signature doesn’t appear in the identified malware database.

Zero-day attack – attack that was not recognized, classified and was registered

Case 2 – Malware that doesn’t implement as E-mail attachment

In many Phishing mail attacks, the malware doesn’t appear as an E-mail attachment. Instead, the victim is seduced to click on a link that will lead him to the hostile website and then asked to download a specific file (the malware). In this scenario, the malware mail filter is not involved in the process and cannot detect the malware.

the victim is seduced to access a Phishing website and download a malware

2. Implementing E-mail attachment policy.

The advice of “Implementing mail attachment policy,” in which block a specific type of E-mail attachment such as the executable file is a “good advice,” and not just for the scenario of dealing with a Phishing mail attack.

The main problem is that most of the time, Phishing mail attack that has an attachment, will use an Innocent type of file such as Microsoft office files (Word, Excel etc.).
The main problem that we are facing is – that most of the time, we cannot define mail attachment policy that will block “standard” E-mail attachment such as a word document.

This is the weak spot that is exploited by the hostile element that sends the “Innocent attachment.”

Note – if you want to read more information about how to implement mail attachment policy in an Exchange base environment by using Exchange rule, you can read the article series – Manage E-mail attachment policy in Office 365 – part 1#4

3. Implementing “sandbox” solutions.

One of the most frustrating and challenging security threats is the subject of zero-day attack.

The simple meaning of this term can be translated into a “new type of malware” that is distributed by hostile elements, that consider as “UN knows malware” meaning, the security, defense systems that should protect our infrastructure from this specific malware are not aware of the fact that this malware.

Note – the definition of “new type of malware” can also be translated to a variation of a well know malware.

Implementing sandbox solutions for dealing with zero-day attack

The problem of identifying scenarios of zero-day attack considers as “blind spot” or, a congenital weakness of antivirus products.

A common antivirus software detects malware is by examining the existing file and compare the file characters to a signature database, that include information about malware that was detected, classified as malware and registered in the malware signature database.

Virus malware Signature database

Because in the specific scenario of zero-day attack the malware is not “registered” in the malware signature database, it’s hard for the antivirus application to detect and mark the zero-day file as malware.

The solution for a zero-day attack is a technology (technology that is offered by a couple of manufacturers) that was built to deal with the problem by implementing a mechanism named – sandbox.

The concept of “Sandbox” is implemented in the following way:

When an E-mail that includes an attachment is sent to a destination recipient who is protected by security gateway that uses the mechanism of “Sandbox,” the E-mail will not be sent directly to the destination recipient but instead, will be “Intercepted” by the security gateway.

The security gateway will simulate the exact action that was supposed to be performed by the end user, such as, open the E-mail message, and try to open the attachment (double-click on click on the file).

The “activation” of the attached file is executed in a dedicated and isolated memory space (the is the meaning of the term Sandbox).

The activation of the file is executed in a isolated memory space - Sandbox

The security gateway, will watch the “file behavior” and check if the attachment (the file) is trying to do something that is not standard such as – trying to access the hard disk, try to access a suspicious area in the RAM that a standard file will not access, try to create a buffer overflow and so on.

In this way, we can locate malware that’s disguised them self as Innocent file.

Implementing a URL verification mechanism.

A very common method that is used in a Phishing mail attack is – to infect the victim’s desktop with a malware or hostile code, using a smart process” which includes a two or three steps.

The first step is to convince the victim to “do something” by clicking on a specific link that will lead him to a website which includes the malware.

The victim will need to download the file and open the file (the malware).

This method enables the attacker to bypass existing implementation of malware filter because the malware doesn’t appear as part of the E-mail message.

The only way to deal with this “bypass method” is, to implement a security mail filter that can verify URL addresses that appear in the E-mail message by deciding if the specific URL considers as a legitimate URL address or a hostile URL address such as Phishing website.

The security mail filter that needs to verify URL address can implement the verification process in two methods:

1. URL address database

Using a database that includes information about a “problematic website” or a dangerous website” such as a Phishing website or websites that were compromised.

2. Simulate the access to the specific website instead of the “original user”

A process in which the “URL filter” tries to access to the URL address that includes in the E-mail message before the recipient read the E-mail message and try to check if the website looks like a legitimate website or a website that tries to manipulate the user desktop by trying to exploit existing vulnerability.

An example of such “URL verification filter” is the Microsoft technology, that is implemented in the EOP (Exchange Online protection) by using the feature named ATP (advanced threat protection) which includes a component named – safe links.

The purpose of this technology is to add an additional layer of security, in which the mail security gateway (the EOP infrastructure) will check and verify each URL address (link) that appears in E-mail message, and verifies the that the “destination website” is a legitimate website and not a website that appears as a problematic website.

Phishing mail attacks and link to malicious website

C- Dealing with a Spoof mail attack and Phishing mail attacks effectively | Users Education & awareness program

Most of the time, when we use sentence such as fighting Spoof E-mail attacks and Phishing mail attacks, the first association that comes to mind is related to some kind of “high end sophisticated products” that will know how to deal with this terrible threat.

The simple truth is that we probably we will need to use this “high-end sophisticated products” but, to be able to provide a complete and comprehensive for the problem that we are facing we must add the layer of – educating our users about the risk of the Spoof mail attack and Phishing mail attacks, the specific characters of such attack, how to recognize these attacks and so on.

In other words, the technological solutions do not provide a complete solution!

Although there is a great importance to the subject of “user education,” most of us, tend to underestimate this solution because the common association that is related to the term “education” is – boring, not needed, useless.

Dealing with a Spoof mail attack and Phishing mail attacks effectively - Users education

The interesting thing, that I would like to draw your attention is the fact that – one of the most effective and significant ways, to deal with the phenomenon of Spoof and Phishing mail attacks is the subject of “education.”

At the same time, one of the most neglected areas is the “education.” Because most of us are sure that is just a non-useful nonsense.

Dealing with a Spoof mail attack and Phishing mail? - Education

Notice that I didn’t use the common term “user education” because the subject of “education” is related to different elements in the ecosystem:

1. Our education

Most of us (IT persons) have the misleading sense that we know everything about mail security, the different type of mail Threats such as Spoof mail attack and Phishing mail attacks and so on.

The simple truth is that we don’t.

Let’s make it simple – the purpose of the current “boring article series” is -to make you understand that the subject of Spoof mail attack and Phishing mail attacks is not so simple and that there is a lot of information that we should learn about this subject.

2. Management education

When I use the term “management education,” I relate to the concept of “management commitment.”

The concept of “management commitment” must be realized in two ways:

  • The acknowledgment that Spoof mail attack and Phishing mail attacks could cause serious damage.
  • The acknowledgment that there is no “magic solution” to this risk buy instead, a combination of a different solution.
  • The acknowledgment that there is no “magic solution” that will block 100% of the Spoofing or Phishing attacks.

The management will need to commit to the simple fact in which she needs to allocate the required resources (time, money, education and so on).

3. User’s education

Because the Phishing mail attack is so sophisticated and hard to detect one of the most effective tools that we can use dealing with this risk is – to make our user aware of this threat.

Teach them about the specific characters of Spoof E-mail attacks and Phishing mail attacks, show an example of Spoof E-mail or Phishing mail and so on.

The outcome of the acknowledgment of the big importance to educate our user regarding the subject of Spoof E-mail attacks and Phishing mail attacks is – the user awareness program.

Dealing with a Spoof mail attack and Phishing mail attacks effectively ? - Education and awareness program -03

D- Dealing with a Spoof mail attack and Phishing mail attacks effectively | Policy, standards and regulations

1. Define a policy and regulation that will restrict the level of damage that could be caused by a Phishing mail attack

One of the most neglected areas regarding the subject of dealing with a scenario of Spoof E-mail attacks and Phishing mail attacks is – an area which I describe as “Policy, standards and regulations.”

And again, most of the time, the first association that comes to mind regarding these terms is – boring or, not relay a useful solution that I can use.

I would like to give you an example of a regulation \ policy that seemingly doesn’t relate directly to the subject of Phishing mail attack.

A policy which restricts the specific amount if the money, that specific employee is authorized to transfer to another bank account by himself.

The main purpose of such regulation \ policy is to reduce the level of damage in a scenario in which a company employee, maliciously execute a criminal activity in which he will steal money by transferring money from the company bank account to his bank account.

A specific type of Phishing mail attack, and especially Spear phishing attack, is directed to a very specific organization’s role such as the company CEO, CFO, etc.

In this Phishing attack, the hostile element used a false identity and lures his victim to – transfer a specific amount of money to a specific bank account (the hostile element bank account).

In this case, one of the most effective operations that can be implemented is – define a very clear and simple company policy that deals with subject such as:

  • What is the maximum amount of the money that can be transferred?
  • Who is the element that needs to authorize this money transfer?
  • The possibility of implementing a mechanism in which two “entities” need to authorize the money transfer.
  • What are the allowed “destination bank account” in which the company money can be transferred?

2. Appointing a “dedicated authority” that will be responsible for managing the defense infrastructure.

Another subject that I would like to emphasize is – they need to decide about a “person” or “persons,” that will be responsible for managing the enforcement and the ongoing day to day tasks, that are related to the protection mechanism that deals with Spoof E-mail attacks and Phishing mail attacks.

For example, let’s assume that we configure a protection mechanism which monitors our incoming mail flow, and identifies an event, in which there is high chance that the sender spoofs his identity.

In our specific scenario, we don’t block such as E-mail message, but instead, generate an incident report, that is sent to a dedicated mailbox which stores this incident reports that include a copy of the E-mail message that was identified as Spoof E-mail.

The major questions that I would like to ask are:

Q1: Who is the person\s that will have access to the mailbox that stores the information about the Spoof E-mail events?

Q2: How often this person needs to access the mailbox that stores the information about the Spoof E-mail events?

Q3: What is the procedure that needs to be implemented in a scenario in which we identify
a scenario of Spoof mail?

What is my point?

My point is – that the fact that we recognize and send a suspicious E-mail message (Spoof mail) to a dedicated mailbox that will store the information about this E-mail doesn’t solve the problem.

We need to define a very clear and precise procedure, which will define what is the scope of the responsibility of this person, what he needs to need, who should he report about a Spoof E-mail event, what are the “actions” that will be implemented in a scenario of Spoof E-mail events and so on.

Dealing with a Spoof mail attack and Phishing mail attacks - Policy -standards and regulations -04

E- Dealing with a Spoof mail attack and Phishing mail attacks effectively | Client side security

In this section, I would like to review the “client side” of the formula.

In an event of Spoof E-mail attacks or Phishing mail attacks, we can use a “client side” mechanism, that will help us to deal with this problem.

1. Using antivirus

Most of the common antivirus clients, was not created for identifying an event of Spoof E-mail.
The main benefit of using antivirus client is in a scenario in which the Phishing mail seduces the user to download an open a malware file, and the malware manage to slip that “server side defense systems.”

For example – a scenario in which the Antivirus client can be useful is – a scenario in which the user downloads a malware from a specific URL address that appears in the E-mail message (Phishing website).

In this scenario, the Antivirus client provides an additional layer of protection because, the mail security gateway is useful when the malware appears as part of the E-mail message, and not a scenario in which the user uses his browser for downloading the malware to his desktop.

2. Using additional desktop “smart defense mechanism”

As mentioned, the antivirus software is good for detection of “well know malware”. The problem is with zero-day malware that their signature is not listed.

The solution for this “blind spot” is – using a “smart client,” that have the capabilities to identify programs that behave strangely and not in a proper way or a scenario of “anomaly” in which a specific process or service behaves strangely.

There is no specific name for this feature because each of the providers of “desktop security product” uses other names or terms.

An example of such a solution is a desktop security product that includes IDS\IPS (intrusion-detection detection system \ intrusion prevention system) that can identify and detect software component that doesn’t beehives on a legitimate way.

3. Harding the policy that related to Microsoft office documents such as disabling macro

  • Some of the malware will appear as E-mail attachment and some won’t.
  • Some of the malware will appear as E-mail attachment using an executable file and some won’t.

What is my point?

My point is that in a “perfect scenario,” the malware will be implemented as an executable file that will be recognized by the malware filter as a malware and will be blocked.

Most of the time, the attacker who uses a Phishing mail attack is a professional, that will make the required effort to make our life difficult, by using attachments that appear as a legitimate file such as Microsoft office file.

The malware will be “hidden” in the office document as a macro, and will be executed when the user opens the file.

Besides of implementing a mechanism that can perform “Sandbox” verification test, one of the simplest solutions that, can we implement is – by configuring and enforcing the policy that will prevent from our user to use Microsoft office document that includes macro.

In case that now your mind says something like – I cannot do it, some of my users must use the document with macros!

My answer is – it’s your decision; you will need to weigh the business need versus the security need and make the right decision.

Using a malware that is wrapped in office document macro

In the following diagram, we can see a summary of the “client side elements” that we can use for dealing with Spoof E-mail attacks and Phishing mail attacks.

Dealing with a Spoof mail attack and Phishing mail attacks ?- client side -05

Dealing with Spoof and Phishing mail attacks | Article series index

Now it’s Your Turn!
We really want to know what you think about the article

The post Dealing with the threat of Spoof and Phishing mail attacks |Part 6#9 appeared first on o365info.com.

Why our mail system is exposed to Spoof and Phishing mail attacks |Part 5#9

$
0
0

Let’s start with a declaration about a strange phenomenon: Spoof mail attacks and Phishing mail attacks, are well-known attacks, and consider as a popular attack among the “hostile elements.”

Most of the existing organizations, do not have effective defense mechanisms against the above attacks, and there is a high chance, at some point, that your organization will experience the bitter taste of Spoofing or Phishing attacks!

In other words – most of the organizations are exposed to Spoof and Phishing mail attacks, and it’s only a matter of “when”.

So the most obvious questions could be:

  1. Is this statement correct?
  2. And if this Is this statement is correct is correct, how could it be that no one pays attention to this problem, and doing something accordance?

In the current article, I would like to give you some “food for thought” regarding this strange phenomenon, which we prefer to ignore the danger of Spoof mail attack and Phishing mail attacks, close our eyes, and continue to declare that “we are doing our best for protecting our mail infrastructure!”

Why do we prefer to ignore the problem of Spoof mail attack and Phishing mail attacks

The common misconception that causes us to ignore the threat of Spoof mail attack and Phishing mail attacks

1. It will not happen to me.

From time to time, we read some story about a company that was attacked by a Phishing mail and a sad story such as – a story about the CEO who was lured to transfer a large amount of money to the attacker’s bank account, but we don’t really believe that it will happen to us.

My answer is that it’s not a matter of “if” but only a matter of “when.”

Most of the chances are that your organization will experience Spoof E-mail attacks and Phishing mail attacks at some point.

2. Too much on my mind

Every average IT member or IT manager is experiencing the feeling of – “too much on my mind.”
Every day “invites” new challenges and new crises.

“I know that the subject of Spoof mail attack and Phishing mail attacks is important, but I have more critical issues that I need to take care of them at the moment”

The little secret is that probably; you will never have the required time!

If you do not find the required time, the next Spoof mail attacks and Phishing mail attacks will find you unprepared, and the result can become very critical!

Only when you are able to acknowledge the importance of this risk, you will “make the time.”

Two Self-defeating thoughts which make you ignore the threat of a Spoof mail and Phishing mail attacks

3. My organization is well protected from Spoof mail and Phishing mail attacks.

All of us, have the strong need to believe that someone watches us and will protect us when it’s needed.

The fatal miss conceptions which make your organization vulnerable to Spoof mail and Phishing mail attacks

This is a very basic human need.

When relating to the risk of – Spoof E-mail attacks and Phishing mail attacks, most of the time, we prefer not to be realistic.

Instead, we prefer to cling to the general thought that “they” (my IT, my mail provider and so on), are doing what they know to do, and that “they,” are doing whatever it takes for protecting our organization from Spoof E-mail attacks and Phishing mail attacks.

The reality is much more complicated!

Most of the time, the “IT” doesn’t include a professional authority who is specialized in the subject of “mail security” or doesn’t know what are the unique threats that relate to a modern mail infrastructure, what are the specific characters of Spoof mail attack and Phishing mail attacks, what is the available solution? and so on.

Hosted mail infrastructure such as Office 365 (Exchange Online) | My mail infrastructure is automatically protected!

In a scenario in which your mail infrastructure is hosted at “external mail provider” such as Office 365 and Exchange Online, this Incorrect assumption is manifested most strongly.

Most of the mail provider such as Office 365, have all the required tools and infrastructures for dealing and preventing Spoof E-mail attacks and Phishing mail attacks.

The “little thing” that we are not aware of the simple fact that these “defense mechanisms,” are not activated by default. Instead, they are just sitting there waiting for us to use them!

The main reason that this defense mechanism is not activated automatically is – because this defense mechanism can intercept accidentally legitimate E-mail.

The important thing that most of us are not aware of being – that the responsibility to use the existing defense mechanism is our responsibility!

For example, when relating to the subject of Spoof mail attack, Exchange Online support three mail standards, that implements sender verification + support the option of creating an Exchange rule that will identify events of the Spoof mail attack.

The responsibility of knowing the specific characters of each of the sender verification mail standards, the required configuration settings for each of this standard, how to configure the required adjustment that will suit our specific organization needs is our responsibility!

The Spoof mail attack and Phishing mail attacks defense mechanisms - are not activated by default

What is the weakness that the hostile element exploits when using Spoof mail attack and Phishing mail attacks?

The base for Spoof mail attack and Phishing mail attacks, relies on two major weaknesses:

  1. The SMTP protocol weakness
  2. The Human factor weakness

Spoof E-mail attack and SMTP as Innocent protocol

When we hear or experience a Spoof E-mail attack, the first question that can appear in our mind could be:

Q1: Why mail servers don’t know how to protect themselves from Spoof E-mail attacks and Phishing mail attacks?

A1: The simple answer is that the “creator” of the SMTP protocol, didn’t relate to the issue of “mail security” and instead, concentrated on creating mail protocol, that will deliver an email message from point A to point B effectively and reliably.

The issue of “mail security” was neglected because at that time, the popularity of the SMTP protocol was not so great, and the use of the SMTP protocol was not so common.

In a standard mail communication that involves two parties, the SMTP protocol is based on the concept in which the destination mail servers (side B) “believe” in the identity
(E-mail address) that the sender (side A) provides.
The sender (side A), doesn’t need to prove his identity!

Why is it so easy to execute Spoof mail attacks -03

Phishing mail attack and we as a human being

Regarding Phishing mail attack, the base for this attack is – the ability to exploit the “thing” that makes us “human”.

Q1: Why is it so hard to deal with Phishing mail attacks? Or, why there are so many people that fall prey to Phishing mail attack?

A1:

The standard Phishing mail attack is based on two “parts” that exploit the human character:

The Phishing mail attack starts with the “trust part”, in which the hostile element uses an E-mail address of someone we trust or E-mail address that looks like an E-mail message that was sent from respectable and trusted source.

The “sender trusts part,” relies on the “innocence” of the SMTP protocol, that doesn’t include a built-in mechanism for verifying the identity of the “other side.”

The second part of the Phishing mail attack is based on the “content” that appears in the E-mail message.

As the famous song of Michael Jackson – the “human nature” – the hostile element that executes the Phishing mail attack, is aware of different “human button” that can be pushed and manipulated.

The Phishing mail content is designed to address a common human character such as pity, fear, greed, curiosity and so on.

The attacker address one of this “human failing” for manipulating the victim to “do something” such as – open a specific file (malware) or click on a specific link in the Phishing mail that will lead the victim to a Phishing website.

Why is it so easy to execute Phishing mail attacks -04

The Awakening of our awareness of the problem of Spoof mail attack and Phishing mail attacks | Additional obstacles

Let’s assume that you decide that you agree that Spoof mail attack and Phishing mail attacks constitute a great risk to your organization and that you are willing to make the effort and take this threat seriously.

In this section, I would like to review additional obstacles that may appear on the way.
To be able to start handling the Spoof mail attack and Phishing mail attack threat, you will need to overcome these obstacles.

The obstacles that may come in the way in the mission of dealing with a Spoof mail attack and Phishing mail attacks

1. The fair from doing something that will harm the organization mail flow.

Let’s talk about the most prominent obstacle: the fear of a scenario, in which the solution that will be implemented will damage the normal mail flow.

A scenario of false positive, in which a legitimate E-mail that sent to our users will be mistakenly identified as Spoof E-mail or Phishing mail and for this reason, will be “blocked” or deleted by the specific Spoof E-mail protection mechanism that we use.

The biggest fear of all - False positive -02

When implementing a security mechanism that deals with Spoof E-mail, we are facing two problematic scenarios:

Incoming mail

In a standard mail flow, we welcome every E-mail message that sent to one of our users, as long as the destination recipient exists. In other words, we don’t care about the element that originates the E-mail message (the sender) but instead, the mail server that represents our organization is only responsible for verifying the information about the destination recipient (that he hosts the mailbox of the destination recipient).

When we implement a defense mechanism that is should protect us from Spoof mail attack, we can compare it to a scenario in which we place a “guard” at the entrance to our base (our mail infrastructure).

Versus a scenario in which every guest is welcomed to enter our perimeter when we force the use of sender verification, we implemented a process in which we try to verify the identity of each entity that wants to “enter our base.”

When we use this additional layer of security, there is a reasonable chance that we will experience a scenario of false positive.

In this scenario, some of our “legitimate guests,” will not be allowed to enter our base and will be rejected because they do not have the required proof of their identity or from any technical problem that relates to the proof of their identity (their E-mail message will be rejected).

Using a defense mechanism for block Spoofing attacks - Adding a guard to the entrance of our base

Outgoing mail

The other aspect of implementing sender verification mechanism is the ability to “stamp”
a legitimate E-mail message that sent by our legitimate users, so, the “other side” will be able to verify our identity, and will be able to differentiate our legitimate sender from E-mail messages that send by hostile elements that spoof our organizational identity.

The problem of “false positive” can be realized also when relating to the scenario of outgoing mail flow, meaning, an E-mail message that is sent by our user to external destination recipients.

In a complex mail infrastructure, the ability to “stamp” all of the E-mail messages that is sent from our mail infrastructure fully and in a “proper,” way is a quite a challenging task!

In case that we didn’t manage to correctly “stamp” each E-mail message that uses our organizational identity (E-mail message in which the sender uses our domain name), this could lead to a scenario, and which a legitimate E-mail message that is sent from our users, will be rejected by the “other” mail infrastructure.

2. Fear of hurting business activity

Every implementation of any security solution mechanism will probably cause some disruption to the business activity, at least in the first phase of the adoption and assimilation.

The fear of this anticipated disruption leads us to the attitude of – don’t rock the boat!

Alternatively, if no one complained, until now, I guess everything is OK!

The false sense that if, until now, everything was fine, in the future everything will be fine will eventually explode in our face.

In other words – If you can’t stand the heat, get out of the kitchen.

The obstacles - implement defense mechanism that deals with a Spoof mail attack and Phishing mail attacks -01

3. The resources issue
To be able to clearly understand the “enemy” we will need to ask (and answer) many questions such as:

  • How the enemy thinks and functions?
  • What is the vulnerability of your mail infrastructure?
  • What are the possible solutions for the existing mail infrastructure vulnerability?
  • What is the difference between the different solution such as SPF, DKIM, DMARC?

You will need to have a patience and the willingness to devote the time required to read and internalize information.

4. The vanity syndrome

The fact that you are veteran IT professional doesn’t mean that you are a security professional and doesn’t mean that you are familiar with the existing risk that threatens your mail environment, and the possible solution to this risk.

5. The fear of the unknown syndrome

Like any “un-know territory”, the mail security standard territory, is an un-know territory” for most of us.

In the process of implementing a specific solution to the problem of Spoof E-mail attacks and Phishing mail attacks, you will certainly encounter many questions and problems.
It’s OK; this is expected as part of the process.

The obstacles - implement defense mechanism that deals with a Spoof mail attack and Phishing mail attacks -02

6. The need for simplicity syndrome

Most of the time, we are looking for a simple solution and try to avoid the need to understand and implement complex solutions.

The simple answer is – there is no simple solution for the task of dealing with Spoof E-mail attacks and Phishing mail attacks.

7. The military approach syndrome

This is one of the noticeable features of many managers.

The subtext of this approach is – I don’t care how, just make it work!
Well, we can make it work but, only of the “management” is obligated to the process, and is willing to allocate the require resource for the implementation of the possible solutions.

The obstacles - implement defense mechanism that deals with a Spoof mail attack and Phishing mail attacks -03

Why is there no simple solution for the problem of Spoof E-mail attacks and Phishing mail attacks?

The simple answer is that Phishing mail attack is not simple!

The phishing mail attack is a sophisticated attack that combines a couple of attacks, which we will have to deal with each of them separately.

In addition, the ability to deal with the infrastructure for the Phishing mail attack – spoof mail attack is not so simple!

The mail risks family

The common confusion between Spoof mail attack versus Phishing mail attacks

A very important observation that I like to mention regarding the task of – “dealing with a scenario of Spoof E-mail attacks and Phishing mail attacks” is – that we should distinguish Spoof mail attack from Phishing mail attacks.

Each type of attack has different characters, and for this reason, need a different type of solutions.

Most of the Phishing mail attacks, use the Spoof mail attack in the initial phase of the attack.

For this reason, it’s reasonable to assume that in case that we identify and block
Spoof E-mail; the derivative will be blocking the Phishing mail attack.

The Food chain of Spoof E-mail attacks and Phishing mail attacks -01

However, the important thing is, that we cannot build our defense infrastructure based on this assumption for a couple of reasons:

  • Not all the Phishing mail attack uses the option of spoofing the sender identity.
    There is a reasonable option, in which the Phishing mail attacks will use just a standard E-mail address from well-known mail providers such as Gmail, Hotmail or Yahoo.
  • It’s very reasonable to assume that even when we use some protection mechanism that will use to identify Spoof mail attack, we will not be able to identify and block 100% of the Spoof mail attacks.
Note – another aspect of Phishing attacks is that not all the Phishing attacks are “Phishing mail attacks”. It’s true that most of the Phishing attacks are executed via the “mail channel” but some of the Phishing attacks can be executed by using a phone call or a phone SMS, via a message that sent to instant messaging users, via a message that sent to social-network users and so on.

Dealing with Phishing mail attacks -02

What are the challenges that we need to face when we want to fight Spoof E-mail attacks?

Regarding our ability to protect our mail infrastructure from Spoof mail attack, there are a couple of well-known mail standards, that was created by completing the SMTP protocol “missing part” meaning, the ability to verify sender identity.

Along the current article series, we will review in details the different sender verification mail standard such as – SPF, DKIM and DMARC, and other optional solutions such as – solutions that we can implement in Exchange based environment.

SMTP protocol missing part

If you think, you can sit back, relax and drink a refreshing cocktail because you found the perfect solution to all the Spoof E-mail problems, you are wrong!

It’s true that there are standards and solutions that were created for dealing with the phenomena of Spoof E-mail but this solution is very far from providing a perfect solution.

1. The implementation of the sender identification mechanism is not so simple.

Each of the different standards has advantages, disadvantages and “blind spots.” spots”.

The implementation of this standard is not so simple and required preliminary assessment, planning and constant accompaniment.

For example – at the current time, we can mention three mail standard that was created for dealing with the need to verify the sender identity.

Each one of this standard uses a different method for verifying the sender identity and each one of this standard, required to implement different preparations and configuration settings.

The implementation of this standard (sender verification standard) becomes quite complicated and challenging, in a complex mail environment that includes many mail servers many sites, etc.

A standard such as SPF, considered as an easy to adapt standard, but have built-in “blind spot,” spot”, that can be exploited by a hostile element that will bypass the existing “SPF wall.”

The DKIM standard can provide a good protection, but because the solution is based on Public-Key infrastructure (certificate, digital signature and so on), it’s not so easy to implement this standard in a compound mail environment that includes many different entities that send mail on behalf of the organization.

Why is it so difficult to implement a simple solution to the problem of - spoof mail attacks-01

2. Not all the organizations use sender identification mechanism.

Another major issue is that we should not forget is – that the implementation of a complete solution for the problem of “Spoof E-mail,” is depended on a “logical circuit” that will include two sides: the sending mail infrastructure and the receiving (the destination) mail infrastructure.

Why is it so difficult to implement a simple solution to the problem of - spoof mail attacks-02

In case that “our side” is implementing all the required solutions for dealing with Spoof E-mail phenomenon, but the “other side” doesn’t implement any Spoof E-mail protection solution, the outcome is that every hostile element can use our identity and attack the “other side” using our organizational identity.

Why is it so difficult to implement a simple solution to the problem of - spoof mail attacks-04

What are the challenges that we need to face when we want to fight Phishing E-mail attacks?

Regarding the subject of existing solutions for the problem of Phishing mail attacks, the situation is much poorer compared to the status of Spoof E-mail solutions.

The Phishing mail attack considers as sophisticated attacks. The ability to identify and block Phishing mail attacks is much more complicated than dealing with the Spoof mail attack.

Why is it so difficult to implement a simple solution to the problem of - Phishing mail attack

The “interesting news” is that at the current time, there is no formal standard or a well know protection mechanism, that can directly deal and prevent all the types of Phishing mail attacks.

If you perform a simple search using a question such as – “solution for Phishing email attacks,” most of the results that appear are dealing with tips and tricks, guideline and best practices that instruct users how to avoid or to recognize a scenario of Phishing mail.

The “missing part” is that the answers and the solution are related to the “end point” meaning, the users and not to the “server side” meaning our mail infrastructure.

The information is not related to a specific technology or a standard, that can be implemented on the “server side”.

Some links, will lead you to a company that provides services for testing your mail infrastructure (by simulating a Phishing mail attack), and the reaction of your users to Phishing mail attack, but the painful truth is – that there is no “tangible” standard, that promises to protect your mail infrastructure from all the Phishing mail attacks.

My answer to the question of – “Why is there no formal solution to the threat of Phishing mail attack?” is, that the Phishing mail attack made of “different parts.”
We cannot relate to Phishing mail attack as “one problem” but instead, as a “collection of problems.”

For example-

  • One of the building blocks of Phishing mail attack is a Spoof mail attack.
    To be able to successfully deal with a Phishing mail attack, we will need to find a good solution for the problem of Spoof mail attack such as – implementation of sender verification standard – SPF, DKIM, DMARC and so on.
  • One of the building blocks of Phishing mail attack is infecting the user desktop with a malware (most of the time, “smart malware” that are injected into legitimate files).
    To be able to successfully deal with a Phishing mail attack, we will need to find a good solution for the problem of malware such as – “send box” solutions.
  • One of the building blocks of Phishing mail attack is social engineering.
    To be able to successfully deal with a Phishing mail attack, we will need to find a good solution for the problem of social engineering such as – guide and instruct our users about the characters of Phishing mail attack.

Q1: Should I feel despaired from the fact that there is no formal solution to the threat of Phishing mail attack?

A1: No! although there is no “magic button”, that we can use for dealing with a Phishing mail attack, there are a couple of solutions that we can use, and the combination of these “solutions” can provide good and effective protection for most of the Phishing mail attack scenarios.

In the article – Using sender verification for identifying Spoof mail | SPF, DKIM, DMARC, Exchange and Exchange Online |Part 8#9 , we will review the list of the solutions that we can use.

Should I feel despaired from the fact that there is no formal solution to the threat of Phishing mail attack

The next article in the current article series is

Dealing with the threat of Spoof and Phishing mail attacks |Part 6#9

Dealing with Spoof and Phishing mail attacks | Article series index

Now it’s Your Turn!
We really want to know what you think about the article

The post Why our mail system is exposed to Spoof and Phishing mail attacks |Part 5#9 appeared first on o365info.com.

What is the meaning of mail Phishing attack in simple words? | Part 4#9

$
0
0
In the current article, we will continue our journey to the land of “mail threats and dangers,” and this time; our main focus will be on one of the most dangerous and deadly types of mail attack – the Phishing mail attack!


The main points that I would like to emphasize regarding Phishing mail attack are:
  • The lack or the partial knowledge that we have about the characters of Phishing mail attack.
  • The greater vulnerability of our mail infrastructure to Phishing mail attack.
  • The greater vulnerability of our user to Phishing mail attack.

Phishing mail attack? Who, What, Where and when

Let’s start with a formal definition of Phishing mail attack as described by the Wikipedia:

Phishing is the attempt to acquire sensitive information such as usernames, passwords, and credit card details (and sometimes, indirectly, money), often for malicious reasons, by masquerading as a trustworthy entity in an electronic communication.

The word is a neologism created as a homophone of fishing due to the similarity of using a bait in an attempt to catch a victim.

Communications purporting to be from popular social websites, auction sites, banks, online payment processors or IT administrators are commonly used to lure unsuspecting victims.

Phishing emails may contain links to websites that are infected with malware.

Phishing is typically carried out by email spoofing or instant messaging, and it often directs users to enter details at a fake website whose look and feel are almost identical to the legitimate one.

Phishing is an example of social engineering techniques used to deceive users and exploits the poor usability of current web security technologies.

[Source of information – Wikipedia]

Why should I spend my time on getting to know better the character of Phishing mail attacks?

The answer is that if we want to know of to protect our organization from Phishing mail attack, we need to know our “enemy,” the way he thinks, the way he attacks, the characters of the attack and so on.

The need to recognize the characters of Phishing mail attack is “our need,” and also “our users need.”

We need to be familiar with the characters of Phishing mail attack, so we will be able to create and configure the required defense mechanism + to be able to instruct our users.

Our users should be familiar with a Phishing mail attack so in the scenario in which the Phishing mail attack will duck our defense systems (false-negative negative scenario); our users will have the knowledge that required for identify an event of Phishing mail attack.

Why do I need to study the way in which the Phishing attack takes place -01

What is the reason for the strange term Phishing?

As a child, I loved to fish.

I have a picture in mind of an endless blue sea.

You throw the bait into the deep and blue water, and patiently wait for the “strong pull,” in which you know that the fish bit the bait.

The same concept is implemented in a Phishing attack.

The fisherman prepares the bait (the attacker creates the Phishing mail), and “throw” his bait in the big blow sea. In our scenario – the list of the destination recipients who could become his potential victims.

The fisherman (the attacker) doesn’t know if there are any fishes in the “sea” and if a specific fish decides to bite the bait.

All he can do is – waiting patiently for the “strong pull,” in which you know that the fish bit the bait.

Why do we use the strange term- Phishing-02

The different flavor of Phishing attack

It’s important that we will be aware of the fact that the term “Phishing attack,” is not translated automatically only to Phishing mail attack.

The opposite is true; Phishing mail attack is only a specific flavor of “Phishing attack.”

The mechanism of “Phishing attack” can be implemented via different channels such as:

  • Phone channel – addressing the victim by sending him SMS message or directly call him.
  • IM (instant messaging) – addressing the victim via instant messaging applications such as Skype
  • Social network channel – addressing the victim via well-known social networking such as Facebook, etc.

In our specific article, we relate only to the flavor of – “mail Phishing attack” but most of the information about the characters and the logic of “Phishing attack,” is identical to all the types of the different flavors.

The different flavor of Phishing attack-03

The different building blocks of Phishing mail attack

Later, we will go into more specific details of the “Phishing mail attack” but for now; it’s important for me to emphasize that the term “Phishing mail attack” is translated to an “array of attack methods” that are combined and gathered into a specific channel that we describe as a Phishing mail attack.

The different building blocks of Phishing attack -04

The Phishing mail attack is based on a very simple concept of – finding the weakest link in the chain and via the “weakest link” access additional territory.

For example – the Phishing mail attack was designed to use social engineering for addressing a specific human weakness. The attacker is tempting the victim “to do something” such as open a specific file.

The “specific file” is actually a malware, that tries to exploit existing weakness that exists on the user desktop (now the user desktop becomes the “weakest link”).

For this reason, Phishing mail attack belongs to the notorious family of “new type of attacks” that describe as – advanced threats.

Phishing attack - exploit the weakest link

The sophistication level of Phishing mail attack

In the same way that the term “car,” can relate to many different types of “cares” begging with an old or simple car versus, luxury car, the term “Phishing mail attack,” can relate to very simple Phishing mail attack or to a very sophisticated Phishing mail attack.

Simple Phishing mail attack

The characters of a “simple Phishing mail attack” could be translated into a simple, very easy to identify the attack because that attacker made a very little effort to execute a “professional attack.”

For example, the characters of “nonprofessional Phishing mail attack” will include the following characters.

1. Sender’s identity

The attacker will not make the required effort to use an applying identity or well-known E-mail address and instead; we use a general E-mail address from a public mail provider such a GMAIL and so on.

2. The destination recipient

The Phishing mail will be targeted to a specific recipient or the E-mail content will not address the specific recipient by his name. Instead, the Phishing mail content will address the recipient by using a general description such as – “dear organization user”.

3. Phishing mail content

The style of the Phishing mail will be very simple and will not mimic the “look and feel” of the mail style that the “original organization” uses.

Phishing mail connects will not include a sophisticated social engineering method which should convince the victim to do something and instead, will include a very simple request such as – “please open the following file” (the malware file).

Simple basic Phishing mail attack

Professional Phishing mail attack

Versus the simple Phishing mail attack, the other type of Phishing mail attack can be considered as a well-crafted, and professional Phishing mail attacks, that can easily bypass our security mail infrastructure and successfully attack our users.

For example:

1. Sender’s identity

The sender identity – the attacker can use a method in which the information about the sender looks identical (or almost identical) to the sender information that appears in a legitimate mail

The attacker can invest resources in research and find information about you and your manager and use not just a “simple identity” of the user from your organization but a very specific identity such as your manager identity.

2. The destination recipient

The “destination victim” that the attacker tries to attack is not a random list of Potential victims, but instead, a very specific destination recipient. The attacker invests the required time to learn about the company structure, the specific persons that hold a key position (CFO, CEO, etc.).

3. Phishing mail content

The attacker will invest the required resources for

  • Getting a sample E-mail message from the organization which he uses his identity.
  • Create an E-mail message template that looks identical to the original E-mail message style of the person which he spoofs his identity. The E-mail message style can include a specific font, the size of the font, the signature style and so on.

The level of sophistication can also be expressed in the specific social engineering method or narrative that the attacker uses as the Phishing mail content.

A Professional attacker will craft “good content” that includes a relevant incentive to do the specific “thing” that’s appealing to you or relevant to you as a person.

Sophisticated Phishing mail attack

The basic logic of Phishing mail attack and the Phishing mail structure

Regarding the subject of Phishing mail attack logic, the logic is quite simple:

The attacker tries to present an identity that can be trusted by the victim, and then, ask him to “do something” (bitten the bait) that will “activate” the attack.

The basic logic of Phishing attack

The basic structure of Phishing mail includes the flowing parts:

Part A – The “trust” part

This is the part, in which the attacker is trying to “establish a relationship” with the victim.
Very similar to the logic of a “Business Card.”
The message is – I am a reliable and trusted the person. You can trust me and trust the “thing” that I will ask you to do below.

Part B – The “Call to Action” part

This section includes two parts:

1. The “logic” for doing the specific action

Before I ask you to do something, I want to explain and convince you to read the reason for doing the specific action.

2. The “the Action” part

This is the part, in which the attacker explicitly stated what is the “action” that he asks from the victim to do.
Most of the time, the “action” will be:

  1. Open a specific file (malware)
  2. Click on a specific link (URL) that will lead the victim to a specific Phishing website and then, “do something” when he gets to the website such as provide personal details, deposits a money to a bank account, download the specific file and so on.

The common structure of Phishing E-mail

What are the “thing” that the attacker asks from the victim to do?

Theoretically, there are endless options for the “things” that the hostile element can ask from to a victim to do. In reality, there are two major “request” that the hostile element asks most of the time:

1. Access a specific website

The Phishing mail attack includes a link (URL address) to a specific website.
The website serves as the “trap,” that the attacker had already prepared.

There could be a couple of variations to the Phishing website which the attacker is redirecting his victims too:

  • A legitimate website that was compromised by the hostile element.
  • A non-legitimate website that was created to mimic a legitimate website.
  • A non-legitimate website which includes a forum, in which the victim fell in his details.
  • A non-legitimate website which includes a malware file that the victim is asked to download and open.
  • A non-legitimate website that exploits the existing vulnerability of the victim’s browser for injecting hostile code to the user desktop.

Phishing website serve as a trap for the Phishing mail attack victims

2. Click on a malware file that is attached to the Phishing mail

The other type of Phishing mail attack is straighter forward.

The attacker doesn’t convince the victim to access a particular website and then download and “activate” a specific file (malware) but instead, attached the malware directly to the E-mail message.

In case that you think – “hahaha, my mail infrastructure will block any type of executable files, and for this reason, my mail security infrastructure will prevent this scenario (a scenario in which the E-mail message includes executable file), the bad news is that in nowadays, most of the malware appear as a legitimate Innocent file such as – Microsoft office document (Word document, Excel document and so on).

Malware that disguised himself as an innocent file

One of the most famous and deadliest Phishing mail attacks are the attack that includes the Ransomware malware that appears as a legitimate attachment.

When the victim opens the “Innocent attachment,” the malware encrypts the victim’s hard disk and asks for a ransomware!

Phishing attacks - What is the attacker asking from to the victim to do -03

Plan your Phishing mail attack | step by step instructions

The header is a little dramatic.

Our main purpose is not relayed to teach you how to plan and execute a successful Phishing mail attack, but instead, enable you to get into the mind of the attacker who is set in his room, and “cooking” his Phishing mail attack.

Note – In case the “title” makes you feel slightly angry because the article includes instructions that can be used by the “dark side” to become better at planning a Phishing mail attack, don’t worry.

The “bad guy” doesn’t need my help and my guidelines. They are professionals who master this field.

plan your next Phishing trip

The life cycle of Phishing mail attack includes three major phases:

1#3 | Preparation phase

In this phase, the attacker makes all the necessary preparations that will serve as the building block for the Phishing mail attacks.

Decide what are the target victims.

The attacker needs to decide who are the “destination victims”.
For example – a Phishing mail attack that will be targeting a specific organization or a specific destination recipient in the organization (Spear phishing).

Another option has sent the Phishing mail attack to a harvest E-mail address list.

In a scenario of Spear phishing, the attacker will conduct research about the role of the specific recipient whom he wants to attack, his relationship with other organization users, etc.

Decide, which spoofed identity to use

The attacker can choose from a wide range of “spoofed identities” beginning with a very general sender identity, and ending with choosing a spoofed identity that uses the domain name of the target victim and even the identity of a very specific user.

For example, a Phishing mail attack in which the Phishing mail is sent to the company CEO, and the spoofed identity that the attacker use is the spoofed identity of the company CFO.

Plan and design the style of the E-mail message.

In a “sophisticated” Phishing mail attack, the attacker will spend effort in crafting an E-mail message that will mimic that exact style of the “original E-mail message” that is used by the specific organization. For example, mimic the exact signature of the user whom he spoofs his identity.

Choosing the specific human weakness that will be exploited by using social engineering.

The attacker will need to decide about the specific “human weakness” that he is going to target.

For example

  • Greed – inform the victim that he is the winter in some lottery, if you click on this link, you will win a big prize, get a free trial and so on.
  • Curiosity – learn the secret of losing 10 kilos in 10 days.
  • Humanity – if you click this link, you will help hungry children.
  • Fear of authority – this is your manager, please provide the following details for the next 2 hours!

Choosing the specific human weakness that will be exploited by using social engineering

In the following diagram, we can see the part of the initial phase of the Phishing mail attack

Phishing E-mail attacks as a sophisticated attack -The art of Phishing -01

The additional part of the preparation phase could be:

  • Find a website that you can attack, attack the website and “inject” malware code to the website that will infect users who will access the specific website.
  • Copy the source code of a legitimate website, such as a bank website and build an identical website that looks exactly the same as the original website.
  • Purchase sibling domain name, which will use as a subtle variation of a legitimate domain name of the website that you are mimicking.
  • Design and create the malware file that will be attached to the Phishing mail.

Phishing E-mail attacks as a sophisticated attack -The art of Phishing -02

2#3 | Sending the Phishing mail phase

This is the phase in which the attacker needs to find a mail server that will be used for distributing the Phishing E-mail message.

Phishing E-mail attacks as a sophisticated attack -The art of Phishing -03

3#3 | Executing the attack phase

The Phishing mail is just a “bridge” or a “gateway “to the main course of the meal – the specific attack that the hostile element wants to execute.

Theoretically, there is no limit to the type of the “attacks” that can be executed.

The most common type of attacks is:

Malware files | Virus

A very well-known and deadly attack is the “Ransomware virus” which will encrypt the local hard drive.

Malware files | Trojan

There are many types of “goals” that the attacker wants to achieve using a Trojan.
For example – some of the Trojan will enable the attacker to remotely control a specific user desktop; some of the Trojan will enable the attacker to steal the user password (keylogger); some of the Trojan will enable the attacker to convert the user desktop into a zombie machine and so on.

Phishing E-mail attacks as a sophisticated attack -The art of Phishing -04

Another popular Phishing mail attacks are – attacks in which the victim is asked to click on a link that will lead him to a website that was created or controlled by the attacker.

Phishing E-mail attacks as a sophisticated attack -The art of Phishing -05

Assuming that you have to manage to successfully complete all the above steps, you are entitled to be described as a “proud Phishing mail attacker”!

Congratulations your Phishing mail attack was successfully completed

The next article in the current article series is

Dealing with Spoof and Phishing mail attacks | Article series index

Now it’s Your Turn!
We really want to know what you think about the article

The post What is the meaning of mail Phishing attack in simple words? | Part 4#9 appeared first on o365info.com.

What is so special about Spoof mail attack? |Part 3#9

$
0
0

The special character of the spoofing attack is – that the “spoof action”, serves as a spearhead for most of the other mail attacks.

In other words – the Spoof mail attack is accompanied by an additional type of mail attacks such as Phishing mail attack or spam mail.

Spoof mail attack, what is good for?

The main purpose of the “spoof phase” is – to cause the destination recipient to trust the sender identity.

The “trust,” is the first building block in the “mail attack building.”
The notorious couple - Phishing mail attacks and Spoof mail attack

After the hostile element manage to build the bridge of “trust” between him and his victim, there is a high chance that the next step in the attack will successfully complete.

The Spoof E-mail attack does not exist by itself, but instead, serve as the first phase (the trust phase) that leads to the next phase in which the hostile element asks from his victim to do something.

For example

Case 1 – E-mail message + malware

The hostile element presents himself as a trustworthy sender and asks from the destination recipient to open the attachment (the malware) in the E-mail message.

Case 2 – Spam mail

The hostile element presents himself as a trustworthy sender and asks from the destination recipient to purchase a specific product or specific service.

Case 3 – Phishing mail attacks

The hostile element presents himself as a trustworthy sender and asks from the destination recipient to “do something” such as – reset his password, access a specific website, deposit money to a specific bank account and so on.

E-mail Spoofing - the platform for other mail attacks

What is the meaning of Spoofing, Spoof E-mail, spoof attack and all the rest?

The simple explanation for the term “spoofing” is, a scenario in which entity A is masking his true identity, and present another identity such as the identity of entity B.

What is the meaning of the term – Spoofing

The main purpose of the element that uses the option of spoofing his identity is to “buy the trust” of his victim by using an identity that the victim can trust.

The “spoofed identity” can be an identity of a sender who “belong” to a well-known organization or in some cases, the attacker provides the identity of a sender whom the destination recipient knows such as someone from his organization.

What is the main goal of E-mail Spoofing

The purpose of Spoof mail attack

As mentioned, the purpose of the “spoof mechanism” is to serve as the tool by hostel element for – “opening the gate” of the victim fortress.

In case that the attacker manages to bypass the “trust obstacle,” the attacker executes the rest of attack steps such as – social engineering, Phishing website, malware and so on.

spoof mechanism serve as the tool for -opening the gate of the victim fortress

Exploiting the “victim trust”

Cause the recipient to trust on dangerous element that can harm him

The type of identities that can be used by the hostile element.

1. The identity of a sender of a famous or well-known company that has a good reputation.
For example, the identity of a recipient from a well-known company such as PayPal or a famous bank.

2. The identity of a sender of the same organization of the victim.
This is the classic scenario of the CFO and CIO, the scenario of “manager and assists,” the scenario of people from the Helpdesk that address an organization’s user and so on.

In this type of scenario, the attacker abuses the natural tendency of people to trust someone from their organization, and especially if this person (the spoofed identity that used by the attacker) considers as VIP, manager or identity with power or authority.

3. Anonymous identity
Less professional attackers, could use an E-mail account (E-mail message) that was created on the major mail, provide such as – Gmail, Hotmail, Yahoo and so on. In this case, the “trust factor” is reduced because the destination recipient is not tempted to believe that the sender is a “known sender”.

A common two misconceptions about Spoof E-mail attack

In this section, I would like to talk about two misconceptions that most of us have regarding the subject of Spoof E-mail attack.

Misconception 1#2 – Spoof E-mail are executed by a professional hacker.

The most common misconception about Spoof E-mail attack is, that executing Spoof E-mail attack can be implemented only by a professional or, by a super doper cyber-criminal!

Most of us have an image in our head of a guy with thick glasses, sitting in a dark room full will computer screen, print in rage strange computer language commands, trying to attack our systems.

The common misconception -we believe that the attacker is a super cyber-criminal

The truth is much simpler, in nowadays, the ability to send anonymous E-mail or to spoof the identity of the sender is very simple and easy.

No need to be a super cyber-criminal!

The option of sending Spoof E-mail is very simple, and if we want to make even simpler, there are many online web-based tools that can help us to accomplish this task.

In the following screenshot, we can see an example of the search result for the search string “send mail anonymous tool”.

As we can see, there are 28,000,000 results for this specific search term.

You are most welcome to try out yourself to realize, how easy and simple is the process is spoofing your E-mail address identity.

The means for performing Spoof E-mail attack

Note – if you want to read more information about the way of simulating Spoof E-mail attack, you can read the article – How to Simulate E-mail Spoof Attack |Part 11#12

Misconception 2#2 – my mail server “know” how to identify and block Spoof E-mail.

The simple true on the assumption in which our mail infrastructure includes a protection mechanism that will protect us from Spoof E-mail attack, most of the time this assumption is wrong!

In other words, most of the existing mail infrastructures don’t deal so not handling well or not handling at all scenarios of Spoof E-mail and Phishing mail attacks.

Spoof E-mail is not a virus and not a spam mail!

Most of the mail infrastructure include some kind of anti-virus protection and some kind of anti-spam filter, and this protestation mechanism provides pretty good protection.

Misconception 2#2 – my mail server know how to identify and block Spoof E-mail

The strange answer to the declaration of the fact that most of the mail infrastructure are not handling well scenario of Spoof E-mail is because an Inherent weakness of the SMTP mail protocol.

The SMTP protocol can be described as a “naive protocol” or “innocent protocol” because the SMTP protocol was not created with an awareness of a scenario in which hostile elements will try to spoof their identity.

The main goal of the people who created the SMTP protocol was to enable the delivery of

E-mail message from point A to point B quickly and efficiently.

The mail server that represents the sender addresses the mail server that represents the destination recipient and asks him to deliver the E-mail message to the specific recipient\s.

Very easy and very straight forward.

The mail server that represents the destination recipient (the receiving mail server) was not configured to suspect or, to doubt the information about the sender identity.

If the senders claim that his identity is X, as long as the E-mail address format is correct, the destination mail server will “believe” the information about the sender identity.

Let’s assume that we have improved the awareness of the destination mail server to the fact that some of the senders could be hostile elements.

How can we verify the sender identity, so we will be able to trust him?

How complex or simple is to use of false identity -E-mail Spoofing in mail based environments

The good news that in nowadays, we have a couple of mail sender authentication standards such as SPF, DKIM and DMARC, that can help is to verify the sender identity.

The less good news is that the implementation of this protocol is not so simple because of many reasons that we will review later in the article – The questions that we will need to answer before we start the project of – building a defense system that will protect us from Spoof mail attacks | Part 7#9

The two major flavors of Spoof E-mail attacks

A very important subject that I would like to emphasize is that when we use the term – “Spoof E-mail attack,” the term can be translated into two major scenarios:

Scenario 1 – Spoof mail attack that is directed towards “other users” (not our users) but the attacker uses our organizational identity when performing the Spoof mail attack.

Scenario 2 – Spoof mail attack in which the attack is directed towards our users.

The attacker can use a false sender E-mail address which includes our domain name or use an “external E-mail address” (an E-mail address that includes other domain names that represent other organizations with a good reputation that considers as trusted organization.

The two major flavors of Spoof E-mail attacks

The common association that appears in our mind regarding the Spoof mail attack is related to “scenario 2” in which our users become the victim of Spoof mail attack.

Although this type of attack is more “viable” and more tangible, it’s important to emphasize that the other scenario, in which hostile is Stealing our organizational identity and abuse it by attacking another organization is also a “problematic scenario” which could lead to unwanted results that can harm our organization’s reputation.

Scenario 1 – Spoof mail attack that is directed towards “other users” (not our users).

A scenario in which the attacker is “stealing” our organization identity.

For example, our organization domain name is – o365info.com

A hostile element, present himself by using a sender E-mail address, that includes our domain name such as – ceo@o365info.com

The reason that the attacker chooses to use our domain is – probably because our organization is considered as an organization with a good reputation that can be trusted.

In this case, the main purpose of the attacker is – persuade the victim (the recipients from the other organization) “believe him” because his identity (his E-mail address that uses our domain name) can be trusted.

In this case, the hostile element is using “our organization good reputation” for abusing recipient from other organizations.

Case 1 - Spoofing sender identity - Hostile element using our identity to attack other organizations

Scenario 2 – Spoof mail attack in which the attack is directed towards our users.

A scenario in which the hostile element attacks our organization recipients by presenting false sender identity.

The false sender identity which the attacker is using can be implemented in two ways:

Scenario 2.1 – the attacker attacks our organization, using a “well know” E-mail address.

In this scenario, the attacker uses a false identity that is based on email messages that include a domain name of a company that is well known or, considered as trusted organization.

Case 2.1 - Spoofing sender - Hostile element -using external trusted identity to attack our organization users

Scenario 2.2 – the attacker attacks our organization, using an E-mail address that includes our domain name.

This type of scenario is the most “painful” scenario because, in this case, the attacker Disguises himself using the identity of a person from the same organization as the person that he attacks
(the victim).

An example to such as scenario could be a spear phishing, a specific type of Phishing mail attack, in which the attacker uses an identity of a “well know” person from our organization such as the E-mail address of the company CFO.

The attacker uses this identity for attacking Key People in the organization.

Because the victim sees a familiar sender’s identity, he is easily tempted to trust the “sender E-mail”.

Case 2.2 - Spoofing sender identity - Hostile element using -our identity to attack our organization users

Note – technically speaking, regarding the scenario in which the Phishing mail attack is pointed toward our organization users, there could be an additional variation on this scenario in which the hostile element does not bother to “cover his real identity” using a “good fake identity” and instead, uses a general identity or public mail provider such as Yahoo, Hotmail, Gmail, etc.

Spoof E-mail attacks | What are the possible damages?

Let’s briefly review the most obvious damages in the case that the attacker manages to execute his Spoof E-mail attack.

As mentioned before, in reality, that hostile element is not satisfied with Spoof E-mail attack because he cannot gain anything by succeeding the complete this type of attack.

The attacker uses the Spoof E-mail attack as an “appetizer” for the “main course.” course”.

The optional damage in case that the hostile element manages to complete the attack (such as Spoof E-mail attacks and Phishing E-mail attacks) is the damage that will be realized from the specific attack that was executed.

For example – in as scenario of an E-mail message that includes a malware, the damage that we will experience, depend on the malicious activity that the malware was programmed to do.

Spoof E-mail attacks - What are the possible damages -01

Another question that can appear in our mind could be – is this is the only damage that can happen? Is there a possibility for additional and further damages?

The damages of the “attack” could be a minor damage but on the other side, can cause a huge damage.

For example, let’s assume that the attacker executes Phishing E-mail attacks (that include a Spoof E-mail attack) in which he persuaded the company CEO to transfer to his bank account the amount of money worth 500, 000$.$.

What could be the damage of this attack beside of the financial loss?

The damage could be a “CEO rage attack,” which can lead to a scenario in which we need to update our CV because we need to look for a new job (the politically-correct term is – looking for a new challenge).

Spoof E-mail attacks - What are the possible damages -02

A scenario in which the attacker uses our organizational identity for attacking other victims.

Now, let’s talk about the possible damages in a scenario, in which the hostile element uses our organization identity and attacks another organization.

Let’s assume that the attacker manages to complete the attack, and let’s assume that we don’t care what is the damage caused by another organization.

So what do we care if a hostile element uses our organizational identity?

The answer is that we should care!

The fact that the attack was executed using “our identity” is very bad for our reputation.

In many scenarios, the “other organization” that was the victim of the Spoof E-mail attack, will reward us be reporting this information to blacklist providers.

The process in which our domain name is registered in the email blacklist is quite simple (because there is real evidence for the fact that our organization “attack” other organizations).

The process of “delist,” in which we recognize that our domain name appears in a well know blacklists, and we ask to remove our name from this “respectable list”, is not so simple and in many cases, could be a long exhausting process.

Meanwhile, while our domain name appears on a blacklist, the outcome could be that many of the outgoing E-mail messages that sent by organization users to external recipients, will be blocked or rejected by the destination mail infrastructure because our domain name appears as a problematic domain.

Spoof E-mail attacks - What are the possible damages -03

Additional reading

Video lecture

The next article in the current article series is

What is the meaning of mail Phishing attack in simple words? | Part 4#9

Dealing with Spoof and Phishing mail attacks | Article series index

Now it’s Your Turn!
We really want to know what you think about the article

The post What is so special about Spoof mail attack? |Part 3#9 appeared first on o365info.com.

What are the possible damages of Phishing and spoofing mail attacks? | Part 2#9

$
0
0

We are living in a dangerous world that produces many types of threats and risks to our organizational mail infrastructure, to our users and to us.

In the current article, I would like to review some of the possible damages that we can experience in a scenario, in which Spoof or Phishing mail attacks are realized.

The great market of mail threats, possible damages and Phishing mail attack

Regarding the threats and risks to our mail infrastructure, there are a variety of threats which we should be aware of and prepare accordingly.

So why did I prefer to talk about the specific threat describe as “Phishing mail attack”, and his relative – the Spoof mail attacks?

The reason is that Phishing mail attacks are very interesting from the risk management and security perspective and very challenging from the “possible solutions” perspective.

Phishing mail attacks are the representative of a modern threat that belongs to the famous family of advanced threats

The main character of Phishing mail attacks is, that this type of attack considered as a very sophisticated attack that can cause a very serious damage.

To be able to protect our users and our organization from the threat of Phishing mail attack, we will need to complete a couple of phases:

  • Be familiar with the specific characters and the behavior (the DNA) of the Phishing mail attack and Spoof mail attacks. For example, how does Phishing mail attack uses different tools and methods such as Spoof mail attack for getting the required results.
  • Be familiar with the possible damages in the case that the Phishing mail attack threat is realized.
  • Be familiar with all the common obstacles that prevent us from successfully dealing with the threat of Spoof E-mail attacks and Phishing mail attacks.
  • Be familiar with the complexity of “solutions cocktail” that we need to use for dealing with Phishing mail attacks and Spoof mail attacks.
  • Be familiar with the specific characters and the concept of each of the possible solutions, the strengths and the weaknesses of each of the solutions, etc.

The list of things which we should be committed to when dealing with the phenomena of Spoof Phishing mail attacks

Bottom line

To acknowledge that the subject of Phishing mail attack is a very serious threat that needs our full attention.

Phishing mail attacks are a very serious threat that needs our full attention

The existing threats and risks to your mail infrastructure.

The modern mail environment includes a variety of “risks” and “threats” that we need to deal with.

A very general classification of these “mail threats” could be:

Mail attacks | Threats and risks that are executed by hostile elements.

This type of these “threats” is executed by a hostile element, that tries to exploit existing vulnerabilities of our mail infrastructure, or the vulnerabilities our users.
The results of such attacks could be a minor damage – such as the damage of spam mail in which the damage is harassment of our users, by sending a mail that includes inappropriate content, such as advertising persuasion to purchase products, which will increase certain body organs.

The other side of the story could be mail attack such as a Phishing mail attack that can cause serious damage such as: stealing intellectual property, stealing money, stealing passwords, infects our infrastructure with malware and so on.

As an example, we can mention the following mail attacks:

  1. Spoof E-mail attacks – a scenario in which hostile element uses a false identity, usually an identity of a “trusted sender” in which the victim can trust.
  2. Phishing mail attacks –attack that can be described as – advanced or sophisticated attack, which combines a variety of methods such as – Spoof mail, social engineering, Phishing website, malware and so on for attacking the victim.
  3. Spam mail attacks – spam mail that can flood the organization mail infrastructure harasses and annoying mail users.
  4. Malware – a hostile code that could cause a minor damage, but at the same time, can cause a huge damage.

Another type of threats and risks

  1. Data leak – a scenario in which sensitive data is leaking by using the organization mail infrastructure as a “bridge”.
  2. Data privacy, data confidentiality and data integrity – a scenario in which hostile element access data that is transferred via the communication line etc.
  3. Availability of mail infrastructure – a scenario in which the mandatory need of 7 X 24 availability of the organization mail infrastructure may be affected by various factors such as – failure of the mail server’s hardware, failure of communication lines and so on.

Although each of this “mail threats” that are mentioned above is – an Important and respected threat, in the current article series, I would like to focus on the subject of “Mail attacks” and especially on the subject of Spoof mail attack and Phishing mail attacks.

The mail infrastructure threats and risks family

The possible damages of Phishing mail attack

One of the most “interesting” characters of Phishing mail attack is, that there is a wide range of “damages” that could be realized by the Phishing mail attack.
The type of the “damage” depends upon the creativity and imagination of the attacker.

Just in case, I would like to review the most common results from the Phishing mail attack:

1. Fraud

Under the section of “fraud,” there are a variety of possible types of frauds, for example – Finical fraud, in which the victim is seduced to deposit money in the attacker bank account.

2. Theft \ Access to user or organization private information

A scenario in which hostile element gets access to a private information about the victim such as user password, bank account number and so on.

Another option is – A scenario in which hostile element gets access to the organization private data by using the victim as a “bridge” to enter that protected organization perimeter.

3. Variable type of “damages” to the organization infrastructure

I use this vague definition because, the severity of the possible damage that can be caused by the attacker, depend upon the type of the Phishing mail attack that is executed.

For example, the Phishing mail attack can tempt the victim to download and activate a specific file that is actually a malware such as – Trojan horse.

The damages that can be caused by a Trojan horse can be a minor damage such as in a scenario in which the Trojan horse serves as an adware (collect information about the user habit, etc.) Or can be translated into a very serious damage in which the Trojan horse serves as a back door for the attacker, that take control on the victim’s desktop, and uses the victim’s desktop as a “bridge” to the rest of the organization infrastructure.

The realization of the threat that our ?users - organization is exposed to - 02

The wicked structure of the Phishing mail attack

As mentioned, the Phishing mail attack considered as a sophisticated attack which combined many malicious methods for implementing a successful attack.

For example, in a common Phishing mail attack, the attacker will use a spoofed sender identity, which looks like trusted sender identity that the victim can trust.

The E-mail message content will include some “narrative” which is based on social engineering methods, that will address a specific human vulnerability or a specific human character that will seduce and lead the victim “to do something” such as – download and open a specific file, click on a specific link that will lead the victim to a Phishing website and so on.

The result of the “user action” (the victim) could be data theft, money fraud, infect the user desktop with a malware etc.

The wicked structure of the Phishing mail attack

What is my point?

My point is that if we manage to “catch the head of the snake”, we can avoid from the of a snake bite!

If we use a less metaphorically description – in case that we manage to identify and block the Spoof mail attack and Phishing mail attacks, we can prevent the painful results from the attack.

Cut off the head - Eliminate Phishing mail attack -04

For example, along the current article series, we will review in details the subject of – “Spoof mail attack”.

We will review the characters of Spoof mail attack, and the way that we can use for dealing with a Spoof mail attack (by implementing sender verification mechanisms).

The Spoof mail attack doesn’t have a “life of its own”.
The meaning is that from the attacker’s point of view, the ability to spoof the sender’s identity, have a “value” only as “bridge” which will pave the way for the “reset” of the Phishing mail attacks.

In case that we will be able to identify and block most of the Spoof mail attack, the derivative is that we also be able to block most of the Phishing mail attack!

An important observation is that not all the Phishing mail attack uses Spoof mail attack and in addition, there is not granted that we will be able to identify 100% of Spoof mail attack.

Spoof mail attacks don’t have any life of its own used as a tool by factors such as Phishing mail attack or spam mail

Why do I want to focus on Spoof mail and Phishing mail attacks?

The answer to the question is that in the current time, there is a deadly cocktail that is served at the local pub which includes the following Ingredients:

  1. The significant damage that is caused by Phishing attacks (and Spoof mail attack that is part of the Phishing mail attack).
  2. The incredible ease of performing Spoof mail and Phishing mail attacks.
  3. The incredible lack of knowledge and understanding about the mechanism, and the characters of Spoof mail and Phishing mail attacks.

My main goal is – to be your wake-up call!

The deadly cocktail of Spoof mail and Fishing mail attacks

The lack of awareness of the risks that involved in Spoof mail and Phishing mail attacks.

Although it seems like that everyone knows the meaning of – Spoof mail and Phishing mail attacks, the simple truth is that most of the time, most of us, not really understand the huge impact of this type of attacks, how this attack is implemented, what are the main characters this attack and so on.

From my personal acquaintance with customers and organizations, there are a number of core beliefs, that prevent us from dealing with the risks of risks of Spoof mail and Phishing mail:

  • It will not happen to me!
  • Don’t rock the boat!
  • We will deal with the problem when we get to it!

The type the above approach, causes us to close our eyes to this Immediate and tangible threat, and hope that – if and when this risk will be realized, we will know how to deal with this “issue” or most of the time, find a way to “outsource the responsibility” to another factor that we can blame.

The less good news is that in the case of Spoof mail attack and Phishing mail attacks, we can rely on the famous Murphy’s law – “If anything can go wrong, it will!”

Alternatively, if you want, to put it differently – it’s not a matter of “if”, it’s a matter of “when.”

To emphasize my point, let’s do a little test that will enable us to be impressed from the
“level of interest” regarding two important subjects: Identifying phishing mail, and Kim Kardashian.

For the purpose of this test, let’s use the YouTube site as an indicator of the “level of interest.”

In the following screenshot, we can see the search results for the term “Identifying phishing mail.” We can clearly see that this issue is not a very popular subject.

The sum of the results that deal with this subject of Phishing mail is 700~.
The first result is a video that created a year ago, and the average number of “views” for the video results that appear on the first page is measured in hundreds.

lack of awareness for the huge damages of Spoof mail and Fishing mail attack-01

In the next screenshot, we can see the search results for the term – “Kim Kardashian.” We can clearly see that this issue is a very popular subject.

The sum of the results that deal with this subject is 1, 630, 000~.
The average number of “views” for the video results that appear on the first page is measured in thousands, and some video was watched 4,500,000 ~.

lack of awareness for the huge damages of Spoof mail and Fishing mail attack-02

A little about Spam mail before we continue with the subject of Spoof E-mail attacks and Phishing mail attacks.

When reading a technical article about the subject of mail security and mail threats, the Phishing mail attack is frequently described as – a “subcategory” of spam mail.

I am strongly opposed to the above definition because this classification minimizes and reduces our awareness of the big risk of Phishing mail attack versus spam mail.

If we want to condense the main goal of all the types of mail attacks, the simple answer is – “to earn money”.

The main goal of all the types of mail attacks is – money

The main difference between spam mail attack and Phishing mail attack is – the “way” that the element uses for getting the amount of money.

The similar characters of spam mail and Phishing mail

The common denominator of spam mail and Phishing mail is that way that the E-mail message is “distributed” among many destination recipients.

The main target of “element” that sends spam mail and the element that sends Phishing mail is – to reach the largest possible number of target recipients, by using the option of bulk mail or mass mail.

The method for getting the E-mail address of the “victims,” could be similar such as using the option of Harvested E-mail address.

Spam mail versus Phishing mail attack - Common denominator

Note – this observation is not complete accurately because, when using a specific Phishing mail attack that described as – spear phishing, the attacker doesn’t use the option of bulk mail, but instead, aim his attack to a very specific organization recipient such as the company CEO and so on.

The difference between spam mail and Phishing mail

The main difference between spam mail attack versus Phishing mail attack is the level of damage or the level of “wickedness.”

Most of the times, the “standard spam mail” can be considered as an E-mail that includes some kind of a message, that tries to convince you to buy “something.”

Apart from the harassment that is caused by accepting “unwanted E-mail message” that compels the user to waste the time required for read or delete the spam mail, there is no other critical damage.

Note – there are “other damages” that are caused by spam mail such as flooding of an organization, communication lines and the waste of storage space on the mail server but, from the “user perspective,” the spam mail is considered as a non-useful mail, and that’s all.

Regarding the subject on – possible damage that is caused by a Phishing mail attack, in this case, the story is totally different!

The Phishing mail attacks “damage” could be translated into a specific user damage such as – breaking into a specific person’s bank account and stealing his money or can be realized as an attack, that infects the organization infrastructure with malware that can take control over the organization infrastructure, encrypts hard disks and asking for a ransom and so on.

Regarding the “damage level” which can be caused by a Phishing mail attack, the sky is the limit!

Spam mail versus Phishing mail attack - The main difference

Spam mail, a very brief review

Although this article series is dedicated to the subject of Spoof E-mail attacks and Phishing mail attacks, I would like to “pay my debt” to the subject of spam mail, by providing a very brief review on this subject.

Know your enemy | What is the motivation of the spammers?

The main motivation of the elements which perform spam mail attack is – money.

A very useful way to make money and even a lot of money is – by selling something to someone.

One of the easiest and the profitable way of addressing a huge amount of “potential buyers” is – by using the Internet infrastructure.

The “thing” that the spammer wants to sell, could be a product, a service or even an “idea.”

  • The spammer may wish to promote a specific product \ service which he provides.
  • The spammer may wish to promote a specific product \ service someone else’s product (affiliate programs).
  • Other – I add the “other,” as a space holder for any other thing that the spammer has an interest to promote.

What are the main goal of the professional spammer

Spam mail | The risk level and the consequence

In general, we can define the “risk level” of spam mail as low or medium.
Although no one would like to get a spam mail, the damage of spam mail is not considered as a real threat to crucial assets of the organization.

The possible damage from the spam mail attack could be:

  • Annoying our users.
  • A waste of time that is required for reading the spam mail sends the spam mail to the junk folder, inform the IT staff about the spam mail.
  • Lead our users to problematic websites.

Another type of damages that are caused by spam mail are the damage of the organizational infrastructure such as communication line and storage:

  • Spoof E-mails that causes communication lines are overloaded.
  • Mail server storage that is wasted on storing the spam mail.

What is the damage of spam mail

The way that spammers get our E-mail address

The last thing that I would like to relate to the subject of “spam mail” is the method which the spammers use for getting the information about the E-mail address of their “victims” (our users).

In a spam mail scenario, the most common complaint of the users is – that they never registered a specific mail list or didn’t provide their E-mail address to the element that sends the spam mail.

The simple answer is that most of the time, they are right!

The spammer gets the required information about the “E-mail address” of their victims by purchase E-mail lists of mediators who have a database of harvested email address.

These “mediators” know how to harvest this E-mail address from many types of resources such as – chat rooms, newsgroups, websites, social networking, blogs, Internet directories and so on.

Additional methods that spammer use described as – running a dictionary attack.

The dictionary attacks are implemented by software engineers who know how to generate billions of combinations, which create “optional E-mail address” that are used by the spammer.

Note – the same methods for getting the E-mail address of the potential victims is used by the hostile elm nets that perform Phishing mail attacks.

Buy E-mail lists from mediators who have a database of harvested email address

The next article in the current article series is

What is so special about Spoof mail attack? |Part 3#9

Dealing with Spoof and Phishing mail attacks | Article series index

Now it’s Your Turn!
We really want to know what you think about the article

The post What are the possible damages of Phishing and spoofing mail attacks? | Part 2#9 appeared first on o365info.com.


Dealing with a Spoof mail attacks and Phishing mail attacks | A little story with a sad end | Part 1#9

$
0
0
In the current article, I would like to review the chain of events that occurs every time, again and again, in a scenario in which the attacker manages to successfully execute a Phishing mail attack.

The reaction of the involved persons is known in advance, and the sad end of the story is known in advance.

The main goal of the story is – to serve as a wake-up call, so you do not have to be a character in the play of – Phishing mail attack!

The major challenges relating to the subject of Spoof mail attack and Phishing mail attacks are

  1. The fact the Phishing mail attack is a sophisticated attack that includes many parts that will need to deal with each one of them separately such as – Spoof mail attack.
  2. Our ignorance about the way the Phishing mail attack work and executed.
  3. Our fake confidence which is based on our mistaken assumption that our mail infrastructure is protected and can deal with all this “mambo jumbo attack” stuff.

Why are we so arrogant?

The common denominator of IT people is – the strong belief, that he is some kind of Albert Einstein, that knows everything there is to know about IT and security.

The misconception that we have regarding Spoof E-mail attacks and Phishing mail attacks -01

If we will have the courage to admit, most of us not really know what is the meaning of Phishing mail attack, what are the characters of Phishing mail attack, what are the different flavor of Phishing mail attack, what is the difference between spam mail, Phishing mail attack or a Spoof E-mail.

The misconception that we have regarding Spoof E-mail attacks and Phishing mail attacks -02

The bitter truth appears when and where we least expect it!

Your organization experiences a successful Phishing mail attack, in which the attacker manage to cause a huge damage to our organization.

You feel like a bull rammed you!

You fell a powerful header which brings down the floor

The next emotion in our emotional rollercoaster is “panic.”

We don’t know what is the volume of damage, we don’t know if our network was infected with malicious code to continue to damage our organization or, just sit and wait for the right opportunity.

The real reason for the “panic” is the very reasonable suspicion that his ass is on fire!

The misconception that we have regarding Spoof E-mail attacks and Phishing mail attacks -03

The next emotion in our emotional rollercoaster is “anger.”

The source for the “anger,” is frustration.

The source of the frustration is because:

  • We didn’t manage to identify and block the attack.
  • The fact that we are faced with the simple truth, that says that we are not so smart as we thought.

The anger outcome is – shouting and screaming at everyone below us or any other person that who we can shout.

One of the most popular “objects” for channeling our frustration is – the companies, that provide us some kind of service because most of the time they will not answer back.

Spoof mail attack and Phishing mail attacks - Shout and scream anyone you can

This is the last phase of our bad trip, which I describe as the “the silent grief phase.”

This is the phase in which we manage to understand and accept that there is nothing that we can do besides of accepting the reality, and understand that the attacker was smart enough to revel in our weak spot.

Spoof mail attack and Phishing mail attacks - The silent grief phase

The conclusion

The drama which was described is not so special or unique to a specific origination.

It happened all the time to many organizations.

The only difference between the events is the name and the faces of the people that are involved.

The sad story about a Phishing mail attack and the sad end

Let me tell you a story that happened long long time ago in a distant land.

The legend of the Phishing mail attack and the sad result - Scene 1 -00

Scene number 1

In our little story, your name is Jeff, and you are the CIO of a company that belongs to the financial sector named – “Don’t do anything and hope that everything will work out by itself.”

It’s 9:30 in the morning; the sun is shining.

You’re sitting in your office, drinking a cup of hot coffee (no sugar because you need to maintain your weight).

The legend of the Phishing mail attack and the sad result - Scene 1 -02

You log on to Facebook and start to watch some boring video of a dog or a cat, doing something.

The legend of the Phishing mail attack and the sad result - Scene 1 -03

Your phone is ringing.

On the line is Suzan, the personal assistant of Brad, the company CEO.
Suzan is asking you to urgently come to Brad’s office.

The legend of the Phishing mail attack and the sad result - Scene 1 -04

Your gut feeling is telling you that something is wrong!

You enter the Brad’s room.

Brad asks you to close the door behind you.

The facial expression of Brad is grave and serious.

Brad says:

“Jeff, let’s make it simple and straightforward.
Yesterday, I got an E-mail message from David (David is the company CFO) that asked me to deposit 500, 000$ in a specific bank account.
The purpose of the deposit was an initial payment for a big acquisition deal, which is about to take place soon.”

This morning, after a brief conversation with David, I understand that I was a victim of an ugly fraud!

The legend of the Phishing mail attack and the sad result - Scene 1 -05

  1. I want my money back!
  2. I want you to locate the persons that carried out this ugly fraud + report the information to the police!

The legend of the Phishing mail attack and the sad result - Scene 1 -06

  1. I demand to know – how can it be that our security infrastructure that costs us so much money, didn’t recognize and blocked this attack, and I demand to know who to blame and who is the person that is responsible for this disaster!

The legend of the Phishing mail attack and the sad result - Scene 1 -07

Scene number 2

You can hear your heart pounding.

The legend of the Phishing mail attack and the sad result - Scene 2 -02

You Instantly call Billy (the company IT manager), and ask him firmly, to reach your office immediately.

Billy enters your office.

You ask Billy to close the door behind him.

The legend of the Phishing mail attack and the sad result - Scene 2 -03

You inform Billy about the “mess,” waving your finger in his face.

You inform Billy that you need instant answers and that someone will have to pay the price!

The legend of the Phishing mail attack and the sad result - Scene 2 -04

Scene number 3

Billy rushes into his office, finds Bob (the Help desk manager), and informs him about the “issue.”

The legend of the Phishing mail attack and the sad result - Scene 3 -02

Billy asks from Bob to immediately call the IT company, which planned and built our mail infrastructure, and inform them that they will have to provide an accurate answer to the following questions:

  1. How did the hostile element manage to hack our system despite the advanced security infrastructure that was supposed to protect our mail infrastructure?
  2. How to identify with certainty the hostile element, and locate the hostile element which carried out the attack?
  3. How are they going to compensate us for the Indignities and the financial losses?

The legend of the Phishing mail attack and the sad result - Scene 3 -03

Scene number 4

Bob calls the technical support of the IT company that built our mail infrastructure.

Bob informs them about the incident that happened and present the list of questions.

The legend of the Phishing mail attack and the sad result - Scene 4 -02

The “other side”, explains that this problem is not related to “their side” in any way, and that the responsibility for protecting the organization mail infrastructure from such attack, is the responsibility of the organization that owns the mail infrastructure meaning, our responsibility.

The legend of the Phishing mail attack and the sad result - Scene 4 -03

After an exchange of harsh words, Bob disconnects the call and informs Billy that the provider refuses to help us and in addition, blames us for the “mess”.

The legend of the Phishing mail attack and the sad result - Scene 4 -04

Scene number 5

Billy (the company IT manager) picks up the phone, and calls the technical support of the provider who built the mail infrastructure.

The legend of the Phishing mail attack and the sad result - Scene 5 -02

Billy asks politely but firmly to talk to Stephen, the manager!

Stephen explains that this problem is not related to “their side” in any way and that responsibility for protecting the organization mail infrastructure from such attack, is the responsibility of the organization who owns and manages the mail infrastructure.

The legend of the Phishing mail attack and the sad result - Scene 5 -03

After an exchange of harsh words, Billy disconnects the call.

The legend of the Phishing mail attack and the sad result - Scene 5 -04

Scene number 6

Billy calls you (just a quick reminder; you are Jeff the company CIO) and reports on the conversation with Stephen.

The bottom line – Stephen that represents the IT company that built our mail infrastructure declares that – they are not willing to take any kind of responsibility for this mess!

The legend of the Phishing mail attack and the sad result - Scene 6 -02

You ordered Billy to immediately summon a conference call, that includes yourself, Billy (the company IT manager) and Stephen.

The legend of the Phishing mail attack and the sad result - Scene 6 -03

You start the phone conversation with some statement about the fact that you have decades of experience in the field (usually, the magic number is 15 years).

The legend of the Phishing mail attack and the sad result - Scene 6 -04

You continue to the “threats phase”, and clarify unambiguously that if he (the provider) will not take responsibility, provide immediate answers and solve the mess, you will fire him, sue him, and in addition, publish negative information about his company on Facebook.

The legend of the Phishing mail attack and the sad result - Scene 6 -05

Stephen says that he is very sorry, that he understands my pain, but nothing he can do to help us in this scenario.

The legend of the Phishing mail attack and the sad result - Scene 6 -06

Scene number 7

Clumping you enter the director’s office.

The legend of the Phishing mail attack and the sad result - Scene 7-02

You start to stutter and mumble about security risks, cyber-attacks, the difficulty in dealing with the risks and threats of the modern work environment.

Brad (your CEO) informs you that you will have drawn the required conclusions.

The legend of the Phishing mail attack and the sad result - Scene 7-03

Scene number 8

Two years passed since you have been fired following the unfortunate incident.

You could not find another job (because of age and other reasons).

Your financial situation is not good, and you get a call from the bank on a daily basis.

After many reflections and obsessive thoughts, you decide that….

The legend of the Phishing mail attack and the sad result - Scene 8 -02

Scene number 9

The wind blows in your face.

You’re standing on a high bridge looking into the abyss which pours down!

Good-bye, crawl word!

The legend of the Phishing mail attack and the sad result - Scene 9 -02

Dealing with Spoof and Phishing mail attacks | Article series index

Now it’s Your Turn!
We really want to know what you think about the article

The post Dealing with a Spoof mail attacks and Phishing mail attacks | A little story with a sad end | Part 1#9 appeared first on o365info.com.

Office 365 Cutover mail migration – Exchange on-Premises pre requirements

$
0
0

The most common cause for a scenario, in which we fail to start the process of Office 365 cutover mail migration is – the lack of the Exchange on-Premises pre requirements.
The main goals of the current article are:

  1. Provide the checklist of Exchange on-Premises pre-requirements
  2. Explain in details the reasons for each Exchange on-Premises pre requirements
  3. Provide you tools, which will help you to verify the existence of Exchange on-Premises pre requirements

Office 365 mail migration The gate of the herd.

The common denominator of most of the Office 365 mail migration project is what I described as the “racing herd”.

The mail migration project is executed in a hurry; we yearn to “push the mail migration button,” without any preparation and without any prior knowledge about “boring subjects” such as –  cutover mail migration pre requirements, mandatory requirements, best practice and so on.

In case that luck is on our side, the cutover mail migration process is running successfully, but many times, the “luck lady” does not come, and the cutover mail migration process does not start!

Mail Migration to Office 365

The cutover mail migration pre requirements are the “little thing” that makes a difference between smooth and efficient mail migration project to the cloud versus, a scenario in which we are not able to meet the mail migration to Office 365 deadlines, and the memory of the migration to Office 365, leaves a bitter taste in the mouth.

Why does its so important to verify all the pre requirements before starting the cutover migration process

The scope of the current article

Office 365 cutover mail migration phases

The project of mail migration to Office 365 using cutover migration, includes three major phases:

  1. Pre-migration tasks
  2. The migration process
  3. Post-migration tasks

In the current article, we focus only on the first phase in which we prepare our environment and our mail infrastructure to the Office 365 cutover mail migration process.

What are the cutover migration phases

Office 365 cutover mail migration pre requirement’s classification

The “first phase” of Office 365 cutover mail migration can include a couple of parts such as –  learning about the specific characters of cutover mail migration, building a lab for testing the designed migration process, and verifying that all the pre requirements are fulfilled.

The phase of the “cutover mail migration pre requirements” can also be divided into different sections such as:

  • User desktop pre requirements
  • Network infrastructure pre requirements
  • Office 365 infrastructure pre requirements
  • Exchange on-Premises pre requirements

In the current article, we will relate only to the subject of Exchange on-Premises pre requirements

Office 365 cutover mail migration pre requirements classification

Office 365 different types of mail migration

Office 365 provides three built-in types of mail migration option from Exchange on-Premises server:

  1. Cutover mail migration
  2. Stage mail migration
  3. Exchange Hybrid mail migration

The current article is dedicated to the Office 365 cutover mail migration and the Exchange on-Premises server pre requirements, but the important thing then we should know is that the ” Exchange on-Premises server pre requirements” that are relevant to the Office 365 cutover mail migration are relevant and almost identical to the rest of the Office 365 mail migrations.

The factor of Exchange on-Premises public availability

All the different types of Office 365 mail migration options, dictate the mandatory need in which Exchange on-Premises server will need to have a “public presence” which is translated to:

  1. Public IP address.
  2. Public name.
  3. Public certificate.

The relevance if the pre requirements to the different Office 365 mail migrations -Common denominator

The mail migration protocol

Regarding the subject of the “mail migration protocol” the Office 365 mail migration methods are classified in the following way:

Office 365 cutover mail migration and Office 365 stage mail migration, are implemented by using the Outlook Anywhere protocol. The Exchange Online server will “fetch” the Exchange on-Premises mailboxes, by using the RPC over HTTPS (Outlook Anywhere) protocol.

Office 365 Exchange Hybrid mail migration, is implemented via the Exchange on-Premises EWS (Exchange web services) interface. In other words, the Exchange hybrid environment doesn’t need to use the RPC over HTTPS (Outlook Anywhere) protocol for mail migration.

The relevance if the pre requirements to the different Office 365 mail migrations - Mail migration protocol -02

What is the exact meaning of “mail migration”?

Before we continue with the description of the Office 365 cutover mail migration, it’s important that we will agree on the definition of the term “mail migration”.

The first association that appears in our mind regarding the term “mail migration” is – a migration of Exchange mailboxes.

This association is partially true because Exchange mailbox doesn’t have any life of its own.

The meaning is that Exchange mailbox must be “attached” or “connected” to a user account.

Office 365 cutover migration - What is the exact meaning of mail migration -01

The process of Office 365 cutover mail migration is designed to implement a migration process which will create two separated “migration channels”.

1.  User \ group account migration process

One migration channel is – the user and group account that will be copied from On-Premise Active Directory to the Windows Azure Active Directory.

2.  Exchange on-Premises mailbox migration process

The second migration channel is the Exchange mailbox process, in which all the
Exchange on-Premises mailboxes (100%) will be copied to the Exchange Online infrastructure.

Office 365 cutover migration - What is the exact meaning of mail migration -02

Office 365 cutover mail migration – User and mailbox migration

An additional detail that I would like to emphasize is that the term “migration,” is translated into a copy operation and not move operation.

When we say Office 365 cutover mail migration, the term “cutover” could be misleading because, in reality, we don’t “cut off” the Exchange on-Premises mailboxes (move) but instead, copy the Exchange on-Premises mailbox content to the Exchange Online mail server.

Throughout the process of Office 365 cutover mail migration, there will be two user mailboxes at the same time.

The “original Exchange mailbox” stored in the Exchange on-Premises, and the copy of the user mailboxes that is stored in the Exchange Online.

Office 365 cutover migration - Exchange mailbox migration is Copy mailbox -03

What are the mandatory pre requirements of the Exchange on-Premises server?

Later on, we will review in details each of the “pre requirements” that Exchange on-Premises server need to support for implementing the Office 365 cutover mail migration.

In a nutshell, the most basic and mandatory Exchange on-Premises pre requirements are:

  1. Public availability
  2. Support the options Outlook Anywhere.

Office 365 cutover migration - The two mandatory requirements form Exchange on-Premises -04

To be able to simplify the cutover mail migration process, we can use a metaphor in which Exchange Online server reaches out his hand, knocking your organization network and asking to get a copy of all the On-Premise Active Directory users, groups and contact, and all the user mailboxes stored in the Exchange on-Premises server\s.

The organization representative who communicates with “Office 365” is the
Exchange on-Premises server.

To be able to enable this communication channel between Office 365 and you’re Exchange on-Premises server, the Exchange on-Premises will need to have public availability.

The term “public availability” is translated into three different components:

  1. Public IP – a Public IP address that is accessible to external hosts. The
    Exchange on-Premises public IP address will be “mapped” to the Exchange on-Premises public name.
  2. Public name – the more accurate term is the FQDN (fully qualified domain name). Exchange on-Premises server will need to use a public name which external hosts such as Exchange Online use for addressing our Exchange on-Premises server. For example – o365info.com
  3. Public certificate – technically speaking, the server certificate is not directly related to the communication process with the Exchange on-Premise server because all we really need is just a public IP address. The reason that we “wrap” the public certificate with the term “public availability” is because the need for a public valid server certificate is a mandatory requirement of the Office 365 cutover mail migration.

Office 365 cutover migration - Exchange on-Premises server Pre requirements - Public availability -05

Cutover mail migration | Phase A

The Office 365 cutover mail migration is initialized from the “Office 365 side” (Exchange Online admin portal) that need to locate and communicate Exchange on-Premise server.

The communication channel between Exchange Online and Exchange on-Premises must be implemented as a secure communication channel (encrypted using SSL).

The establishment of the communication channel will serve for the purpose of – copy information from the On-Premise Active Directory and Exchange on-Premise server.

Office 365 cutover migration - The logic of the mail migration process and Exchange on-Premises pre requirements -01

1.  Locating our Exchange on-Premises server

As mentioned, the Office 365 cutover mail migration process, is initialized from the Office 365 side that “reaches out his hand,” and accesses the Exchange on-Premises server.

To enable Office 365 cutover mail migration to locate our Exchange on-Premises server, we need to provide the Office 365 cutover mail migration the required information.

The preferred \ recommended method is – by using the Autodiscover process.
Given that our Exchange on-Premises server have the required setting for Autodiscover, when we create the cutover mail migration batch, Office 365 will use the “domain name” of the E-mail message that we will provide for locating “our” Exchange on-Premises server.

In case that our Exchange on-Premises server doesn’t support Autodiscover or the Autodiscover settings are incorrect, we can provide Office 365 the required information about the Exchange on-Premises server manually.

2.  Communicating with the Exchange on-Premises server.

After the Office 365 cutover mail migration locates our Exchange on-Premises server, he needs to “talk” with Exchange on-Premises server for the purpose of asking a copy of existing On-Premise Active Directory users and Exchange on-Premises mailboxes.

The mandatory requirement for the communication channel from Office 365 side is that the communication will be implemented by using the HTTPS protocol (port 443).

The Exchange on-Premises server will need to identify himself by providing a valid public certificate.

Office 365 cutover migration - The logic of the mail migration process and Exchange on-Premises pre requirements -02

Cutover mail migration | Phase B

The communication channel between Office 365 and the On-Premises environment (Exchange on-Premises) is implemented by using the SSL protocol.

The actual migration process is implemented by using the RPC protocol. The RPC protocol is positioned “above” the SSL protocol.

This implementation, described as encapsulation (the method of using a protocol that used additional protocol) and in Exchange based environment, this method described as RPC over HTTPS.

The friendly name for this method is – Outlook Anywhere.

Office 365 cutover migration - The logic of the mail migration process and Exchange on-Premises pre requirements -03

1.  Exchange on-Premises and Outlook Anywhere

To be able to implement the cutover mail migration, Exchange on-Premises will need to support Outlook Anywhere.

Note – the option of Outlook Anywhere relies on the “public availability” of the Exchange on-Premises and in addition the need for a server certificate.

Outlook Anywhere doesn’t dictate the need for a public certificate, but the Office 365 cutover mail migration does.

2.  Exchange Online | The required user credentials

The Office 365 cutover mail migration is based on the assumption that we will be able to copy all the On-Premise Active Directory content (not all the content but most of it) and all the Exchange on-Premises mailboxes.

When we define the Office 365 cutover mail migration setting (migration endpoint), we will need to provide a username + user credentials which will be used by Office 365 cutover mail migration when he connects our Exchange on-Premises server.

The technical term for the “user” that we will provide to the Office 365 cutover mail migration is – migration administrator.

For a cutover migration, the migration administrator account must be:

A member of the Domain Admins group in Active Directory in the on-premises organization.

Or

Assigned the FullAccess permission for each on-premises mailbox.

Or

Assigned the Receive As permission on the on-premises mailbox database that stores the user mailboxes.

Office 365 cutover migration - The logic of the mail migration process and Exchange on-Premises pre requirements -04

Exchange on-Premises certificate

A mandatory need of the Office 365 cutover mail migration is – the need that the Exchange on-Premises server will use a public valid certificate.

In many scenarios, this mandatory need is annoying the person who is responsible for the Office 365 cutover mail migration process because not all the organizations use a public valid certificate. Another possible scenario is a scenario in which the organization uses
Exchange on-Premises certificate, but uses a public certificate (certificate that was not enrolled by a public certificate authority).

Q1: Is there a way to implement the Office 365 cutover mail migration without using an Exchange on-Premises public valid certificate?

A1: No, this is a mandatory requirement

Q2: What is the meaning of “public valid certificate”?

A2:

  • The meaning of “public certificate” is – a certificate that was purchased from a well-known public CA (certificate authority).
  • The meaning of “valid certificate” is – a certificate that has a valid expiration date + a valid host name \s or a valid domain name.

Office 365 cutover migration - Exchange on-Premises server Pre requirements - Server certificate -01

Q4: Why does the cutover mail migration “insist” using a public certificate?

A4: The Office 365 cutover mail migration needs to verify that Exchange on-Premises server have a public certificate for two main reasons:

1.  Data privacy and data integrity

The Office 365 cutover mail migration is implemented over a public network infrastructure that considers as a non-private or non-safe environment. To be able to fulfill the most basic security need for data privacy and data integrity, the Office 365 cutover mail migration is implemented by using the SSL protocol. The implementation of SSL protocol requires a server certificate.

Note – technically speaking SSL doesn’t place a mandatory requirement for a public certificate, and even a private certificate is “OK”.

2.  The need for authentication and identification

Although we use the term “our Exchange on-Premises server”, Office 365 doesn’t really know or trust our Exchange on-Premise server.

When using SSL, the mechanism that we use for fulfilling the need of – verifying the identity of a specific entity is, by using a public certificate that was enrolled by a public CA.

When the Office 365 cutover mail migration connects Exchange on-Premises server, Office 365 will need to be sure beyond all doubts, that the Exchange on-Premises server who represents a specific domain is really who he claims to be.

The ability to proof the Exchange on-Premises server’s identity is implemented when Exchange on-Premises displays a valid public certificate that was provided by a CA which Office 365 trusts.

Office 365 cutover migration - Why does Exchange on-Premises need to have public certificate -02

Q5: What type of a public certificate can be used by Exchange on-Premises server?

A5: A valid server certificate could be

SAN (subject alternative name) certificate or a wildcard certificate.

Case 1 – using an SAN certificate

The SAN certificate includes information about hosts, who are authorized to use the certificate. The information about this host appears as FQDN (fully qualified domain name).

In Exchange based environment, that SAN certificate will need to include at least two hosts (FQDN) names:

  1. The Exchange on-Premises server public name.
  2. The Autodiscover hostname who represents a specific domain name.

For example: in our specific scenario, the organization domain name is o365info.com

  • The Exchange on-Premises server public name is – mail.o365info.com
  • The Autodiscover hostname is – autodiscover.o365info.com

Case 2 – using a wildcard certificate

In case that we use a wildcard certificate, the certificate “covers” all the hosts in a specific domain name.

For example – a wildcard certificate for the domain name will include the following information – *.o365info.com

All the host names who appear “under” this domain name such as “mail” (the hostname of our Exchange on-Premise server) or Autodiscover, considers as a valid host name that is authorized to use the certificate.

Office 365 cutover migration - Exchange on-server Pre requirements - Server certificate - certificate type -03

Verifying my Exchange on-Premises server certificate

As mentioned, the Office 365 cutover mail migration mandatory requirement is that the Exchange on-Premises server will use a public valid certificate.

In the following section, I would like to briefly review a “standard” SAN public certificate and display the certificate parts which we need to check.

Certificate date validation

The most basic parameter that needs to be verified with a server certificate is the subject of the certificate validation date.

When we select the general tab, we can see the section named – valid from, that the specific certificate is valid until 2/2/2018

How to verify my Exchange server certificate -01

Certificate and the host named

In our specific scenario, the organization domain name is – o365info.com

The Exchange on-Premises server public hostname is – mail.o365info.com
the Autodiscover record for the o365info.com domain is – autodiscover.o365info.com
When we select the details tab, we can see the section named – Subject Alternative Name, the host names who include in the SAN certificate.

In our scenario, we look for

  • A valid Autodiscover hostname

How to verify my Exchange server certificate -02

  • A valid Exchange on-Premises public name – hostname

How to verify my Exchange server certificate -03

Certificate and public CA (certificate authority). 

As mentioned, when using Office 365 cutover mail migration, the Exchange on-Premises server certificate must be a “public certificate” that was provided by a public CA.

When we select the Certificate Path tab, we can see the section named – Certificate Path we can see information about the public CA that provides the certificate. In our specific scenario, the public CA is
Go Daddy.

How to verify my Exchange server certificate -04

Q6: In the case that my Exchange on-Premises server doesn’t include the server certificate, can you instruct how to purchase and install the required server certificate?

A6: The subject of “how to install a server certificate on Exchange on-Premises server” is out of the scope of our current article.

Instead, I will provide some useful links, that include instructions for the task of installing the server certificate for Exchange on-Premises server based on the specific Exchange on-Premises server version.

Exchange server certificate
Exchange 2003
Configuring Exchange 2003 for Client Access

How to Install a Public 3rd Party SSL Certificate on IIS on SBS 2003

Exchange 2007
Add an SSL certificate to Exchange 2007

Certificate Manager for Exchange 2007

Exchange 2010
Add an SSL certificate to Exchange 2010
Exchange 2013
Add an SSL certificate to Exchange 2013
Exchange 2016
Configure Exchange 2016 certificates

The communication channel between Exchange Online and Exchange on-Premises server

An additional “part” that I would like to add to our Office 365 cutover mail migration checklist is – the mandatory need for enabling external hosts such as Office 365 and Exchange Online to access the Exchange on-Premises server via port 443 (SSL).

In reality, the Exchange on-Premises server is nor relay “exposed” to the external network and communicate directly with external hosts such as – Exchange Online.

The access to Exchange on-Premises server will be implemented via the mediation of Firewall or Proxy servers, which represent our internal hosts.

Any communication request from external hosts will reach the Firewall and will be “forwarded” to the “internal Exchange on-Premises server”

Bottom line – to be able to start the Office 365 cutover mail migration, Exchange Online will need to access Exchange on-Premises server using port 443.

Office 365 cutover migration - Exchange on-Premises -Pre requirements - incoming communication port -02

Exchange on-Premises server version

Q7: What is the Exchange on-Premises server version that supports Office 365 cutover mail migration?

A7: All of the existing Exchange on-Premises server versions starting with
Exchange on-Premises 2003.
Technically speaking, Exchange 2003 on-Premises is not supported anymore, but it doesn’t mean that you cannot try to use Office 365 cutover mail migration and most of the chance are that if the Exchange 2003 includes all the pre requirements, the Office 365 cutover mail migration will complete successfully.

Office 365 cutover migration - Exchange on-Premises server Pre requirements - Exchange server version -03

Q8: Does the Exchange on-Premises server need to include a specific service pack, a specific Rollup or a specific cumulative update?

A8: The interesting thing regarding the subject of Exchange on-Premises server required or minimum System Requirements for implementing Office 365 cutover mail migration is that, as far as I know, there is no formal article that defines this Exchange on-Premises software requirement.

My answer to this question is – to use the general rule that says – the more updated version is better.

For example, in case that your Exchange on-Premises server is an Exchange 2010 server, the recommended software version is Exchange service pack 3 + Exchange 2010 Rollup 12.

It doesn’t mean that a lower Rollup will not work, but in case that we want to maximize our chances for implementing a successful Office 365 cutover mail migration process, the more advanced Exchange 2010 Rollup Increases the likelihood for a successful mail migration process.

In the following table, you can find links to the Exchange on-Premises most updated service pack, Rollup and Cumulative Updates based on the specific Exchange on-Premises version.

Exchange service pack and software updates
Exchange 2003
Exchange 2003 service pack

Exchange Server 2003 Service Pack 2

Exchange 2007
Exchange service pack

Exchange Server 2007 Service Pack 3

Exchange 2007 Rollup 18

Update Rollup 18 for Exchange Server 2007 Service Pack 3 (KB3078672)

Exchange 2010
Exchange service pack

Microsoft Exchange Server 2010 Service Pack 3 (SP3)

Exchange 2010 Rollup 12

Update Rollup 12 For Exchange 2010 SP3 (KB3096066)

Exchange 2013
Exchange 2013 service pack

Microsoft Exchange Server 2013 Service Pack 1 (SP1)

Exchange Cumulative Update 12

Cumulative Update 12 for Exchange Server 2013

Exchange 2016
Exchange 2016 Cumulative Update 1

Cumulative Update 1 for Exchange Server 2016

If you need additional information about the Exchange server version, you can use the following links

Exchange on-Premises server and the Outlook Anywhere protocol

As mentioned, the mandatory requirement for implementing the Office 365 cutover mail migration is that the Exchange on-Premises will support the Outlook Anywhere feature.

In case that your Exchange on-Premises don’t support the Outlook Anywhere option or in case that you are not familiar with the Outlook Anywhere option, here is a very brief review of the Outlook Anywhere configurations setting as they appear in Exchange 2010 and Exchange 2013.

Exchange 2010

In Exchange 2010, we activate the Outlook Anywhere feature by using the following path:

Server Configuration => Client access => Enable Outlook Anywhere

In the following screenshot, we can see that the Outlook Anywhere was already enabled.

Verifying Outlook anywhere on Exchange 2010 server -01

If we want to view the Outlook Anywhere setting, we can select the properties menu.

In the following screenshot, we can see an example of the Outlook Anywhere settings.

The hostname who appears in the “External host name” section, is the host name the Outlook will address.

Verifying Outlook anywhere on Exchange 2010 server -02

Exchange 2013

In Exchange 2013, we activate the Outlook Anywhere feature by using the following path:

servers => servers => <Server name>

In the following screenshot, we can see that the Outlook Anywhere was already enabled.

Verifying Outlook anywhere on Exchange 2013

In the following table, you can find links to articles that include guideline regarding the steps that need to be implemented for “activating” the Outlook Anywhere feature in different Exchange server versions:

Exchange server Outlook Anywhere 
Exchange 2003
How to Configure Outlook Anywhere with Exchange 2003
Exchange 2007
How to Enable Outlook Anywhere Exchange 2007
Exchange 2010
Enable Outlook Anywhere Exchange Server 2010
Exchange 2013
Outlook Anywhere
Exchange 2016
Configure Outlook Anywhere

Verifying the Outlook Anywhere service by using Remote Connectivity Analyzer.

Before we start the Office 365 cutover mail migration process, the best practice is to test and verify that our Exchange on-Premises support Outlook Anywhere option and that we can successfully implement a successful Outlook Anywhere session with our Exchange on-Premises.

The good news is that we have a very handy web-based tools for this purpose
named – Remote Connectivity Analyzer.

The Remote Connectivity Analyzer is a Microsoft web-based tool useful and powerful tool that is used for testing many different Exchange on-Premises and Exchange Online services.

The most powerful feature of the – Remote Connectivity Analyzer tool is the ability to provide a detailed report about “what happens behind the scenes” of a specific communications protocols.

In case that the communication process fails, we can use the report information for finding the possible cause for the communication failure

In our specific scenario, before we start the Office 365 cutover mail migration, we want to verify that:

  1. The outlook Anywhere feature is enabled on our Exchange on-Premises server.
  2. That external client can connect Exchange on-Premises using the Outlook Anywhere (RPC \ HTTPS) protocol.

In the following section, we demonstrate the steps that need to be implemented for using the Remote Connectivity Analyzer tool for verifying Outlook Anywhere connectivity.

To access the Remote Connectivity Analyzer tool, we will use the following URL address: https://testconnectivity.microsoft.com

  • We will select the Exchange tab
  • Under the section named- Microsoft Office Outlook Connectivity Tests, we will select the option – Outlook connectivity.

Using Exchange remote connectivity analyzer to verify Outlook AnyWhere connectivity -01

In the next screen, we will need to provide the user credentials that represent the Exchange on-Premises recipient who needs to access his mailbox.

  • In the E-mail address section, we will provide the E-mail address of the recipient – david@o365info.com (number 1).
  • In the domain\user name (or UPN) section, we will type the user credentials in a UNC-based format –o365info\david (number 2).
  • We will provide the user password (number 3).

By default, the Outlook connectivity test will try to use the option of Autodiscover (use Autodiscover to detect server settings).

Using Exchange remote connectivity analyzer to verify Outlook AnyWhere connectivity -02

  • We will need to check the box in which we approve that the Remote Connectivity Analyzer tool is authorized to use our credentials (number 1).
  • We will need to write down the captcha sequins and select Verify

Using Exchange remote connectivity analyzer to verify Outlook AnyWhere connectivity -03

To initialize the Microsoft Office Outlook Connectivity Tests, we will select Perform Test

Using Exchange remote connectivity analyzer to verify Outlook AnyWhere connectivity -04

In the following screenshot, we can see that the Microsoft Office Outlook Connectivity Tests is running (the Remote Connectivity Analyzer tool is trying to access our Exchange on-Premises server and connect to David’s mailbox using Outlook Anywhere protocol).

Using Exchange remote connectivity analyzer to verify Outlook AnyWhere connectivity -05

In the following screenshot, we can see that the Microsoft Office Outlook Connectivity Tests successfully complete.
The meaning is that the Exchange on-Premises that we test support the Outlook Anywhere services, and that we were able to access the recipient mailbox.

Notice the small white arrow that appears on the left of the result.
The information that appears by default is just the summary of the test result. In case that we want to get a details information about each of the steps that were included in the simulation, we can click on the small white arrow and the information will expand.

Using Exchange remote connectivity analyzer to verify Outlook AnyWhere connectivity -06

In the following screenshot, we can see we have clicked on the small arrow.

The test result was expanded, and now we can see that the Microsoft Office Outlook Connectivity Tests consist of two different parts:

The Autodiscover test which was used for locating and connecting the Exchange on-Premises server and the second part which is the Outlook Anywhere communication channel.

Using Exchange remote connectivity analyzer to verify Outlook AnyWhere connectivity -07

Now it’s Your Turn!
We really want to know what you think about the article


The post Office 365 Cutover mail migration – Exchange on-Premises pre requirements appeared first on o365info.com.

Manage Send As Permissions using PowerShell – Office 365

$
0
0

The Send As permission enables recipient X to send an E-mail message using the identity of a recipient Y.
Technically speaking, this method can be described as “impersonation.”

In Office 365 based environment, we can perform administrative tasks that relate to assigning or removing the Send As permission, via Exchange Online graphical admin portal or, by using PowerShell command.

The current article is dedicated to the subject of performing a management task that relates to the Send As permission using PowerShell.

Why do our users need to have Send As permission to another user?

In Exchange based environment, there are many possible scenarios, in which our users need to “hide” their identity and present themselves using the identity of another recipient.

A classic scenario could be – the personal assistant and the manager. A scenario in which the personal assistant sends E-mail to another recipient, using the identity of his manager.

Another scenario could be a scenario in which help desk employees, send response E-mail to a support ticket using the identity of the “Help Desk” E-mail address instead of his “real identity.”

A couple of details worth mentioning About Send As permissions

  1. A recipient X cannot “give” by himself; the Send As permission to another recipient. The “authority” that can assign the Send As permission is, the Exchange administrator.
  2. A recipient who has an Alias in addition to his primary E-mail address, cannot send E-mail using his Alias (Send As) because, how funny it sounds; we cannot assign the Send As permission to the recipient Alias. In this case, the only solution will create a distribution group that uses the E-mail address of the “Alias” and assigns the recipient Send As permission on the distribution group.
  3. We can use the Exchange Online graphical admin portal to assign Send As permission on almost all the recipient types, except a contact recipient.
  4. At the current time, we cannot use the Exchange Online graphical admin portal for display and export information about an existing Send As permission.

Send As permission and the “trustee” concept

The “Send As permission”, based upon a concept on which recipient X “agree” to enable recipient Y, to send E-mail using his identity (his E-mail address).

User “Y” which gets the Send As permission defines as a “trustee.”

For example-

  • Suzan is John’s personal assistant.
  • We want to enable Suzan to send E-mail using the John E-mail address.
  • To accomplish this requirement, we will grant Suzan the Send As permission on John’s
  • Suzan will be described as the “trustee” of John.

Send As permissions logic -The Trustee concept

Manage Send As permissions using PowerShell in Office 365 based environment

In the next section, we will review a variety of scenarios that relates to the task of managing Send As permissions using PowerShell in Office 365 based environment.

I have grouped the different Send As permissions scenarios using the following classification:

  1. Management tasks that relate to – Assign \Grant Send As Permissions .
  2. Management tasks that relate to – Display \View information about Send As permissions .
  3. Management tasks that relate to – Remove \Revoke existing Send As Permissions.
In case that you are a newbie in the PowerShell world, in the bottom of the article, I add some links to PowerShell introduction’s articles.
Expand and collapse Section 1#3 | Assign Send As Permissions

Section 1#3 | Assign Send As Permissions

Assigning or granting the Send As Permissions, is implemented by using the PowerShell cmdlets – Add-RecipientPermission

Scenario 1.1 – Assign Send As Permissions to user X on user Y Mailbox.

Scenario description

  • Suzan is John’s personal assistant.
  • We would like to assign Send As permissions to Suzan (the Trustee) on John’s mailbox so, she will be able to send an E-mail message using the John E-mail address.

Implementation

We will use the PowerShell command “Add-RecipientPermission

PowerShell command Syntax

Add-RecipientPermission <Identity> -AccessRights SendAs -Trustee <Identity>

PowerShell command Example

Add-RecipientPermission John -AccessRights SendAs -Trustee Suzan

Scenario 1.2 – Assign Send As Permissions to user X on all users Mailbox’s (Bulk Mode)

Scenario description

  • We would like to grant the Send As Permissions to a user named John.
  • The Send As permission will be assigned to a list of recipients.
  • The Send As permission will be assigned separately, for each recipient on the list.
  • The “recipient list”, will be defined as – all the existing Exchange Online recipients who classified as – users with a mailbox.

Implementation

Step 1: we will define a filter that will scan all the existing Exchange Online recipients and “pull out” only the Exchange recipient who defined as users with mailboxes.

The filter syntax that we use is-

Where {$_.RecipientTypeDetails -eq “UserMailbox”}

Step 2: we will define a variable named $UserMailboxes, that will serve as a “container” for the output from a PowerShell filter that will fetch the required recipient list.

Step 3: we will pipe the information stored in the $UserMailboxes variable, to a second PowerShell command, which will assign the required Send As permissions to John (the Trustee) for each of the recipients the appears in the filtered list.

Using the confirm parameter

When we assign or remove Send As Permissions, the PowerShell is configured by default to ask for approval, for any assignment or removal of Send As Permissions. In case that we want to avoid the need to approve the operation and let the command run freely without the need for approval, we can add the parameter -Confirm:$False

PowerShell command Syntax

$UserMailboxes = Get-Mailbox | Where {$_.RecipientTypeDetails -eq “<Type of mailbox>”}

$UserMailboxes | Add-RecipientPermission -AccessRights SendAs –Trustee <identity>

PowerShell command Example

$UserMailboxes = Get-Mailbox | Where {$_.RecipientTypeDetails -eq “UserMailbox”}

$UserMailboxes | Add-RecipientPermission -AccessRights SendAs –Trustee John 
-Confirm:$False

Scenario 1.3 – Assign Send As Permissions to user X on all the Exchange Online recipient type (Bulk Mode)

Scenario description

  • We would like to grant the Send As Permissions to a user named John.
  • The Send As permission will be assigned to a list of recipients.
  • The Send As permission will be assigned separately, for each recipient on the list.
  • Versus the former example, this time, we would like to grant John the Send As Permissions, on all the existing Exchange Online recipients, type such as – mailboxes, room mailbox, public folders and so on.
General information – the term “recipient,” relates to any mail-enabled entity. The most common example for a recipient is a user with a mailbox but, there are many other types of Exchange recipient, such as – room mailbox, shared mailbox, mail contact, Public Folder and so on.

Implementation

Step 1- we will use the PowerShell command Get-Recipient , for “storing information” about all the Exchange Online recipients.

Step 2- we will pipe the information to the second PowerShell command.
The second PowerShell command will use the recipient list, and grant the Send As permissions to John for each of the recipients in the list (the recipients list from the former PowerShell command).

PowerShell command Syntax

Get-Recipient | Add-RecipientPermission -AccessRights SendAs –Trustee <identity>

PowerShell command Example

Get-Recipient | Add-RecipientPermission -AccessRights SendAs –Trustee John

Scenario 1.4 – Assign Send As Permissions to user X on multiple users by using a user list saved to a CSV file.

Scenario description

  • We would like to grant the Send As Permissions to a user named John.
  • The Send As permission will be assigned to a list of recipients.
  • The Send As permission will be assigned separately, for each recipient on the list.
  • The “recipient list”, will be defined as a – recipient list that is stored in a CSV (comma separated value) file.

Implementation

To be able to work with the information that is stored as a CSV file, we will use the following procedure:

Step 1 – working with a CSV file

  • We will prepare in advanced, a CSV file that will contain our recipient list. (You can download a sample of the CSV file).
  • CSV file name – in our scenario, we will name the CSV file – csv.
    CSV file location – the CSV file, will be saved to a folder named Temp in C: drive.
  • The information about the recipient list will be created “under” a column header
    named – alias

Technically speaking, a CSV file can contain multiple columns.

In the following screenshot, we can see an example of the CSV file content.

Import information from a CSV file using PowerShell

When using the option of CSV file, we will need to define a header name, for each of the existing columns.
Notice that although our CSV file contains multiple columns, we need to address only a specific column that stores our recipient list. The column header name of our specific column is – alias.

Regarding the column header name, technically we can choose any name whom we want.
The best practice is to define a simple column header name, using a single word, no spaces, etc.

Step 2 – we will use the PowerShell command that will import the information from the CSV file, into a temporary store in the RAM.

Step 3 – we will define a variable named $UserList, that will contain the output from a PowerShell command that imports the information from the CSV file.

Step 4 – using the PowerShell Foreach Loop operator

We will use the PowerShell Foreach Loop operator, for scanning (looping through) the information that was fetched from the CSV file (the information that is stored in the $UserList variable).

We will instruct the PowerShell Add-RecipientPermission command, to grant John; the send As permission separately, for each recipient’s name who appears “under” the alias column header.

When using the Foreach Loop operator, we need to define a variable that will serve as a “container”, for each recipient who appears on the list.

This variable will store the “first name” in the list, and after we finish the task of assigning John the required Send as permission, the recipient name will be “deleted” from the “variable store”, and the “next name” in the recipient list will be populated in the “variable storage”.

In our specific scenario, the variable that we use for referencing a “single recipient” from the recipient list is – $user

We will “attach” to the $user variable the “alias” property from the CSV file.
For example – $user.alias

In this way, the $user variable will contain in the “first time”, the first recipient name who appears “under” the alias column header.
The next time, the $user variable, will contain the second recipient name who appears “under” the alias column header and so on, until the end of the recipient list.

PowerShell command Syntax

$UserList = import-CSV <Path>

ForEach ($User in $UserList)
{
Add-RecipientPermission $user.alias -AccessRights SendAs –Trustee <identity> 
}

PowerShell command Example

$UserList = import-CSV C:\temp\users.csv 

ForEach ($User in $UserList)
{
Add-RecipientPermission $user.alias -AccessRights SendAs –Trustee John 
}

Scenario 1.5 – Assign Send As Permissions to user X on multiple users by using Filter parameter | Filter by users the belong to a specific department.

Scenario description

  • We would like to grant the Send As Permissions to a user named John.
  • The Send As permission will be assigned to a list of recipients.
  • The Send As permission will be assigned separately, for each recipient on the list.
  • The “recipient list”, will be defined as – all the Exchange Online users who work in the marketing

Implementation

To be able to implement this requirement, we use a PowerShell command that consists of two parts:

Step 1 – filter a list of recipients

We will use the PowerShell cmdlets – Get-Recipient, for getting a list of all the existing Exchange Online recipients.

We will use the –Filter parameter to filter from the list only a specific recipient whom their department is marketing (we will use a PowerShell command that will “filter out” only Exchange Online recipient whom their department is equal to marketing).

An example of the filter syntax in our scenario is-

Get-Recipient -Filter {(Department -eq “department”)}

Step 2 – we will pipe the output from the first command to an additional PowerShell command, that will grant the Send As permission to John, for each of the recipients named who appears on the list.

PowerShell command Syntax

Get-Recipient -Filter {(Department -eq "department")} | Add-RecipientPermission -AccessRights SendAs –Trustee <identity>

PowerShell command Example

Get-Recipient -Filter {(Department -eq "marketing")} | Add-RecipientPermission -AccessRights SendAs –Trustee John

Assign Send As Permissions | Working with Groups

The subject of assigning permission while working with an “Exchange mail group” is a little tricky.

Scenario 1 – is a scenario, in which we want to grant to Send As permission to a specific mail group on a specific recipient.

Scenario 2 – is a scenario, in which we want to grant to Send As permission to a specific recipient for each of the members who “belong” to a specific mail-enabled group.

Let’s start with the fact, that there are two major types of mail groups:

  1. Security group
  2. Destitution group

The common denominator is, that both of these mail groups, serve for the purpose of ‘grouping” mail recipients.

The difference between the two groups above is:

  • A security group, as the name implies, consider as a “security object.”
    The meaning is that we can grant a security group permission on “other objects.”
  • A distribution group doesn’t consider as a “security object.”
    The meaning is that we cannot grant distribution group permission on “other objects.”

Scenario 1.6 – Assign Send As Permissions to each member of a distribution group to a specific user

Scenario description

  • We would like to grant the Send As permissions, to each of the recipients who belongs to a distribution group named – marketing.
  • We want to assign the Send As permissions on a recipient’s mailbox named – John

Implementation

As mentioned, we cannot directly grant Send As permissions to a distribution group on “other objects.”

The good news is that we can bypass the obstacle by use a little trick.

The trick that we use, will “extract” each of the members of a specific distribution group, and will assign the Send As permission for each of the members separately.

Note – notice that this “trick” will not be applied to a new member in the marketing distribution group, that will be added to the group after we execute the PowerShell command.

Step 1 – we will use the PowerShell command Get-DistributionGroupMember, that will get the list of members in a specific distribution group (the marketing distribution group in our scenario).

Step 2 – we will use a variable named $Members who will “contain” the output, from a PowerShell command, that will “fetch” all the members in the marketing distribution group.

Step 3 – using the PowerShell Foreach Loop operator

We will use the PowerShell Foreach Loop operator, for scanning (looping through) the list of the distribution group members.

In our scenario, the Trustee identity will be replaced a couple of times for each of the members in the marketing distribution group.

A single member in the marketing distribution group (the Trustee) will be defined by the following combination of variable + property.

In our example, the variable is $Member and the property is – name.

The combination will look like – $Member.name

The PowerShell – Add-RecipientPermission , will “loop” through the member list and will assign each of the members the Send As permission on John’s mailbox.

PowerShell command Syntax

$Members = Get-DistributionGroupMember -id >Group name>
ForEach ($Member in $Members)
{
Add-RecipientPermission <identity> -AccessRights SendAs –Trustee $Member.name
}

PowerShell command Example

$Members = Get-DistributionGroupMember -id marketing
ForEach ($Member in $Members)
{
Add-RecipientPermission John -AccessRights SendAs –Trustee $Member.name
}

Scenario description

  • We would like to grant the Send As Permissions to a user named John.
  • The Send As permission will be assigned to a list of recipients.
  • The Send As permission will be assigned separately, for each recipient on the list.
  • The “recipient list”, will be defined as – all the members of a distribution group named – marketing.

Implementation

Note – notice we will need to use the same “extract trick” because, we don’t want to grant John permission to the distribution group, but instead, grant the Send As permission for each of the group members separately.

Step 1 – we will use the PowerShell command Get-DistributionGroupMember, that will get the list of members in a specific distribution group (the marketing distribution group in our scenario).

Step 2 – we will use a variable named $Members who will “contain” the output, from a PowerShell command, that will “fetch” all the members in the marketing distribution group.

Step 3 – using the PowerShell Foreach Loop operator

We will use the PowerShell Foreach Loop operator, for scanning (looping through) the list of the distribution group members.

In this case, the Trustee is John.
We want to assign John; the Send as permission for each of the distribution group members.

The way that we relate to each element of the array (each of the group members) is, by using the variable with a combination of the property – name in the following way – $Member.name

PowerShell command Syntax

$Members = Get-DistributionGroupMember -id marketing
ForEach ($Member in $Members)
{
Add-RecipientPermission $Member.<property> -AccessRights SendAs –Trustee <identity> 
}

PowerShell command Example

$Members = Get-DistributionGroupMember -id marketing
ForEach ($Member in $Members)
{
Add-RecipientPermission $Member.name -AccessRights SendAs –Trustee John
}

Expand and collapse Section 2#3 | Display information about Send As permissions

Section 2#3 | Display information about Send As permissions

Assigning or granting the Send As Permissions, is implemented by using the PowerShell cmdlets Get-RecipientPermission

By default, the information from the Get-RecipientPermission command will be displayed on the PowerShell console window.

In some scenarios, we need to save this information to a file. Later on, we will review how to export the information from the PowerShell command – Get-RecipientPermission to a file.

Scenario 2.1 – Display information about recipients who have “Send As” permission on a specific user Mailbox.

Scenario description
In the following scenario, our goal is,

  • Display information about the recipient who has the Send As permission on John’s mailbox.

Implementation

We will demonstrate how to use the “simple version” of the PowerShell command, and in addition; we will provide a more “sophisticated PowerShell command” that will help us to remove an unnecessary information from the PowerShell command output.

PowerShell command Syntax

Get-RecipientPermission <Identity>

PowerShell command Example

Get-RecipientPermission John

In the following screenshot, we can see that we can see a list of recipients that have Send as permission to John’s mailbox, in addition, we can see
a “strange recipient” named – nt authority\self

The is the permission that John has for the purpose of sending email using his Email Adress (yes, I know it sounds strange).

Get-RecipientPermission and - nt authority self

If we want to display more “clean” output without the information about the permission that the user has to his own mailbox, we can use a PowerShell syntax that will remove this no useful information.

PowerShell command Example

Get-RecipientPermission  John | Where { -not ($_.Trustee -like “nt authority\self”) } | select Identity, Trustee, AccessRights

Scenario 2.2 – Display information about All the recipients who have “Send As” permission on any user Mailbox.

Scenario description

In the following scenario, our goal is,

  • Display information about all if our organization recipients, who have the Send As permission on other recipient mailboxes.

Implementation

Step 1- we will use the PowerShell command Get-Recipient, for “storing information” about all the Exchange Online recipients.

Step 2- we will pipe the information to the second PowerShell command, which will display on the screen, the Send As permissions that each recipient has on other recipients’ mailboxes.

PowerShell command Example

Get-RecipientPermission | Where {($_.Trustee -ne 'nt authority\self') } | select Identity, Trustee, AccessRights

Scenario 2.3 – Display information on the Send As permission that a specific recipient has on “other recipient”.

Scenario description

  • John has Send As permission on many organization recipients. We need to get a clear information about who are these recipients.

Implementation

Step 1- we will use the PowerShell command Get-Recipient, for “storing information” about all the Exchange Online recipients.

Step 2- we will pipe the information to the second PowerShell command, which will display on the screen, the recipient that John has Send As permissions on their mailboxes.

PowerShell command Syntax

Get-Recipient | Get-RecipientPermission -Trustee <Identity> | Select Identity, Trustee, AccessRights

PowerShell command Example

Get-Recipient | Get-RecipientPermission -Trustee John | Select Identity, Trustee, AccessRights

Export information to file using PowerShell export commands

Export information to file

In some scenario, we need to save output that we get from a specific PowerShell in a file for later use such as a report or even as a “source” for other \ additional PowerShell command.

Technically speaking, PowerShell enables us to export PowerShell command output using four different file formats:

  1. TXT
  2. CSV
  3. HTML
  4. XML

In the following section, I would like to demonstrate the way that we use for exporting infrastructure to TXT file + CSV file format.

Scenario 2.4 – Export information about Send As permission to TXT file.

Scenario description

  • John has Send As permission on many organization recipients. We need to export the information about John Send As permission to a TXT file.

Implementation

The PowerShell parameter that we use for exporting information to a text file is – Out-File

We will need to provide the required path in which the text file will be created.
In our specific scenario, we wish to create a text file that will be stored in C: drive in a folder named – Temp.

In case that your Office 365 tenet uses characters set that include additional characters to the standard English characters, is recommended to add an additional PowerShell format parameter named – “-Encoding UTF8”, which will enable to PowerShell to export non-English characters.

PowerShell command Example

Get-Recipient | Get-RecipientPermission -Trustee John | select Identity, Trustee, AccessRights | Out-File c:\temp\"John Send As perissions.txt" -Encoding UTF8

Scenario 2.5 – Export information about Send As permission to CSV file.

Scenario description

  • John has Send As permission on many organization recipients. We need to export the information about John Send As permission to a CSV file.

Implementation

The PowerShell parameter that we use for exporting information to a text file is Export-CSV

We will need to provide the required path in which the text file will be created.
In our specific scenario, we wish to create a text file that will be stored in C: drive in a folder named – Temp.

When exporting information to a CSV file, a parameter that is recommended to add is –

-NoTypeInformation

The purpose of this parameter is to omit the type information from the CSV file.
By default, the first line of the CSV file contains “#TYPE ” followed by the fully-qualified name of the type of the object.

PowerShell command Example

Get-Recipient | Get-RecipientPermission -Trustee John | select Identity, Trustee, AccessRights | Export-CSV c:\temp\"John Send As perissions.CSV" –NoTypeInformation 
-Encoding utf8

Expand and collapse Section 3#3 | Remove Send As Permissions

Section 3#3 | Remove Send As Permissions

Removing \revoking the Send As Permissions, is implemented by using the PowerShell cmdlets Remove-RecipientPermission

Scenario 3.1 – Remove Send As Permissions that user X has on user Y Mailbox.

Scenario description

  • Suzan has Send As permissions on John’s
  • We would like to remove Suzan Send As permissions from John

Implementation

We will use the Remove-RecipientPermission PowerShell command.

PowerShell command Syntax

Remove-RecipientPermission <Identity> -AccessRights SendAs -Trustee <Identity>

PowerShell command Example

Remove-RecipientPermission John -AccessRights SendAs -Trustee Suzan

Scenario 3.2 – Remove from all the recipients, the Send As Permissions that user X has.

Scenario description

  • John has Send As permissions on many Exchange Online recipients.
  • We would like to remove John Send As permissions from all the existing Exchange Online recipients.

Implementation

Step 1- we will use the PowerShell command Get-Recipient, for “storing information” about all the Exchange Online recipients.

Step 2- we will pipe the information to the second PowerShell command.
The second PowerShell command will check if John has Send As permission on a specific recipient, and if he has, the PowerShell command will remove these permissions.

PowerShell command Example

Get-Recipient | Remove-RecipientPermission -AccessRights SendAs –Trustee John

Scenario 3.3 – Remove from all of the recipients, the Send As Permissions that user X has, using a user list saved to a CSV file.

Scenario description

  • John has Send As permissions on many Exchange Online recipients.
  • We would like to remove John Send As permissions from all the existing Exchange Online recipients.
  • The “recipient list,” will be defined as – recipient list that is stored in a CSV file.

Implementation

Step 1 – working with a CSV file

  • We will prepare in advanced, a CSV file that will contain our recipient list. (You can download a sample of the CSV file).
  • CSV file name – in our scenario, we will name the CSV file – csv.
    CSV file location – the CSV file, will be saved to a folder named Temp in C: drive.
  • The information about the recipient list will be created “under” a column header
    named – alias

Import information from a CSV file using PowerShell

Step 2 – we will use the PowerShell command that will import the information from the CSV file, into a temporary store in the RAM.

Step 3 – we will define a variable named $UserList, that will contain the output from a PowerShell command that imports the information from the CSV file.

Step 4 – using the PowerShell Foreach Loop operator

PowerShell command Example

$UserList = import-CSV C:\temp\users.csv 

ForEach ($User in $UserList)
{
Remove-RecipientPermission $user.alias -AccessRights SendAs –Trustee John 
}

Scenario 3.4 – Remove from all the recipients, the Send As Permissions that user X has, using the Filter parameter | Filter by users the belong to a specific department.

Scenario description

  • John has Send As Permissions to all the recipients who work in the marketing
  • We would like to remove John Send As permissions from these recipients.

Implementation

To be able to implement this requirement, we use a PowerShell command that consists of two parts:

Step 1 – we will use a PowerShell command that will a filter out only Exchange Online recipient whom their department is equal to marketing.

Step 2 – we will pipe the output to an additional PowerShell command, that will remove the
Send As permission that John has for each of the recipients who appears on the list.

PowerShell command Example

Get-Recipient -Filter {(Department -eq "marketing")} | Add-RecipientPermission -AccessRights SendAs –Trustee John

Scenario 3.5 – Remove the Send As Permissions that user X has, from each member in a distribution group.

Scenario description

  • Each of the distribution group members named – marketing has Send As Permissions on John’s
  • We want to remove the Send As Permissions of each distribution group members from John’s

Implementation

PowerShell command Example

$Members = Get-DistributionGroupMember -id marketing
ForEach ($Member in $Members)
{
Remove-RecipientPermission John -AccessRights SendAs –Trustee $Member.name
}

Scenario 3.6 – Assign Send As permissions to user X, for each member of a Distribution group.

Scenario description

  • John has Send As Permissions for a recipient the “belong” to a distribution group named –
  • We want to Remove John Send As Permissions for each distribution group member of the marketing distribution group.

Implementation

PowerShell command Example

$Members = Get-DistributionGroupMember -id marketing
ForEach ($Member in $Members)
{
Remove-RecipientPermission $Member.name -AccessRights SendAs –Trustee John
}

PowerShell | Help & additional information

In case that you are a novice in the PowerShell environment, you can use the following links to get more information about the “first steps” such as: downloading the required PowerShell
software components, how to use the PowerShell console, running a PowerShell script, etc.

Read more
Link Table
PowerShell Naming Conventions & general information

If you want to get more information about the Naming Conventions that we use for this article and get some general tips about: how to work with the PowerShell, read the article: Help and additional information – o365info.com PowerShell articles

Create remote PowerShell session

Before we can use the required PowerShell commands, we need to download and install the Office 365 cmdlets + create remote PowerShell session to Office 365 or Exchange Online. If you need more information about how to create a remote PowerShell session read the following articles: Part 2: Connect to Office 365 by using Remote PowerShell and Part 3: Connect to Exchange Online by using Remote PowerShell

How to use a PowerShell script

Most of the PowerShell articles include a PowerShell script that simplifies the use of the PowerShell commands. If you want to get more information about: How to use a PowerShell script, read the article: Connect to Office 365 and Exchange Online using a script

PowerShell command and Script languish in more details

If you are new to the PowerShell world, you can read more information about PowerShell in Office 365 environment in the article: The Power of PowerShell

PowerShell command syntax – Office 365 | Article series index

Now it’s Your Turn!
We really want to know what you think about the article

The post Manage Send As Permissions using PowerShell – Office 365 appeared first on o365info.com.

Configure Outlook to access Office 365 mailbox using IMAP and SMTP

$
0
0
In the following article, we will review how to configure Outlook mail client to connect “Office 365 mailbox” that is hosted on the Exchange Online server by using the IMAP and the SMTP protocol.

Generally speaking, Exchange Online provides a variety of methods and protocol, which we can use for connecting to a specific mailbox. Regarding Outlook mail client, the preferred mail protocol is Outlook anywhere (RPC over HTTPS) with a combination of the Autodiscover service which enables Outlook to automatically locate the Exchange Online mail server and the required configuration settings.

In a scenario in which we prefer to connect our Outlook mail client using the “good old” internet mail protocol – IMAP for receiving incoming mail and SMTP for sending Outlook going mail, we will need to use the following configuration settings:

Connecting Outlook to Office 365 mailbox using IMAP and SMTP port number -01

The information about the required protocols and port number appears in Office 365 OWA mail client settings and in addition in the following article-

Outlook settings for POP and IMAP access for Office 365 for business or Microsoft Exchange accounts

Note – the article includes different configuration setting regarding the IMAP protocol, the settings that I manage to use are the setting that appears in the appear in Office 365 OWA mail client settings

To view the information about the IMAP and SMTP protocol, log into your OWA mail client.

  • Choose the settings icon
  • Select the options menu

Connecting Outlook to Office 365 mailbox using IMAP -01

  • On the left menu bar, select the menu – POP and IMAP

In the following screenshot, we can see the information about the configuration setting of the IMAP and the SMTP protocol.

Connecting Outlook to Office 365 mailbox using IMAP -02

Creating a new Outlook mail profile – Configure Outlook to access Office 365 mailbox using IMAP and SMTP

As mentioned, when we use the option of IMAP and SMTP protocol, we cannot Take advantage of the Outlook Autodiscover service which is used to configure for us the required configuration settings. Instead, we will need to configure Outlook mail client by using manual settings.

In the current article, we will demonstrate the required configuration setting for IMAP\SMTP protocol using an Outlook 2016 mail client, but the configuration settings are almost identical to former versions of Outlook mail client.

  • Go to the control panel
  • Choose the icon – Mail (Microsoft Outlook 2016) (32 bit)

Connecting Outlook to Office 365 mailbox using IMAP -02

  • Select the option – Show Profiles…

Connecting Outlook to Office 365 mailbox using IMAP -03

  • Select the option – Add…

Connecting Outlook to Office 365 mailbox using IMAP -04

  • In the profile name text box – write the name of the Outlook profile and click OK

Connecting Outlook to Office 365 mailbox using IMAP -05

  • Select the option – Manual setup or additional server types
  • Click the Next > button

Connecting Outlook to Office 365 mailbox using IMAP -06

  • Select the option – POP or IMAP

Connecting Outlook to Office 365 mailbox using IMAP -07

  • In the user information section, write your name and your E-mail address (number 1,2)
  • In the server information section, in the Account type, select IMAP (number 3)

Connecting Outlook to Office 365 mailbox using IMAP and SMTP -07

Now, we will need to provide the hostname (FQDN) of the Office 365 mail server that we need to connect.

  • In the section – Incoming mail server, add the server name – outlook.office365.com (number 4)
  • In the section – Outgoing mail server (SMTP), add the server name – smtp.office365.com (number 5)
  • In the section Logon information, write down your credentials – your Office 365 login name + password (number 6 + 7)

In Office 365 based environment the “login name” described as UPN (user principal name) and the login name is written as an E-mail address.

  • Click on the More Settings… option

onnecting Outlook to Office 365 mailbox using IMAP and SMTP -08

  • Choose the Outgoing Server TAB
  • Select the option – My outgoing server (SMTP) requires authentication
  • Leave the default settings – Use same settings as my incoming mail server

onnecting Outlook to Office 365 mailbox using IMAP and SMTP -09

  • Choose the Advanced TAB

In the following tab, we will need to configure the specific settings that are relevant to Office 365 based environment (Exchange Online).

Connecting Outlook to Office 365 mailbox using IMAP and SMTP -10

IMAP mail protocol settings

  • In the incoming server (IMAP) type the protocol number 993 (number 1)
  • In the section – use the following type of encrypted connection, select – SSL (number 2)

SMTP mail protocol settings

  • In the outgoing server (SMTP) type the protocol number 587 (number 3)
  • In the section – use the following type of encrypted connection, select – TLS (number 4)

Connecting Outlook to Office 365 mailbox using IMAP and SMTP -11

  • On the bottom of the window, click the Next> button

Connecting Outlook to Office 365 mailbox using IMAP and SMTP -12

Outlook client will start automatically a communication test to verify is he can access the mail server based upon the setting that we have provided.

In the following screenshot, we can see that the communication test completes successfully.

Connecting Outlook to Office 365 mailbox using IMAP and SMTP -13

  • On the bottom of the window, click on the Finish button

Connecting Outlook to Office 365 mailbox using IMAP and SMTP -14

In the following screenshot, we can see that the “test e-mail” that was sent by Outlook to the user mailbox.

Connecting Outlook to Office 365 mailbox using IMAP and SMTP -15

Now it’s Your Turn!
We really want to know what you think about the article

The post Configure Outlook to access Office 365 mailbox using IMAP and SMTP appeared first on o365info.com.

How to simulate spam mail?

$
0
0

Let’s start with the most obvious question – why should I try to simulate spam mail?
And the answer is – to test our existing mail security infrastructure.

In a modern mail environment, the need for implementing some kind of “security mechanism” which will protect our mail infrastructure from spam mail and other threats, consider as a mandatory need.

Given that we implement a mail security gateway; the big question could be – how do I know if our mail security gateway is functioning and how he “react” to the event of spam mail?

For example, a scenario in which we define a specific rule in which, when our mail security gateway recognizes spam mail, a notification will be sent to a designated recipient and so on.

The good news is that the option of creating an email message that will be identified as – “spam mail” is existing, and the implementation of simulating a scenario of “spam mail”, is quite simple.

All we need to do is to create an E-mail message that includes a predefined text string and sends this E-mail message to the destination recipient which is “protected” by our mail security gateway.

This nice trick is implemented via a special procedure that was defended by Apache SpamAssassin organization.

his is the GTUBE — the Generic Test for Unsolicited Bulk Email.

If your spam filter supports it, the GTUBE provides a test by which you can verify that the filter is installed correctly and is detecting incoming spam, in a similar fashion to the EICAR anti-virus test file.

Spam filter developers should add a rule, where possible, to recognize the following 68-byte string in the message body, and trigger on it:

XJS*C4JDBQADN1.NSBN3*2IDNEN*GTUBE-STANDARD-ANTI-UBE-TEST-EMAIL*C.34X

Note that this should be reproduced in one line, without whitespace or line breaks. A suitable mail message in RFC-822 format can be downloaded here.

This string and mail can be reproduced freely, without attribution; they are hereby placed in the public domain.

[Source of information – GTUBE]

Simulate spam mail

In the following section, we will simulate a scenario in which recipient A send spam E-mail message to recipient B

simulate spam mail | Scenario description

In our scenario, Justin will send “spam mail” (Justin@thankyouforsharing.org ) to a recipient in another organization named – Bob (bob@o365pilot.com).

Bob is a user whom his mailbox is hosted in Office 365 (Exchange Online server).

Note – to be able to simulate the scenario of spam mail, the “sender” and the “recipient” need to be recipients from different organizations. For example, we cannot test the option of spam mail in case that the sender and the destination recipient belong to the same Office 365 tenet because, in this case, the verification check is not implemented by the EOP server.

Sending the spam mail

In the mail body, we will add the following text string:

XJS*C4JDBQADN1.NSBN3*2IDNEN*GTUBE-STANDARD-ANTI-UBE-TEST-EMAIL*C.34X

And send the E-mail message.

How to simulate spam mail -01

Receiving the spam mail

In the following screenshot, we can see the E-mail message that was sent to Bob.

As we can see, the E-mail message was sent to the Junk mail folder.

The reason for that is because, in an Office 365 based environment, the component that serves as a mail security gateway is – the EOP (Exchange Online protection) server.

Each E-mail message that is sent to Office 365 recipient is examined and checked by the EOP server.

EOP recognizes the text string in the E-mail message, and classifies the E-mail message as “spam mail”, by setting the value of the SCL (spam confidence level) to “9”.
When the E-mail message reaches the recipient mailbox, because the high value of the SCL, the mail will be sent to the junk mail folder.

How to simulate spam mail -02

Viewing and analyzing the content of the E-mail message by using E-mail header

In this section, I would like to demonstrate the “behind the scenes” of the spam E-mail message, so we will be able to understand better that way that the Office 365 EOP server use for “stamping” specific E-mail message as “spam mail”.

In Exchange based environment, the method for classifying E-mail message as “spam mail” is, by define a specific value in the SCL parameter.
In our specific scenario, Exchange Online will set the SCL value to “9”.

Viewing the information of the mail header.

To be able to see the information that is included in the E-mail message, we will be using the OWA mail client. We will “fetch” the content of the mail header of the spam mail that was sent to Bob.

Open the specific E-mail message and select the small arrow that appears in the right part of the E-mail message (close the Reply all option).

How to simulate spam mail – view E-mail message header - 01

  • Select the menu – View message details.

How to simulate spam mail – view E-mail message header - 02

In the following screenshot, we can see the content if the specific E-mail mail header.

How to simulate spam mail – view E-mail message header - 03

  • Select the content of the mail header (CTRL + A)
  • Copy the content by using right mouse click and the menu – Copy (or CTRL + A)

How to simulate spam mail – view E-mail message header - 04

Using the Microsoft Remote Connectivity Analyzer | Message analyzer

In the following section, we will demonstrate how to use a very useful web-based tool named – Microsoft Remote Connectivity Analyzer for analyzing the mail header content.

Technically speaking, there are a couple of free web-based tool that we can use for the purpose of analyzing a mail header. The Microsoft Remote Connectivity Analyzer tool is just my personal preference.

Access the Microsoft Remote Connectivity Analyzer by using the following URL address: https://testconnectivity.microsoft.com/

  • Select the Message Analyzer tab
  • Right click on the “white space” and choose – Paste.

How to simulate spam mail – analyze E-mail header – using Microsoft Remote Connectivity Analyzer - 01

  • Select the button – Analyze headers

How to simulate spam mail – analyze E-mail header – using Microsoft Remote Connectivity Analyzer - 02

In the following screenshot, we can see the various mail fields that included in the mail header.

The specific mail field that we look for named- X-Forefront-Antispam-Report-Untrusted

In this field, we can see that the SCL value of the E-mail message is “9” meaning the E-mail message was steamed as spam mail by the EOP server.

How to simulate spam mail – analyze E-mail header – using Microsoft Remote Connectivity Analyzer - 03

Now it’s Your Turn!
We really want to know what you think about the article

The post How to simulate spam mail? appeared first on o365info.com.

Viewing all 373 articles
Browse latest View live