Quantcast
Channel: o365info
Viewing all 375 articles
Browse latest View live

Define what to do with a spoof E-mail using the Exchange online E-mail spoof rule |Part 3#4

$
0
0

The current article is the continuation of the former article in our “spoof E-mail in Office 365 environment”.

Just a quick reminder – in the first article, we have created an Exchange transport rule that will identify E-mail that has the potential to be considered as spoofed E-mail.

The important part is – “what to do with this E-mail?”

Dealing with spoof E-mail in Exchange Online | The article series

The article series include the following articles:

  1. How to prevent E-mail spoof attack in Office 365 using Exchange Online transport rule | Part 1#4
  2. Define what to do with a spoof E-mail using the Exchange online E-mail spoof rule |Part 2#4
  3. Define what to do with a spoof E-mail using the Exchange online E-mail spoof rule |Part 3#4
  4. Simulating E-mail spoof attack and checking the Exchange Online spoof transport rule |Part 4#4

The Exchange Online transport roles offer us a variety of “actions” that we can choose from regarding the question – what to do with E-mail that was identified as spoofed E-mail.

In the next section, we will continue optional “action” that we can configure for the Exchange Online spoof transport rule.

Scenario 4 – Create and incident report and sent it to the Exchange Online administrator + Delete the spoofed E-mail message

The option of “incident report” is a very interesting and useful Exchange feature that enables us to send a detailed report about specific E-mail message + the e-mail message itself.

When using the option of the incident report, we can enable a detected contact such as the Exchange Online administrator to be notified about specific events that were “captured” by Exchange Online transport rule.

We can use the option of an incident report as a “stand alone” option, meaning, instruct the Exchange transport rule Not to intervene and change the mail flow but instead only report about the specific event to the contact person.

The other option is to implement a specific action for the E-mail message that was “captured” by the Exchange Online transport rule + generate an incident report that will be sent to the contact person.

For example – blocked E-mail that was identified as spoofed E-mail + send the incident report.

In our specific scenario the business need:

  • We want to block and delete the E-mail message that considers as a spoof
    E-mail.
  • We want to create an incident report for each “event” in which the Exchange rule identifies a specific E-mail message as – “spoofed E-mail”.
  • The incident report will be sent to Exchange Online administrator + will include the original E-mail message.

We will need to define “two” separated actions that will help us to fulfill this requirement

  1. Define an “action”, that will generate an incident report + send the incident report to a specific contact person.
  2. Define an “action”, that will block + delete the E-mail message that was identified as spoofed E-mail.

To be able to implement this action, we need to implement the following steps:

  • Go the section named – *Do the following…
  • Select the option – Generate incident report and send it to…

Define the action that the Exchange E-mail spoof rule will perform -10

We will need to define two parameters

  • Send an incident report to: *Select one – this will be the E-mail address of the “contact person” to whom the Exchange will send the incident reports.

Define the action that the Exchange E-mail spoof rule will perform -11

In our specific scenario, we will choose the Exchange Online Administrator
E-mail address.

Define the action that the Exchange E-mail spoof rule will perform -12

The second parameter that will need to be configured is – include message properties.
We will need to decide which information fields will be added to the incident report + if to attach the original E-mail message to the incident report.

Define the action that the Exchange E-mail spoof rule will perform -13

In the following screenshot, we can see the options window. In our specific scenario, we have chosen to add all the available data fields + the original E-mail message.

Define the action that the Exchange E-mail spoof rule will perform -14

Now, we will need to define the second “action” that will be executed by the Exchange Online transport rule-

  • Click on the option – add action
  • Go the section named – *Do the following…
  • Select the option – block the message… and on the submenu options choose – delete the message without notify anyone

Define the action that the Exchange E-mail spoof rule will perform -15

In the following screenshot, we can see the final result.

The Exchange Online transport rule includes two different “actions”

Define the action that the Exchange E-mail spoof rule will perform -16

In the following screenshot, we can see an example of an incident report that was sent to the contact person.

We can see that the incident report includes many details about the E-mail message that was blocked + the original E-mail message (the E-mail message that was identified as spoofed E-mail).

Define the action that the Exchange E-mail spoof rule will perform -17

In the following screenshot, we can see the content of the E-mail message that was attached to the incident report.

Define the action that the Exchange E-mail spoof rule will perform -18

Scenario 5 – “Stamp” the spoofed E-mail message as spam

The main characters of this scenario are – we don’t wish to block and delete the E-mail message that considers as a spoofed E-mail.

Instead, we want to deliver the ” suspected E-mail” to the user mailbox and let him decide by himself, what to do with the mail that has a high chance of being spoofed E-mail.
Although we don’t want to intervene, we would like to notify our organization user that the E-mail message is probably a non-legitimate E-mail message and that he should be aware.

This scenario is similar to the scenario which we have reviewed in the section Scenario 3 – Prepend the subject of the message.

The main difference is that in the current scenario, we would like to classify the E-mail message as a spam mail.

The way that we use for indicating a specific E-mail message as a spam mail is by assigning a high value of SCL (spam confidence level).

The element that “stamp” the value of the SCL is the Exchange Online server. When the Exchange Online server sends the E-mail message to the destination recipient, the recipient mailbox is configured by default to send an E-mail message with a high SCL value to the junk mail folder.

The option in which we send an E-mail message to the junk mail folder enables us to “send a message” to the user and notify him that this is a “problematic E-mail message”. The user can decide if he wants to keep the mail item or delete \report the mail item.

The business need:

  • We don’t want to block E-mail message that considers as a spoof
    E-mail.
  • We want to update the SCL value and set it to “5”. The E-mail message will be sent to the destination recipient mailbox and by default, we are sent to the Junk mail folder.

To be able to implement this action, we need to implement the following steps:

  • Go the section named – *Do the following…
  • Select the option – Modify the message properties…
  • On the sub-menu options choose – Set the spam confidence level (SCL)

Define the action that the Exchange E-mail spoof rule will perform -19

Choose the required value that will be suitable for your needs

In our specific scenario, we will choose the SCL value of 5.

Define the action that the Exchange E-mail spoof rule will perform - 20

In the following screenshot, we can see an example to an E-mail message that was identified by the “spoof rule” that we have created.

The E-mail message SCL Value was updated to – 5.
When the E-mail message is accepted at the user mailbox, the E-mail message was automatically “relocated” to the junk mail folder.

Define the action that the Exchange E-mail spoof rule will perform -21

In case that we want to understand better this process and verify the SCL value of the E-mail message, we can look at the E-mail message header.

In the following section, we will demonstrate how to view email headers by using OWA mail client.

To be able to view the E-mail message header, open the E-mail message, click on the small arrow near the Replay all and choose the menu option – View message details

Define the action that the Exchange E-mail spoof rule will perform -22

In the following screenshot, we can see the content of the E-mail message header.

To be able to analyze the information.

Define the action that the Exchange E-mail spoof rule will perform -23

Technically, we can copy the message header to a simple text file. In our specific scenario, we will use a nice web-based tool named ExRCA (Exchange remote connectivity analyzer).

We will use the option to – Message analyzer tab and paste the information that we have a copy in the former step.

In the following screenshot, we can see the result. We can see that the SCL value is 5.

Define the action that the Exchange E-mail spoof rule will perform -24

Scenario 6 – Set the Exchange Online spoof rule to use “audit mode” (Test mode)

A very useful and powerful option of the Exchange Online transport rule is the ability to set the rule to test mode.

Additional popular terms are inspection mode, audit mode, and learning mode.

When we set an Exchange Online transport rule to use a test mode, the flow will be implemented as follows:

  1. Exchange accepts the E-mail message
  2. The Exchange server will check the pool of the existing transport rules
  3. In case, that Exchange finds a match to the Transport rule that was configured to use test mode, the information about the “match” will be registered in the Exchange log file but the transport rule will not be activated. In other words, no action will be implemented.

The option of configuring the Exchange transport rule in a test mode can also describe as – audit mode or learning mode because this option enables us to understand and learn about the E-mail message that will be affected by the transport rule that we have created.

Regarding our scenario, we want to create an Exchange Online transport rule that will block spoofed E-mail but, we don’t wish to “activate” this rule Immediately to avoid a scenario in which legitimate and business mail will be identified by mistake as a spoofed E-mail.

On the other hand, we would like to have some tool that would help is to use “what if scenario” meaning, what would have happened if the Exchange Online.

Exchange Online transport rule -test mode

In the following section, we will “re-edit” the Exchange Online transport spoof rule that was created in the former article.

All we need to do is just double-click on the transport rule, scroll down and find the section name: Choose a mode for this rule.

Instead of using the default option of – enforce, we will choose the option – Test without policy tips

Exchange Online transport rule - Test without Policy Tips -01

Viewing the result by using Exchange Online message trace

In the following section, we will demonstrate

In our specific scenario, we have sent again a spoof E-mail message to Bobm@o365pilot.com

The main difference from the former scenario, in which the Exchange Online transport spoof rule was configured to “Enforce” the action, such as blocking the spoof E-mail message is that now, after we have configured to Exchange Online transport rule to “test without policy tips”, a spoof mail will not be blocked but instead, we reach the destination recipient!

It’s important that we will understand the logic of the “test mode”:

  • The spoofed E-mail message was accepted by Exchange Online.
  • Exchange Online checks his list of “transport rules” looking for a “match”.
    Exchange Online manages to find a “match” meaning, the Exchange Online transport rule that relates to the scenario of spoof mail.
  • Because the Exchange Online transport spoof rule was configured to use “test mode”, the information was registered in the Exchange Online Logfiles, but Exchange Online didn’t take any action and simply deliver the E-mail message to her destination.

In the following screenshot, we can see that the E-mail message STATUS is – Delivered

Exchange Online transport rule - Test without Policy Tips -02

We will double-click on the log row, and a detailed description appears.

In the following screenshot, we can see the exact mail flow.

  1. The E-mail message was accepted by Exchange Online.
  2. Exchange Online checks his transport rules.
  3. The specific spoof transport rule that we have configured in the former article “captured” the E-mail message.
  4. The spoof transport rule includes an “action” for deleting or blocking the E-mail message, but… Because we have configured to transport rule to use a “test mode”, the rule didn’t “executed” a specific action and for this reason, the STATUS is Delivered

Exchange Online transport rule - Test without Policy Tips -03

Scenario 7 – View Office 365 rules report

In the following section, I would like to review a very interesting Office 365 feature – the reports.

Office 365 includes the option to display many different types of reports that relate to the different Office 365 infrastructures.

In our specific scenario, I would like to relate to the Exchange Online reports and to a very specific type of report named – Rule match for all mail

The Rule match for all mail enables us to display a report about the mail filter that’s related to an existing Exchange Online transport rule.

In other words – the ability to count and display the number of mail items that “match” to all of existing Exchange transport rule or to a very specific transport rule.

In our scenario, we would like to get a report about the number of the E-mail messages that was “affected” by the Exchange Online transport rule that we have created.

Pay attention that the term “affected” is quite flexible because technically we can set the Exchange Online transport rule to use only “test mode”.

In that situation, the report will reflect the number of mail items that were supposed to be affected by the Exchange Online transport rule (the spoof rule in our scenario) but in reality, no “action” was implemented so the information is quite theoretical.

To be able to view the report that display information about “match” to existing Exchange Online transport rules, use the following steps:

View Office 365 – Exchange Online rules report -01

In the window that appears, we can choose from a couple of options.
For example-

  • Choose the view information about a specific transport rule (number 1 in the in the screenshot).
  • Choose to display a table with additional information (number 2 in the in the screenshot).
  • Choose to display a specific date range (number 3 in the in the screenshot).

View Office 365 – Exchange Online rules report -02

In our specific scenario, we will choose the display information about the Exchange Online spoof rule that we have created in former steps and, in addition, choose the table view.

View Office 365 – Exchange Online rules report -03

In the following screenshot, we can see that in a specific date, there were 21 “matches” to our specific rule.

View Office 365 – Exchange Online rules report -04

An addition an interesting feature of the Office 365 reports is – the ability to use the option of scheduled reports.

View Office 365 – Exchange Online rules report -05

In the following screenshot, we can see the different options that are available for us such as ask for a “filtered report”, set the schedule and so on.
In the next article, we will learn how to simulate a spoof attack and how to check the mail flow that is related to the specific Exchange transport rule by using the Exchange message trace.

View Office 365 – Exchange Online rules report -06

Dealing with spoof E-mail – Office 365 | Article series index

Now it’s Your Turn!
We really want to know what you think about the article

The post Define what to do with a spoof E-mail using the Exchange online E-mail spoof rule |Part 3#4 appeared first on o365info.com.


Define what to do with a spoof E-mail using the Exchange online E-mail spoof rule |Part 2#4

$
0
0

The current article is a continuation of the former article in which we learn how to create an Exchange Online transport rule that will “identify” spoof E-mail attack.

The second part of the spoof rule configuration is the part in which we need to decide about – what to do with an E-mail message that is “captured” by the Exchange Online spoof rule that we have created.

Dealing with spoof E-mail in Exchange Online | The article series

The article series include the following articles:

  1. How to prevent E-mail spoof attack in Office 365 using Exchange Online transport rule | Part 1#4
  2. Define what to do with a spoof E-mail using the Exchange online E-mail spoof rule |Part 2#4
  3. Define what to do with a spoof E-mail using the Exchange online E-mail spoof rule |Part 3#4
  4. Simulating E-mail spoof attack and checking the Exchange Online spoof transport rule |Part 4#4

The answer for “what to do with a mail that was captured” seems to be simple and obvious such as – delete the spoofed E-mail message!

However, before we rush to “destroy” these E-mail items it’s important that we will consider few factors that are not so clear in the first look.

For example

  • What about a scenario in which the Exchange spoof rule capture a legitimate E-mail and classify these E-mails as a spoofed E-mail?
  • What about a scenario, in which we use complicated Exchange Online infrastructure and the spoof rule that we have created include some logical failure, which leads to a scenario in which a legitimate E-mail is identified as a spoofed E-mail?

Lets assume that the Exchange spoof rule manages to capture a spoof E-mail, and the E-mail is indeed spoofed E-mail, what do we want to do with these E-mail items?

  1. Do we want to automatically “destroyed” (delete) this spoofed E-mail items?
  2. Do we want to automatically “destroyed” (delete) this spoofed E-mail items and information our Exchange Online administrator?
  3. Do we deliver the E-mail message that was identified as a spoofed to the recipient with a warning?
  4. Do we deliver the E-mail message that was identified as a spoofed to the recipient and send the E-mail message to the junk folder?
  5. Maybe we would like just to “test” the Exchange spoof transport rule with Outlook performing any action?

My main purpose is not to confuse you or to start a philosophical debate about what to do with an E-mail message that is “suspected” as spoof E-mail but instead review the advanced capabilities of the Exchange Online transport rule, that can provide an answer for any of the scenarios mentions above and for many other desired scenarios.

In other words, how to use Exchange Online transport rule for implement the required The decision that will best fit the specific scenario.

The need to decide what to do with the captured spoof E-mail message

Quick reminder regarding the logic of Exchange transport rule

In the current article and the next article, we will “dive inside” the Exchange Online transport rule that is responsible for implementing or executing the rule.

Before we start we that “step by step” instructions just a quick reminder for the logic of a standard Exchange transport rule.

Each transport rule is comprised of two parts:

  • The “upper part” (A in the screenshot) is that part which define a specific condensation that needs to be meet.
  • The “bottom part” (B in the screenshot) is that part which define the “action” that will be enforced or executed by the transport rule.

How to prevent spoof attack in Office 365 using Exchange Online transport rule -10

The flow of Exchange transport rule is implemented as follows –

When an E-mail message is accepted by Exchange server, Exchange checks his “rule pool”, trying to find a match to a specific rule.

In case that he finds a “match”, Exchange checks what are the exact “instructions” in the rule.

The rule “instructions” could be – do “something” + write the information to a log file or – don’t do anything but write the information to a log file. This scenario described as test mode or audit mode.

Note – we will review the option of test mode in the next article.

Exchange Online transport rule logic

Define the action that the Exchange E-mail spoof rule will perform | Seven Possible scenarios

In the following section, we will demonstrate seven different optional scenarios that related to the “action part” of the Exchange Online spoof transport rule.

The Exchange transport rule is a very powerful feature that can enable us to define and implemented almost an unlimited number of scenarios.

The scenarios that will be demonstrated are just a sample for the variety of options that you can choose based on your specific requirements.

The scenarios that we will review are:

Scenario 1 – Block and delete the spoofed E-mail message

The business needs are:

  • We want to block all the E-mail message that considers as a spoof E-mail without saving the original message and without notifying the destination recipient (the recipient who was to receive the e-mail).

Scenario 2 – Delete the spoof E-mail message + send notification (NDR) to the destination recipient

The business needs are:

  • We want to – block all the E-mail message that considers as a spoof E-mail.
  • We want to – inform the destination recipient (the recipient who was to receive the e-mail) that a spoof E-mail was sent to him.

Scenario 3 – Prepend the subject of E-mail message

The business needs:

  • We don’t want to block E-mail messages that considered as a spoofed
    E-mail.
  • The “spoofed E-mail” will be sent to the destination recipient mailbox, but we will add a “prefix” to the mail subject (a text string) which will inform the recipient that the specific mail is “Dangerous” and can be considered as spoof E-mail.

Scenario 4 – Create an incident report and sent it to the Exchange Online administrator + Delete the spoofed E-mail message.

The business needs are:

  • We don’t want to block E-mail message that considers as a spoof
    E-mail.
  • We want to create an incident report for each “event” in which the Exchange rule identifies a specific E-mail message as – “spoofed E-mail”.
  • The incident report will be sent to Exchange Online administrator + will include the original E-mail message.

Scenario 5 – “Stamp” the spoofed E-mail message as spam.

The business needs are:

  • We don’t want to block E-mail message that considers as a spoof
    E-mail.
  • We want to update the SCL value and set it to “5”. The E-mail message will be sent to the destination recipient mailbox and by default, the E-mail will be sent to the Junk mail folder.

Scenario 6 – Set the Exchange Online spoof rule to use “audit mode”.

The business needs are:

  • We don’t want to block E-mail message that considers as a spoof
    E-mail.
  • We don’t want to implement any “action” by using the Exchange rule
  • We want to activate the Exchange rule in a “learning mode”

Scenario 7 – view Office 365 rules report.

This scenario is the continuation of scenario 6 but in addition, we will review how to use the Exchange Online report option, to view a report about the mail flow that is related to the spoof rule that was created.

Scenario 1 – Block and delete the spoofed E-mail message

The main character of this scenario is – that we don’t want to “deal” (keep or save) with mail items that identified as a spoof E-mail.

We are willing to take the risk of false-positive meaning a scenario in which a legitimate message mistakenly marked as spoofed E-mail.

We don’t wish to inform the “hostile element” that we have blocked + deleted his E-mail and, we don’t wish to bother the “destination recipient” with information about the scenario in which hostile try to send him a spoof E-mail

To be able to implement this action, we need to implement the following steps:

  • Go the section named – *Do the following…
  • Select the option – block the message…
  • On the sub-menu options choose – delete the message without notify anyone

Define the action that the Exchange E-mail spoof rule will perform -01

In the following screenshot, we can see the result.

Each mail that will be identified as a spoofed E-mail by the Exchange rule will be automatically deleted.

It’s important to mention that the “event” will be recorded in the Exchange Online log file. Although the fact that the E-mail was deleted, we can find information about the “deletion” but we cannot recover the original E-mail item.

Define the action that the Exchange E-mail spoof rule will perform -02

Scenario 2 – Delete the spoof E-mail message + send notification (NDR) to the destination recipient

The main character of this scenario is – that we don’t want to “deal” (keep or save) with mail items that identified as a spoofed E-mail but, we want to inform the “destination recipient” that someone tries to send him a spoofed E-mail.

The “recipient notification” is implemented via an NDR (non-delivery report) message that includes a very detailed information about the “event”.

The “explanation” is a text string that we add that enhanced the information that appears in the NDR and. provide a friendlier description of the problem.

To be able to implement this action, we need to implement the following steps:

  • Go the section named – *Do the following…
  • Select the option – block the message… and on the submenu options choose – reject the message and include explanation

Define the action that the Exchange E-mail spoof rule will perform -03

In the next window, we will add our custom text message.

For example:

It looks like that the E-mail message that you have sent to the organization recipient is a spoofed E-mail

Define the action that the Exchange E-mail spoof rule will perform -04

In the following screenshot, we can see the result.

Define the action that the Exchange E-mail spoof rule will perform -05

This is an example to the NDR that was sent to the organization recipient in the event in which mail that was sent to him was classified as spoofed E-mail.

The NDR message is “loaded” with information about the specific scenario.

We can see a clear indication for the fact the E-mail was blocked by an Exchange rule.

We can the custom text message that was added in the former step in which we create the rule.

Define the action that the Exchange E-mail spoof rule will perform -06

The is a screenshot of the reset NDR message.
We can see a clear information about the mail flow, the cause for the NDR and so on.

Note – the original NDR includes even additional infrastructure such as the E-mail header and more.

Define the action that the Exchange E-mail spoof rule will perform -06-a

Scenario 3 – Prepend the subject of the message

The main characters of this scenario are – we don’t wish to block and delete the E-mail message that considers as a spoofed E-mail.

Instead, we want to deliver the ” suspected E-mail” to the user mailbox and let him decide by himself, what to do with the mail that has a high chance of being spoofed E-mail.
Although  we don’t want to intervene, we would like to notify our organization user that the E-mail message is probably a non-legitimate E-mail message and that he should be aware.

The “element” that we use is the option of “Prepend the subject”. The meaning is that we add a custom prefix to the E-mail subject that could warn the recipient and let him know that the specific E-mail could be dangerous or suspicious E-mail.

To be able to implement this action, we need to implement the following steps:

  • Go the section named – *Do the following…
  • Select the option – Prepend the subject of message with…
  • In the windows that appear, add the custom text that will be addressed to the E-mail subject. In our specific scenario, we will add the text – This E-mail is a spoof E-mail!!

Define the action that the Exchange E-mail spoof rule will perform -07

In the next screenshot, we can see the text that we have added for the Prepend subject

Define the action that the Exchange E-mail spoof rule will perform -08

In the following screenshot, we can see an example to an E-mail message that was identified as spoofed E-mail by the Exchange rule and the “Prepend text” in the E-mail message.

Define the action that the Exchange E-mail spoof rule will perform -09

In the next article, we will continue to review different options scenario for the “action” that will be executed by the Exchange Online spoof transport rule.

Dealing with spoof E-mail – Office 365 | Article series index

Now it’s Your Turn!
We really want to know what you think about the article

The post Define what to do with a spoof E-mail using the Exchange online E-mail spoof rule |Part 2#4 appeared first on o365info.com.

Exchange on-Premises – authentication and mail relay

$
0
0
In the following article, I would like to review the subject Exchange on-Premise server, mail relay, authentication and an anonymous session (un-authenticated session).

The main reason for writing this article is to try to clarify some of the miss concepts and the confusing terms that are used regarding this subject.
For example:
The term mail relay or relaying mail seems to be a common term when relating to mail infrastructure, but this term has a couple of meaning and different variations.

Another example could be the subject of Exchange on-Premise server and the need for authentication. The prevailing view is that each element that communicates or addresses Exchange server needs to identify himself to be able to complete the mail flow session, but this “idea” is right only for a specific scenario.

Q1: Does each host who address the Exchange server must be identified?
A1: In general, the answers depend on the specific scenario and the “service” that the client \ host need from Exchange server

  • An exchange mail client that needs to access their mailbox must be identified (provide user credentials).
  • Hosts, such as other mail servers who need to deliver an email message to one of the Exchange clients (recipient) doesn’t need to identify them self.
  • Hosts who address Exchange server asking him to deliver an email message to the external recipient (mail relay) need to identify them self (provide user credentials).

To be able to understand better the concept of authentication and Exchange base environment, we will need to understand the different elements that communicate Exchange server the different scenarios and the different characters in each of the different scenarios.

Exchange on-Premises versus Exchange Online

The o365info website is dedicated primarily to Office 365 and Exchange Online based environment. The specific article relates to Exchange on-Premises based environment.
Despite the fact that the Exchange Online is based on the “Exchange server technology” there are many implementation Differences between the Exchange on-Premises environment versus the “cloud” environment.

Long short – most of the examples and the screenshot are relevant, mainly to the Exchange on-Premise environment.
The purpose of the article was to provide more information about a scenario of mix environment that consists of Exchange on-Premises environment and Exchange Online environment.

Who are the “elements” that communicate with the Exchange-based server?

The answer for this question could also be quite complicated because, there are many types of “entities” that can communicate with the Exchange server and each one of them has a unique character and behaviors.
Let’s start with a very high-level classification: client versus server.
1. Mail client
When we use the term “mail client” most of the time, we relate to Exchange clients that their mailbox is hosted on the Exchange server and this “mail client” address Exchange server asking him one of the following services:

  • Access to his data stored on the Exchange mailbox.
  • Deliver E-mail message to other mail recipients.

The term “mail client”, can be translated to a mail client that has an Exchange mailbox, and he needs to access his data stored in his mailbox.

Another type of mail client could be a device or an application that doesn’t have an Exchange mailbox and instead, relate to Exchange as a “mail server” asking him to “deliver” E-mail message to some recipient.

Another classification that we can use the term “mail client” is the type of the specific mail client.
Exchange server supports a wide range of the mail client. Each mail client, use a different mail protocol and different authentication protocols.

2. Mail Server
When we use the term “mail server” we mean to relate to another mail server that addresses the Exchange server.

The entities that communicate with Exchange based server - General classification -01

If we want to get a more accurate description, there could be an additional classification of the terms: mail client and mail server.
For example:

Regarding the term “mail server”, this definition can be translated to – “additional Exchange server” that is part of the Exchange organization.

“Exchange server” has a special relationship with an additional Exchange server from his organization.

Many of the configuration settings that relate to the communication process between Exchange server from the same organization such as the authentication protocol and access permissions are configured automatically.

Many times, the term “mail server” relates to any “external mail server” that addresses the Exchange server asking him to “accept” E-mail message for one of the recipients who is hosted on the Exchange server.

The entities that communicate with Exchange based server - Different type of clients-02

Mail communication protocols

Regarding the subject of – the mail communication protocols in Exchange based environment, we will continue to use are a basic classification of the mail client versus mail server.

Mail server communication protocol

Regarding mail server that communicates with Exchange server, the most common communication protocol is the SMTP protocol.

In some scenario, the communication protocol that will be used is TLS, that uses for encrypting the communication channel between the two endpoints (Exchange server and the other mail server).

Mail communication protocols - Mail server -03

Client Mail communication protocols

Regarding the term “mail client” I will classify a mail client to two main groups:

1. Standard Exchange mail client

This group includes all the familiar mail client such as Outlook, OWA, and mobile clients.
OWA and Outlook mail client use the HTTPS protocol for communicating with the Exchange mail server, and mobile mail client uses the ActiveSync protocol for communicating with Exchange mail server.

Regarding Outlook mail clients, if we want to be more accurate, Outlook mail client uses a combination of mail protocol such as RPC over HTTPS or MAPI over HTTPS, but for simplicity, we can say that OWA and Outlook mail client using the HTTPS protocol is the mail communication protocol.

Mail communication protocols -Standard mail client -04

2. Special or non-standard Exchange mail clients

Under this clarification, I put the mail client which I describe “internet mail clients”.

This term, relate to old mail clients, that use the common internet protocol that was very popular in the past, for communicating with the Exchange-based server.
The internet mail client uses – POP3 and IMAP4 for retrieving E-mail message from the mailbox and SMTP for “sending out” E-mail message via the Exchange server.

Exchange server can support this type of mail client, but in most of the scenarios such as Exchange on-Premise environment or “cloud-based Exchange environment” (Office 365 and Exchange Online) this protocol is not used or not supported.

Mail communication protocols - internet mail clients -05

The “entity” that communicates with Exchange server and the requested type of service

1. Exchange mail client and Exchange server

Let’s start with the relationship that exists between Exchange clients and Exchange server:
Exchange client “consume” from Exchange server two main services:

1. Access to mailbox data

Exchange client that has Exchange mailbox, connect Exchange server, provide the required credentials and ask from Exchange to access their data that is located in the Exchange mailbox.

Exchange mail clients and the services that Exchange server provides - Access to mailbox -06

2. Addressing Exchange server for delivering email messages

The second common service that Exchange client “consume” from Exchange server is – the service in which the Exchange client address Exchange server and “ask” him to deliver an
E-mail message to the other Exchange recipient or the external (non-Exchange recipient) recipient.

Exchange mail clients -services Exchange server provides - Deliver E-mail message -07

2. “Other” client and Exchange server

I use the term “another mail client” for describing any entity or hosts, who address the Exchange server and ask him to deliver an email message to some “destination recipient”.

This “another mail client” doesn’t have an Exchange mailbox.

This mail client could be – web-based application, mail-enabled devices such as a printer or scanner or any other than consume mail services.

The scenario in which an “element” address the Exchange server asking him to deliver an email message to a specific recipient can be implemented via authenticated session or non-authenticated (anonymous) session:

  1. Anonymous – a method in which the “element” that addresses Exchange server doesn’t provide any user credentials or in other words, doesn’t authenticate.
  2. Authentication by providing user credentials – a method in which the “element” that addresses Exchange server provides user credentials.
  3. Authentication based on IP address – in this method the “element” that addresses Exchange server doesn’t provide any user credentials but instead uses a specific IP address that was already.

The entities that communicate with Exchange based server -Other mail clients -08

3. Mail servers and Exchange server

When I use the term “mail server”, I refer to external mail servers who represent an external domain (a domain which is not managed by Exchange) that address Exchange server asking him to deliver or forward an E-mail message to a specific recipient who is hosted by the Exchange.

The entities that communicate with Exchange based server - External mail servers -09

The “entity” that communicates with the Exchange-based server and the authentication protocol.

In this section, we will continue to use the classification of the different “entities” that communicate with the Exchange server, but this time, I would like to focus on the subject of the authentication infrastructure.

Exchange mail client and Exchange server

When relating to Exchange client, the need for the “authentication” is a mandatory requirement.

Exchange client that addresses Exchange server, asking for any type of services, need to provide first his credentials and, only the credentials are verified, Exchange will “agree” to provide a specific service such as access to mailbox data or delivering an E-mail message.

Each of the different Exchange clients such as Outlook, OWA or mobile client (ActiveSync) uses a different authentication protocol and the protocol has a specific character.

Exchange server and the authentication requirements from Exchange clients -01
In the following section, I provide a quick review for the different authentication setting that can be configured for the different type of Exchange clients.

OWA mail client

In the following screenshot, we can see the different authentication setting that can be configured for OWA mail clients.
OWA mail client can use authentication method such as:

  • Integrated Windows authentication
  • Basic authentication
  • Digest authentication
  • Formed based authentication

Exchange server and the authentication requirements from Exchange clients -02

ActiveSync mail client

In the following screenshot, we can see the different authentication setting that can be configured for ActiveSync mail clients.
ActiveSync mail client can use authentication method such as:

  • Basic authentication
  • Client side certificate

Exchange server and the authentication requirements from Exchange clients -03

IMAP4\POP3 mail client
In the following screenshot, we can see the different authentication setting that can be configured for IMAP4\POP3 mail clients.
IMAP4\POP3 mail client can use authentication method such as:

  • Clear text
  • Clear text over TLS

Exchange server and the authentication requirements from Exchange clients -04

Outlook (MAPI) mail client
In the following screenshot, we can see the different authentication setting that can be configured for Outlook mail clients.

Outlook (MAPI) mail client can use authentication method such as:

  • Basic authentication
  • NTLM authentication

Exchange server and the authentication requirements from Exchange clients -05

Internet mail client, “Other” mail client, Mail servers, and Exchange server

In the former section, we review the “Interface” that is used by Exchange clients for communicating with the Exchange server.

In the current section, I would like to review the “other Exchange communication interface” that serve for communicating with “SMTP clients”.

The term “SMTP clients” relate to hosts who address Exchange on-Premises and ask from the Exchange server, to deliver \ forward the E-mail message to Exchange recipient or to other external recipients.

The “Exchange interface \component ” which is dedicated to listening to the SMTP communication request (and sometime TLS protocol) is the Exchange receive connector.
The Exchange “SMTP listener” (the Exchange receive connector) is configured with default settings.

For example – by default, Exchange server receive connector is configured to accept anonymous (non-authenticated) SMTP connection from “entities” that want to deliver an email message to Exchange recipients.

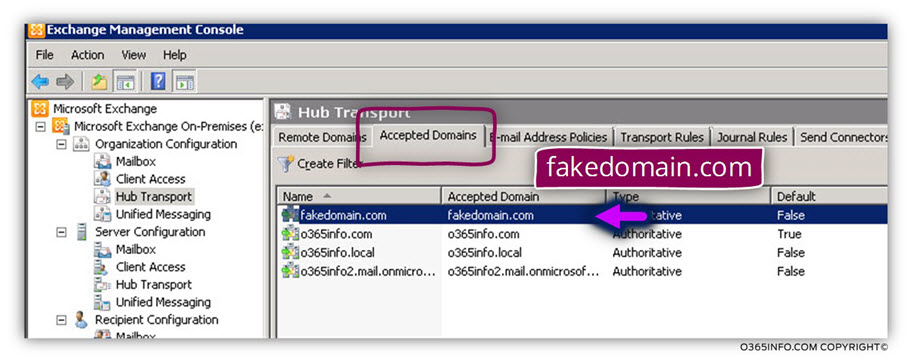
The term Exchange recipients, define Exchange clients that have an Exchange mailbox or a recipient who has an E-mail address that uses the domain name which Exchange server is “responsible” for (authoritative domain).

In other words, by default any entity can address Exchange server, start an SMTP session and forward an E-mail message to Exchange recipients.

Although this “declaration” seems a little strange because the first association that appears in our mind could be that – this behavior is a “security issue” which can be used by hostile elements, we should not forget that by design, every mail server was created by default for communicating with “un-know” elements that represent “external entities”.

The entities that communicate Exchange server using SMTP
To explain the concept of anonymous SMTP connection, let’s use the following example:
Exchange on-Premises represent the domain name – o365info.com

An external mail server addresses the Exchange on-Premises server and “ask him” to deliver an E-mail message to the recipient named John (John@o365info.com).

Because the Exchange on-Premises is responsible for the domain name – o365info.com, and because the Exchange hosts John’s mailbox, the Exchange server will “agree” to accept the E-mail message that is Intended to John@o365info.com.

Notice that in this scenario, the external mail server didn’t provide any credentials to the Exchange on-Premises server.
This “behavior” is that standard mail flow that is implemented between the mail servers most of the time.

Addressing Exchange server using SMTP - No authentication is needed

Using an authenticated session

There are some scenarios, in which the communication between the mail servers (the Exchange server in the “other” mail server) will be configured in such a way that the external mail server will have to identify himself before the Exchange on-Premises server by providing a specific credential or a specific server certificate.
In the current article, we would not relate to such scenarios.

Exchange server and the receive connector

The Exchange components that “listen “to incoming SMTP requests for communication is the Exchange receive connector.

By default, Exchange uses a default receive connector, which is created automatically when we install Exchange server.
The default Exchange receives connectors are created by using the following naming convention:
• Client <Exchange server name>
• Default <Exchange server name>

In the following screenshot, we can see an example for this Exchange receive connectors + an additional Exchange receives connectors that were created manually for specific mail flow needs.

Exchange authentication settings and the relationships with SMTP clients - 01

Exchange server and the receive connector authentication settings

As mentioned, by default the Exchange receives connector is configured to support anonymous SMTP communication requests.
In the following screenshots, we can see the configuration settings on the Exchange receive connector named – Default EX01
The Exchange receive connector setting appear in three main tabs:

The Authentication tab | Exchange Receive connector

This tab is used for configuring the authentication protocol that Exchange server support.

As mentioned, Exchange receive connector doesn’t impose a mandatory requirement for authentication, so the obvious question that can appear is – why there is no option box named “no authentication” or where we can see the default setting in which Exchange server is configured to support anonymous access?

The answer is – not in the authentication tab, but instead, in another tab named – Permission Groups.

The authentication tab relates to a scenario in which we define a mandatory need for authentication.

For example, a scenario in which we need to define a mail flow with “another” mail server in which this mail server, will have to identify himself before the Exchange server.

In this scenario, the authentication tab will include in its list of authentication protocols, which can be used by the “other” mail server for identifying himself.

Exchange authentication settings and the relationships with SMTP clients - 02

The Permission Groups tab | Exchange Receive connector

The settings that include in the Permission Groups tab “dictate” if the Exchange server agrees to approve “anonymous communication” or only authenticated communication requests.

In the following screenshot, under the section – “Specify who is allowed to connect to this Receive connector” we can see a variety of options.

By default, the option of – Anonymous users is checked.

The term ” Anonymous users” is somewhat confusing because – the real meaning is not just “human users” but instead, any entity (mail enabled host or mail server) that try to communicate with Exchange server using SMTP.

The “other” options such as – Exchange users and Exchange servers are related to the relationships that Exchange server have with his Exchange clients (users whom their mailbox is hosted on the Exchange server) or the relationship with the “other Exchange servers” that belong to the same organization of the specific Exchange server.

Exchange authentication settings and the relationships with SMTP clients - 03

The Network tab | Exchange Receive connector

The network tab defines additional “filter” or parameters, that related to the “condition” in which Exchange server is willing to accept communication requests from “other entities”.

The additional parameters are:
1. The IP address which represents the “other mail entity”
2. The communication protocol port

In the following screenshot, we can see that the default setting on the Exchange receive connector.
Regarding the port number, Exchange receives connector is configured to “listen” to the standard mail communication protocol – the SMTP protocol that uses port 25.

Regarding the subject of “IP ranges”, we can see that by default, the Exchange server will “agree” to accept communication requests from any IP address. The concept of “any IP address” is represented by the subnet address – 0.0.0.0255.255.255.255

Exchange authentication settings and the relationships with SMTP clients - 04

Exchange and the subject of mail relay

The term that we want to review – “mail relay“, is quite confusing and unclear.

In addition, in different scenarios the term “mail relay“, have different meanings.
Technically speaking, the term “mail relay” or ” SMTP relaying” defines a mail flow in which element A address element B asking him to deliver or forward the E-mail message to element C.

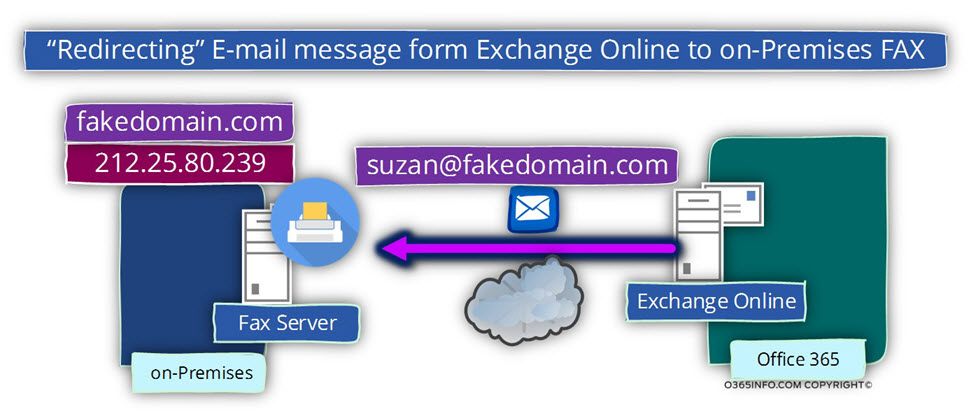
For example – recipient named John’s address Exchange mail server asking him to deliver an email message to a recipient named – Suzan.
In the following diagram, we can see an example to standard mail relay mail flow.
In our specific example, the mail server (B) is responsible for the domain name o365info.com

When John (A) address the mail server and ask him to “deliver” E-mail message to a recipient who is hosted the mail server (Suzan@o365info.com), the mail server is “willing” to accept the
E-mail message (relay the E-mail message) because the mail server is authoritative for the domain name o365info.com and the destination recipient also belongs to this domain.

Most of the time, the “source recipient” (A) doesn’t need to prove his identity or provide user credentials because, the “main requirement” is fulfilled because the destination recipient Suzan@o365info.com) is under his authority of the Exchange server.

Mail relay

The additional use of the term – “mail relay”

The additional use for the term “mail relay” or the more common use, describes a scenario in which element A,address element B, asking him to deliver or forward E-mail message to element C

The main difference from the former scenario is that this time, the “destination recipient (element C) is not a recipient who is not part of the domain for which the mail server (element B) considers as authoritative.

In other words, the mail server that should accept the request for delivering the E-mail message to the destination recipient will need to find + address the mail server that represents the required domain and asks for him to deliver the E-mail message to the destination recipient.

For example, John (A) addresses the mail server and asks him to “deliver” E-mail message to a recipient named Alice@outlook.com

In this scenario, the Exchange server is not responsible for the specific domain,
the Exchange on-Premises server will need to find the MX record of the server that represents the domain outlook.com, connect him and ask him to deliver the E-mail message to Alice@outlook.com

Despite that the described scenario looks quite standard, this scenario is really a standard scenario only when the client that request to deliver the E-mail message to the external recipient is an authenticated client that Exchange server can “trust” and identify.

In case that the “client” that addresses the mail server (Exchange on-Premises in our scenario) is not an authenticated client (doesn’t provide user credentials), this could be a huge security risk because every hostile element can abuse the organization mail server and use the mail server is a “tool” for distributing spam mail, mail items with malware and so on.

We should prevent a scenario in which “everyone” could address, our mail server, and ask him to deliver an email message to the external recipient (recipient whom their domain name is not under the authority of our mail server).

Instead, we need to be sure that the element that asks to relay the E-mail message is a “legitimate element” that can be trusted by the mail server.

Mail relay in Exchange based environment and the default settings

In Exchange based environment, to the option of “open relay” in disabled by default.

The term “open relay”, define a scenario in which mail server will accept requests to forward the E-mail message to “external recipient” from non-authenticated recipients (anonymous connection).
In Exchange based environment, the ability to use a mail relay to an external recipient via the Exchange server can be implemented only for authenticated recipients.

To be able to understand better the optional scenario that relates to mail relay to the internal + external recipient and the subject of authentication, let’s use the following scenario’s examples:

  • An organization that uses the public domain name – o365info.com
  • The organization Exchange server is authoritative for the domain name o365info.com

Scenario 1 – authenticated recipient | mail delivered to an internal recipient.

  • The source recipient is John@o365info.com
  • John’s mailbox is hosted on the Exchange on-Premises
  • John is the authenticated user
  • The destination recipient Suzan@o365info.com belongs to the same domain name as the source recipient

John addresses the local Exchange on-Premises, asking him to deliver an email message to Suzan@o365info.com

In this scenario, the Exchange on-Premises will “agree to forward” the E-mail message to Suzan because, Suzan “belong” to the o365info.com domain (the Exchange on-Premises is authoritative for the domain name o365info.com).

Exchange client - Asking from Exchange to deliver E-mail message to Exchange recipient-01

Scenario 2 – authenticated recipient | mail delivered to an external recipient

  • The source recipient is John@o365info.com
  • John’s mailbox is hosted on the Exchange on-Premises
  • John is the authenticated user
  • The destination recipient is Alice@outlook.com
  • The destination recipient considered as “external recipient”

John addresses the local Exchange on-Premises, asking him to deliver an email message to Alice@outlook.com

Notice that Alice E-mail address, include an “external domain name” meaning – a domain name that from the Exchange on-Premises point of views consider as -“external domain” or non-authoritative domain.

The be able to deliver the E-mail message to the destination recipient, Exchange on-Premises will need to address the “external mail server” that is responsible (represent) the domain name outlook.com
In this scenario, the Exchange on-Premises will “agree to forward” the E-mail message to Alice@outlook.com because John is the authenticated user.

Exchange client -Asking from Exchange to deliver E-mail message to non- Exchange recipient -02

Scenario 3 – non-authenticated recipient | mail-enabled device | mail delivery to internal recipient

  • The source recipient is mail- enabled device such as a printer
  • The mail-enabled device is not authenticated user (doesn’t provide user credentials)
  • The destination recipient is Suzan@o365info.com
  • The destination recipient considered as “internal recipient”

The mail-enabled device addresses the local Exchange on-Premises, asking him to deliver
an email message to Suzan@o365info.com

In this scenario, the Exchange on-Premises will “agree to forward” the E-mail message to Suzan because, Suzan “belong” to the o365info.com domain (the Exchange on-Premises is authoritative for the domain name o365info.com) although the user is not identified (the mail- enabled device).

Mail enabled device -Asking from Exchange to deliver E-mail message to Exchange recipient -03

Scenario 4 – non-authenticated recipient | mail-enabled device | mail delivery to external recipient

  • The source recipient is the mail-enabled device such as a printer
  • The mail-enabled device is not authenticated user (doesn’t provide user credentials)
  • The destination recipient is Alice@outlook.com
  • The destination recipient considered as “external recipient”

The mail-enabled device addresses the local Exchange on-Premises, asking him to deliver
an email message to Alice@outlook.com

Notice that Alice E-mail address, include an “external domain name” meaning – a domain name that from the Exchange on-Premises point of views consider as -“external domain” or non-authoritative domain.

The be able to deliver the E-mail message to the destination recipient, Exchange on-Premises will need to address the “external mail server” that is responsible (represent) the domain name outlook.com

In this scenario, by default, the Exchange on-Premises will not agree to forward the E-mail message to Alice@outlook.com because the mail-enabled device is not an authenticated user (didn’t provide user credentials).

Mail enabled device -Asking Exchange to deliver E-mail message - NON Exchange recipient -04

Trying to relay via an Exchange server using anonymous SMTP session an example

In the following section, I would like to demonstrate the process of SMTP-based communication with the Exchange-based server using an anonymous session (non-authenticated session) and a telnet client.
Using the telnet client, enables us to get a “behind the scenes” view of the session channel that is created between the host, who tries to communicate the Exchange server and the Exchange server response.
In our specific scenario, the Exchange considers as authoritative for the domain name – o365info.com
We will demonstrate two different scenarios of communication requests:

Case 1 – the non-authenticated host, address Exchange and ask to deliver a \forward E-mail message to a recipient who considers as an internal recipient (the Exchange server represents the specific domain name).

Case 2 – the non-authenticated host, address Exchange and ask to deliver a \forward E-mail message to a recipient who considers as the external recipient the meaning is that the Exchange server is not authoritative for the domain name, and he will need to contact the external mail server that is responsible for the destination domain.

Case 1 – non-authenticated host asks to deliver an email message to the internal Exchange recipient
In the following screenshot, we can see an example of a telnet session.

The element that addresses the Exchange server asks to deliver an email message to a recipient named – Suzan@o365info.com

Because, in our scenario, the Exchange server is responsible for this domain, Exchange will agree to deliver the message to the destination recipient.
In the screenshot, we can see that the Exchange server to inform the host that they accept the E-mail message, and the E-mail message is queued mail for delivery.

Trying to relay via Exchange server using anonymous SMTP session -01

Case 2 – non-authenticated host asks to deliver an email message to the external recipient
In the following screenshot, we can see the “un-authenticated” host address Exchange server, and ask him to deliver an email message to an “external E-mail recipient” – Alice@outlook.com

Because the host is not authenticated, the Exchange Online refuses to forward the E-mail message (the Exchange doesn’t support the option of “open relay”).
The Exchange server responds are – unable to relay

Trying to relay via Exchange server using anonymous SMTP session -02

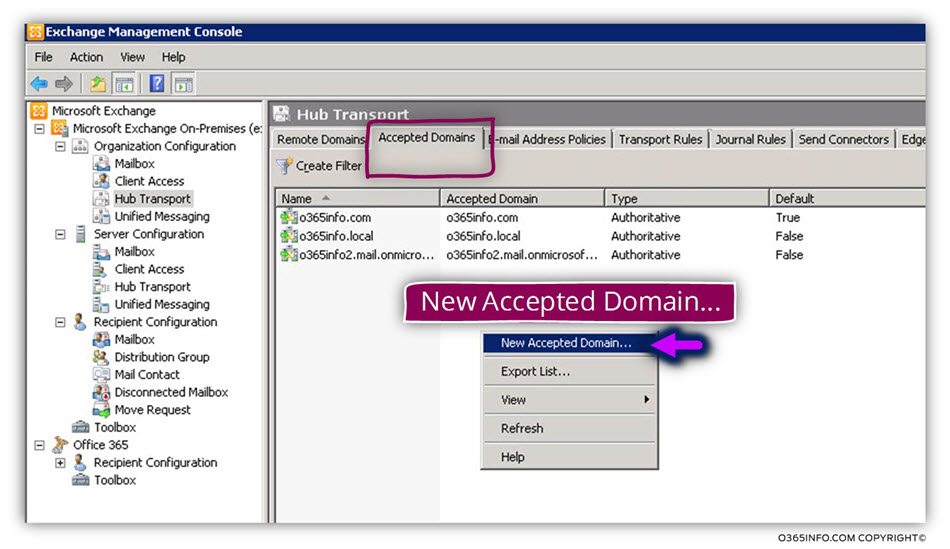
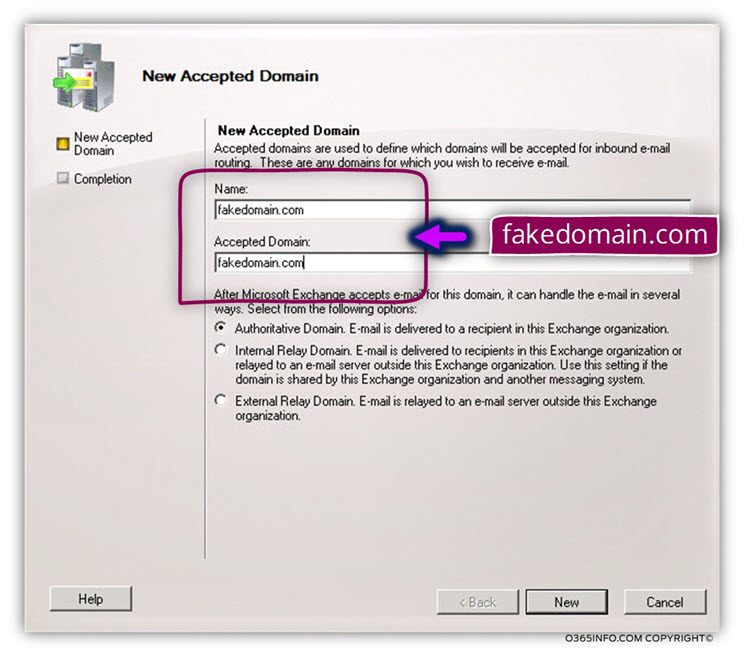
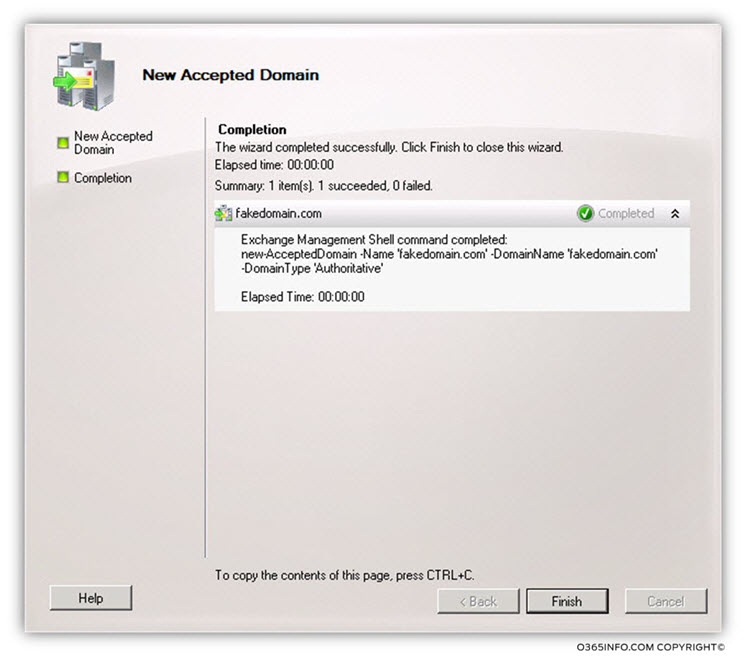
Exchange on-Premises | Allow Anonymous Relay on a Receive Connector

As mentioned, by default Exchange server will not accept anonymous SMTP session from a host who needs to relay an email message to the external recipients.
In other words, by default Exchange on-Premises is configured not to support the option on “open relay” which enabled un-authenticated hosts, to address Exchange and ask him to deliver an email message to external recipients.

In some scenario, we will need to “bypass” this restriction by enabling specific un-authenticated hosts (anonymous SMTP session) to address Exchange server and ask Exchange server to deliver email messages to the external recipient.

To be able to provide this “mail relay service” only to specific hosts or a specific “allowed” mail enabled devices, we will identify this host by their IP address.

Note – technically speaking they need to identify the hosts by IP address is not a mandatory requirement, but it’s not recommended and not ” Wise” to implement such as configuration.
Configuring Exchange receive connector to relay requests from specific hosts

In this scenario, we could fulfill this requirement by using two steps:
1. Create a dedicated Exchange receive connector
2. Configure the Exchange receive connector to accept anonymous requests from a specific IP address

Scenario description
The scenario is as follows:

  • The IP address of the Exchange mail server is 10.0.0.50
  • The IP address of the mail-enabled host is – 10.0.0.80

In the following example, we will implement the two steps by using PowerShell
Step 1 – create a new receive connector

We will create a deducted Exchange on-Premises receive connector that will “listen” to the specific host requests.

New-ReceiveConnector -Name “Anonymous Relay” -Usage Custom -PermissionGroups AnonymousUsers -Bindings 10.0.0.50:25 -RemoteIpRanges 10.0.0.80

Step 2 – grant relay permission to anonymous connections on the new Receive connector

In step 2, we need to change the default Exchange receive connector setting so Exchange will “agree” to implement the mail relay process for hosts that doesn’t provide user credentials and can be identified by their IP address.

Get-ReceiveConnector “Anonymous Relay” | Add-ADPermission -User “NT AUTHORITY\ANONYMOUS LOGON” -ExtendedRights “Ms-Exch-SMTP-Accept-Any-Recipient”


Now it’s Your Turn!
We really want to know what you think about the article


The post Exchange on-Premises – authentication and mail relay appeared first on o365info.com.

Manage E-mail attachment policy in Office 365 – part 1#4

$
0
0

The subject of E-mail Message attachment manifests itself in two main scenarios:

  1. Malware scenario – a scenario that relates to an event, in which hostile element attached some malware to an E-mail message, send the E-mail message to one of our organization recipients, the recipient opens the E-mail message and “excite” the malware file.
  2. Company policy, regulation, etc – a scenario in which the company policy or s specific regulation dictates what are file types that can be attached (mail attachment) to an E-mail message sent to or by some company employees.

Manage E-mail attachment policy in Office 365 | The article series

The article series include the following articles:

  1. Manage E-mail attachment policy in Office 365 – Part 1#4
  2. Manage E-mail attachment policy in Office 365 – Part 2#4
  3. Manage E-mail attachment policy in Office 365 – Part 3#4
  4. Manage E-mail attachment policy in Office 365 – Part 4#4

In the following article, I would like to review the subject of – mail attachment in Office 365 and Exchange Online based environment.

We will start with reviewing a very common miss concept of the subject of mail attachment in an Office 365 environment and later, review how to implement an E-mail attachment policy in an Office 365 based environment by creating an Exchange Online transport rules.

E-mail attachment policy – The article series

The article series Manage E-mail attachment policy include four articles.
In the first article, we will review in high level the subject of the E-mail attachment policy characters and requirements.

The rest of the three articles is dedicated to the “how to” part. In this article, we will review a couple of examples of the way for configuring E-mail attachment policy in the Office 365 environment by using Exchange Online transport rules.

Exchange Online, mail attachment, and malware

Let’s start with two important “declarations”

1.  Automatic scanning and removal of the malware file attachment in Exchange Online environment.

In Office 365 based environment, the infrastructure that is responsible for the mail security and serve as a mail security gateway is – the EOP (Exchange Online protection) infrastructure.

Every E-mail message that sent to Office 365 recipients or, from Office 365 recipients to other recipients is scanned by the EOP (Exchange Online protection) infrastructure.

In case the EOP finds that the E-mail message includes an attachment that considers as a “malware” (hostile code), the EOP will automatically block the hostile file.

In case that an E-mail message includes an attachment that considers as malware, we cannot “tell” EOP that we want to accept the specific hostile attachment but instead, we can decide regarding a couple of possible “actions” that will be enforced for an E-mail message that include a hostile attachment.

The EOP policy that relates to hostile attachment described as – Malware Detection Response

In the following screenshot, we can see the interface that we use for configuring the EOP Malware Detection Response

In the Exchange Online management, on the left menu bar, we choose the protection menu and on the top menu bar, we choose the malware filter.

Exchange Online – mail protection and Malware Detection Response -01

We can see that the choices that we have are:

  • Delete the entire message
  • Delete all attachments and use default alert text
  • Delete all attachments and use custom alert text

Exchange Online – mail protection and Malware Detection Response -02

In the following diagram, we can see an example to the flow of E-mail message that include an EXE file attachment.

The E-mail message is accepted by EOP, EOP will scan the EXE file that is attached to ten E-mail message.

In case that the EXE is not a “malware” (a legitimate EXE file), EOP will forward the E-mail message to the user mailbox.

In case that the user uses Outlook mail client for reading the E-mail message, Outlook mail client will block by default the access to the EXE file.

The standard flow of mail that include an attachment in Office 365 environment

2.  The element that is responsible for enforcing E-mail message attachment policy is the mail client and not the mail server by default.

A very common miss’s conception regarding the subject of – “E-mail message attachment policy in Exchange based environment” is that the element that is responsible for enforcing by default the of E-mail message attachment policy is the “server” side.

In reality, the truth is just the opposite.

By default, the Exchange server will not enforce any E-mail message attachment policy.

When we use a standard “Microsoft mail client” such as Outlook and OWA, the element that enforces the mail message attachment policy is – the mail client by himself!

Enforcing E-mail attachment policy

Attached a quote from a Microsoft article:

Out of the box, EOP does not block executable files. EOP will scan executable files and delete them if malware is detected, but will not block them if the malware scan is clean. This behavior can be both good and bad. From a developers point of view, this allows me to send my programs and cool applications to my co-workers. On the bad side, this will allow zero-day malware to come through email in the form of an attached executable file.

[Source of information – Tips to prevent Zero-Day Malware with EOP]

Exchange Online |OWA and Outlook mail client | mail items with attachments

As mentioned in the former section, Outlook mail and the OWA mail client have their own built-in E-mail message attachment policy.

In the following screenshots, we can see an example of an E-mail message that include an EXE file attachment.

When using the Outlook mail client, we can see that the E-mail message includes an EXE attachment file named- notepad.exe but, the red circle icon informs us that we cannot save or activate this file.

The default Behavior of OWA and Outlook mail client regarding executable files -02

The same concept is implemented when using OWA mail client.

The default Behavior of OWA and Outlook mail client regarding executable files -01

Notice that in our scenario, the recipient is an Office 365 recipient.
The mail that was sent to the Office 365 recipients with the EXE file attachment were delivered via the Exchange Online server.

Exchange Online didn’t block or remove the EXE file attachment because, in our scenario, the EXE file attachment is a legitimate file (the notepad executable file) and not a malware.

In other words, Exchange Online is neutral regarding the EXE file attachment.

The “element” that blocks the access to the EXE file attachment is the mail client (Outlook and OWA).

Technically speaking – we would use another mail client (not Outlook or OWA mail client) there is a change that we can access the EXE file attachment because the specific mail client that we use does not enforce E-mail message attachment policy.

How to set\update the Outlook and OWA E-mail message attachment policy

In the current article, we will not review the way that we can use to change or update the default Outlook and OWA E-mail message attachment policy.

Instead, I have attached a couple of links to relevant articles the deal with this subject.

OWA and attachment file settings E-mail message attachment policy

Outlook and attachment file settings

The three common mail flow scenario relating to mail attachment in an Office 365 environment

When we mention the term “E-mail message attachment policy”, there are three main mail flow scenarios:

Scenario 1 – “internal mail flow”

This scenario relates to – all the mail flow between organization recipients.
In this scenario, we need to decide what is the “right” E-mail message attachment policy that we want to implement for an E-mail message that is delivered “in house”.

For example – we can say that the policy of attachment can be less restrictive and allow more types of file attachment because we can “trust” E-mail message that sent by our company users.

Scenario 2 – external recipient sends E-mail message to the organization recipient

This scenario relates to an E-mail message that sent from “un-know” or un-trusted recipient to our organization recipients.

In this case, we are much more suspicious regarding the type of mail attachment that we are “willing” to accept.

Scenario 3 – organization recipient sends E-mail message to the external recipient

This scenario relates to E-mail message that sent from our organization recipients to
“non-organization recipients”.

Seemingly, we “don’t care” about E-mail attachment that are sent to the non-organization recipient but the reality is more complicated.

We should think about a possible scenario in which our organization users sent deliberately or not, an email message that includes a malware or specific file attachment that are not “acceptable” by other organizations.

This scenario could lead to some lawsuits, damage to the company’s reputation and so on.

The three common mail flow scenario relating to mail attachment in Office 365 environment

Before we begin – what to do with E-mail messages that include a specific attachment

In the next article, we will review the different options and variations of the Exchange Online transport rule that will be used by implementing and enforcing E-mail message attachment policy.

However, before we start with the “step by step” instructions and the decision about – what type of mail attachment we will “block”, it’s very important to take a moment and allocates some time to the part of the “transport rule action part”.

In other words – what exactly to do in a scenario in which we “capture” an E-mail attachment that is not a complaint with our E-mail message attachment policy.

The good news is that the Exchange transport rule infrastructure is a very sophisticated and Includes a variety of options for us to choose from.

In the following section, I would like to briefly review common options or “actions” that we can implement in a scenario that the E-mail message includes a specific attachment that is not a complaint.

Option 1 – send E-mail with attachment to quarantine

Description

A scenario in which we “redirect” the E-mail message with the attachment to a dedicated “quarantined area” (not part of the user’s mailbox) that can be accessed by the recipient himself or by the Exchange Online admin.

Advantage:

  • The “problematic E-mail message” will not “reach “the user mailbox and by doing so, we element the risk factor, in which the users can download + activate the attachment.

Disadvantage

  • The recipient is not aware of the fact that an E-mail message was sent to him and there is a chance that the specific E-mail message is important \ legitimate E-mail message (False positive).
  • The recipient needs to access by himself to the quarantine and “pull” or deletes the E-mail message.
  • The recipient can “pull” the E-mail message to his mailbox and activates the attachment file.

Option 2 – send E-mail with attachment to “admin user”

Description

The E-mail message is not deleted but instead, sent to a “dedicated user mailbox” which will be responsible for accessing the mailbox, check the “problematic” E-mail messages etc.

Advantage:

  • The “problematic E-mail message” will not “reach” the user mailbox and by doing so, we element the risk factor, in which the users can download + activate the attachment.

Disadvantage

  • The recipient is not aware of the fact that an E-mail message was sent to him, and there is a chance that the specific E-mail message is important \ legitimate E-mail message (False positive).
  • The person which was assigned as a responsible will need to allocate the required resources for accessing the mailbox that contains the E-mail message with the attachments, inspecting and testing the attachments, informed the “destination recipients” etc.

Option 3 – Delete the E-mail with the attachment

Description

A scenario in which we don’t want to “deal” with email messages that include an attachment. The required action is – delete (destroy) the E-mail message.

Advantage:

  • The “problematic E-mail message” will not “reach “the user mailbox and by doing so, we element the risk factor, in which the users can download + activate the attachment.

Disadvantage:

  • The recipient is not aware of the fact that an E-mail message was sent to him, and there is a chance that the specific E-mail message is important \ legitimate E-mail message (False positive).
  • There is no option to recover the E-mail message in case that the E-mail message is a legitimate E-mail message.

Option 4 – prepend a disclaimer to the source and the destination recipient

Description

This “action” is applied in most cases as an addition to specific actions such as – Delete the E-mail with the attachment.

For example – in case that the E-mail message include an executable file attachment, deleted the E-mail message + send a response to the element \ recipient that sent the mail notifying him that his E-mail message was blocked or deleted and in the same time, send a notification message to the destination recipient (our organization user) notifying him that an E-mail message that was supposed to send to him was blocked because the E-mail message includes an attachment file that is not complaint to the company policy.

Advantage:

  • The advantage is that the recipient organization is “aware” to the fact that an E-mail message that was supposed to send to him was blocked. In case that the E-mail message attachment is a “legitimate attachment”, the organization user can address the external recipient that sent the E-mail and ask him to provide the file using a different way instead of the E-mail message.

Disadvantage:

  • I cannot think about a prominent disadvantage

Next article

In the next article, we will review how to create an Exchange Online transport rule, that will enforce an E-mail attachment policy on E-mail messages by “stopping” E-mail message that includes an executable content.

Manage E-mail attachment policy in Office 365 | Article series index

Now it’s Your Turn!
We really want to know what you think about the article

The post Manage E-mail attachment policy in Office 365 – part 1#4 appeared first on o365info.com.

Manage E-mail attachment policy in Office 365 – part 4#4

$
0
0

In the current article, we will review how to enforce an E-mail attachment policy by using Exchange Online transport rule.The examples that we will review in the current article are as follows:

  1. E-mail attachment policy that stops E-mail messages, that include a password-protected attachment. Each E-mail message that has this type of attachment will be sent to quarantine.
  2. E-mail attachment policy that stops E-mail messages, that include a password-protected attachment. Each E-mail message that has this type of attachment will be deleted and in addition, a notification message will be sent to the originating recipient + the destination recipient.

Manage E-mail attachment policy in Office 365 | The article series

The article series include the following articles:

  1. Manage E-mail attachment policy in Office 365 – Part 1#4
  2. Manage E-mail attachment policy in Office 365 – Part 2#4
  3. Manage E-mail attachment policy in Office 365 – Part 3#4
  4. Manage E-mail attachment policy in Office 365 – Part 4#4

Block E-mail that has an attachment that is password protected

In the following section, we will review how to create an Exchange Online transport rule, that will identify an E-mail message that includes a password-protected attachment.

The business “need” for protecting a specific file attachment using a password is to protect the file and prevent from non-authorize users to read the information, but at the same time the password protection prevents from EOP to inspect and scan the attachment and verify that the attachment doesn’t include malware.

In case that we want to prevent such a scenario in which E-mail message includes password-protected file, we can create a dedicated rule that will block or send to quarantine.

To be able to create the required rule, use the following steps:

Login to Exchange admin

  • On the left bar menu, choose – mail flow
  • On the top bar menu, choose – rules
  • Click on the plus sign
  • Choose – Create a new rule…

Block E-mail message that have attachment that is password protected -01

In the Name: text box, add a descriptive name for the rule that will be created.

In our specific scenario we will use the name – Block E-mail with password protected attachment

On the bottom part of the window, click on the option – More options…
(using the More Option… menu is needed for displaying all of the available mail attachment rule options).

Block E-mail message that have attachment that is password protected -02

Under the *Apply this rule if…. choose the menu – Any attachment… in the sub menu that appear, choose the menu – Is password protected

Block E-mail message that have attachment that is password protected -03

The “action” rule part

In this part, we decide what is the specific action that will be implemented or enforced, in case that Exchange Online “capture” a specific E-mail message with an attachment that includes a password-protected file.

In our specific scenario, we decide to send the E-mail message to quarantine (described as Hosted quarantine).

In the section – Do the following… choose the menu Redirect the message to…. And, in the sub menu that appear, choose the menu hosted quarantine

Block E-mail message that have attachment that is password protected -04

In the following screenshot, we can see the “logic” of the Exchange Online transport rule.

The “top part” of the rule defines the condition that needs to occur.
The “bottom part” defines the action that will be execrated when a specific condition occurs.

Block E-mail message that have attachment that is password protected -05

Block E-mail that has an attachment that is password protected and send notification for the both of the recipients.

In the current section, we will demonstrate the power of the Exchange Online transport rule in creating a more advanced and sophisticated rule.

This time we want to define an attachment rule, that is based on the next logic:

In case that an E-mail message that includes a password-protected file attachment is sent to one of our organization recipients, we want to “activate” the following actions:

  1. The E-mail message will be blocked.
  2. An E-mail notification will be generated and sent to the “source recipient” notifying him that his E-mail message was blocked because it includes an attachment that violates the company policy.
  3. An E-mail notification will be generated and sent to the “destination recipient” notifying him that his E-mail message that was supposed to be sent to him was blocked because it includes an attachment that violates the company policy.

Block E-mail message and notify booth of the recipients -Source and destination

To be able to create the required rule, use the following steps:

Login to Exchange admin

  • On the left bar menu, choose – mail flow
  • On the top bar menu, choose – rules
  • Click on the plus sign
  • Choose – Create a new rule…

Block E-mail with password protected attachment and notify sender and recipient -00

In the Name: text box, add a descriptive name for the rule that will be created.

In our specific scenario, we will use the name – Block E-mail with password-protected  + notify

On the bottom part of the window, click on the option – More options…
(using the More Option… menu is needed for displaying all the available mail attachment rule options).

Block E-mail with password protected attachment and notify sender and recipient -01

In the following section, define the condition that refers to the E-mail message that includes a password-protected attachment.

Under the *Apply this rule if…. choose the add condition option.

Block E-mail with password protected attachment and notify sender and recipient -02-a

Under the *Apply this rule if…. Choose the menu – Any attachment… in the sub menu that appears, choose the menu – Is password protected

Block E-mail with password protected attachment and notify sender and recipient -02-b

In the following section, define the condition that refers to the “destination recipient”.
In our scenario, we want to “activate” the rule when an E-mail message is sent to one of our organization recipients (internal recipient).
Under the *Apply this rule if…. choose the add condition option.

Block E-mail with password protected attachment and notify sender and recipient -03

Choose the option – The recipient… and in the sub menu that appear, choose the menu is an external / internal

Block E-mail with password protected attachment and notify sender and recipient -04

In the next window, choose the option – inside the organization

Block E-mail with password protected attachment and notify sender and recipient -05

In the following screenshot, we can see that, up until now, we have finished configuring  the “condition” part of the rule.

Next, we will need to define “what will have happened” when the condition that we define is meet.

Block E-mail with password protected attachment and notify sender and recipient -06

The “action” rule part

In this part, we decide what is the specific action that will be enforced, in case that Exchange Online “capture” a specific E-mail message with an attachment that includes a password-protected file.

In our specific scenario, we decide to block E-mail message that includes an attachment that we cannot inspect (password-protected protected attachment).

The “response” will include three different “actions”

  1. Block the E-mail message that includes password protected.
  2. Send an E-mail notification to the recipient (source recipient) that sent the E-mail message.
  3. Send an E-mail notification to the recipient (internal recipient) that was supposed to get the E-mail message.

Now, we will define the action that will include these three different parts:

1.  Send a notification to the source recipient

In the section – Do the following… choose the menu block the message…. And, in the sub menu that appears, choose the menu Reject the message and include an explanation

Block E-mail with password protected attachment and notify sender and recipient -07

The notification that we define we be sent to the “source recipient” meaning the originating of the E-mail message.

In our specific scenario, we will send a notification with the following message:

Our organization doesn’t accept E-mail message with attachment

Block E-mail with password protected attachment and notify sender and recipient -08

Next, we will need to add the additional action that will be implemented – notify the destination recipient.

Choose the option – add action

Block E-mail with password protected attachment and notify sender and recipient -09
Choose the menu option – Notify the recipient with a message…

Block E-mail with password protected attachment and notify sender and recipient -10

One of the nice options that are available for us when using a transport rule is the option to use “pre-defined fields” (variables) that will be included in the “response message”
for example, we can use the “%%From%%” as a variable that will include the name (display name and E-mail address) of the source recipient.

In addition, we can use and HTML tag that will enable us to format the text in the E-mail response message.

In the following section, you can see (and copy) and an example of a notification that will be sent to the destination recipient who should have got the E-mail message.

<p>Dear recipient (%%to%%) </p>

<p>Our organization mail attachment policy blocked E-mail message sent to you by <b>%%From%% </b> because, it contains an attachment. </p>

<p><u>Additional details</u></p>

<br> Sent by: %%From%% <br>

<br> Sent to:   %%To%% <br>

<br> Mail subject: %%Subject%%<br>

<br> Message Date:  %%MessageDate%% <br>

In the following screenshot, we can see the text that I have prepared.
I will copy the text and paste it in the section of – provide message text.

Block E-mail with password protected attachment and notify sender and recipient -11

In the window that appear past the text message that you want to send, to the destination recipient.

Block E-mail with password protected attachment and notify sender and recipient -12

In the following screenshot, we can see the “complete rule” that includes the condition and the actions that were defined in the former steps.

Block E-mail with password protected attachment and notify sender and recipient -13

Testing the password-protected rule that we have created.

In this section, I would like to demonstrate the “result” of the rule that we have created in the former section.

To be able to test the rule, we will use a simple mail message that will include a password-protected file.

Our expectation is that Exchange Online will block the E-mail message and will send a notification to the source + the destination recipients.

In the following screenshot, we can see the E-mail message that includes the password-protected attachment.

  • The source recipient is: Alice@o365pilot.com
  • The destination recipient is: Bobm@o365pilot.com

Block E-mail with password protected attachment and notify sender and recipient -14

1 . The mail notification that Exchange Online sends to the “source recipient”.

In the following screenshot, we can see the E-mail notification that sent to the originating of the E-mail message (Alice).

The E-mail notification that Exchange Online generates is clear and easy to understand (user-friendly).

The notice informs the sender that his E-mail message was blocked and, in addition, includes the ” explanation” that we have prepared in the former step:

Our organization doesn’t accept E-mail message with attachment

Block E-mail with password protected attachment and notify sender and recipient -15

The following screenshot is the bottom part of the E-mail notification message that was sent to the source recipient.

We can see that the notification includes very detailed information such as the mail flow if the E-mail message, the mail servers who were involved in the process and so on.

Block E-mail with password protected attachment and notify sender and recipient -16

2.  The mail notification that Exchange Online sends to the “destination recipient”.

In the following screenshot, we can see the mail notification that Exchange Online, send to the “destination recipient” (Bob in our scenario).

In the E-mail notification, we can see the “result” if the template that was had created in the former step.

Block E-mail with password protected attachment and notify sender and recipient -17

Manage E-mail attachment policy in Office 365 | Article series index

Now it’s Your Turn!
We really want to know what you think about the article

The post Manage E-mail attachment policy in Office 365 – part 4#4 appeared first on o365info.com.

Manage E-mail attachment policy in Office 365 – Part 3#4

$
0
0

In the current article, we will review how to enforce an E-mail attachment policy by using Exchange Online transport rule.

The example that we will review in the current article is – an E-mail attachment policy, that stop E-mail messages that include an attachment with a specific file extension.

Manage E-mail attachment policy in Office 365 | The article series

The article series include the following articles:

  1. Manage E-mail attachment policy in Office 365 – Part 1#4
  2. Manage E-mail attachment policy in Office 365 – Part 2#4
  3. Manage E-mail attachment policy in Office 365 – Part 3#4
  4. Manage E-mail attachment policy in Office 365 – Part 4#4

Block E-mail that has an attachment with a specific file extension

The following option as the name implies, enable us to choose the specific file Extension that will be blocked.

In this scenario we are “taking” the responsibility from the mail client such as OWA and Outlook and use the Exchange Online server for enforcing the E-mail attachment file extension policy.

The main disadvantages of this method are:

  1. We will need to prepare a list of file extensions that we want to block and update this list from time to time in the Exchange Online transport rule in case that we want to add a “new file extension”
  2. The Exchange Online transport rule will relate only to the file name extension and not the true file type (MIME type).

For example – in the case that we define an E-mail message attachment rule that will block mail attachment that uses the file name extension *BAT, each E-mail message that will include this attachment will be blocked.

However, in case that a hostile element changes the filename extension from BAT to PDF, for example, the Exchange Online transport rule will not block the E-mail message.

Attached some quotation from Microsoft public articles:

For increased protection, we also recommend using Transport rules to block some or all of the following extensions: ade, adp, ani, bas, bat, chm, cmd, com, cpl, crt, hlp, ht, hta, inf, ins, isp, job, js, jse, lnk, mda, mdb, mde, mdz, msc, msi, msp, mst, pcd, reg, scr, sct, shs, url, vb, vbe, vbs, wsc, wsf, wsh. This can be done by using the Any attachment file extension includes these words condition.

[Source of information – Best practices for configuring EOP]

Not all malware comes in the form executable files and so we also recommend the following extensions be blocked.

ade, adp, ani, bas, bat, chm, cmd, com, cpl, crt, hlp, ht, hta, inf, ins, isp, job, js, jse, lnk, mda, mdb, mde, mdz, msc, msi, msp, mst, pcd, reg, scr, sct, shs, url, vb, vbe, vbs, wsc, wsf, wsh.

[Source of information – Tips to prevent Zero-Day Malware with EOP]

To be able to create the required rule, use the following steps:

Login to Exchange admin

  • On the left bar menu, choose – mail flow
  • On the top bar menu, choose – rules
  • Click on the plus sign
  • Choose – Create a new rule…

Block attachment that has dangerous file extensions-01

In the name: text box, add a descriptive name for the rule that will be created.

In our specific scenario, we will use the name – Block attachment that has dangerous file extinctions

Block attachment that has dangerous file extensions-02

On the bottom part of the window, click on the option – More options…
(using the More Option… menu is needed for displaying all of the available mail attachment rule options).

Block attachment that has dangerous file extensions-03

Under the *Apply this rule if…. choose the menu – Any attachment… in the sub menu that appear, choose the menu – file extension includes these words.

Block attachment that has dangerous file extensions-04

In the text box – specify words or phrases and the name of the file extension that you want to block such as – ade, adp, ani, bas, bat, chm, cmd, com, cpl, crt, hlp, ht, hta, inf, ins, isp, job, js, jse, lnk, mda, mdb, mde, mdz, msc, msi, msp, mst, pcd, reg, scr, sct, shs, url, vb, vbe, vbs, wsc, wsf, wsh

Block attachment that has dangerous file extensions-05

Click on the plus icon to add the required file extensions

Block attachment that has dangerous file extensions-06

The “action” part of the rule

In this part, we decide what is the specific action that will be implemented or enforced, in case that Exchange Online “capture” a specific E-mail message with an attachment that is not a complaint with our E-mail message attachment policy.

In our specific scenario, we decide to send the E-mail message to quarantine (described as Hosted quarantine).

In the section – Do the following… choose the menu Redirect the message to…. And, in the sub menu that appear, choose the menu hosted quarantine

Block attachment that has dangerous file extensions-07

In the following screenshot, we can see results

Block attachment that has dangerous file extensions-08

Next article

In the next article, we will review how to create an Exchange Online transport rule, that will enforce an E-mail attachment policy on E-mail messages by “stopping” E-mail message that that includes a password protected attachment.

Manage E-mail attachment policy in Office 365 | Article series index

Now it’s Your Turn!
We really want to know what you think about the article

The post Manage E-mail attachment policy in Office 365 – Part 3#4 appeared first on o365info.com.

Manage E-mail attachment policy in Office 365 – Part 2#4

$
0
0

In the current article, we will review how to enforce an E-mail attachment policy by using Exchange Online transport rule.

The example that we will review in the current article is – an E-mail attachment policy that stops E-mail messages that have an executable content (executable attachment).

As we learn in the former article, by default, Exchange Online will not use any type of mail message attachment policy besides the process of scanning incoming and outgoing E-mail message looking for an E-mail message that includes an attachment that considers as a malware.

Manage E-mail attachment policy in Office 365 | The article series

The article series include the following articles:

  1. Manage E-mail attachment policy in Office 365 – Part 1#4
  2. Manage E-mail attachment policy in Office 365 – Part 2#4
  3. Manage E-mail attachment policy in Office 365 – Part 3#4
  4. Manage E-mail attachment policy in Office 365 – Part 4#4

Choosing the “right” file attachment policy – Exchange Online transport rule

The available option when using an Exchange Online file attachment transport rule.

The Exchange Online transport rule includes a dedicated section that deals with the subject of “E-mail message attachment policy”.

In the current article, we will not review all the available options that we can use, but instead focus in three major options that are most commonly used:

  1. Block attachment that has been executable content – a policy in which we are prevented incoming and outgoing E-mail message that includes any type of ” executable attachment”. In this scenario, we are not related to the specific file extension, but instead of any type of executable attachment.
  2. Block E-mail that has an attachment with a specific file extension – a scenario in which we want to block only a specific file attachment type. In this scenario, we want to allow executable attachment but prevent or block only a specific executable attachment.
  3. Block E-mail that has an attachment that is password protected – an E-mail attachment that is protected by a password, cannot be scanned. In this scenario, we are not willing to allow incoming and outgoing E-mail message that includes an attachment that considers as a password protected.

What to do with an E-mail message that includes an attachment that is not a complaint with our E-mail message attachment policy.

Another part that we should consider when we design our E-mail message attachment policy is – the “action” that will be executed regarding attachment that is not a complaint with our E-mail message attachment policy.

For example – in a scenario, in which we dedicate an E-mail message that included an attachment that is not compliant with our E-mail message attachment policy what to do with the E-mail message?

  • Should we delete the E-mail message?
    Should we send the E-mail message to a quarantine (described as Hosted quarantine)?
  • Should we allow the E-mail message to be sent to the recipient mailbox, but mark the E-mail message as spam mail (raise the SCL value)?
  • Should we notify the originating recipient that his mail was blocked?
  • Should we notify the destination recipient that mail that was sent to him his mail was blocked because our E-mail message attachment policy?

Note – in the E-mail message attachment rule demonstration that will be provided in the next sections we will use the “action” of sending email messages with an attachment that is not a complaint with our E-mail message attachment policy to quarantine.

Using different our E-mail message attachment policy for our organization users versus an external recipient

Another important question that we should ask is:

Should we use a different E-mail message attachment policy to E-mail messages that sent between our organization users versus E-mail message that sent by external recipients?

The answer

As usually, there is no “one good answer”.

The “right -mail message attachment policy” depends on the specific organization needs and structure, and My main goal is just to expose the different available options and let you decide to regard what is the best solution for your specific needs.

General tip regarding Exchange Online transport rule that will enforce E-mail attachment policy

A very important tip regarding the process of creating an Exchange transport rule that will deal with an E-mail address with attachment is the subject of “more details”.

The “standard” Exchange Online transport rule includes by default a very limited option of settings that relate to the “mail attachment settings”

To be able to display the complete set of options that relate to “mail attachment settings” we should “activate” the transport rule option named – More options.

To be able to demonstrate this “issue”, we will use the following steps:

Login to Exchange admin

  • On the left bar menu, choose – mail flow
  • On the top bar menu, choose – rules
  • Click on the plus sign
  • Choose – Create a new rule…

Tip regarding Exchange Online transport rule for blocking E-mail with an attachment -01

Choose the option – Any attachment’s content includes…

Tip regarding Exchange Online transport rule for blocking E-mail with an attachment -02

In the following screenshot, we can see that the only option that is available for us is the option named – specify words or phrases.

To be able to “reveal” the additional useful options that relate to the management of file attachments, we will cancel the current windows and go back to the main rule wizard window.

Tip regarding Exchange Online transport rule for blocking E-mail with an attachment -03

All we need to do for adding the additional configuration settings is just click on the
More Options…” link

Tip regarding Exchange Online transport rule for blocking E-mail with an attachment -04

In the following screenshot, we can see that now, if we choose the menu  – Any attachment, a new submenu “appears” with a variety of configuration options which we can choose from.

Tip regarding Exchange Online transport rule for blocking E-mail with an attachment -05

Block E-mail attachments that have executable content

The main character of this E-mail attachment rule is that we would like to prevent any type of scenario, in which any element (Office 365 users and external recipient) will be able to send an E-mail message that includes an executable content.

For example, prevent the option in which Office 365 will be able to accept E-mail messages that include EXE file.

In addition, we would like also to prevent a scenario in which a hostile element, tries to “cover his tracks” by changing the file type extension from the original executable file type into an Innocent file type.
For example – rename the extension of a file named – notepad.exe to notepad.pdf

In other words, we are expecting from Exchange Online to be “smart” and implement a file scan which will “reveal” the file type based on the real file type and not only based on the name of the file extension.

Login to Exchange admin

  • On the left bar menu, choose – mail flow
  • On the top bar menu, choose – rules
  • Click on the plus sign
  • Choose – Create a new rule…

Exchange Online transport rule - Block attachment that has executable content -01

In the Name: text box, add a descriptive name for the rule that will be created.

In our specific scenario, we will use the name – Block attachment that has executable content

Exchange Online transport rule - Block attachment that has executable content -02

On the bottom part of the window, click on the option – More options…
(using the More Option… menu, is needed for displaying all of the available mail attachment rule options).

Exchange Online transport rule - Block attachment that has executable content -03

Under the *Apply this rule if…. choose the menu – Any attachment… in the sub menu that appear, choose the menu – has executable content.

Exchange Online transport rule - Block attachment that has executable content -04

The rule “action” part

In this part, we decide what is the specific action that will be implemented or enforced, in case that Exchange Online “capture” a specific E-mail message with an attachment that is not a complaint with our E-mail message attachment policy.

In our specific scenario, we decide to send the E-mail message to quarantine (described as Hosted quarantine).

The Exchange Online quarantine is a restricted area (part of the Exchange Online service) that is “accessible” for the mailbox owner and in addition, to the Exchange Online administrator.

In the section – Do the following… choose the menu Redirect the message to…. And, in the sub menu that appears, choose the menu hosted quarantine

Exchange Online transport rule - Block attachment that has executable content -05

In the following screenshot, we can see the “logic” of the Exchange Online transport rule.

The “top part” of the rule defines the condition that needs to occur.
The “bottom part” defines the action that will be execrated when a specific condition occurs.

Exchange Online transport rule - Block attachment that has executable content -06

Testing the Block attachment that has an executable content rule.

The rule that we have created should detect and stop every E-mail message that includes an executable attachment.
But what about a scenario in which a hostile element will change the file suffix from the executable suffix such an EXE into Innocent suffix such as PDF?

The answer is that the Exchange Online is “smart enough” to detect an executable attachment even if the file suffix was changed.

To be able to test this theory, we will implement the following test:

We will copy the notepad executable file into a temporary folder and change the file name suffix from the original suffix (exe) into PDF suffix.

Simulating hostile element that changing the file type extension -01

In the next step, we will send the file as an attachment.

Notice that Outlook mail client relates to the file as a PDF file.

Simulating hostile element that changing the file type extension -02

The last step is sending the E-mail message to some other Office 365 recipient and verifying if the E-mail message was sent to his mailbox or instead was captured by the Exchange Online E-mail attachment rule and was redirected to the quarantine.

Next article

In the next article, we will review how to create an Exchange Online transport rule, that will enforce an E-mail attachment policy on E-mail message by preventing E-mail messages that include an attachment with a specific file extension.

Manage E-mail attachment policy in Office 365 | Article series index

Now it’s Your Turn!
We really want to know what you think about the article

The post Manage E-mail attachment policy in Office 365 – Part 2#4 appeared first on o365info.com.

Configure Exchange Online to forward E-mail to a FAX service |Part 1#2

$
0
0
In the current article and the next article, we will review a scenario in which we need to use the Exchange Online infrastructure for – “forward” E-mail messages that need to be sent as an FAX message, to an FAX service that is hosted on an external network, such as our On-Premises organization’s network.

Theoretically, we can think of a scenario in which we “install” the FAX service (such as FAX connector) on the Exchange Online infrastructure but in the current time, this option is not available.

In other words, we can install or use FAX services on our “private environment” and ask from Exchange Online to “redirect” E-mail message to this “external FAX services.”

Implementing the “redirection procedure” to the external FAX service

The process in which we redirect E-mail message that we created by Exchange Online recipient to the FAX services is implemented by using “outgoing Exchange Online mail connector”.

The “redirection” will be implemented by using a specific domain name that represents the “external FAX infrastructure”.

Most of the time the domain name is a fake domain that serves only for the routing purposes.

The process is based on the following logic – each time that an Exchange Online recipient sends an E-mail message to the destination recipient who includes a specific domain name. The E-mail message will be “captured” by Exchange Online and will “channeled” via the dedicated Exchange Online outbound connector that will send \ forward the E-mail message to the external FAX service.

In the following diagram, we can see an example of the logic of routing E-mail messages to external FAX services.

The “external FAX services” is represented by the domain name – fakedomain.com.

Based on the assumption that we have already created the required outgoing Exchange Online send connector, each time that the Exchange Online recipient will send E-mail message to a recipient using the E-mail address such as 87456587945@fakedomain.com, the Exchange Online will “understand” that he needs to route this specific E-mail message to the smart host who was configured in the sends connector (in our scenario, the domain name is fakedomain.com).

When the E-mail message reaches the destination FAX services, the FAX service will “fetch” the left part Public Folder the E-mail message that includes the phone number (in our scenario, the phone number is 87456587945).

The logic of routing E-mail message by Exchange Online to FAX services

Testing the settings in which Exchange Online to forward E-mail to on-Premises FAX

In this type of scenario, there are two parties that involved in the communication channel:

  1. Exchange Online infrastructure
  2. External FAX infrastructure

In the current article, we can only review the “Exchange Online side” of the story because we have no control or information about the “destination FAX infrastructure”.

To be able to simulate the “full flow” in which E-mail message is sent from Exchange Online infrastructure to the “external FAX infrastructure” we will use Exchange on-Premises infrastructure that will help us to verify of the Exchange Online setting working “OK” and the E-mail message is routed to the external FAX infrastructure.

Scenario description

In our specific scenario, the “FAX domain name” (the domain name that will be used by Exchange Online for routing purposes) is – fakedomain.com
We will configure this domain name on Exchange on-Premises server and in addition, select a “test user” to whom we will add E-mail address with this domain name.

In our scenario, we will add the additional E-mail address – Suzan@fakedomain.com
to Suzan Exchange on-Premises mailbox.

Redirecting E-mail message from Exchange Online to on-Premises FAX

Step 1#2 – configuring the required setting in the Exchange on-Premises infrastructure

As mentioned, this step is not mandatory and the only reason that we are implementing these steps is to “mimic” the FAX environment, so we will be able to verify that the task of routing E-mail messages from Exchange Online to the external FAX services is successfully completed.

In our specific scenario, we will use an Exchange 2010 based server.

We will add and additional “accepted domain” under the Organization Configuration and choose the tab – Accepted Domains

In our scenario, we will add the domain name – fakedomain.com

Right click on the “white space” and chose the menu – New Accepted Domain…

Testing the fake FAX domain using Exchange on-Premises – 01

We will add the domain name – fakedomain.com

Testing the fake FAX domain using Exchange on-Premises – 02

And click on the Finish button to end the process.

Testing the fake FAX domain using Exchange on-Premises – 03

In the following screenshot, we can see now, Exchange on-Premises “understand” that he is responsible for the domain name – fakedomain.com

Testing the fake FAX domain using Exchange on-Premises – 04

In the next step, we will add to Suzan mail box an additional E-mail address based on the domain name that we have added in the former step.

Testing the fake FAX domain using Exchange on-Premises – 05

We will chose the E-mail tab and add the following E-mail address – Suzan@fakedomain.com

Testing the fake FAX domain using Exchange on-Premises – 06

In the following screenshot, we can see that now Suzan has an addition E-mail address. In the next article, we will create the required configuration setting in Exchange Online and at the end, try to send E-mail message the domain that represent the “External FAX infrastructure”

Testing the fake FAX domain using Exchange on-Premises – 07

Next Article

In the next article, we will review the required steps for creating and verifying an Exchange Online send connector, that will be used for forwarding the E-mail message to the FAX server

Now it’s Your Turn!
We really want to know what you think about the article

The post Configure Exchange Online to forward E-mail to a FAX service |Part 1#2 appeared first on o365info.com.


Configure Exchange Online to forward E-mail to a FAX service |Part 2#2

$
0
0
The current article is the continuation of the former article in which we review that subject of the required settings that need to be configured for implementing a scenario in which Exchange Online to forward E-mail to on-Premises FAX.

The demonstration will include two phases.

  1. Creating the required Exchange Online send (outbound) connector that will redirect E-mail message that needs to be sent as FAX to the external FAX service
  2. Checking and verging the Exchange Online send connector and verifies that the E-mail message reach to her destination.

Part 2#2 – Creating Exchange Online outbound connector that will redirect E-mail message to the external FAX service

Login to Exchange admin

  • On the left bar menu, choose – mail flow
  • On the top bar menu, choose – connectors
  • Click on the plus sign
  • Choose – Create a new rule…

Configure Exchange Online to forward E-mail to on-Premises FAX - 01

In the From: box choose – Office 365

Configure Exchange Online to forward E-mail to on-Premises FAX - 02

In the To: box choose – Your organization’s email server

Configure Exchange Online to forward E-mail to on-Premises FAX - 03

In the following screenshot, we can see the “result” and message that inform us that we will need to relate to the destination host using the option of the smart host.

Configure Exchange Online to forward E-mail to on-Premises FAX - 04

In this window, will we define a name for the outbound Exchange Online connector. There are not specific instructions regarding the name beside the recommendation to make the name informative as much as we can.

Configure Exchange Online to forward E-mail to on-Premises FAX - 05

In the next window, we need to choose the option – Only when email messages are sent to these domains

The meaning of this option is that in the next step, we will need to define the domain name which will “activate” the Exchange Online send connector.
Every time that Exchange Online recipient will send an E-mail message that includes the specified domain, the Exchange sends connector will be activated.

Click on the plus sign to add the required domain name

Configure Exchange Online to forward E-mail to on-Premises FAX - 06

In our specific scenario, the “destination domain name” is – fakedomain.com

Notice the interesting fact that, in reality, there are no such domain and Exchange Online will not locate the host who represents this “fake” domain by using the stranded MX record lookup.

Instead, each time that an E-mail message will include this domain name (fakedomain.com) the E-mail message will be routed to a designated host described as – smart host, by specifying a specific IP Address.

Configure Exchange Online to forward E-mail to on-Premises FAX - 07

Click on the Next button

Configure Exchange Online to forward E-mail to on-Premises FAX - 08

In this step, we will need to add the public IP address of the host (the FAX service) that represent the domain name – fakedomain.com

Click on the plus icon

Configure Exchange Online to forward E-mail to on-Premises FAX - 09

In our specific scenario, the public IP address of the smart host (the FAX service) is 212.25.80.239

Configure Exchange Online to forward E-mail to on-Premises FAX - 10

Click Next to move to the Next wizard window

Configure Exchange Online to forward E-mail to on-Premises FAX - 11

We will need to uncheck the option – Always use Transport Layer Security (TLS) to secure the connection (recommended).

The reason for – unchecking this option is that most of the time the external FAX service will not support TLS.

Most of the time the recommendation to simplify things in the first phase, meaning – not to implement TLS. Later,  if the Exchange Online sends connector will manage to deliver that required mail as we expect, we can go back to the send connector settings and add the requirement for TLS if needed.

Configure Exchange Online to forward E-mail to on-Premises FAX - 12

In the following screenshot, we can see the summary of all the configuration setting that was created until now.

Configure Exchange Online to forward E-mail to on-Premises FAX - 13

Click Next to move to the Next wizard window

In this step, the Exchange Online connector needs to validate the connection to the destination mail infrastructure.

The Exchange Online feature of “validation” is a nice feature, but could be considered as “problematic” sometimes because the need for using the validation process is mandatory.

Even in the case that the validation process fails, we can complete the task of creating the new Exchange send connector.

In simple words- we will need to complete the validation process to be able to complete the creation if the Exchange Online sends connector.

Click on the plus icon

Configure Exchange Online to forward E-mail to on-Premises FAX - 14

In our specific scenario, we will try to send test E-mail message to a destination recipient who uses the E-mail address – Suzan@facedomain.com

Configure Exchange Online to forward E-mail to on-Premises FAX - 15

Click on the Validate button

Configure Exchange Online to forward E-mail to on-Premises FAX - 16

In the following screenshot, we can see that the validation test completes successfully.
Notice that the term “successfully” only mean that the validating test complete, but it doesn’t mean that the E-mail message was successfully sent to the destination recipient.

Configure Exchange Online to forward E-mail to on-Premises FAX - 17

In the following screenshot, we can see that in our scenario, the E-mail message test completes successfully.

Configure Exchange Online to forward E-mail to on-Premises FAX - 18

If we want to get more details on the mail flow, we can double-click on the log and see the “content” of the log.

Configure Exchange Online to forward E-mail to on-Premises FAX - 19

In the following screenshot, we can see “Suzan’s mailbox.” We can see that the Exchange Online sends connector manage to deliver a “test message” to Suzan using the E-mail address –Suzan@fakedomain.com

Configure Exchange Online to forward E-mail to on-Premises FAX - 20

Now it’s Your Turn!
We really want to know what you think about the article

The post Configure Exchange Online to forward E-mail to a FAX service |Part 2#2 appeared first on o365info.com.

Configuring exceptions for the Exchange Online Spoof E-mail rule |Part 3#12

$
0
0

In this article, we will review the subject of – “how to create an Exchange Online rule exception.

As the name implies, the “exceptions” part of the Exchange rule was created to prevent the execution of the Exchange Online rule in a specific scenario.

In the current article, we will continue to use the scenario that we have reviewed in the former article

Just a quick reminder for our scenario requirements:

  1. We want that Exchange Online will scan incoming E-mail message and identify
    E-mails that look like spoofed E-mail.
  2. We don’t want to delete the E-mail messages that were identified as spoofed E-mail, but we want to inform a designated recipient about this E-mail message, and we want to be able to send a copy of “original E-mail message” that was identified as spoofed E-mail.

The “trigger” that will activate the Exchange Online “Spoofed E-mail rule” will be based on the following two conditions (a combination of condition 1 + condition 2):

  1. An incoming email message that is sent by a non-authenticated recipient (recipient who doesn’t provide user credentials).
  2. The recipient present himself by using an E-mail address that includes our public domain name. In our specific scenario and E-mail address that include the domain name – o365pilot.com

The way we define the characters of a spoofed E-mail poses a problem because part of our mail flow infrastructure is based on a web application and mail-enabled devices that address Exchange Online serve as “their mail server” but, without providing any user credentials (anonymous session).

In case that we “activate,” the Exchange Online Spoofed E-mail rule that we have created in the former article, the mail that is sent by this host will be identified as spoofed E-mail.

The good news is that we can use the required Exchange Online Spoofed E-mail rule + add to the rule a specific instruction in which the rule will not be applied to as specific hosts or in other words, define an Exchange Online rule exception.

The description of the hosts\ services that will be excluded from the Spoof email rule

In our specific scenario, the following hosts are addressing Exchange Online as their mail server by using and “anonymous SMTP session” (without providing user credentials):

  • External web application – our organization uses, a web application that sent E-mail messages to organization users. The web application sends E-mail messages using the E-mail address – support@o365pilot.com. The web application doesn’t provide any user credentials.
  • Mail-enabled devices – the organization’s network includes a mail-enabled device such as scanners and printers, which uses Exchange Online as their mail server. The mail-enabled device doesn’t provide any user credentials.

Theoretically, when we will “activate” the Exchange Online Spoofed E-mail rule, each E-mail message that will be sent by these “entities”, will be considered as spoofed E-mail and in a response Exchange Online will generate and send an incident report to the designated recipient\s.

We wish to prevent this scenario by “telling” Exchange Online, that in case that the E-mail message was sent by one of these hosts (the web application or the mail-enabled device that are located on our network), Exchange will “ignore” this E-mail message.

Adding an exception to the Exchange Online spoof E-mail rule

Adding the required exceptions to the Exchange Online Spoof email rule

In the following section, we will demonstrate how to add exceptions to the Exchange Online Spoof email rule that was reviewed in the former article.

  • Log in to the Exchange admin portal
  • On the left menu bar, choose – mail flow
  • On the top menu bar, choose – rules

In our specific scenario, we will select the rule named – Detect Spoofed E-mail + Send an incident report (the rule that was reviewed in the former article).

We will select the pencil icon for editing the rule

Configuring exceptions for the Exchange Online Spoof email rule -00

In the following screenshot, we can see the structure of the Exchange Online rule.
In the current scenario, we will edit the “third part” that enable us to define some exceptions to the rule.

Configuring exceptions for the Exchange Online Spoof email rule -01

Configuration exception 1#2 – exclude the external web services that use the E-mail address – support@o365pilot.com

Click on the option – add exception

Configuring exceptions for the Exchange Online Spoof email rule -02

  • In the section named – Except if…, Click on the small black arrow
  • Choose the menu – The sender…
  • In the submenu, choose the menu – Is this person

Configuring exceptions for the Exchange Online Spoof email rule -03

In our specific scenario, the “person” is represented by the E-mail address – Support@o365pilot.com

Select the required E-mail address and click on the add-> button

Configuring exceptions for the Exchange Online Spoof email rule -04

Configuration exception 2#2 – exclude the mail-enabled host represented by the IP Address 212.25.80.226

In this section, we will add the second exception that “defines” all the mail-enabled hosts that are located on our company network that is represented by the public IP address – 212.25.80.226

Click on the option – add exception

Configuring exceptions for the Exchange Online Spoof email rule -05

  • Under the section named – or, click on the small black arrow
  • Choose the menu – The sender…
  • In the submenu, choose the menu – IP address is any of these ranges or exactly matches

Configuring exceptions for the Exchange Online Spoof email rule -06

In the text box – specify IP address ranges, we will add the Public IP address that represents the organization’s network

Configuring exceptions for the Exchange Online Spoof email rule -07

In the following screenshot, we can see the “final result” – an Exchange Online rule that consists of three separate parts:

  • The first part (A) defines the condition in which a specific E-mail message will be classified as a spoofed E-mail message.
  • The second part (B) defines the action that will be “executed” by Exchange Online when he recognizes a specific E-mail message as “spoofed E-mail message”.
  • The Third part (C) defines the exception for the condition which is used in part A.

Configuring exceptions for the Exchange Online Spoof email rule -08

Dealing with spoof E-mail – Office 365 | Article series index

Now it’s Your Turn!
We really want to know what you think about the article

The post Configuring exceptions for the Exchange Online Spoof E-mail rule |Part 3#12 appeared first on o365info.com.

Detect spoof E-mail and mark the E-mail as spam using Exchange Online rule |Part 4#12

$
0
0

In the current article, we will review how to deal with the phenomenon of spoofed E-mail in Office 365 environment by using an Exchange Online rule that will identify and mark Spoof email message as “spam mail”.

The main characters of our specific scenario are:

  1. We want that Exchange Online will scan incoming E-mail message and, identify
    E-mails that look like spoofed E-mail.
  2. We don’t want to delete the E-mail messages that was identified as spoofed E-mail but instead, we want “mark” the E-mail message as spam mail.

In our scenario, we will “enable” this E-mail messages to reach their destination (the organization recipient mailbox) but, we will “stamp” the E-mail message as a spam mail message.

In other words, we will enable the “end recipient” to decide what to do with the E-mail message that will be saved in his junk mail folder.

The process of “stamping” or classifying a specific E-mail message as a “spam E-mail” is implemented by setting the value of the SCL.
SCL stand for – Spam Confidence Level. The ability of the Exchange server to describe an
E-mail as a “safe E-mail” or “spam E-mail” is, by using a specific number for the SCL value.

for example:

  • SCL value of “-1” – the meaning of the SCL value “-1” is translated to “the specific E-mail message is totally safe and trusted”.
  • SCL value of “5” – the meaning of the SCL value “5” is translated to – “the specific E-mail message considered as spam mail”.
Note – the SCL value range is -1 up to 9.
In our specific scenario, we will use the value 5 for the SCL. Technically speaking, we can use other SCL values such as 6, 7 etc.

Additional actions that will be implemented by the Exchange Online rule

Besides the process of “stamping” E-mail message as spam E-mail message, we would also like to notify a designated recipient such as the Exchange Online administrator, about each event in which a specific E-mail message is identified as spoofed E-mail.

In Exchange Online environment, this “notification” is implemented by using the option of the incident report.

When the Exchange Online rule “intercept” an E-mail message that look like a spoofed
E-mail, Exchange will generate and send an incident report to a designated recipient that was configured in the Exchange Online rule.

The incident report will include a summary report of the specific E-mail message + a copy of the original E-mail message.

The responsibility of the “designated recipient” that will get the incident report is – to analyze the E-mail message and, decide if the E-mail message is “indeed” spoofed E-mail message or, a legitimate E-mail message that was mistakenly identified as “spoof E-mail message”.

In case that the designated person decides that the E-mail message is indeed so spoofed E-mail message, he is responsible for notifying the “destination recipient” and other persons about the spoofed E-mail message.

The specific characters of our Spoof E-mail scenario

The business need and the goals that we need to accomplish are as follows:

  • We want to be able to identify E-mail messages that look like a spoofed E-mail.
  • We don’t want to delete the E-mail message that looks like a spoofed E-mail because, we would like to avoid a false-positive event, in which in which a legitimate E-mail message was mistakenly identified as a spoofed E-mail message and will be deleted.
  • We want to “warn” the organization recipient and inform him that the E-mail message could be a dangerous E-mail message, by stamping the E-mail message that was “captured” by the Exchange Spoof email rule as “spam mail”.
  • We want to send a sample of the spoofed E-mail to the designated user, so he will be able to analyze the E-mail message.

The Exchange Online Spoofed E-mail rule structure and logic

The “trigger” that will activate the Exchange Online “Spoofed E-mail rule” will be based on the following two conditions (a combination of condition 1 + condition 2):

  1. An incoming email message that is sent by a non-authenticated recipient (recipient who doesn’t provide user credentials).
  2. The recipient present himself by using an E-mail address that includes our public domain name. In our specific scenario and E-mail address that include the domain name – o365pilot.com

The “action” that will be executed by our “Spoofed E-mail rule” are:

  • Action 1#2 – stamp the E-mail message as a spam E-mail by using the SCL value of “5”.
  • Action 2#2 – generate + send an incident report to the designated destination recipient (the incident report will include a summary report + the original E-mail message).

In the following diagram, we can see the sequence of actions, that will be implemented by the Exchange Online Spoofed E-mail rule:

The logic of Exchange rule for detecting spoof E-mail ?- Mark as spam E-mail

When Exchange Online identifies E-mail messages that answer the conditions of “spoofed
E-mail”, the Exchange rule will activate the following sequence:

The E-mail message will be sent to the destination recipient mailbox.
Because the E-mail message has SCL value of “5”, the Exchange mail client will redirect the
E-mail message to the junk mail folder.

Detect spoof E-mail message and classify the E-mail as spam E-mail - Step 1 -2

Exchange Online will generate an incident report, that will be sent to the E-mail address of the designated recipient\s. In our specific scenario, we ask to send the incident report to Brad (Brad is our Exchange Online administrator).

Detect spoof E-mail message and classify the E-mail as spam E-mail - Step 2 -2

Configuring Exchange Online rule that will – detect spoof E-mail message and raise the SCL value to “5”

In the following section, we will provide “step by step” instructions, for creating the required “Exchange Online Spoofed E-mail rule” that will answer our business needs.

Part 1#3 – configuring the “condition part” of the Exchange Online Spoofed E-mail rule

Login to Exchange Online admin portal and create a new rule -01

Login to Exchange Online admin portal and create a new rule -02

  • On the left menu bar, choose –mail flow
  • On the top menu bar, choose – rules

Login to Exchange Online admin portal and create a new rule -03

  • Click on the plus sign
  • Choose – Create a new rule…

Login to Exchange Online admin portal and create a new rule -04

  • In the Name: box, add a descriptive name for the new rule. In our specific scenario, we will name the rule – Spoof E-mail – Mark as Spam + Incident report
  • Click on the – More Options… link (by default, the interface of the Exchange Online rule includes only a limited set of options. To be able to display the additional options, we will need to “activate” the More Options…).

Detect spoof E-mail message and classify the E-mail as spam – the condition -01

In the following screenshot, we can see that after we “activate” the More options… link, an additional option is added to the Exchange Online rule wizard.

  • In the section named – Apply this rule if… click on the small black arrow

Detect spoof E-mail message and classify the E-mail as spam – the condition -02

  • Choose the menu – The sender…
  • In the submenu, choose the menu – Is external/internal

Detect spoof E-mail message and classify the E-mail as spam – the condition -03

  • In the select sender location window, choose the option – Outside the organization. The meaning of the term “outside the organization” relates to an un-authenticated recipient, meaning a recipient that doesn’t provide user credentials.

Detect spoof E-mail message and classify the E-mail as spam – the condition -04

Now, we will add an additional part of the “rule condition”, in which we relate to
the un-authenticated recipient who uses an E-mail address that includes our domain name
(o365pilot.com in our specific scenario).

Click on the – add condition

Detect spoof E-mail message and classify the E-mail as spam – the condition -05-A

  • In the section named – and click on the small black arrow

Detect spoof E-mail message and classify the E-mail as spam – the condition -05-B

  • Choose the menu – The sender…
  • In the submenu, choose the menu – domain is

Detect spoof E-mail message and classify the E-mail as spam – the condition -06

In the specify domain window, add the required domain name that represents your organization. In our specific scenario, the public domain name is –
o365pilot.com

Note – to forget to click on the plus icon to add the domain name.

Detect spoof E-mail message and classify the E-mail as spam – the condition -07

If you would like to read more information about the meaning of the Exchange Online terms– “External sender” and “outside the organization“, read the following section: Dealing with an E-mail Spoof Attack in Office 365 based environment | Introduction | Part 1#12

Part 2#3 – Configuring the “action part” of the Exchange Online Spoofed E-mail rule

In this phase, we will configure the “second part” of the Exchange Online rule, in which we define the required Exchange response (action) to a scenario of spoofed E-mail that is sent to our organization recipients.

Detect spoof E-mail message and classify the E-mail as spam – the Action -01

As mentioned, in our specific scenario, we wish to instruct Exchange Online to respond the Spoof email with three different “actions”:

  1. Stamp E-mail message that was identified as Spoof email using the SCL value of “5”.
  2. Create an incident report and send it to a designated recipient.
  1. Stamp E-mail message that was identified as Spoof email using the SCL value of “5”.
  • In the section named – Do the following… click on the small black arrow
  • Choose the menu option – Modify the message properties…
  • In the submenu choose the menu option – set the spam conference level (SCL)

Detect spoof E-mail message and classify the E-mail as spam – the Action -02

In the window named – specify SCL, we will choose the default value of “5

Detect spoof E-mail message and classify the E-mail as spam – the Action -03

  1. Create an incident report and send it to a designated recipient.

In this step, we will instruct Exchange Online to generate + send an incident report to a designated recipient. In our specific example, the designated is Bob, the Exchange Online administrator.

  • Click on the option – add action

Detect spoof E-mail message and classify the E-mail as spam – the Action -04-A

  • In the section and, click on the small black arrow

Detect spoof E-mail message and classify the E-mail as spam – the Action -04-B

  • Choose the menu option – Generate incident report and send it to…

The settings of the incident report include two parameters:

  • The name of the “destination recipient” which will get the incident report.
  • The information fields that will be included in the incident report.

Detect spoof E-mail message and classify the E-mail as spam – the Action -05

  • To add the required “destination recipient” name, click on the link – Select one…

Detect spoof E-mail message and classify the E-mail as spam – the Action -06

  • In our specific scenario, the recipient who will get the incident report is Brad.

Detect spoof E-mail message and classify the E-mail as spam – the Action -07

To select the information fields that will appear in the incident report, click on the link named- *include message properties

Detect spoof E-mail message and classify the E-mail as spam – the Action -08

In our specific scenario, we will choose to include all the available message properties in the summary report.

Detect spoof E-mail message and classify the E-mail as spam – the Action -09

In the following screenshot, we can see he “end result” – the Exchange Online Spoof E-mail rule, includes the two parts:

  • The condition part
  • The action part

Detect spoof E-mail message and classify the E-mail as spam – the Action -10

Verifying that the Exchange Online Spoofed E-mail rule working properly

In this step, we would like to test the Exchange Online Spoof email rule that was created and, verify that working properly.

To be able to check the Exchange Online rule, we will simulate a Spoof email attack that has the following characters:

A hostile element is trying to spoof the identity of a legitimate organization recipient named – Suzan (Suzan@o365pilot.com).

The spoofed E-mail message will be sent to an organization recipient who uses the E-mail address – Bob@o365pilot.com

Note – if you like to learn about the way that we use for simulating the E-mail spoof attack, you can read the article – How to Simulate E-mail Spoof Attack |Part 11#12

The required results from the Exchange Online Spoofed E-mail rule

Our desired expectations are that the Exchange Online Spoof email rule will execute that following sequence of actions:

  • Identify E-mail messages that “behaving” like spoofs E-mail.
  • Raise the SCL value of the Spoof email message to “5”.
  • An incident report that will be sent to the designated recipient – in our scenario, to Bard our Exchange Online administrator.

Step 1#2 – Verifying that the SCL value of E-mail message that was identified as Spoof E-mail was raised to “5”

The destination recipient

In the following screenshot, we can see an E-mail message that was sent by Suzan to Bob.
The E-mail message sent to the Junk mail folder because Exchange “stamp” the E-mail message using the SCL value of “5”.

Detect spoof E-mail message and classify the E-mail as spam – the results -01

When looking at the E-mail message that was sent to the junk mail folder, we can see the following information –

This message was marked as spam using a junk filter other than the Outlook junk
E-mail filter

The meaning is that the “other junk E-mail filter” is the Exchange Online server

Detect spoof E-mail message and classify the E-mail as spam – the results -02

To be able to view the value of the SCL (spam confidence level), we can look at the E-mail message header.

In the following section, we will see how to access the information in the E-mail message header and then we will analyze the data by using the
ExRCA (Exchange remote connectivity analyzer) tool.

  • Open the specific E-mail message that we want to check
  • Choose the File menu
  • Choose the property option

Detect spoof E-mail message and classify the E-mail as spam – the results -03

In the section named- internet headers, we can see the content of the E-mail header.

To be able to analyze the data, we will copy the information.

  • Select all the information by using the Keyboard key combination – CTRL + A
  • Copy the information by using the Keyboard key combination – CTRL + C

Detect spoof E-mail message and classify the E-mail as spam – the results -04

Now, we will access the ExRCA (Exchange remote connectivity analyzer) tool.

  • Choose the tab – Message Analyzer
  • In the white space, phase the information that was copied in the former step by using the Keyboard key combination – CTRL + V
  • Choose the option – Analyze headers

Detect spoof E-mail message and classify the E-mail as spam – the results -05

In the following screenshot, we can see the results.

The value of the information field named- X-MS-Exchange-Organization-SCL is “5”.
in other words, the SCL value is equal to “5”.

Detect spoof E-mail message and classify the E-mail as spam – the results -06

Step 2#2 – Verifying that an incident report was sent to the designated recipient

In the following screenshot, we can see an example of the incident report E-mail that was sent to Exchange administrator – Brad.

When we look at the incident report, we can see that the incident report includes two parts:

  • The incident report summary.
  • The copy of the original E-mail message.

The incident report summary includes details such as:

  • The “source recipient” (number 1) that claim to be a legitimate organization recipient named – Suzan@o365pilot.com
  • The E-mail message subject (number 2)
  • The destination recipient (number 3) is – Bob@o365pilot.com
  • The Exchange Online rule (number 4) the was “activated” and was used for generating and sending the incident report

Incident report - Exchange Online Spoof E-mail rule


The next article in the current article series

In the next article – Detect Spoof E-mail And Delete The Spoof E-mail Using Exchange Online Rule |Part 5#12, we will review how to create an Exchange Online rule that will identify events of spoofed E-mail and, as a response will delete the Spoof E-mail.


Dealing with spoof E-mail – Office 365 | Article series index


Now it’s Your Turn!
We really want to know what you think about the article


The post Detect spoof E-mail and mark the E-mail as spam using Exchange Online rule |Part 4#12 appeared first on o365info.com.

Detect spoof E-mail and delete the spoof E-mail using Exchange Online rule |Part 5#12

$
0
0

In the current article, we will review how to deal with the phenomenon of spoofed E-mail in Office 365 environment by using an Exchange Online rule that will identify
and delete Spoof E-mails.

The main characters of our specific scenario are:

  1. We want that Exchange Online will scan incoming E-mail message and identify
    E-mails that look like spoofed E-mail.
  2. We want to delete the E-mail messages that were identified as spoofed E-mail.

The specific characters of our spoofed E-mail scenario

The business need and the goals that we need to accomplish are as follows:

  1. We want to be able to identify E-mail messages that look like a spoofed E-mail.
  2. We want to prevent this “spoofed E-mail” from reaching the organization user mailbox by deleting the E-mail message that looks like a spoofed E-mail.
    We are willing to take the risk of a false-positive event, in which in which a legitimate E-mail message was mistakenly identified as a spoofed E-mail message and will be deleted.
  3. We want to send a sample of the spoofed E-mail to the designated user, so he will be able to analyze the E-mail message.

The Exchange Online Spoofed E-mail rule structure and logic

The “trigger” that will activate the Exchange Online “Spoofed E-mail rule” will be based on the following two conditions (a combination of condition 1 + condition 2):

  1. An incoming email message that is sent by a non-authenticated recipient (recipient who doesn’t provide user credentials).
  2. The recipient present himself by using an E-mail address that includes our public domain name. In our specific scenario and E-mail address that include the domain name – o365pilot.com

The “action” that will be executed by our “Spoofed E-mail rule”, will include the following “parts”:

  • Action 1#2 – delete the E-mail message that was recognized as Spoof E-mail.
  • Action 2#2 – generate + send an incident report to the designated destination recipient (the incident report will include a summary report + the original E-mail message).

In the following diagram, we can see the sequence of actions, that will be implemented by the Exchange Online Spoofed E-mail rule:

The logic of Exchange rule for detecting spoof E-mail - Delete spoofed E-mail

When Exchange Online identifies E-mail messages that answer the conditions of “spoofed E-mail”, the Exchange rule will activate the following sequence:

The E-mail message will not be sent to the destination recipient mailbox and instead, will be deleted!

Detect spoof E-mail message and Delete the E-mail - Step 1 -2

Exchange Online will generate an incident report, that will be sent to the E-mail address of the designated recipient\s. In our specific scenario, we ask to send the incident report to Brad (Brad is our Exchange Online administrator).

Detect spoof E-mail message and Delete the E-mail - Step 2 -2

Creating an Exchange rule, that will delete Spoof E-mail and send an incident report.

In the following section, we will provide “step by step” instructions, for creating the required “Exchange Online Spoofed E-mail rule” that will answer our business needs.


Part 1#3 – configuring the “condition part” of the Exchange Online Spoofed E-mail rule

Login to Exchange Online admin portal and create a new rule -01

Login to Exchange Online admin portal and create a new rule -02

  • On the left menu bar, choose –mail flow
  • On the top menu bar, choose – rules

Login to Exchange Online admin portal and create a new rule -03

  • Click on the plus sign
  • Choose – Create a new rule…

Login to Exchange Online admin portal and create a new rule -04


  • In the Name: box, add a descriptive name for the new rule. In our specific scenario, we will name the rule – Detect Spoofed E-mail – Delete the E-mail + Send an incident report
  • Click on the – More Options… link (by default, the interface of the Exchange Online rule includes only a limited set of options. To be able to display the additional options, we will need to “activate” the More Options…).

Detect spoof E-mail message and Delete the E-mail – the condition -01

In the following screenshot, we can see that after we “activate” the More options… link, an additional option is added to the Exchange Online rule wizard.

  • In the section named – Apply this rule if… click on the small black arrow

Detect spoof E-mail message and Delete the E-mail – the condition -02

  • Choose the menu – The sender…
  • In the submenu, choose the menu – Is external/internal

Detect spoof E-mail message and Delete the E-mail – the condition -03

  • In the select sender location window, choose the option – Outside the organization.
    The meaning of the term “outside the organization” relates to an un-authenticated recipient, meaning a recipient that doesn’t provide user credentials.

Detect spoof E-mail message and Delete the E-mail – the condition -04

Now, we will add an additional part of the “rule condition”, in which we relate to
the un-authenticated recipient who uses an E-mail address that includes our domain name
(o365pilot.com in our specific scenario).

Click on the – add condition

Detect spoof E-mail message and Delete the E-mail – the condition -05

  • In the section named – and click on the small black arrow

Detect spoof E-mail message and Delete the E-mail – the condition -06

  • Choose the menu – The sender…
  • In the submenu, choose the menu – domain is

Detect spoof E-mail message and Delete the E-mail – the condition -07

In the specify domain window, add the required domain name that represents your organization. In our specific scenario, the public domain name is – o365pilot.com

Note – Don’t forget to click on the plus icon to add the domain name.

Detect spoof E-mail message and Delete the E-mail – the condition -08

If you would like to read more information about the meaning of the Exchange Online terms– “External sender” and “outside the organization“, read the following section: Dealing with an E-mail Spoof Attack in Office 365 based environment | Introduction | Part 1#12

Part 2#2 – Configuring the “action part” of the Exchange Online Spoofed E-mail rule

In this phase, we will configure the “second part” of the Exchange Online rule, in which we define the required Exchange response (action) to a scenario of spoofed E-mail that is sent to our organization recipients.

Detect spoof E-mail message and Delete the E-mail – the action -01

As mentioned, in our specific scenario, we wish to instruct Exchange Online to respond the Spoof E-mail with three different “actions”:

  1. Delete E-mail that was identified a Spoof E-mail.
  2. Create an incident report and send it to a designated recipient.
  1. Delete E-mail that was identified a Spoof E-mail.
  • In the section named – Do the following… click on the small black arrow
  • Choose the menu option – Block the message…
  • In the submenu choose the menu option – Delete the message without notifying anyone

Detect spoof E-mail message and Delete the E-mail – the action -02

  1. Create an incident report and send it to a designated recipient.

In this step, we instruct Exchange Online to generate + send an incident report to a designated recipient. In our specific example, the designated is Bob, the Exchange Online administrator.

  • Click on the option – add action

Detect spoof E-mail message and Delete the E-mail – the action -03

  • In the section and, click on the small black arrow

Detect spoof E-mail message and Delete the E-mail – the action -04

  • Choose the menu option – Generate incident report and send it to…

 Detect spoof E-mail message and Delete the E-mail – the action -05

The settings of the incident report include two parameters:

  1. The name of the “destination recipient” which will get the incident report.
  2. The information fields that will be included within the incident report.

Detect spoof E-mail message and Delete the E-mail – the action -06

  • To add the required “destination recipient” name, click on the link – Select one…
    In our specific scenario, the recipient who will get the incident report is Brad.

Detect spoof E-mail message and Delete the E-mail – the action -07

To select the information fields that will appear in the incident report, click on the link named- *include message properties

Detect spoof E-mail message and Delete the E-mail – the action -08

In our specific scenario, we will choose to include all the available message properties in the summary report.

Detect spoof E-mail message and Delete the E-mail – the action -09

In the following screenshot, we can see he “end result” – the Exchange Online Spoof E-mail rule, includes the two parts:

  • The condition part
  • The action part

Detect spoof E-mail message and Delete the E-mail – the action -10

Verifying that the Exchange Online Spoofed E-mail rule is working properly

In this step, we would like to test the Exchange Online Spoof email rule that was created in the former step and verify that the rule is working properly.

The required results from the Exchange Online Spoofed E-mail rule

Our desired expectations are – that the Exchange Online Spoof E-mail rule will execute that following sequence of actions:

  • Identify the event of – incoming E-mail messages that have the characters of spoof E-mail.
  • Prepend the subject of the E-mail message.
  • Add a disclaimer to the body of the Spoof E-mail message.
  • Generate and send an incident report to the designated recipient. In our scenario, we ask to send the incident report to Bard, our Exchange Online administrator.

Simulate a Spoof E-mail attack | Scenario characters

To be able to ensure that the Exchange Online Spoofed E-mail rule is working properly, we will simulate a Spoof email attack, that has the following characters:
A “hostile element” is trying to spoof the identity of a legitimate organization recipient named –

  • A “hostile element” is trying to spoof the identity of a legitimate organization recipient named – Suzan using the E-mail address – Suzan@o365pilot.com
  • The spoofed E-mail message will be sent to a legitimate organization user named Bob, which uses the E-mail address – Bob@o365pilot.com
Note – if you like to learn about the way that we use for simulating the E-mail spoof attack, you can read the article – How to Simulate E-mail Spoof Attack |Part 11#12

Step 1#2 – Verifying that the Spoof E-mail was “captured” by the Exchange Online rule

To be able to get information about the Spoof E-mail message, we will use the Exchange Online message trace option.

In the following screenshot, we can see Exchange Online manage to identify the Spoof E-mail message.

The status of the E-mail message is “failed” because, the E-mail message wasn’t delivered to the destination recipient mailbox (was deleted by Exchange Online).

Verifying that the Exchange Online Spoof E-mail rule – delete the Spoof E-mail -01

To get more information about the mail flow, we can double-click on the log row.

Now we can see that the Exchange Online “actions” are:

  • Delete the Spoof E-mail message.
  • Generate and send an incident report.

 Verifying that the Exchange Online Spoof E-mail rule – delete the Spoof E-mail -02


2#2 – Verifying that an incident report was sent to the designated recipient (Brad)

In the following screenshot, we can see an example of the incident report E-mail that was sent to Exchange administrator – Brad.

When we look at the incident report, we can see that the incident report includes two parts:

  • The incident report summary.
  • The copy of the original E-mail message.

The incident report summary includes details such as:

  • The “source recipient” (number 1) that claim to be a legitimate organization recipient named – Suzan@o365pilot.com
  • The E-mail message subject (number 2)
  • The destination recipient (number 3) is – Bob@o365pilot.com
  • The Exchange Online rule (number 4) the was “activated” and was used for generating and sending the incident report

Incident report - Exchange Online Spoof E-mail rule

The next article in the current article series

In the next article – Detect Spoof E-mail – Prepend The Subject Of The Spoof E-mail + Add Disclaimer Using Exchange Online Rule |Part 6#12, we will review how to create an Exchange Online rule that will identify events of spoofed E-mail and as a response, will – prepend the subject of the spoof E-mail + add disclaimer Spoof E-mail.

Dealing with spoof E-mail – Office 365 | Article series index

Now it’s Your Turn!
We really want to know what you think about the article

The post Detect spoof E-mail and delete the spoof E-mail using Exchange Online rule |Part 5#12 appeared first on o365info.com.

Detect spoof E-mail – prepend the subject of the Spoof E-mail + add Disclaimer using Exchange Online rule |Part 6#12

$
0
0

In the current article, we will review how to deal with the phenomenon of spoofed E-mail in Office 365 environment by using an Exchange Online rule that will identify and prepend the Subject of the Spoof E-mail.The main characters of our specific scenario are:

  1. We want that Exchange Online will scan incoming E-mail message and, identify
    E-mails that look like spoofed E-mail.
  2. We don’t want to delete the E-mail messages that was identified as spoofed E-mail and instead, we want the add to the E-mail subject a warning message (prepend) + add a warning message to the E-mail message body (disclaimer).


The purpose of the “warning message” is to enable organization recipients to “decide” by themselves, what to do with the E-mail message.

In the same time, raise the user awareness to the fact that the specific E-mail message could be a dangerous E-mail message.

The specific characters of our spoofed E-mail scenario

The business need and the goals that we need to accomplish are as follows:

  1. We want to be able to identify E-mail messages that look like a spoofed E-mail.
  2. We don’t want to intervene with the incoming mail flow. In other words, we don’t want to block the E-mail message that has a good chance of being “spoofed E-mail” from reaching the organization user mailbox. The user himself could decide what to do with the specific mail item.
  3. We want to warn the destination recipient regarding the fact that the E-mail message that was sent to him has a good chance of being “spoofed E-mail”.
  4. We want to send a sample of the spoofed E-mail to the designated user, so he will be able to analyze the E-mail message.

The Exchange Online Spoofed E-mail rule structure and logic

The “trigger” that will activate the Exchange Online “Spoofed E-mail rule” will be based on the following two conditions (a combination of condition 1 + condition 2):

  1. An incoming email message that is sent by a non-authenticated recipient (recipient who doesn’t provide user credentials).
  2. The recipient present himself by using an E-mail address that includes our public domain name. In our specific scenario and E-mail address that include the domain name – o365pilot.com

The “action” that will be executed by our “Spoofed E-mail rule” will include the following “blocks”:

  • Action 1#3 – prepend the subject of the E-mail message.
  • Action 2#3 – add a disclaimer to the E-mail message body.
  • Action 3#3 – generate + send an incident report to the designated destination recipient (the incident report will include a summary report + the original E-mail message).

In the following diagram, we can see the sequence of actions, that will be implemented by the Exchange Online Spoofed E-mail rule:

The logic of spoof E-mail rule- Prepend E-mail message of the spoofed E-mail

When Exchange Online identifies E-mail messages that answer the conditions of “spoofed E-mail”, the Exchange rule will activate the following sequence:

The E-mail message will be sent to the destination recipient mailbox but, the Exchange Online rule will prepend the subject of the original E-mail message + add a disclaimer to the E-mail message body.

In our specific scenario, the additional text that will be added to the subject of the E-mail message is –

This E-mail is probably spoofed!

Detect spoof E-mail message - Prepend E-mail message subject - Step 1 - 3

In addition, the Exchange Online rule will add a disclaimer to the original E-mail message.

In our specific scenario, the disclaimer will be:

There is a high chance that the E-mail that you have received is a spoofed E-mail.
Please report this E-mail message to the security team!

Detect spoof E-mail message - Prepend E-mail message subject - Step 2 - 3

Exchange Online will generate an incident report, that will be sent to the E-mail address of the designated recipient\s. In our specific scenario, we ask to send the incident report to Brad (Brad is our Exchange Online administrator).

Detect spoof E-mail message - Prepend E-mail message subject - Step 3 - 3

Creating rule that will identify spoofed E-mail rule | prepend the E-mail subject |Add disclaimer | Generate an incident report

Part 1#3 – configuring the “condition part” of the Exchange Online Spoofed E-mail rule

Login to Exchange Online admin portal and create a new rule -01

Login to Exchange Online admin portal and create a new rule -02

  • On the left menu bar, choose –mail flow
  • On the top menu bar, choose – rules

Login to Exchange Online admin portal and create a new rule -03

  • Click on the plus sign
  • Choose – Create a new rule…

Login to Exchange Online admin portal and create a new rule -04

  • In the Name: box, add a descriptive name for the new rule. In our specific scenario, we will name the rule – Spoof E-mail – Prepend subject + Disclaimer + Incident report
  • Click on the – More Options… link (by default, the interface of the Exchange Online rule includes only a limited set of options. To be able to display the additional options, we will need to “activate” the More Options…).

Detect spoof E-mail - Prepend subject + Disclaimer - Exchange online rule condition -01

In the following screenshot, we can see that after we “activate” the More options… link, an additional option is added to the Exchange Online rule wizard.

  • In the section named – Apply this rule if… click on the small black arrow

Detect spoof E-mail - Prepend subject + Disclaimer - Exchange online rule condition -02

  • Choose the menu – The sender…
  • In the submenu, choose the menu – Is external/internal

Detect spoof E-mail - Prepend subject + Disclaimer - Exchange online rule condition -03

  • In the select sender location window, choose the option – Outside the organization. The meaning of the term “outside the organization” relates to an un-authenticated recipient, meaning a recipient that doesn’t provide user credentials.

Detect spoof E-mail - Prepend subject + Disclaimer - Exchange online rule condition -04

Now, we will add an additional part of the “rule condition”, in which we relate to
the un-authenticated recipient who uses an E-mail address that includes our domain name
(o365pilot.com in our specific scenario).

  • Click one the – add condition option

Detect spoof E-mail - Prepend subject + Disclaimer - Exchange online rule condition -05

  • In the section named – and click on the small black arrow

 Detect spoof E-mail - Prepend subject + Disclaimer - Exchange online rule condition -06

  • Choose the menu – The sender…
  • In the submenu, choose the menu – domain is

Detect spoof E-mail - Prepend subject + Disclaimer - Exchange online rule condition -07

In the specify domain window, add the required domain name that represents your organization. In our specific scenario, the public domain name is – o365pilot.com

Note – Don’t forget to click on the plus icon to add the domain name.

 Detect spoof E-mail - Prepend subject + Disclaimer - Exchange online rule condition -08

If you would like to read more information about the meaning of the Exchange Online terms– “External sender” and “outside the organization“, read the following section: Dealing with an E-mail Spoof Attack in Office 365 based environment | Introduction | Part 1#12

Part 2#3 – Configuring the “action part” of the Exchange Online Spoofed E-mail rule

In this phase, we will configure the “second part” of the Exchange Online rule, in which we define the required Exchange response (action) to a scenario of spoofed E-mail that is sent to our organization recipients.

Detect spoof E-mail - Prepend subject + Disclaimer - Exchange online rule Action -01-A

As mentioned, in our specific scenario, we wish to instruct Exchange Online to respond the Spoof email with three different “actions”:

  1. Prepend E-mail message subject.
  2. Add a disclaimer to the E-mail message body.
  3. Create an incident report and send it to a designated recipient.

Action 1#3 –  Prepend E-mail message subject.

  • In the section named – Do the following… click on the small black arrow

Detect spoof E-mail - Prepend subject + Disclaimer - Exchange online rule Action -01-B

  • Choose the menu option – Prepend the subject of the message with…

Detect spoof E-mail - Prepend subject + Disclaimer - Exchange online rule Action -02

In the text box – specify subject prefix, add the required prefix.

In our specific scenario, we will add the prefix –

This E-mail is probably spoofed!

Note – there is a limitation for the maximum number of Characters.
The estimation is 32~ characters

Detect spoof E-mail - Prepend subject + Disclaimer - Exchange online rule Action -03

Action 2#3 –  Add a disclaimer to the E-mail message.

In this phase, we will add the “second action” in which we add a disclaimer to the E-mail message that was identified as Spoof email.

  • Click on the add action option

 Detect spoof E-mail - Prepend subject + Disclaimer - Exchange online rule Action -04

  • In the section named – and click on the small black arrow

 Detect spoof E-mail - Prepend subject + Disclaimer - Exchange online rule Action -05

  • Choose the menu option of – Apply a disclaimer to the message…
  • In the submenu, choose the option – append to disclaimer

Detect spoof E-mail - Prepend subject + Disclaimer - Exchange online rule Action -06

The configuration of the disclaimer includes two elements:

  1. The disclaimer text
  2. The fallback action
  • To add the required disclaimer message, click on the Enter text… link

Detect spoof E-mail - Prepend subject + Disclaimer - Exchange online rule Action -07

In our specific scenario, the disclaimer text is:

There is a high chance that the E-mail that you have received is a spoofed E-mail.
Please report this E-mail message to the security team!

Detect spoof E-mail - Prepend subject + Disclaimer - Exchange online rule Action -08

  • To select the required fallback action, click on the link named – *Select one…

Detect spoof E-mail - Prepend subject + Disclaimer - Exchange online rule Action -09

In our specific scenario, we choose the option of – wrap

Detect spoof E-mail - Prepend subject + Disclaimer - Exchange online rule Action -10

Action 3#3 –   Create an incident report and send it to a designated recipient.

In this step, we will define the “last action”, in which we instruct Exchange Online to generate + send an incident report to a designated recipient. In our specific example, the designated is Bob, the Exchange Online administrator.

  • Click on the option – add action

Detect spoof E-mail - Prepend subject + Disclaimer - Exchange online rule Action -11

  • Choose the menu option – Generate incident report and send it to…

 Detect spoof E-mail - Prepend subject + Disclaimer - Exchange online rule Action -12

The settings of the incident report include two parameters:

  1. The name of the “destination recipient” which will get the incident report.
  2. The information fields that will be included in the incident report.
  • To add the required “destination recipient” name, click on the link – Select one…

Detect spoof E-mail - Prepend subject + Disclaimer - Exchange online rule Action -13

  • In our specific scenario, the recipient who will get the incident report is Brad.

Detect spoof E-mail - Prepend subject + Disclaimer - Exchange online rule Action -14

To select the information fields that will appear in the incident report, click on the link named- *include message properties

Detect spoof E-mail - Prepend subject + Disclaimer - Exchange online rule Action -15

In our specific scenario, we will choose to include all the available message properties in the summary report.

Detect spoof E-mail - Prepend subject + Disclaimer - Exchange online rule Action -16

In the following screenshot, we can see he “end result” – the Exchange Online Spoof E-mail rule, includes the two parts:

  • The condition part
  • The action part

Detect spoof E-mail - Prepend subject + Disclaimer - Exchange online rule Action -17

Verifying that the Exchange Online Spoofed E-mail rule is working properly

In this step, we would like to test the Exchange Online Spoof email rule that was created in the former step and verify that the rule is working properly.

The required results from the Exchange Online Spoofed E-mail rule

Our desired expectations are – that the Exchange Online Spoof E-mail rule will execute that following sequence of actions:

  • Identify the event of – incoming E-mail messages that have the characters of spoof E-mail.
  • Prepend the subject of the E-mail message.
  • Add a disclaimer to the body of the Spoof E-mail message.
  • Generate and send an incident report to the designated recipient. In our scenario, we ask to send the incident report to Bard, our Exchange Online administrator.

Simulate a Spoof E-mail attack | Scenario characters

To be able to ensure that the Exchange Online Spoofed E-mail rule is working properly, we will simulate a Spoof email attack, that has the following characters:
A “hostile element” is trying to spoof the identity of a legitimate organization recipient named –

  • A “hostile element” is trying to spoof the identity of a legitimate organization recipient named – Suzan using the E-mail address – Suzan@o365pilot.com
  • The spoofed E-mail message will be sent to a legitimate organization user named Bob, which uses the E-mail address – Bob@o365pilot.com
Note – if you like to learn about the way that we use for simulating the E-mail spoof attack, you can read the article – How to Simulate E-mail Spoof Attack |Part 11#12

Step 1#2 –  Verifying that the spoofed E-mail subject was prepended + include disclaimer

In the following screenshot, we can see an example to a Spoof email that was sent to Bob by “Suzan”.

The prepended text that we define is added at the begging of the E-mail message subject.

When using the default view of OWA, the organization recipient will notice only the prepend text which warn him that the E-mail message is dangerous.

Testing the Spoof email rule - Prepend subject - Disclaimer -01

When looking at the E-mail message content, we can the E-mail message subject that include the “original subject text” in our specific exam – Hello Bob, it’s me, the company CEO, send me your bank account and the prepend text – This E-mail is probably spoofed!

The E-mail message body include the disclaimer that was configured in the Exchange Online Spoof email rule.

Testing the Spoof email rule - Prepend subject - Disclaimer -02

2#2 – Verifying that an incident report was sent to the designated recipient (Brad)

In the following screenshot, we can see an example of the incident report E-mail that was sent to Exchange administrator – Brad.

When we look at the incident report, we can see that the incident report includes two parts:

  • The incident report summary.
  • The copy of the original E-mail message.

The incident report summary includes details such as:

  • The “source recipient” (number 1) that claim to be a legitimate organization recipient named – Suzan@o365pilot.com
  • The E-mail message subject (number 2)
  • The destination recipient (number 3) is – Bob@o365pilot.com
  • The Exchange Online rule (number 4) the was “activated” and was used for generating and sending the incident report

Incident report - Exchange Online Spoof E-mail rule

The next article in the current article series

In the next article – Detect Spoof E-mail And Send The Spoof E-mail To Administrative Quarantine Using Exchange Online Rule |Part 7#11, we will review how to create an Exchange Online rule that will identify events of spoofed E-mail and as a response, will – send the spoof E-mail to administrative quarantine.

Dealing with spoof E-mail – Office 365 | Article series index

Now it’s Your Turn!
We really want to know what you think about the article

The post Detect spoof E-mail – prepend the subject of the Spoof E-mail + add Disclaimer using Exchange Online rule |Part 6#12 appeared first on o365info.com.

Detect spoof E-mail and send the spoof E-mail to Administrative Quarantine using Exchange Online rule |Part 7#12

$
0
0

In the current article, we will review how to deal with the phenomenon of spoofed E-mail in Office 365 environment by using an Exchange Online rule that will identify Spoof email message and “route” this E-mail message to the Exchange Online administrative quarantine.The main characters of our specific scenario are:

  1. We want that Exchange Online will scan incoming E-mail message and identify
    E-mails that look like spoofed E-mail.
  2. We don’t want to delete the E-mail messages that were identified as spoofed E-mail but instead, we want to “forward” the Spoof email to a quarantine that can be accessed by the Exchange Online administrator.

The meaning of the term “administrative quarantine” is – a dedicated Exchange Online storage, that will store the quarantined E-mail message. Only Exchange Online administrator can view the content of the administrative quarantine.

Generally speaking, Exchange Online offers other types of quarantine, that can be accessed by the Exchange Online users. We will review this scenario in the article –  Detect Spoof E-mail And Raise the SCL value to “9” – Send E-mail To Quarantine Using Exchange Online Rule |Part 8#12

The specific characters of our spoofed E-mail scenario

The business need and the goals that we need to accomplish are as follows:

  • We want to be able to identify E-mail messages that look like a spoofed E-mail.
  • We want to prevent this “spoofed E-mail” from reaching the organization user mailbox.
  • We don’t want to delete the E-mail message that looks like a spoofed instead, we want to send the Spoof email to a “restricted area” meaning the Exchange Online quarantine.
  • Only the Exchange Online administrator will be able to access the quarantine.
  • We want to notify the destination recipient (the destination recipient) that an E-mail message that was sent to him was classified as spoofed E-mail and sent to the administrative quarantine.
  • We want to notify a designated user (such as the Exchange Online administrator) about the “event of spoofed E-mail”.
  • We want to send a sample of the spoofed E-mail to the designated user, so he will be able to analyze the E-mail message.


The Exchange Online Spoofed E-mail rule structure and logic

The “trigger” that will activate the Exchange Online “Spoofed E-mail rule” will be based on the following two conditions (a combination of condition 1 + condition 2):

  1. An incoming email message that is sent by a non-authenticated recipient (recipient who doesn’t provide user credentials).
  2. The recipient present himself by using E-mail address that includes our public domain name. In our specific scenario and E-mail address that include the domain name – o365pilot.com

The “action” that will be executed by our “Spoofed E-mail rule”, will include the following “parts”:

  • Action 1#3 – Send the spoofed E-mail message to administrative quarantine.
  • Action 2#3 – generate + send a custom E-mail notification to the destination recipient. Exchange Online will inform the destination recipient that an E-mail message that was sent to him, was blocked and sent to the administrative quarantine.
  • Action 3#3 – generate + send an incident report to the designated destination recipient (the incident report will include a summary report + the original E-mail message).

In the following diagram, we can see the sequence of actions, that will be implemented by the Exchange Online Spoofed E-mail rule:

The logic of Exchange rule for detecting spoof E-mail - Send spoofed E-mail quarantine

When Exchange Online identifies E-mail messages that answer the conditions of
“spoofed E-mail”, the Exchange rule will activate the following sequence:

The E-mail message will not be sent to the destination recipient mailbox and instead, will be “routed” to the administrative quarantine (the term administrative quarantine describes a storage space that can be accessed only by the Exchange Online administrator and not by the user).

Detect spoof E-mail message and send E-mail to quarantine - Step 1-3

Exchange Online will generate an E-mail message notification, that will be sent to the destination recipient who was supposed to receive the e-mail the E-mail message (the E-mail message that was identified as spoofed E-mail and sent to the quarantine).

In our specific scenario, we will create a custom E-mail notification and using an HTML code to make to notification message easy to understand and useful to our organization recipients.

Detect spoof E-mail message and send E-mail to quarantine - Step 2-3

Exchange Online will generate an incident report, that will be sent to the E-mail address of the designated recipient\s. In our specific scenario, we ask to send the incident report to Brad (Brad is our Exchange Online administrator).

Detect spoof E-mail message and send E-mail to quarantine - Step 3-3

Configuring the Exchange Online Spoofed E-mail rule | Send to administrative quarantine | Generate an incident report | Send E-mail notification


In the following section, we will provide “step by step” instructions, for creating the required “Exchange Online Spoofed E-mail rule” that will answer our business needs.

Part 1#3 – configuring the “condition part” of the Exchange Online Spoofed E-mail rule

Login to Exchange Online admin portal and create a new rule -01

Login to Exchange Online admin portal and create a new rule -02

  • On the left menu bar, choose –mail flow
  • On the top menu bar, choose – rules

Login to Exchange Online admin portal and create a new rule -03

  • Click on the plus sign
  • Choose – Create a new rule…

Login to Exchange Online admin portal and create a new rule -04

  • In the Name: box, add a descriptive name for the new rule. In our specific scenario, we will name the rule –
    In our specific scenario, we will name the rule –
    Spoof E-mail – quarantine + incident report + User notification
  • Click on the – More Options… link (by default, the interface of the Exchange Online rule includes only a limited set of options. To be able to display the additional options, we will need to “activate” the More Options…).

Detect spoof E-mail - Send email to quarantine - the Exchange rule condition -01

  • In the section named – Apply this rule if… click on the small black arrow

Detect spoof E-mail - Send email to quarantine - the Exchange rule condition -02

  • Choose the menu – The sender…
  • In the submenu, choose the menu – Is external/internal

Detect spoof E-mail - Send email to quarantine - the Exchange rule condition -03

  • In the select sender location window, choose the option – Outside the organization.
    The meaning of the term “outside the organization” relates to an un-authenticated recipient, meaning a recipient that doesn’t provide user credentials.

Detect spoof E-mail - Send email to quarantine - the Exchange rule condition -04

Now, we will add an additional part of the “rule condition”, in which we relate to
the un-authenticated recipient who uses an E-mail address that includes our domain name
(o365pilot.com in our specific scenario).

  • Click on the – add connection

Detect spoof E-mail - Send email to quarantine - the Exchange rule condition -05

  • In the section named – and click on the small black arrow

Detect spoof E-mail - Send email to quarantine - the Exchange rule condition -06

  • Choose the menu – The sender…
  • In the submenu, choose the menu – domain is

Detect spoof E-mail - Send email to quarantine - the Exchange rule condition -07

In the specify domain window, add the required domain name that represents your organization. In our specific scenario, the public domain name is – o365pilot.com

Note – Don’t forget to click on the plus icon to add the domain name.

 Detect spoof E-mail - Send email to quarantine - the Exchange rule condition -08

If you would like to read more information about the meaning of the Exchange Online terms– “External sender” and “outside the organization“, read the following section: Dealing with an E-mail Spoof Attack in Office 365 based environment | Introduction | Part 1#12

Part 2#3 – Configuring the “action part” of the Exchange Online Spoofed E-mail rule

In this phase, we will configure the “second part” of the Exchange Online rule, in which we define the required Exchange response (action) to a scenario of spoofed E-mail that is sent to our organization recipients.

Detect spoof E-mail - Send email to quarantine - the Exchange rule Action -01

As mentioned, in our specific scenario, we wish to instruct Exchange Online to respond the Spoof email with three different “actions”:

  1. Send the spoofed E-mail to quarantine.
  2. Create an E-mail notification that will be sent to the destination recipient.
  3. Create an incident report and send it to a designated recipient.

1#3 – Send the spoofed E-mail to quarantine.

  • In the section named – Do the following… click on the small black arrow
  • Choose the menu option – Redirect the message to…
  • In the submenu choose the menu option – hosted quarantine

Detect spoof E-mail - Send email to quarantine - the Exchange rule Action -02

2#3 – Create an E-mail notification that will be sent to the destination recipient.

In this step, we will define the action that will send a mail notification, to the Exchange Online recipient who was supposed to get the E-mail message.

  • Click on the option – add action

Detect spoof E-mail - Send email to quarantine - the Exchange rule Action -03

  • Choose the menu option – Notify the recipient with a message…

Detect spoof E-mail - Send email to quarantine - the Exchange rule Action -04

In the “provide the message text” window, add the required E-mail notification text.

Technically, the content if the E-mail message notification can be a simple text message.
In our specific scenario, I have prepared a “styled E-mail notification” using an HTML format.

If you want to download an example to the HTML format that I have used, you can download the example from the following link

Detect spoof E-mail - Send email to quarantine - the Exchange rule Action -05

3#3 – Create an incident report and send it to a designated recipient.

In this step, we will define the “last action”, in which we instruct Exchange Online to generate + send an incident report to a designated recipient. In our specific example the designated is Bob, the Exchange Online administrator.

  • Click on the option – add action

Detect spoof E-mail - Send email to quarantine - the Exchange rule Action -06

  • Choose the menu option – Generate incident report and send it to…

The settings of the incident report include two parameters:

  • The name of the “destination recipient” which will get the incident report.
  • The information fields that will be included in the incident report.

Detect spoof E-mail - Send email to quarantine - the Exchange rule Action -07

  • To add the required “destination recipient” name, click on the link – Select one…

Detect spoof E-mail - Send email to quarantine - the Exchange rule Action -08

  • In our specific scenario, the recipient who will get the incident report is Brad.

Detect spoof E-mail - Send email to quarantine - the Exchange rule Action -09

To select the information fields that will appear in the incident report, click on the link named- *include message properties

Detect spoof E-mail - Send email to quarantine - the Exchange rule Action -10

In our specific scenario, we will choose to include all the available message properties in the summary report.

Detect spoof E-mail - Send email to quarantine - the Exchange rule Action -11

In the following screenshot, we can see he “end result” – the Exchange Online Spoof E-mail rule, includes the two parts:

  • The condition part
  • The action part

Detect spoof E-mail - Send email to quarantine - the Exchange rule Action -12

Verifying that the Exchange Online Spoofed E-mail rule is working properly

In this step, we would like to test the Exchange Online Spoof email rule that was created in the former step and verify that the rule is working properly.

The required results from the Exchange Online Spoofed E-mail rule

Our desired expectations are – that the Exchange Online Spoof E-mail rule will execute that following sequence of actions:

  • Identify the event of – incoming E-mail messages that have the characters of spoof E-mail.
  • Send the spoofed E-mail to quarantine.
  • Send a custom E-mail notification message to the destination recipient (Bob in our specific scenario) notifying him that a Spoof email was sent to him, and he can contact the Exchange Online administrator if he needs to check the specific E-mail message.
  • Generate and send an incident report to the designated recipient. In our scenario, we ask to send the incident report to Bard, our Exchange Online administrator.

Simulate a Spoof E-mail attack | Scenario characters

To be able to ensure that the Exchange Online Spoofed E-mail rule is working properly, we will simulate a Spoof email attack, that has the following characters:
A “hostile element” is trying to spoof the identity of a legitimate organization recipient named –

  • A “hostile element” is trying to spoof the identity of a legitimate organization recipient named – Suzan using the E-mail address – Suzan@o365pilot.com
  • The spoofed E-mail message will be sent to a legitimate organization user named Bob, which uses the E-mail address – Bob@o365pilot.com
Note – if you like to learn about the way that we use for simulating the E-mail spoof attack, you can read the article – How to Simulate E-mail Spoof Attack |Part 11#12

1#3 – Verifying that the spoofed E-mail sent to administrative quarantine.

To be able to view the content of the Exchange Online administrative quarantine, we will login to the Exchange Online administrative portal.

  • On the left sidebar menu, choose the menu – protection
  • On the top bar menu, choose the menu – quarantine

In the following screenshot, we can see the content of the Exchange Online administrative quarantine.

We can see that the E-mail message that was sent from Suzan@o365pilot.com (the recipient, we use for simulating the spoofed E-mail attack) was “captured by the Exchange Online Spoofed E-mail rule.

Verifying that the spoofed E-mail sent to administrative quarantine -01

2#3 – Verifying that a custom E-mail message will be sent to the destination recipient

In the following screenshot, we can see an example of the mail notification that was sent to the organization user – Bob.

Our specific custom E-mail message notification includes three “sections”.

  • Section 1 – the section in which we inform the organization recipient, that E-mail message that was sent to him was identified as spoofed E-mail.
  • Section 2 – the section informs the user that he can contact the security team.
  • Section 3 – a section with additional information about the “spoofed E-mail message”.

The custom E-mail message that is sent by the Exchange spoofed E-mail rule

3#3 – Verifying that an incident report was sent to the designated recipient (Brad)

In the following screenshot, we can see an example of the incident report E-mail that was sent to Exchange administrator – Brad.

When we look at the incident report, we can see that the incident report includes two parts:

  • The incident report summary.
  • The copy of the original E-mail message.

The incident report summary includes details such as:

  • The “source recipient” (number 1) that claim to be a legitimate organization recipient named – Suzan@o365pilot.com
  • The E-mail message subject (number 2)
  • The destination recipient (number 3) is – Bob@o365pilot.com
  • The Exchange Online rule (number 4) the was “activated” and was used for generating and sending the incident report

Incident report - Exchange Online Spoof E-mail rule

The next article in the current article series

In the next article – Detect Spoof E-mail And Raise the SCL value to “9” – Send E-mail To Quarantine Using Exchange Online Rule |Part 8#12, we will review how to create an Exchange Online rule that will identify events of spoofed E-mail and as a response, the Exchange Online spam filter will send the Spoof E-mail to user quarantine and the Exchange Online rule will send a custom E-mail notification to the recipient.

Dealing with spoof E-mail – Office 365 | Article series index

Now it’s Your Turn!
We really want to know what you think about the article

The post Detect spoof E-mail and send the spoof E-mail to Administrative Quarantine using Exchange Online rule |Part 7#12 appeared first on o365info.com.

Detect spoof E-mail and raise the SCL value to “9” – send E-mail to Quarantine using Exchange Online rule |Part 8#12

$
0
0

In the former article, we have reviewed that required settings that need to be implemented in a scenario, in which we are using an Exchange Online rule that will identify Spoof email message and “route” this E-mail message to the Exchange Online administrative quarantine.

In the current article, we will review a similar scenario in which Spoof email will be sent to the Exchange Online quarantine.

The main difference from the former scenario is that in this scenario, the Office 365 recipients will have the ability to access the “quarantine space”.

The Exchange Online quarantine that is available also for users defines as “user quarantine versus administrative quarantine that can be accessed Only an Exchange Online administrator.

The main difference between “user quarantine versus administrative quarantine is the “mail flow” of the specific E-mail message that sent to the quarantine.

Case 1 – when E-mail message is sent to the quarantine because an Exchange Online rule “capture” the E-mail message and “route” the E-mail message to quarantine, the E-mail message is sent to the administrative quarantine

Case 2 – when E-mail message is sent to the quarantine because the SCL value of the E-mail message is higher than 5 (6-9) and the Exchange Online spam filter is configured to
send E-mail message with “high SCL value” to the quarantine, the E-mail message is “routed” to an Exchange Online quarantine space that can be accessed by the Exchange Online administrator but also by the Exchange recipient whom the mail message was sent to him.

The specific characters of our Spoof E-mail scenario

The business need and the goals that we need to accomplish are as follows:

  1. We want to be able to identify E-mail messages that look like a spoofed E-mail.
  2. We wish to prevent from E-mail that was identified as a Spoof E-mail from reaching the organization user’s mailbox.
  3. We want to “route” mail that was identified as Spoof E-mail to the Exchange Online quarantine.
  4. We want to notify the “destination recipient” (our organization users) that an E-mail message that was sent to him was classified as spoofed E-mail and sent to the administrative quarantine.
  5. We want to enable the “destination recipient” (the recipient who should have got the E-mail message before the E-mail message was sent to quarantine) to be able to access “his quarantine space”, view the E-mail message and decide what to do with the E-mail message.
    The recipient can leave the E-mail message in the quarantine, and the E-mail message will be deleted after a specific time period or release the E-mail message so the E-mail message will be route back to his mailbox.
  6. We want to notify a designated user (such as the Exchange Online administrator) about the “event of spoofed E-mail”.
  7. We want to send a sample of the spoofed E-mail to the designated user, so he will be able to analyze the E-mail message.

A short description of the Exchange Online spam filter

To be able to accomplish the goals that were described in the former section, we will use a combination of two separated Exchange Online components:

  1. Exchange Online spam filter
  2. Exchange Online rule

The Exchange Online spam filter is the Exchange Online “engine” is part of the EOP
(Exchange Online protection)

The Exchange Online spam filter enables us to decide what we will do with email messages that are classified as spam E-mail.

As mentioned, the way that is used for “stamping” E-mail message as a spam E-mail is by using different values for the SCL (spam confidence level).

Part of the configuration setting of the Exchange Online spam filter, enable us to define different actions for a different SCL value.

For example-

  • An E-mail message that has Low or medium SCL value will be sent to the destination recipient mailbox.
  • An E-mail message that has High SCL value, will be sent to the Exchange Online quarantine.

The default setting of the Exchange Online spam filter is to send all the E-mail message that was identified as “spam E-mail” to the destination recipient mailbox.

The E-mail message will be saved by default in the junk mail folder, and the recipient will have the ability to decide what to do with the “spam mail”.

In our scenario, we will change this default setting and “instruct”
the Exchange Online spam filter to route e-mail messages that have a high SCL value (high SCL value is 6-9) to the Exchange Online quarantine.

The Exchange Spoof email rule that we are going to create, will “stamp” E-mail message that was identified as Spoof email by using a high SCL value of “9”.
Because the Exchange Online spam filter is configured to route e-mail messages with high SCL value to the Exchange quarantine, the Spoof email will be sent to the quarantine.

The main difference is that now, the Exchange administrator + the destination organization user will have access the Exchange Online quarantine.

  • Step 1#2 – in the first step, we will update the default Exchange Online spam filter
  • Step 2#2 – in the second step, we will create an Exchange Online Spoof email rule that will change the SCL value of Spoof email to “9”.

The Exchange Online Spoofed E-mail rule structure and logic

The “trigger” that will activate the Exchange Online “Spoofed E-mail rule” will be based on the following two conditions (a combination of condition 1 + condition 2):

  1. An incoming email message that is sent by a non-authenticated recipient (recipient who doesn’t provide user credentials).
  2. The recipient present himself by using an E-mail address that includes our public domain name. In our specific scenario and E-mail address that include the domain name – o365pilot.com

The “action” that will be executed by our “Spoofed E-mail rule”, will include the following “parts”:

  • Action 1#3 – stamp the E-mail message as a spam E-mail by using the SCL value of “9”.
  • Action 2#3 – generate + send a custom E-mail notification to the destination recipient. Exchange Online will inform the destination recipient that an E-mail message that was sent to him was blocked and sent to the Exchange Online quarantine.
  • Action 3#3 – generate + send an incident report to the designated destination recipient (the incident report will include a summary report + the original E-mail message).

In the following diagram, we can see the sequence of actions, that will be implemented by the Exchange Online Spoofed E-mail rule:

The logic of Exchange rule for detecting spoof E-mail - Raise SCL value to 8

When Exchange Online identifies E-mail messages that answer the conditions of
“spoofed E-mail”, the Exchange rule will activate the following sequence:

The Spoof email will be “stamped” by using the SCL value of “9”.

Spoof email – using a combination of Exchange Online spam filter and rule – 01

The Exchange Online spam filter infrastructure will forward the E-mail message that has SCL value of9” to the quarantine.

Because the E-mail message was sent to quarantine by the Exchange Online spam filter, the quarantine space can be accessed by the Exchange Online administrator + the Exchange Online recipient

Spoof email – using a combination of Exchange Online spam filter and rule – 02

Exchange Online will generate an E-mail message notification, that will be sent to the destination recipient who was supposed to receive the e-mail the E-mail message (the E-mail message that was identified as spoofed E-mail and sent to the quarantine).

In our specific scenario, we will create a custom E-mail notification and using an HTML code to make to notification message easy to understand and useful to our organization recipients.

The E-mail message notification will include a link that will direct the recipient to his Exchange Online quarantine space.

Spoof email – using a combination of Exchange Online spam filter and rule – 03

Exchange Online will generate an incident report that will be sent to the E-mail address of the designated recipient\s that will be defined in the Spoof email rule.
In our specific scenario, we ask to send the incident report to Bob. Bob is our Exchange Online administrator.

Spoof email – using a combination of Exchange Online spam filter and rule – 04

Configuring the default setting of the Exchange Online spam filter

In the following section, we will change the default settings of the Exchange Online spam filter, by setting the spam filter to send an E-mail message with high SCL value to a quarantine.

  • Log in to the Exchange admin portal
  • On the left menu bar, choose –protection
  • On the top menu bar, choose – spam filter

Update the default Exchange Online spam policy -01

  • Choose the menu – spam and bulk action
  • In the section named- High confidence spam, click on the small black arrow

Update the default Exchange Online spam policy -02

  • Choose the option of – Quarantine message

Update the default Exchange Online spam policy -03

In the following screenshot, we can see the result

  • An E-mail message with “low SCL” (2-5) will be sent to the destination recipient mailbox.
  • an E-mail message with “High SCL” (6-9) will be sent to the Exchange Online quarantine.

Update the default Exchange Online spam policy -04

Configuring Exchange Online rule that will – detect the spoof E-mail message and raise the SCL value to “9”

In the following section, we will provide “step by step” instructions, for creating the required “Exchange Online Spoofed E-mail rule” that will answer our business needs.

Part 1#3 – configuring the “condition part” of the Exchange Online Spoofed E-mail rule

Login to Exchange Online admin portal and create a new rule -01

Login to Exchange Online admin portal and create a new rule -02

  • On the left menu bar, choose –mail flow
  • On the top menu bar, choose – rules

Login to Exchange Online admin portal and create a new rule -03

  • Click on the plus sign
  • Choose – Create a new rule…

Login to Exchange Online admin portal and create a new rule -04

  • In the Name: box, add a descriptive name for the new rule.
    In our specific scenario, we will name the rule – Spoof E-mail – Quarantine | Recipient + Admin access
  • Click on the – More Options… link (by default, the interface of the Exchange Online rule includes only a limited set of options. To be able to display the additional options, we will need to “activate” the More Options…).

Detect spoof E-mail message – Raise SCP to 9 – the condition -01

  • In the section named – Apply this rule if… click on the small black arrow

Detect spoof E-mail message – Raise SCP to 9 – the condition -02

  • Choose the menu – The sender…
  • In the submenu, choose the menu – Is external/internal

Detect spoof E-mail message – Raise SCP to 9 – the condition -03

  • In the select sender location window, choose the option – Outside the organization.
    The meaning of the term “outside the organization” relates to a un-authenticated recipient, meaning a recipient that doesn’t provide user credentials.

Detect spoof E-mail message – Raise SCP to 9 – the condition -04

Now, we will add an additional part of the “rule condition”, in which we relate to
the un-authenticated recipient who uses an E-mail address that includes our domain name
(o365pilot.com in our specific scenario).

  • Click on the – add condition

Detect spoof E-mail message – Raise SCP to 9 – the condition -05

  • In the section named – and click on the small black arrow

Detect spoof E-mail message – Raise SCP to 9 – the condition -06

  • Choose the menu – The sender…
  • In the submenu, choose the menu – domain is

Detect spoof E-mail message – Raise SCP to 9 – the condition -07

In the specify domain window, add the required domain name that represents your organization. In our specific scenario, the public domain name is – o365pilot.com

Note – Don’t forget to click on the plus icon to add the domain name.

Detect spoof E-mail message – Raise SCP to 9 – the condition -08

If you would like to read more information about the meaning of the Exchange Online terms– “External sender” and “outside the organization“, read the following section: Dealing with an E-mail Spoof Attack in Office 365 based environment | Introduction | Part 1#12

Part 2#3 – Configuring the “action part” of the Exchange Online Spoofed E-mail rule

In this phase, we will configure the “second part” of the Exchange Online rule, in which we define the required Exchange response (action) to a scenario of spoofed E-mail that is sent to our organization recipients.

Detect spoof E-mail message – Raise SCP to 8 – the action -01-A

As mentioned, in our specific scenario, we wish to instruct Exchange Online to respond the Spoof email with three different “actions”:

  1. Stamp E-mail message that was identified as a Spoof email using the SCL value of “9”.
  2. Create an E-mail notification that will be sent to the destination recipient.
  3. Create an incident report and send it to a designated recipient.

1#3 – Stamp E-mail message that was identified as a Spoof email using the SCL value of “9”.

  • In the section named – Do the following… click on the small black arrow

Detect spoof E-mail message – Raise SCP to 8 – the action -01-B

  • Choose the menu option – Modify the message properties…
  • In the submenu choose the menu option – set the spam conference level (SCL)

Detect spoof E-mail message – Raise SCP to 8 – the action -02

In the window named – specify SCL, we will choose the default value of “9

Detect spoof E-mail message – Raise SCP to 8 – the action -03

2#3 – Create an incident report and send it to a designated recipient.

In this step, we will instruct Exchange Online to generate + send an incident report to a designated recipient. In our specific example, the designated is Bob, the Exchange Online administrator.

  • Click on the option – add action

Detect spoof E-mail message – Raise SCP to 8 – the action -04

  • In the section and, click on the small black arrow

Detect spoof E-mail message – Raise SCP to 9 – the action -05

  • Choose the menu option – Generate incident report and send it to…

The settings of the incident report include two parameters:

  • The name of the “destination recipient” which will get the incident report.
  • The information fields that will be included in the incident report.

Detect spoof E-mail message – Raise SCP to 9 – the action -06

  • To add the required “destination recipient” name, click on the link – Select one…

Detect spoof E-mail message – Raise SCP to 9 – the action -07

  • In our specific scenario, the recipient who will get the incident report is Brad.

Detect spoof E-mail message – Raise SCP to 9 – the action -08

To select the information fields that will appear in the incident report, click on the link named- *include message properties

Detect spoof E-mail message – Raise SCP to 9 – the action -09

In our specific scenario, we will choose to include all the available message properties in the summary report.

Detect spoof E-mail message – Raise SCP to 9 – the action -10

In the following screenshot, we can see he “end result” – the Exchange Online Spoof email that includes the two parts:

  • The condition part
  • The action part

Detect spoof E-mail message – Raise SCP to 9 – the action -11

3#3 – Create an E-mail notification that will be sent to the destination recipient.

In this step, we will define the action that will send a mail notification, to the Exchange Online recipient who was supposed to get the E-mail message.

  • Click on the option – add action

Detect spoof E-mail message – Raise SCP to 9 – the action -12-A

  • In the and section, click on the small black arrow

Detect spoof E-mail message – Raise SCP to 9 – the action -12-B

  • Choose the menu option – Notify the recipient with a message…

Detect spoof E-mail message – Raise SCP to 9 – the action -13

In the “provide the message text” window, add the required E-mail notification text.

Technically, the content if the E-mail message notification can be a simple text message.
In our specific scenario, I have prepared a “styled E-mail notification” using an HTML format.

If you want to download an example to the HTML format that I have used, you can download the example from the following link

Detect spoof E-mail message – Raise SCP to 9 – the action -14

In the following screenshot, we can see he “end result” – the Exchange Online Spoof email that includes the two parts:

  • The condition part
  • The action part

Detect spoof E-mail message – Raise SCP to 9 – the action -15


Verifying that the Exchange Online Spoofed E-mail rule is working properly

In this step, we would like to test the Exchange Online Spoof email rule that was created in the former step and verify that the rule is working properly.

The required results from the Exchange Online Spoofed E-mail rule

Our desired expectations are – that the Exchange Online Spoof E-mail rule will execute that following sequence of actions:

  • Identify the event of – incoming E-mail messages that have the characters of spoof E-mail.
  • Stamp the Spoof email using the SCL value of “9”.
  • Send a custom E-mail notification message to the destination recipient (Bob in our specific scenario), notifying him that a Spoof email was sent to him, and he can access his quarantine space for checking the E-mail message.
  • Generate and send an incident report to the designated recipient. In our scenario, we ask to send the incident report to Bard, our Exchange Online administrator.

Simulate a Spoof E-mail attack | Scenario characters

To be able to ensure that the Exchange Online Spoofed E-mail rule is working properly, we will simulate a Spoof email attack, that has the following characters:
A “hostile element” is trying to spoof the identity of a legitimate organization recipient named –

  • A “hostile element” is trying to spoof the identity of a legitimate organization recipient named – Suzan using the E-mail address – Suzan@o365pilot.com
  • The spoofed E-mail message will be sent to a legitimate organization user named Bob, which uses the E-mail address – Bob@o365pilot.com
Note – if you like to learn about the way that we use for simulating the E-mail spoof attack, you can read the article – How to Simulate E-mail Spoof Attack |Part 11#12


Step 1#2 – Send a custom E-mail notification message to the destination recipient

In the following screenshot, we can see an example of a customer E-mail notification, which was sent to an organization recipient, inform him that an E-mail message that was sent to him was “routed” to the quarantine.

In my sample, I add a link to the “personal quarantine” so it would be easier for the recipient to access their personal quarantine.

The URL address of the personal quarantine is: https://admin.protection.outlook.com/quarantine

The E-mail notification about a spoof E-mail – 01

In case that the user clicks on the attached link, he will be redirected to his quarantine storage.

Office 365 recipient access E-mail sent to Quarantine -01

In the following screenshot, we can see an example of an E-mail message that is sent to the recipient by the Exchange Online server who informs him that E-mail message that was sent to him was quarantined.

The E-mail message includes links that enable the user to remove or release the specific E-mail message without the need to access the quarantine private storage.

The disadvantages of the “Exchange Online Automatic E-mail message notification” is that this notification sent every 3 days or more versus the custom E-mail message that is sent Immediately when a specific E-mail message was quarantined.

Exchange Online Quarantine User E-mail notification

In the following screenshot, we can see an example of the quarantine interface that is available to the Exchange Online administrator.

The administrative quarantine, include E-mail messages, that were sent to all the organization recipients and not just for a specific recipient.

Office 365 Exchange Online admin access E-mail sent to Quarantine -01


2#2 – Verifying that an incident report was sent to the designated recipient (Brad)

In the following screenshot, we can see an example of the incident report E-mail that was sent to Exchange administrator – Brad.

When we look at the incident report, we can see that the incident report includes two parts:

  • The incident report summary.
  • The copy of the original E-mail message.

The incident report summary includes details such as:

  • The “source recipient” (number 1) that claim to be a legitimate organization recipient named – Suzan@o365pilot.com
  • The E-mail message subject (number 2)
  • The destination recipient (number 3) is – Bob@o365pilot.com
  • The Exchange Online rule (number 4) the was “activated” and was used for generating and sending the incident report

Incident report - Exchange Online Spoof E-mail rule

The next article in the current article series

In the next article – Analyzing The Results Of The Exchange Spoof E-mail rule |Part 9#12, we will review how to analyze the results of the Exchange Spoof E-mail rule by exporting the information about the Exchange Online mail flow to CSV file using the Exchange message trace.

Dealing with spoof E-mail – Office 365 | Article series index

Now it’s Your Turn!
We really want to know what you think about the article

The post Detect spoof E-mail and raise the SCL value to “9” – send E-mail to Quarantine using Exchange Online rule |Part 8#12 appeared first on o365info.com.


Analyzing the results of the Exchange spoof E-mail rule |Part 9#12

$
0
0

In the current article, we will review the options that are available for analyzing the result of the Exchange Online Spoof E-mail rule that we have created.
The term “analyze” relate to our ability to answer basic questions such as:

  1. How many times the Exchange Online rule that we have created was “triggered”?
  2. What is the scenario in which the Exchange Online rule that we have created was “triggered”?

This information is relevant for us for many different purposes, but for me, there are main three purposes:

  1. The be able to identify false-positive scenarios – the meaning is a scenario in which a legitimate mail is mistaken identified as Spoof E-mail and deleted or blocks instead of reaching into the organization user mailbox.
  2. Verifying that the Exchange Online Spoof E-mail rule fulfills its purpose, meaning – manage to identify a Spoof E-mail event and manage to execute that required “actions” that were configured.
  3. Identify a specific “trend” of Spoof E-mail attack such as a Spoof E-mail attack that are sent from a specific recipient or aimed to a specific organization recipient etc.

The big question is – does Exchange Online include built reporting tools that can provide us this type of information?

The answer is “Yes” and “No”.
“Yes”, Exchange Online includes a built-in reporting tool that enables us to display “usage report” of a specific Exchange Online rule such as – the number of times that the Exchange on-Premises Exchange Online rule was “triggered”.

“No”, at the current time, the information that is provided by the Exchange Online reports doesn’t include information about each of the specific events in which the Exchange Online rule was “triggered”.

For example, by using the Exchange Online built report, we can understand that a specific Exchange Online rule was “trigged” 20 times in the last month, but the report doesn’t tell us for which “source recipient” or “destination recipient” the rule was triggered.

The good news is that there is a workaround solution for these Inabilities of the Exchange Online to provide a detailed report about each separate event in which the Exchange Online rule was triggered.

The Online message trace tool and the historical search

The solution that we will review in the current article is implemented by using the Exchange Online message trace tool.

Exchange Online message trace tool, can provide us a very detailed information about each incoming mail and for each outgoing mail that was sent to our Office 365 recipients and from our Office 365 recipients.

Exchange Online will keep this information for a period of 90 days.

In addition, Exchange Online includes a very useful feature, but at the same time Unknown and an unfamiliar feature that described as historical search.

The Exchange Online message trace feature – historical search, enable us to export all the information to a CSV file (CSV stand for comma separated values).

When we have the information in a CSV file, we can use tools such as Microsoft excel that have capacities that will help us to analyze the data stored in the CSV file.

The information that Exchange Online export using the CSV can be considered as very detailed information and the good news is that each time that a specific Exchange Online rule is triggered, the information will be saved and displayed in the CSV file.

The less good news is that the information about the Exchange Online rule that was triggered doesn’t relate to “name” of the Exchange Online rule, but instead, to the GUID (globally unique identifier) of the Exchange Online rule.

The GUID is implemented as a numerical value.

In other words, when we need to analyze the data that is stored in the CSV file, we will need to look for the GUID number the specific Exchange Online rule.

The question now is – how can we know what is the GUID number of a specific Exchange Online rule?

And the answer is – by using PowerShell command that will “reveal” this information

To summarize – the option of analyzing information about a specific Exchange Online rule exists, but we will need to a little effort to reap the fruits of success

Using the Exchange Online message trace tool and the historical search option

  • Log in to the Exchange admin portal
  • On the left menu bar, choose – mail flow
  • On the top menu bar, choose – message trace

The default Date range is 48 hours.
To be able to “activates” the option of Exchange Online message trace historical search we will need to use a custom time range (more than 7 days).

Analyzing the results of the Exchange spoofed E-mail rule using message trace CSV file -01

In the *Date range box, choose the option of Custom

Analyzing the results of the Exchange spoofed E-mail rule using message trace CSV file -02

As mentioned, to be able to activate the option of historical search, we will need to define date range that is equal or bigger than 7 days.

Analyzing the results of the Exchange spoofed E-mail rule using message trace CSV file -03

In the following steps, we will need to define the “search filter” such as – sender, recipient etc.

The requirement to define at least one filter such as sender, the recipient is a mandatory requirement.

Pay attention that in our specific scenario, this “mandatory requirement” is a problem because our wish is to get information about all the mail transactions that occurs in a specific date range, so we will be able to locate a specific event in which our Exchange Online Spoofed E-mail rule was triggered.

In our scenario, we don’t know if the spoofed E-mail attack was performed by a specific “source recipient” (the sender), and we don’t know if the spoofed E-mail was sent to a specific destination recipient (our organization recipient).

To overcome this obstacle, we will use a little trick in which we define a “search term” that relates to a specific domain name instead of a specific destination recipient name.

In our scenario, the organization domain name is – o365pilot.com

To be able to look for all the E-mail messages that were sent to our organization recipients (recipients whom their E-mail address includes the domain name o365pilot.com), we will look for a “wild card recipient” using the search term – *@<Domain name>

In our example, the search term is *@o365pilot.com

Analyzing the results of the Exchange spoofed E-mail rule using message trace CSV file -04

In the following screenshot, we can see additional options that are available for us.

The most prominent and important option described as – Include message events and details with the report (number 2).

When checking this option, we ask from Exchange Online to provide us a detailed report that will include all of the “additional information” that is not included by default in the standard message trace results.

Additional options are:

Report title (number 3). Exchange Online will generate a default report name who will include the current date and time, we can change this default name to another name who will suit our needs.

Notification E-mail address (number 4) – The process of generating the report and save the information to a CSV file can take 2 -6~ hours.

To be able to know when to process end and to get a notification that informs us that the report (the CSV file) is ready for us, we can add an E-mail address of a designated recipient such as the E-mail address of the Exchange Online administrator.

Analyzing the results of the Exchange spoofed E-mail rule using message trace CSV file -05

After we “hit” the search button, the Exchange Online message trace – historical search option is “triggered”.

A notification message appears that inform us that the request for generating the required report was successfully submitted and that we need to check when the process is completed.

Analyzing the results of the Exchange spoofed E-mail rule using message trace CSV file -06
In the following screenshot, we can see the result – the CSV file that included a detailed report about all the required mail transactions.

Notice that the task of generating this report can take up to 2-6~ hours.

Analyzing the results of the Exchange spoofed E-mail rule using message trace CSV file -07

In our specific example, we can see that the report includes 126 “rows of information” and we can download the report by choosing the link named- Download this report

Analyzing the results of the Exchange spoofed E-mail rule using message trace CSV file -08

Getting the GUID of the Exchange Online rule

In the next sections, we will review how to use the CSV file that we will get from performing the Exchange Online message trace historical search to analyze the data about a mail flow that is realities to a specific Exchange Online rule.

The pre-requirement for this operation is the information about the GUID value if the specific Exchange Online rule.

As mentioned, the information about the Exchange Online rule doesn’t appear using the “name” of the Exchange Online rule, but instead, by using the Exchange Online GUID value.

To get the required Exchange Online rule GUID, we need to use PowerShell command

The PowerShell command that we use for displaying the GUID value of the existing Exchange Online rules is

Get-TransportRule |FL name, guid

Get infrastructure about the specific Exchange Online rule GUID - 01

In our specific scenario, we want to get information about a specific Exchange Online rule that is named – Detect Spoofed E-mail + Send an incident report

The GUID for this rule is – 41b16365-5e3d-4476-b25b-468772545c01

Get infrastructure about the specific Exchange Online rule GUID - 02

Note – for more information about how to use remote PowerShell for connecting to Exchange Online, you can read the article – Connect to Exchange Online using PowerShell

Using Microsoft excel for analyzing the data in the CSV file

Before we begin with the specific instruction about how to “extract” the required information about a mail flow that is related to a specific Exchange Online rule, two “tips
that will enable us to manage “big chunk of data” when using excel to view the content of a file.

In the following screenshot, we can see the content of the CSV that was created by the Exchange Online message trace historical search

It’s clear to see that the “amount of data” can very easily cause headaches.

Analyzing the results of the Exchange spoofed E-mail rule using message trace CSV file -A01

By default, when we scroll down, the data table headers will “disappear”.

Our task is to “fixate” the table headers so when we scroll down, it will be clear to what row the specific cell is “belong”.

Analyzing the results of the Exchange spoofed E-mail rule using message trace CSV file -A02

To “fixate” the table headers choose the menu View and click on the icon – Freeze Panes

Analyzing the results of the Exchange spoofed E-mail rule using message trace CSV file -A03

Another option that we should consider using is to copy the content of the Excel sheet that includes the report to an additional Excel sheet, so we will be can execute different Excel option such as filtering and more without “damaging” or “corrupting” the original data.

To be able to copy the content of a specific Excel sheet, right click on the TAB name and choose the menu Move or Copy…

Analyzing the results of the Exchange spoofed E-mail rule using message trace CSV file -B01

In the option box, choose the option – Create a copy

Analyzing the results of the Exchange spoofed E-mail rule using message trace CSV file -B02

In the following screenshot, we can see the copy of the “original Excel sheet”. We can rename the copy to any suitable name.

Analyzing the results of the Exchange spoofed E-mail rule using message trace CSV file -B03

Using Excel find option

In the former section, we learn how to get the required GUID of the specific Exchange Online rule that we look for.

The simplest procedure that we can use to look for information about “mail transactions” that was priced by the specific Exchange Online rule is to use a “simple find” option.

Use the keyword key combination CTRL + F

Analyzing the results of the Exchange spoofed E-mail rule using message trace CSV file -C01

In the following screenshot, we can see that the result appears as “ruleid=
in other words, Exchange Online provides information about a specific rule as Rule Id (identification) and relates to the rule by using a GUID.

Analyzing the results of the Exchange spoofed E-mail rule using message trace CSV file -C02

Using the Find all search option

More suitable option for our needs is the opting of “Find all” because the information about the specific rows that include the value that we look for will appear many times.

When using the option of the “Find”, click on the button – Find all

Analyzing the results of the Exchange spoofed E-mail rule using message trace CSV file -D01

In the following screenshot, we can see that the “Find BOX” include all the “instances” in which the specific keyword was found.

Analyzing the results of the Exchange spoofed E-mail rule using message trace CSV file -D02

Using the Excel Filter option

An additional option that we can use is – the Excel Filter option.

To be able to “filter out” the specific rows that include the value that we look for, use the following steps:

  • Position the mouse cursor somewhere in the data table.
  • Choose the Data menu and click on the Filter icon

Analyzing the results of the Exchange spoofed E-mail rule using message trace CSV file -E01

In the following screenshot, we can see that a “small arrow ” appears on the right side of each column header.

Analyzing the results of the Exchange spoofed E-mail rule using message trace CSV file -E02

The information about the Exchange Online rule appears in the column named- custom_data

  • Choose the column header custom_data and click on the small black arrow
  • Choose the menu Text Filters
  • In the submenu choose the menu Contains…

Analyzing the results of the Exchange spoofed E-mail rule using message trace CSV file -E03

In the text box, add the GUID value of the specific Exchange Online rule that you are looking for.

Analyzing the results of the Exchange spoofed E-mail rule using message trace CSV file -E04

In the following screenshot, we can see the result.
The information that appears is a “filtered information” that includes only the relevant rows meaning information rows that include the GUID number that we look for.

Analyzing the results of the Exchange spoofed E-mail rule using message trace CSV file -E05

Using Office 365 report to get information about the Exchange Online rule

In the following section, we will review an additional tool – the Office 365 report that can help us to get more information about the mail flow that is related to a specific Exchange Online rule.

The main character of the Office 365 report is that the information is provided by using Graff, and the main purpose of this report is to provide a “high level” view of a specific Office 365 infrastructure.

In our specific scenario, we will use a specific Office 365 report that will help us to get information about an Exchange Online Spoofed E-mail rule that we have created.

At the current time, the Office 365 report cannot be used for providing detailed information about each specific mail transaction, but instead provide us general information about the “trend” of the specific Exchange Online rule and the number of time in which the Exchange Online rule was “triggered”.

The name of the Exchange Online report that we use for getting information about specific Exchange Online rule is – Rule match for all mail

To be able to view the report that display information about “match” to existing Exchange Online transport rules, use the following steps:

Using Office 365 report to get information about Exchange Online rule -01

In the window that appears, we can see a Graff that describes the mail flow that is related to all the existing Exchange Online rules.

In our scenario, we are interested in a specific Exchange Online rule.
To be able to view information about a specific Exchange Online rule, click on the small arrow in the Rule section box

Using Office 365 report to get information about Exchange Online rule -02

In our specific scenario, we will choose the display information about the Exchange Online spoof rule that we have created named –
Detect Spoofed E-mail – Delete the E-mail + Send an incident report

Using Office 365 report to get information about Exchange Online rule -03

In the following screenshot, we can see the result.
We choose the default time range of “last 7 days”

We can see that the Exchange rule was “activated” or “triggered” in the dates 06/12 between 08/12

In case that we need more detailed information such as the number of time in which the specific Exchange Online rule was activated, we can use the option of – View table

Using Office 365 report to get information about Exchange Online rule -04

In the following screenshot, we can see the “table view“.

We can see that the Exchange Online rule was triggered on the date 07/12

Using Office 365 report to get information about Exchange Online rule -05

Verifying if Exchange Online rule was used using the Exchange Online message trace

An additional tool that we can use for getting information about a specific “mail transaction” is by using the option of Exchange Online message trace.

Let’s assume that we have configured an Exchange Online Spoof E-mail rule, that should identify and delete mail items, that appear to be spoofed E-mail messages.

The “issue” is that when Exchange Online identifies a spoofed E-mail, the mail will be deleted, but we cannot know about this event and we are not completely sure that the Exchange Online rule is “forcing” the required policy.

To verify what happened to a “Spoof E-mail meager” we will simulate a Spoof E-mail attack and then use the Exchange Online message to trace to check if the spoofed E-mail message was “captured” by the Exchange Online Spoof E-mail rule.

In our specific scenario, we have sent again a spoof E-mail message from a un-authenticated recipient who will use the identity of Suzan@o365pilot.com that we try sending email messages to the recipient named bob that uses the E-mail address – Bob@o365pilot.com

In our specific scenario, we want to test the following Exchange Online rule:

The rule should identify a scenario in which host tries to impersonate himself to a legitimate organization recipient

In this case, the rule should

  1. Delete the E-mail message
  2. Generate + send an incident report to a designated recipient

In the following screenshot, we can see the content of our specific Exchange Online
Spoof E-mail rule:

verifying if Exchange Online rule was used using Exchange Online message trace -01

We will simulate the scenario of Spoof E-mail that will be sent by Suzan@o365pilot.com and in the next step, use the Exchange Online message trace to get more information about the flow of the specific spoofed E-mail message that was sent the destination recipient – Bob@o365pilot.com

Note – if you want to read more information about how to simulate spoofed E-mail attack, read the article –How to Simulate E-mail Spoof Attack |Part 11#12

To be able to “track” the mail flow of the spoofed E-mail message that we sent to the destination recipient – Bob@o365pilot.com, we will use the Exchange Online message trace

  • Log in to the Exchange admin portal
  • On the left menu bar, choose –mail flow
  • On the top menu bar, choose – message trace

In our specific scenario, we are looking for E-mail message that was sent to the recipient Bob@o365pilot.com

verifying if Exchange Online rule was used using Exchange Online message trace -02

In the following screenshot, we can see the result. The result detailed all of the E-mail messages that was sent to Bob@o365pilot.com

We are interested in an E-mail message that was sent by Suzan@o365pilot.com

The status of the E-mail is “Failed

At first glance, it looks like a problem, but the translation of the term “Failed” is that the
E-mail message didn’t reach to the destination recipient mailbox.

In our specific scenario, this is the desired result because we expect that the Exchange Online Spoofed E-mail rule will identify, block and delete the spoofed E-mail message.

verifying if Exchange Online rule was used using Exchange Online message trace -03

In case that we want to get more details about the mail flow, we need to double click on the log row.

Now we can see the “chain of events” that occurred in the E-mail message.

We can see the Exchange Online accept the spoofed E-mail message (appear as RECEIVE)

Because Exchange Online found “match” to the specific rule that was created, Exchange Online will follow the instructions that appear in the rule:

  • The spoofed E-mail message will be deleted (number 1).
  • An incident report will be created by Exchange Online and sent to the designated recipient (number 2).

verifying if Exchange Online rule was used using Exchange Online message trace -04

Dealing with spoof E-mail – Office 365 | Article series index

Now it’s Your Turn!
We really want to know what you think about the article

The post Analyzing the results of the Exchange spoof E-mail rule |Part 9#12 appeared first on o365info.com.

How to simulate E-mail Spoof Attack |Part 10#12

$
0
0

When we hear the term “spoof E-mail attack”, the initial association that appears in our mind is – a hacker sitting in a dark room, filled with flashing lights, which quickly tap the keyboard commands and strange markings!

Sound romantic?

Well, in reality, the ability to perform or simulate E-mail spoof attack is very simple and can be performed very easily by each one of us.

In the current article, we will demonstrate three easy and simple options for simulating
E-mail spoof attack.

Q1: Do you not think that it’s dangerous to publicly post information on how to carry out the spoofed E-mail attack?

A1: No, the “black hat” elements that perform a spoof E-mail attack, are usually professionals who don’t need my “help and advice” on how to perform the spoof E-mail attack.

Q2: Why should I learn about how to simulate a spoof E-mail attack?

A2: Because when we are building a “security mail infrastructure” that needs to identify and block various E-mail attacks such as – spoof E-mail attack, we need a way to test our security mail infrastructure.

In other words, we are the “white hat” side, that needs to know about the method of the “black hat” side.

We need to have the ability to “mimic” the operations that are executed by the hostile element that perform the spoof E-mail attack.

We need to know how to perform a spoof E-mail attack so, we could verify that the mail security measures that we are implemented such as – Exchange Online Spoofed E-mail rule, are working correctly and doing what they need to do – identify, block and alert about an event of spoof E-mail attack.

What tools and methods for performing the spoof E-mail attack, we will review in the current article?

In the current article, I will demonstrate three options or methods that we can use for simulating spoof E-mail attacks.

  • Option 1 – by using a very useful and effective GUI mail client named – Jbmail
  • Option 2 – by using a telnet client to perform SMTP session with the destination
    E-mail server.
  • Option 3 – by using public online web-based tools

Simulating E-mail Spoof Attack – the Action Plan

Before we start with the actual process, in which we will try to examine the Exchange Online spoof transport rule, it’s important that we will know what is the “action plan” and the task order that needs to be implemented:

Step 1 – create the required Exchange Online transport rule, that should identify Spoof email and will execute a specific action as a response.

Step 2- Plaining the Spoof email attack

Decide about the E-mail address that will be used in our Spoof E-mail attack

  • The source recipient E-mail address – this is the E-mail address that will be used by the “hostile element” that tries to impersonate himself to a legitimate organization recipient
  • The destination E-mail address – this is the E-mail address of the organization user whom we try to “attack”.

Step 3 – choosing the “attack tool”

We will need to decide what is the tool that we will use for simulating the Spoof email attach.

Step 4 – Get the hostname of the mail server that represents the domain that we want to test.

Step 5 – executing the Spoof email attack

Step 6 – verify if the Exchange Online transport rule manages to “identify” the E-mail spoof attack + implement the required actions such as – block the E-mail message, etc.

Simulating E-mail Spoof Attack | Our scenario description

Our organization is represented by the domain name: o365pilot.com

Lately, our organization has experienced E-mail Spoof attack, in which the hostile element presents himself as Suzan, our company chief executive officer.

This hostile element sends an E-mail message to our company employees on behalf of Suzan (using the E-mail address Suzan@o365pilot.com).

To be able to prevent this spoofing attack, we have created an Exchange Online Spoof email that will identify Spoof email attacks.

The main concept of this spoofing attack is that we will address the Exchange Online server who represents the domain name – o365pilot.com, and presents ourselves as Suzan@o365pilot.com but, without providing any user credentials (anonymous SMTP session).

The destination recipient whom we will try to “attack is Bob@o365pilot.com

Simulating Spoof email attack - Scenario description

Get the host name of the destination mail server

When we choose the option of using the GUI mail client named – Jbmail or using an SMTP telnet session, the preliminary information that we need to have is the Host name of the destination mail server that represents the domain which we want to test.

For example – in case that we want to simulate a spoof E-mail attack for checking the security infrastructure of a domain named – o365pilot.com, we will first need to know what is the host name of the mail server\s that represent this domain.

In more technically terms – we will need to perform DNS query looking for the MX record of the host\s that represent a specific domain name.

In our specific scenario, we will try to spoof the identity of a recipient named – Bob@o365pilot.com

To be able to address the mail server that represents the domain name o365pilot.com, we will need to get the exact hostname of the mail server.

We will get the name of the mail server by query public DNS server for the MX record of the domain name – o365pilot.com

Technically, there are many tools and options for creating the required query.

Get the host name of the destination mail server using NSLOOKUP

In our specific example, we will use the built in windows command tool named- NSLOOOKUP

To get the required information, we will open the command prompt and type the following command:

Nslookup -q=mx o365pilot.com

In the following screenshot, we can see results.

The hostname of the mail server that represents the domain name – o365pilot.com, is o365pilot-com.mail.protection.outlook.com

Get the host name of mail server by looking for the MX record using NSLOOKUP -01

Get the host name of the destination mail server using MXTOOLBOX

In case that we prefer using more friendly interface that the NSLOOKUP command interface, we can use a variety of web-based tool that will enable us to get the host name of a mail server that represent a specific domain name.

My favorite web tool is the MXTOOLBOX web site

In the following screenshot, we can see an example to the way that we use for getting the required hostname.

In our specific scenario, we are looking for the hostname of the mail server that represent the domain name – o365pilot.com

Get the host name of mail server by looking for the MX record -02

The answer will include the server hostname + his IP address.

Get the host name of mail server by looking for the MX record -03

Dealing with spoof E-mail – Office 365 | Article series index

Now it’s Your Turn!
We really want to know what you think about the article

The post How to simulate E-mail Spoof Attack |Part 10#12 appeared first on o365info.com.

How to Simulate E-mail Spoof Attack |Part 11#12

$
0
0

In the current article, we will demonstrate three options for accomplishing the task of simulating E-mail spoof attack.

Our main goal is performing a test, in which verify if the Exchange Online Spoof E-mail rule that we have created is manage to identify an event of Spoof E-mail and respond accordingly.

Disclaimer

It is important for me to point out, that this is not a “black hat” information, but instead, a way for us (the “white hats”) to test the strength of our mail infrastructure.

The process in which we are spoofing the source recipient identity by using tools should be used strictly for “test purposes” and not for any other malicious purposes.

General information

The current article is the continuation of the former article in which we have reviewed the Preliminary steps of the Spoof E-mail attack.

In the fourth section, we will review how to verify if the Exchange Online Spoofed E-mail rule that we have created is working “correctly” meaning – manage to identify the spoofed E-mail attack + implement an action such as: deleting the spoofed E-mail and sending an incident report to a designated recipient (the Exchange Online administrator in our example).

Spoof E-mail attack | Scenario description

Just a quick reminder for the characters of our scenario:

A hostile element is trying to spoof the identity of a legitimate organization recipient named – Suzan (Suzan@o365pilot.com).

The hostile element sends a spoofed E-mail message to an organization recipient who uses the E-mail address – Bob@o365pilot.com

To be able to mimic a Spoof email attack, we will use an SMTP telnet session in which we will address the mail server that represents the domain name – o365pilot.com

Simulate an E-mail spoof attack using Telnet session

The most basic tool that we can use for simulating an E-mail spoof attack is – the command shell using an SMTP telnet session.

In case that we use a “Windows OS telnet client”, we will need to install the telnet client (the telnet client is not installed by default).

In our specific demonstration, I will use a very nice windows console emulator with tabs
named ConEmu

Simulating a Spoof email attack using telnet

Before we begin, a short presentation for the SMTP telnet command that we use for creating an SMTP communication channel with the mail server.

Note – an SMTP telnet communication includes an additional commandד that we will not review in the current article.

In the following box, we can see an example of the syntax and the SMTP command sequence that we use:

Telnet <Host name> 25

The first command is used for initializing the SMTP session with the destination mail server using a Telnet client.
We use the command Telnet + the host name of the destination host + the required communication port number.
A standard mail session is usually implemented by using port 25

Ehlo

This is the command that we use for starting the session with the destination host
(the mail server).

Mail from: <E-mail address>

This is the command that we use for telling the mail server – “who we are”.
In a scenario of spoofed E-mail attack, we present ourselves as a legitimate organization user (impersonating our identity).

Rcpt to: <E-mail address>

This is the command that we use for telling the mail server – “who is the destination recipient”.
In a scenario of spoofed E-mail attack, this is the legitimate organization recipient whom we want to attack.

Data

This is the command that we use for “signaling” the mail server than from this phase, we start to write the E-mail message that needs to be sent.

Subject: <Text>

This is an optional command that we use for describing the subject of the E-mail message. I prefer to use the “subject” command because, in this way, it’s easy for me to identify the “spoofed E-mail message” that I try to send when I try to check if the spoofed E-mail reaches to the destination recipient mailbox or was blocked by the Exchange Online server.

<E-email message Text>

This is not a “command” but instead, the text string that will appear in the E-mail message body. This is an optional step.

In case that we want to write text that will send in the body of the E-mail message, we should click on the “space” keyboard key twice.

.

The ” Dot” or the “point” characters are a very important because, this is the character that we use for informing the destination mail server that we want to End the specific SMTP session, meaning – inform the mail server that he is “allowed” to take the E-mail message and deliver the E-mail message to the destination recipient.

In the following box, we can see an example for the SMTP telnet session that we use for simulating a non-authenticated recipient, who presents himself as a “legitimate recipient” from our domain, that tries to send E-mail message to the destination recipient (also from our domain)

1. Telnet mail.o365pilot.com 25

2. ehlo

3. Mail from: Suzan@o365pilot.com

4. Rcpt to: Bob@o365pilot.com

5. Data

6. Subject: This is test E-mail message

7. Hello, how are you?

8. .

In the following screenshot, we can see an example of the SMTP telnet session

Simulating Spoof email attack using telnet-00

Simulate an E-mail spoof attack using Jbmail mail client

In the following section, we will review a demonstration of simulating spoofed E-mail attack, by using a very useful mail client that I like to use named – Jbmail

The Jbmail mail client is a very small piece of software and, there is no need to even install the client (only activate the client by using the EXE file).

How to use the Jbmail mail client for simulating E-mail spoof attack

  1. In the first phase, we will create a “new mail profile” that will include the specific settings for the mail infrastructure that we want to address\test (o365pilot.com in our scenario).
  2. In the second phase, we will try to simulate a spoof attack by presenting ourselves as an organization’s user who use the E-mail address Suzan@o365pilot.com
  • We will create a new mail profile by choosing the New option
  • Enter the mail profile name
  • Choose the Save option

How to simulate a spoof email attack -01

  • SMTP host: in this box, we will need to provide the hostname of the mail server that we want to address. In our example, the hostname of the mail server that represents the domain name com is – o365pilot-com.mail.protection.outlook.com
  • Port: this is the port number in which the destination mail server is “listening”. In a standard mail communication, the port number is – 25.
  • Your name: this is just the display name of the user who sends the mail.
  • Your address: this is the “source recipient” E-mail address. In our scenario, we want to test a spoof attack present ourselves as a legitimate organization recipient who uses
    the E-mail address –Suzan@o365pilot.com

How to simulate a spoof email attack -02

In phase 2, we will send an E-mail message to our destination recipient.

  • Choose the Account tab
  • Click on the Compose button for creating a new mail message.

How to simulate a spoof email attack -03

  • In the To: box, we will add the destination E-mail address. In our specific scenario, the “destination recipient” is Bob@o365pilot.com
  • Click on the Send button

How to simulate a spoof email attack -04

In the following screenshot, we can see that the E-mail message was successfully sent.

The meaning is that we manage to address the Exchange Online server who represents the domain o365pilot.com and, asks him to deliver the E-mail message to the destination recipient.

Notice that the fact that we manage to address the Exchange Online server doesn’t mean
that the E-mail message has reached his destination, but instead, we can only be sure that the Exchange Online “agree to accept” our E-mail message.

How to simulate a spoof email attack -05

Simulate an E-mail spoof attack using an online web-based tool

An additional option that we can use for the purpose of sending “anonymous E-mail” or spoofed E-mail, is by using a free web application.

The advantage of using such application is that we don’t need to install any tool or get the hostname of our destination mail server.

All we need to know is the recipient name whom we want to “spoof” his identity.

I must declare that I cannot guarantee the “safe use” of such sites and the decision to use such a site is on your own personal responsibility.

In the following screenshot, we can see an example of a web-based tool named – Emkei’s Fake Mailer whom we can use for simulating spoofed E-mail.

How to simulate a spoof email attack using online web tool -01

How to verify that the spoof attack was detected by Exchange Online rule?

In the former article in the current article series, we have learned how to create an Exchange Online transport rule that needs to deal with a spoof attack.

Another important subject is the part in which we verify that the Exchange Online transport rule that we have created is really working and, manage to intercept the spoof
E-mail message.

For example, we have created an Exchange Online Spoof email rule that supposed to identify Spoof email and as a response – delete the Spoof email.

To be able to verify this Exchange Online rule, we will simulate a Spoof email and then, to get a detailed information about the mail flow of a specific E-mail message, we will use the Exchange Online message trace tool.

The Exchange Online message trace is the “browsing tool”, that will enable us to view the information stored in the Exchange Online log file.

Using the Exchange Online message trace

  • Login to Exchange Online management interface
  • On the left menu bar, choose the menu – mail flow
  • On the Top menu bar, choose the menu – message trace

Using Exchange Online message trace to verify spoof rule -01

In our specific scenario, we would like to view what happened to the spoofed mail that was sent to Bob@o365pilot.com

To be able to track E-mail message that was sent to Bob, we will choose to filter the results by using the Recipient: filter.

Using Exchange Online message trace to verify spoof rule -02

We will choose the E-mail address of bob and click on the add-> button.

Using Exchange Online message trace to verify spoof rule -03

To activate the message trace search, we will click on the search button.

Using Exchange Online message trace to verify spoof rule -04

In the following screenshot, we can see that the “spoofed” E-mail message that we sent to Bob@o365pilot.com was “captured” by the Exchange Online transport rule and that the STATUS
of the E-mail is –Failed

Using Exchange Online message trace to verify spoof rule -05

Because we would like to get more detailed information about the “cause” that leads to a Failed status, we will double-click on the log row and a detailed description appears.

In the following screenshot, we can see the exact mail flow.

  1. The E-mail message was accepted by Exchange Online.
  2. The E-mail message was “matched” to a specific Exchange Online rules.
  3. The Spoof email rule that “captured” the E-mail message.
  4. The Spoof email rule “action” was configured to – delete the E-mail message instead of sending the E-mail message to the recipient mailbox and for this reason, the STATUS is Failed.

Using Exchange Online message trace to verify spoof rule -06

Additional reading

Dealing with spoof E-mail – Office 365 | Article series index

Now it’s Your Turn!
We really want to know what you think about the article

The post How to Simulate E-mail Spoof Attack |Part 11#12 appeared first on o365info.com.

Report spoof E-mail and send E-mail for Inspection In Office 365|Part 12#12

$
0
0

In the current article, we will review two subjects that relate to a scenario in which organization experiences a Spoof E-mail attack:

  1. Report the Spoof E-mail as “Phishing mail”.
  2. Sent the Spoof E-mail  for further analysis.

Report the Spoof E-mail as “Phishing mail” in Office 365

I try to get additional information regarding the subject of “what happens behind the scenes” when using the option of – reporting E-mail message as phishing in Office 365 environment but, I could not find an information about the exact process that is actually implemented.

Despite this lack of information, in a scenario of phishing E-mail message, the best practice is to use the option of “reporting”.

Send the Spoof E-mail for further analysis

In a scenario in which we want to forward the “Spoof E-mail message” for technical person or team that will be able to analyze the E-mail message, the most common mistake is to copy and paste the content of the “Spoof E-mail message” or send a screenshot to the technical person that will need to analyze the information.

In such a scenario, there are two important issues that we need to know about:

  1. Send the “Spoof E-mail message” as a mail item – the meaning is that we need to have all the data that include in the “Spoof E-mail message”, the content, the email headers and so on.
  2. When send E-mail message as an attachment, there is a reasonable chance that the destination mail serves which “accept” the E-mail message will change \update some fields in the E-mail message header.

For this reason, when we sent an email message for further analysis, it’s important to “zip” the E-mail message.

Report a Spoof E-mail as “Phishing mail” in Office 365

At the current time, to option of reporting about a Spoof E-mail or a “Phishing mail” is available for Office 365 customers and only one using the OWA mail client.

Technically speaking, the Spoof E-mail” is different from the formal definition of Phishing mail, but for our purpose, we will not go into detailed description and relate to Spoof E-mail as a Phishing mail.

The process of reporting a specific E-mail as a “Spoof E-mail” is very simple.

All you need to do is to select the specific E-mail message, click on the small black arrow
on the not junk menu

Report E-mail as Spoof E-mail – Office 365 -01

And choose the menu Phishing

Report E-mail as Spoof E-mail – Office 365 -02

Send a spoofed E-mail for further analysis

In the following section, we will review the steps that need to be implemented in a scenario in which we want to forward a specific E-mail message to further analysis.

  • Choose the specific E-mail message that you want to send for further analysis.

Sent Spoof E-mail message for further process of analysis -01

  • Open the E-mail message and choose the File menu

Sent Spoof E-mail message for further process of analysis -02

  • Choose the Save As menu

Sent Spoof E-mail message for further process of analysis -03

  • Save the E-mail message in a specific path that you choose.

Sent Spoof E-mail message for further process of analysis -04

The E-mail message will be saved by using the MSG file format.

Use your preferred file compression software that you like.
In our specific scenario, we use the built-in zip option for zipping the E-mail message.

Right click on the E-mail message and choose the menu – Send to and on the submenu Compressed (zipped) folder.

Sent Spoof E-mail message for further process of analysis -05

Create a new E-mail message and the ZIP file (the compressed E-mail message) as an attachment.

Sent Spoof E-mail message for further process of analysis -06

In the following screenshot, we can see the E-mail message with the zip attachment.

Sent Spoof E-mail message for further process of analysis -07

Dealing with spoof E-mail – Office 365 | Article series index

Now it’s Your Turn!
We really want to know what you think about the article

The post Report spoof E-mail and send E-mail for Inspection In Office 365|Part 12#12 appeared first on o365info.com.

DKIM – Domain Keys Identified Mail | Basic introduction | Part 1#5

$
0
0

DKIM (Domain Keys Identified Mail) is a mail security standard that enables the sender to declare about his “identity” and enable the destination mail infrastructure, meaning the receiving mail server, to verify the identity of the sender.

The main paradox regarding a security standard is that most of the time, we don’t really understand what they are “doing” and we don’t really care if our infrastructure uses the “security standard” until something is happening.

Relating to mailing infrastructure and the subject if reputation and E-mail attacks, the scenario of “something happened”, could be a minor event or a very major event in which the organization’s reputation severely affected when the hostile element uses the organization identity to attack other mail systems or, a scenario of phishing attack that is directed toward our organization employees.

Bottom line – Invest the required effort for learning and understand this mail security standard so in the future, you will be able to avoid from “on desired scenarios”

The main risks that organization facing relating to mail infrastructure

In a modern based mail environment, one of the most noticeable challenges that each organization needs to face is the problem in which hostile element exploits an Inherent weakness of the SMTP mail protocol that relates to the identity of the “sender”.

When a mail server is addresses of a host, that ask for the mail server that represent the organization to deliver an email message to one of the organization recipients, the sender identifies himself by using an E-mail address.

By default, the mail server will believe the sender and will not perform the verification process in which he tries to validate the identity of the sender.

In other words, when we address mail server, we can use any E-mail address that we would like to use for “presenting our self” before the mail server.

Sound strange or too simple?

The answer is that this is a simple reality. The reason is that when the SMTP protocol was created the main concern of the people that write this protocol was to handle effectively the process of delivering an email message between two hosts.

Other subjects such as mail security or scenario in which the sender tries to fake his identity were not included as part of the SMTP protocol specification.

The outcome is that hostile element that understands this character of the SMTP mail protocol exploits this weakens and used the option of “faking the sender identity” for implementing two major types of E-mail attack.

  • SPAM E-mail
  • Phishing E-mail attack

The common denominator of spam and phishing E-mail attack is that the hostile element attempts to conceal his true identity and instead, present a false identity of a legitimate user.

The common denominator of spam and phishing E-mail attack

Two examples of the common mail attacks

To be able to understand better the two major E-mail attacks: spam mail and phishing mail attack, let’s use the following scenario:

An organization that uses the public domain name o365pilot.com

1. Spam mail attack

In our scenario, we include two organizations:

  • Organization A is represented by the domain name o365pilot.com
  • Organization B is represented by the domain name thankyouforsharing.org

A hostile element wants to send spam E-mail message to a recipient from the thankyouforsharing.org organization.

The hostile element wants to achieve two goals:

  1. Convince recipients from the thankyouforsharing.org that they can trust him and, for this reason, will read his spam mail.
  2. Prevent a scenario in which E-mail message that was sent by the spammer will be identified and report as spam mail and by doing so, prevent his ability to continue to spread spam mail.

To be able to accomplish this goal, the hostile element uses a fake identity of a legitimate organization.

In case that the mail server that he addresses identifies his E-mail message as “spam mail” and decides to report this information to famous black lists provides, the information that will be reported will include information about the fake identity of the hostile element.

In other words, the element that will absorb the damage is the legitimate organization which his name was used by the hostile element. In our specific scenario, the domain name o365pilot.com will be reported as an organization that sends spam mail.

In the following diagram, we can see an example of a standard spam mail attack:

A hostile element wants to send spam E-mail to recipients from an organization named – thankyouforsharing.org

The hostile element using a fake identity, in which he claims to be a legitimate recipient named – o365pilot.com

In a case that the E-mail infrastructure of the other organization (thankyouforsharing.org in our example) will manage to identify the E-mail messages as “spam mail”, and decide to report about this E-mail message as spam mail, this could lead to a scenario in which the domain name o365pilot.com will be blacklisted!

In other words – the spam activity of the hostile element could damage the business flow of a legitimate organization!

hostile element uses our domain name for distributing spam mail -01

2. Phishing mail attack

The main characters of phishing attacks are that a hostile element uses a fake identity of a legitimate organization user (most of the time a VIP user such as the CIO, etc.) Addressing organization users and ask, them “to do something for him” such as – send him money, their bank account and so on.

The hostile element relies on the fact that most of the users are not able to identify this “fake E-mail” because the E-mail message looks like a legitimate E-mail that sent by a legitimate organization recipient.

In our specific scenario, Suzan is the company CIO. The hostile element uses a fake mail identity in which he presents himself as “Suzan the company CIO”.

In case that the E-mail message with the fake identity will reach to one of the organization users, we can assume that the “destination recipient” will treat the E-mail message as an important E-mail message because the E-mail message apparently sent by the company CIO.

hostile element uses Fake identity trying to execute mail attacks such as phishing -02

What can we do for dealing with this Inherent weakness of the SMTP protocol?

The “magic formal” that we are looking for is to provide our mail server, the ability and the required skills that will enable them to distinguish between good and evil.

The SMTP mail protocol was not designed from the start to deal with such scenarios.

Our wish is increasing and extends the capabilities of our mail infrastructure so the mail server that represents our organization will be able to identify a scenario of spoof identity in which a
non-legitimate recipient tries to impersonate himself and use other recipient identities versus a legitimate recipient who tries to send an E-mail message to our recipient, and this recipient is really who he claims to be.

The ability of mail server to distinguish between a legitimate recipient versus non legitimate recipient

Existing Mail authentication mechanism \ standard

The most popular mail security standards, that deal with the ability to Identify with certainty a specific recipient and be sure that he is a legitimate recipient are: SPF and DKIM.

An additional mail security standard that complete the former standard is the DMARC standard.

  • The term DKIM stands for – Domain Keys Identified Mail.
  • The term SPF stands for – Sender Policy Framework.
  • The term DMARC stands for – Domain-based Message Authentication, Reporting & Conformance.

SPF and DKIM standard, enable mail server to “decide” if the identity that the sender provides can be considered as his real identity or a scenario in which there is a high chance that the host is trying to fake his identity.

In a scenario in which the identity of the sender cannot be trusted, the SPF and DKIM standard doesn’t instruct the mail server what to do.

The decision of “what to do” in the scenario of fake identity (or a scenario in which, for some reason, the sender cannot provide the required information that will prove his identity). The mail server will need to decide by himself, what to do with the E-mail message.

The ability of the mail server to decide what action will be executed is implemented via a mail security policy, that will include a set of instructions such as: don’t accept the E-mail message, don’t accept the E-mail message + notify the destination recipient and so on.

The main purpose of the DMARC standard is to “fill the gap” by complete the missing part in the equation.

DMARC standard provides a way to define “mail policy” in which we help to another organization to decide what to do in a “fake identity scenario” in which some element tries to use the identity of one of our legitimate users.

In addition, the DMARC standard provides a way in which the “destination organization” which experiences the spoof E-mail event can report to the organization which the hostile element tries to use his identity.

The interaction between the different E-mail security standards

In reality, the DMARC standard includes additional sophisticated mail protection mechanism built in the current article series will not get into a detailed description of this mail security standard.

How does the SPF and DKIM can help us to verify the identity of the sender?

The common denominator between SPF and DKIM mail identification standards is based on the “domain part” of the E-mail address.

Booth of this standard, based on a concept in which the destination mail server, “fetch” the domain name from the E-mail address of the sender address and use a specific method for verifying the identity of the sender.

The solution that is provided by this mail identification standard is based on a concept
of domain authority.

When a specific host address mail server, asking him to deliver an email message to a specific recipient organization, the host must present his “identity” meaning, his E-mail address, to the mail server that he addresses.

Each E-mail address includes two parts:

  • The “Left part” that represent the name of the recipient (number 1).
  • The “Right part” that represent the domain name of the recipient (number 2).

Using the domain name for verifying the identity of the recipient

In a scenario in which the mail server configures to use SPF or DKIM (or booth by then), the mail server will implement a procedure in which he tries to verify the identity of the sender.

The verification process goal is to find out if the sender has really belonged to this domain and that the E-mail message was sent from the legitimate mail infrastructure that represents the specific domain name.

Verifying the domain name that was “extracted” from the ?E-mail address

The main difference between SPF and DKIM

The SPF and the DKIM use a different procedure for verifying the identity of a sender.

The SPF standard and the sender identity verification concept

The SPF standard is based on a very simple concept in which organization publishes information about the “authorized mail server” that can send an E-mail message on his behalf.

The “authorization process”, is implemented by publishing information about the IP address of this “allowed” mail server.

When a mail server is the address of a sender, in reality, the element that addresses the mail server is not the sender himself but instead, a mail server that represents the sender.

The “destination mail server” will “see” what is the IP address of the “source mail server” (the mail server that represents the sender) and will verify if this IP address appears in the list of “authorized mail server” that consider as a mail server that can send E-mail message on behalf of the specific domain (o365pilot.com in our scenario).

The concept of SPF

The DKIM standard and the sender identity verification concept

The process that is implemented when using the DKIM standard to verify the identity of the sender is more complicated.

Technically, the current article series was written for describing in specific details that way that the DKIM “work” but for the sake of our brief comparison between SPF standard versus DKIM standard, we would provide a short description of the DKIM standard.

When a mail server is the address of a sender, the mail server that uses the DKIM standard, while “open” the E-mail message a look for a signature that was created by the “source mail server” that should represent the domain name that appears as part of the sender E-mail address.

In our specific scenario, the destination mail server will look at the E-mail signature and try to verify if the signature was created by an authority who is authorized or allowed to represent the domain name – o365pilot.com

The concept of DKIM

The question of using versus not using mail authentication mechanism

When the most important question that each organization should ask himself is the very basic question of- what’s in it for me?

Q1: What is the risk of not using mail authentication mechanism?

Q2: What is the risk of using mail authentication mechanism?

The short answer is

A1: In a modern mail environment the results of “not using any type of protection” for the public mail infrastructure could be serious and even destructive.

In other words, every organization should be familiar with the common mail security standard such as SPF, DKIM, and DMARC and should consider using one of this standard or implement the use of each of the above standards.

A2: Although it sounds a bit strange, there are some risks that are involved when using the mail authentication mechanism because the basic assumption is that we want to identify an event of the non-trusted sender and in response “refuse to accept” the E-mail message.

The actual reality is a bit more complex because when “enforcing” this mail security standard, it’s likely that we will experience a scenario of false positive in which a legitimate E-mail or a legitimate sender Is incorrectly identified as non-legitimate sender and for this reason, we block his E-mail message that was supposed to be sent to one of our organization recipients.

The “answers” to the concerns from false positive could be:

1. Using a “learning mode”

The meaning is implementing the use of the SPF and the DKIM standard, but without the part of the “action” in which our mail server reacts to a scenario in which we identify a non-trusted sender.

The best practice is the use a “phases approach”.
in phase 1, we are only inspecting the events in which our mail system recognizes a non-trusted sender and starts looking for a specific pattern, recurring event and so on.

Only after a specific period of time in which we felt that we know and understand most of this “events,” only then, move on to the next phase in which we enforce some mail security policy, which will instruct our mail server what to do in the event of spoof sender identity.

The security policy could include instructions such as – report the event to a designated recipient, block the E-mail message, sent the email to quarantine, inform the “destination recipient” that a problematic E-mail message was sent to him and so on.

2. Prepare in accordance

The recommendation is suitable for almost any scenario.
Before we “Push that button” and activated an infrastructure that can interfere with our organization mail flow, it’s highly recommended to be will prepare ourselves by documenting information about our mail infrastructure, the Ingredients of our mail infrastructure such as, hosts, mail server, network, IP address ranges, business partner and so on.

Only after we have a clear view of our mail infrastructure, only then we can start with the implementation of the mail authentication mechanism, watch carefully the implemented and in an event of a problem such as false positive, have the ability to understand the causes for the problem.

What can DKIM do for me?

Technically speaking the DKIM mail standard is implementing two different security mechanism:

  1. Identity of the sender

A security mechanism in which we are able to verify the identity of a sender that addresses our mail server.

  1. Data integrity

An additional security mechanism that is implemented by the DKIM standard related to a subject which described as data integrity.

The term “data integrity” defines a security requirement in which we want to ensure that the information in the message is original information.
In other words, we want to know the original information wasn’t altered or updated in any way along the way.

The ability to use data integrity is implemented by using Digital Signature.

We will review the subject of “Digital Signature” in the article – DKIM as standard that based upon the Public key infrastructure | Part 2#5

What is DKIM -What is the purpose of DKIM

The two flavors of DKIM in Office 365 based environment

The subject of DKIM implemented can be confusing because when we describe a mail flow, there are two parties that involved in the process:

  • The sender mail infrastructure
  • The receiving mail infrastructure

In Office 365 base environment that uses the Exchange Online mail infrastructure, there are two flavors of DKIM:

  • Inbound DKIM
  • Outbound DKIM or Outbound DKIM signing

The two flavors of DKIM in Office 365 based environment

Inbound DKIM

The meaning of the term “inbound DKIM” in an Office 365 environment is that each mail that is sent to one of the Office 365 recipients is checked automatically by EOP (Exchange Online protection) server looking for DKIM data.

In other words, the DKIM standard for “incoming E-mail message” is implemented automatically in Office 365 and we as a customer doesn’t need to do or add any type of configuration settings.

In a scenario in which sender addresses the Exchange Online server and asks to deliver an email message to one of the Office 365 recipients one of the following scenarios will occur:

Scenario 1 – the sender E-mail message includes DKIM data and the DKIM verification complete successfully.

In this scenario Exchange Online read the E-mail message header, find DKIM data, implement the required DKIM verification test and if the DKIM verification processes complete successfully, Exchange Online will add this information to the original E-mail message.

The information about the successful DKIM validation test appears as – dkim=pass

Scenario 2 – the sender E-mail message includes DKIM data, and the DKIM verification didn’t complete successfully.

In this scenario Exchange Online read the E-mail message header, find DKIM data, implement the required DKIM verification test and if the DKIM verification process but this time the DKIM verification process is not successfully completed.

For example, the HASH value that was Computed by Exchange Online is different from the HASH value that appears in the E-mail message.

The information about the successful DKIM validation test appears as – dkim=fail

Scenario 3 – the sender E-mail message doesn’t include DKIM data

In this scenario, Exchange Online read the E-mail message header but doesn’t find any related DKIM data.

The information about the successful DKIM validation test appears as – dkim=none

The three main DKIM scenarios

It’s very important to mention that, in reality, any of this result will not cause Exchange Online server “to do something”.

Exchange Online takes a Neutral position toward this “DKIM implementation” by the sender.

Technically, it doesn’t matter if the DKIM E-mail message status is: none, pass or fail. Exchange Online will not block or delete E-mail message that includes the DKIM status of none or pass.

The decision what to do with each of the specified scenarios depends on as Exchange Online administrators.

For example, In the following diagram, we can see an example in which hostile element tries to fake is identity and use the identity of a legitimate organization user.

In this scenario Exchange Online read the E-mail message header, find DKIM data, implement the required DKIM verification test and if the DKIM verification process, and the DKIM verification process are not successfully completed.

In this case, the E-mail message will be accepted by Exchange Online and forward to the destination recipient mailbox.

DKIM is not enforcing any kind of E-mail policy

Outbound DKIM signing

The option of “outbound DKIM signing” defines the sender that uses the DKIM standard for signing an E-mail message that sent from his mail infrastructure to the “other recipients”.

In Office 365 based environment the option of “outbound DKIM” is not automatically activated.

The meaning is that E-mail message that sends from Office 365 recipients to another recipient doesn’t include any DKIM data.

The decision about “activating” the DKIM procedure for Outlook going E-mail message depends on us – Exchange Online administrator.

Outbound DKIM in Office 365 based environment

DKIM and the “DKIM Selector”

When we say that the “sender” uses DKIM for signing outbound mail (outbound DKIM signing), the element that uses for singing the E-mail message described as “DKIM Selector”.

The term “DKIM Selector”, defines the element that is authorized to represent a specific
E-mail domain name.

Most of the time, the “DKIM Selector” will be implemented by the mail server who sends
E-mail message on behalf of the organization and consider as authoritative for the organization public domain names.

When the DKIM Selector “stamp” the outgoing E-mail message using a DKIM signature, the DKIM Selector must add his identity (his Host name) to the E-mail message.

When the E-mail message reaches the destination mail infrastructure, the receiver mail server will fetch the name of the DKIM Selector from the E-mail message and start the DKIM verification process.

The DKIM verification process will be based on a process sin which the receiver mail server will create a DNS query looking for the DKIM Selector, Host name who should be implemented as a TXT record that contains information about the Public Key of the DKIM selected.

We will review this process in details in the article – DKIM flow in Office 365 | Part 3#5

DKIM selector the element that stamp the E-mail message

The next article in the current article series

In the next article – DKIM as standard that based upon the Public key infrastructure | Part 2#5, we will review how to create an Exchange Online rule that will identify events of spoofed E-mail and as a response, will – send the spoof E-mail to administrative quarantine.

Implementing DKIM in Office 365 | Article series index

Now it’s Your Turn!
We really want to know what you think about the article

The post DKIM – Domain Keys Identified Mail | Basic introduction | Part 1#5 appeared first on o365info.com.

Viewing all 375 articles
Browse latest View live