Quantcast
Channel: o365info
Viewing all 370 articles
Browse latest View live

Import Google’s contacts with non-English characters to Office 365 mailboxes |Part 2#2

$
0
0

In the current article, we review the process of Export information from our Google mail account to a CSV file.

The difference from the previous article is that in this scenario, we have Google’s contacts whom their name and their information include non-English characters.

Import Google’s contacts| Article Series

The Import Google’s contacts article series, including the following articles:


The “export process” that we execute by using that Google interface “doesn’t care” if our contract includes non-English characters.

The problem appears on the phase which we import the information from the CSV file by using Outlook or OWA mail client.

When we import information from the CSV file that included non-English characters, the information will appear as gibberish!

The little two secrets about importing Google contact with non-English characters

Secret 1#2

The little trick that we use for dealing with this problem is using a simple text editor such as the Notepad for saving the CSV file in a UTF-8 format.

After we implemented the required format conversation (to UTF-8), the information can be imported to our Office 365 mailbox account.

Secret 2#2

When using Outlook mail client for importing information from a CSV file that includes non-English characters, even after we convert the exported Google contacts to UTF-8 format, Outlook doesn’t know how to relate to the non-English characters, and the information will appear as gibberish!

The second secret is that the OWA that Office 365 users have include a unique tool that can help us to import Google exported contact information and successfully managed to import the non-English characters given that we have already implemented that required UTF-8 conversation.

Exporting Google contacts information.

In the following step, we review the process of Exporting Google contact information to a CSV in the required field name format that required by Outlook \ OWA mail clients.

  • Login to your Google account by clicking on the Google squares icon.

View google contacts - with non-English characters -01

  • In the icon menu that appears, click on the More

View google contacts - with non-English characters -02

  • Select the Contacts icon

View google contacts - with non-English characters -03

Exporting the Google contacts information to CSV file

In the following screenshot, we can see an example to Google’s contact list that includes a “mixture” of contact with English and non-English characters (in our example, contact who uses Hebrew characters)

  • On the left-side menu, select the option – More

Export google contacts with non-English characters -01

  • Choose the menu – Export

Export google contacts with non-English characters -02

At a time when the article written, the “New Google web interface” doesn’t include the option to export contact data.

To be able to export the contact data, we will need to use the “old interface.”

  • Select the option – GO TO OLD CONTACTS

Export google contacts with non-English characters -03

  • On the top menu bar, choose the option – More

Export google contacts with non-English characters -04

  • Select the menu – Export…

Export google contacts with non-English characters -05

In the “Export Windows,” that appears, we will need to define two option settings.

1. What contact to export?

The Google export contacts wizard enables us to export only a particular group of contacts or all of our Google contacts. In our example, we choose to export all the Google contacts by selecting the option All contacts (A).

2. The CSV row header format

The Google export contacts wizard enables us to define the CSV file format that we want to use based on the “target mail system” to which we are going to import the data.

In our example, we want to import the data using Outlook \OWA mail client.

For this reason, we will select the option – Outlook CSV format (for importing into Outlook or other application)

  • Click on the Export button

Export google contacts with non-English characters -06

  • In our example, we will save the CSV file in C: drive on a Temp folder
  • The Google export contacts wizard exports the information as a CSV file format.
  • Click on the Save button to save the CSV file

Export google contacts with non-English characters -07

An example of an import process of Google’s contact which includes non-English characters.

In the following screenshot, we can see an example of a scenario in which we import the Google contact by using the “original CSV file” without converting the CSV file to UTF-8 format.

When using Outlook people, the information about the imported contact which created by using non-English characters appears is “strange characters” (gibberish).

Import google contacts from CSV file – outlook - non-English characters -01

The same problem with the “strange characters” exists when we use OWA mail client for looking at the contact (people) information.

Import google contacts from CSV file – outlook - non-English characters -02

Convert the exported Google contact CSV file to UTF-8 format

In the following section, we will demonstrate how to implement the “format conversation process” by using the OS text editor – the notepad.

Technically speaking, every text editor that knows how to save information using UTF-8 format can use.

Right click on the exported Google contact CSV file, select – Open with and in the sub menu select – Notepad.

Saving the exported google contacts CSV file - using UTF8 format -01

In the following screenshot, we can see that the Notepad “understand” the non-English characters (Hebrew characters in our example).

Saving the exported google contacts CSV file - using UTF8 format -02

To be able to prepare the CSV file for the import process by OWA client, we will save the CSV file using UTF-8 format.

  • Select File and Save As…

Saving the exported google contacts CSV file - using UTF8 format -03

  • In the File name section – write the name of the file (number 1).
  • In the Save as type section, select – All Files (number 2).
  • In the Encoding section, select – UTF-8 (number 3).
  • Save the file format by clicking on the Save button

Saving the exported google contacts CSV file - using UTF8 format -04

In the following screenshot, we can see that a “New File” was created based on the “original CSV file.”

Saving the exported google contacts CSV file - using UTF8 format -05

Import the information from the CSV file (Goggle exported contacts) using OWA.

In the following section, we review how to import the Google contacts which exported to the CSV file.

Office 365 OWA mail client has the ability to -import in a proper manner, information from CSV file that includes non-English characters, given that the file was saved in the required format (UTF-8).

Note – the interesting thing is that the Outlook client doesn’t have this ability. Even in the case that the CSV file that includes non-English characters saved in a UTF-8 format, the import process doesn’t know how to handle these non-English characters.

Using OWA mail client.

Import google contacts from CSV file UTF8 format – OWA - Office 365 -01

  • Select the Manage menu and the Import contacts sub menu

Import google contacts from CSV file UTF8 format – OWA - Office 365 -02

  • Click on the Gmail icon

Import google contacts from CSV file UTF8 format – OWA - Office 365 -03

  • Click on the Browse button

Import google contacts from CSV file UTF8 format – OWA - Office 365 -04

  • Select the CSV file that you want to import
  • Click Open

Import google contacts from CSV file UTF8 format – OWA - Office 365 -05

  • Select the Upload menu

Import google contacts from CSV file UTF8 format – OWA - Office 365 -06

The import process successfully completed

Import google contacts from CSV file UTF8 format – OWA - Office 365 -07

In the following screenshot, we can see that the Google contacts successfully imported from the CSV file to OWA contacts (people).

The contact which includes non-English characters (Hebrew characters) displayed correctly!

Import google contacts from CSV file UTF8 format – OWA - Office 365 -08

In the following screenshot, we can see this contact by using the Outlook, mail client.

After the information from the CSV file imported by using OWA, Outlook can “see” the non-English characters (Hebrew characters).

Import google contacts from CSV file UTF8 format – OWA - Office 365 -09


Now it’s Your Turn!
It is important for us to know your opinion on this article


The post Import Google’s contacts with non-English characters to Office 365 mailboxes |Part 2#2 appeared first on o365info.com.


Prevent the option of Reply All using BCC | Part 1#5

$
0
0
In the current article series, we will review how to prevent from our organization users to use the option of “Reply All” in Exchange, and Office 365 based environment.
We will review four different methods.
Each of the methods has advantages and disadvantages versus the “other methods.”
I leave you with the decision of – which of the methods is the best method for you.

Why should we prevent the Reply All option from our users?

There are a couple of answers for this question.

The most common scenarios the “need” to prevent the option of Reply All are:

  1. Unnecessary mail flow

A scenario in which the original mail was sent to many recipients and one of this recipient felt the uncontrollable urge to “say something smart” and hit the Reply All button. The outcome is unnecessary E-mail that wastes the precious time as the rest of the recipients.

  1. Data privacy violation.

A scenario in which secret information or non-appropriate information is sent to the group of the recipients.

In this scenario, the recipient who gets the E-mail that was sent to many other recipients.
One of the users who receives the E-mail, want to respond to a particular recipient, such as the recipient that creates the E-mail.

By mistake, the users select the Reply All option.
The information that was supposed to reach to the specific recipient is sent to all the recipients who were included in the original E-mail message.

What are the methods that are available to us for “disable” the Reply All option?

The methods of disabling the “Reply All option that we will review is as follows:

Method 1#4 – Prevent “Reply All” | Send E-mail using the BCC option

In this solution, we send the E-mail to a couple of recipients. Instead of sending the E-mail to the destination recipients using the standard “TO” or the “CC” mail fields, we use the “BCC” option.

When using the BCC option, the destination recipients who get the E-mail, cannot see the rest of the recipients that was included in the “original E-mail message.”

For this reason, when the destination recipient uses the option of Reply All, the E-mail will not include all the recipients.

We will review this method in the current article.

Method 2#4 – Prevent “Reply All” | Using a Distribution Group + delivery management restrictions

In this solution, we create a dedicated Distribution Group and restrict the ability of our users to send E-mail to this Distribution Group.

Technically, the destination recipients will be able to use the option of Reply All, but the E-mail will be blocked, and will not be sent to the recipients who consider as the distribution group members.

We will review this method in the article – Prevent to option of Reply All using Distribution Group + Delivery management restrictions – Part 2#5

Method 3#4 – Prevent “Reply All” | Using a custom Outlook Form

In this method, we will need to create a custom Form using Outlook, and remove the
option of “Reply All”. The E-mail message that is based on the custom template that was created will look like in standard E-mail but the Reply All option.

We will review this method in the article – Prevent to option of Reply All using Outlook Form – Part 3#5

Method 4#4 – Prevent “Reply All” | Using a custom Outlook add-on

In this method, we use a nice and useful desktop Outlook add-in named – NoReplyAll Outlook Add-In.

In this scenario, we install this Outlook add-in that adds additional options to our mail client interface such as – menu item that enables us to remove the “Reply All” option from a specific E-mail or from every E-mail message that is sent.

We will review this method in the article – Prevent to option of Reply All by using NoReplyAll Outlook Add-In – Part 4#5

Method 1#4 – prevent “Reply All” | Send E-mail using the BCC option.

In the following section, we will demonstrate how to use the BCC option for preventing the option of using “Reply All”.

Scenario description

To be able to demonstrate the use of the BCC option, let’s use the following scenario:

Bob needs to send E-mail to many recipients. Bob would like to avoid a scenario in which one of the recipients will use the “Reply All” and send a reply to all the recipients whom the E-mail was sent to them.

One of the destination recipients is – Brad.

Sending E-mail to a list of recipients by using BCC

By default, when creating a new E-mail message, we add the E-mail address of the target recipient in the TO field.

For example – Bob sends E-mail to Brad + Angelina.

Send E-mail message using BCC - Prevent reply to All -01

When the recipient (Brad in our scenario) gets the E-mail, he can see the list of all the “other Exchange client” which the E-mail sent to them.

Send E-mail message using BCC - Prevent reply to All -02

When Brad gets the E-mail, he can see the E-mail sent by Bob, and also, Brad can see all the other recipients.

When the recipient selects the Reply All option, the “TO” field is automatically populated with all the recipient’s E-mail addresses that were included in the “original mail”.

Send E-mail message using BCC - Prevent reply to All -A3

The “trick” that we are going to use is implemented by adding the E-mail address of the destination recipient to the BCC field instead of the TO mail field.

For those of us who are not familiar with the concept of BCC, the term BCC stands for Blind Carbon Copy.

When using this option of BCC, the destination recipient cannot see information about “other recipients” that was included in the original E-mail message.

The target recipient will be able to see only the E-mail address of the E-mail originator (the recipient that sends the E-mail).

How to use \ add the BCC option.

The way that we use the BCC option depends on the mail client that we use.

Using the BCC option OWA | Office 365 mail client

In case that we use OWA mail client, the BCC field appears on the right side of a new E-mail message

Send E-mail message using BCC - Prevent reply to All -A0

Using the BCC option in Outlook

In case that we use the Outlook mail client, the BCC option doesn’t appear by default.

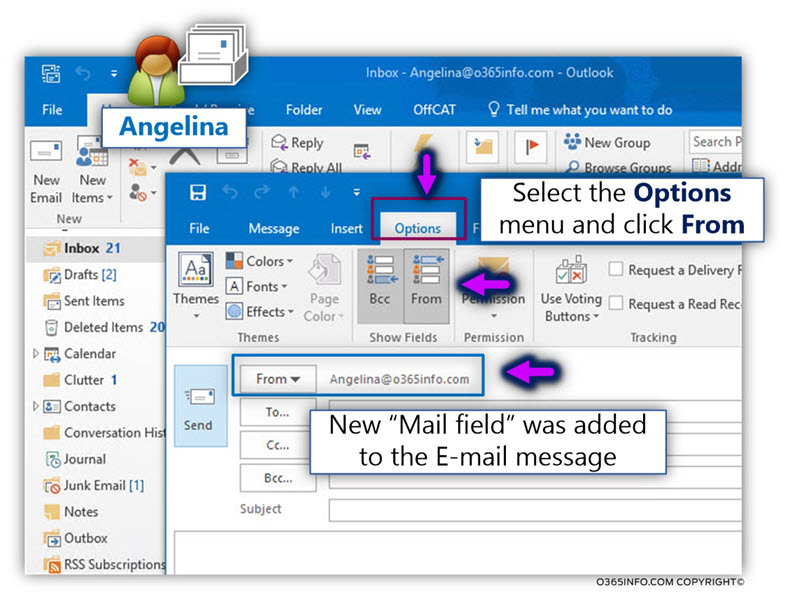
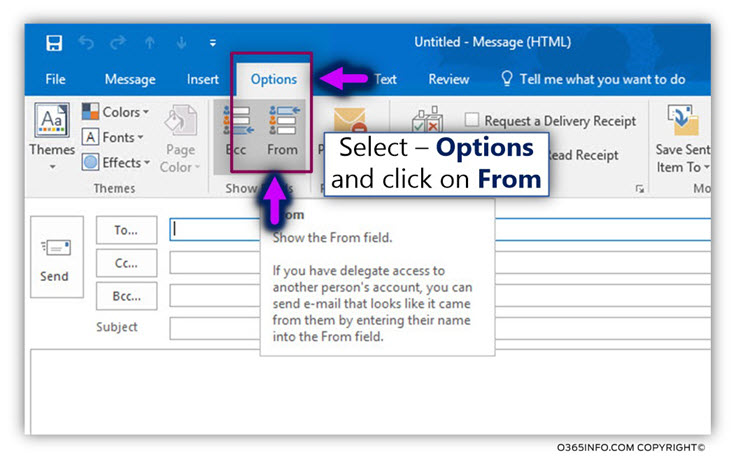
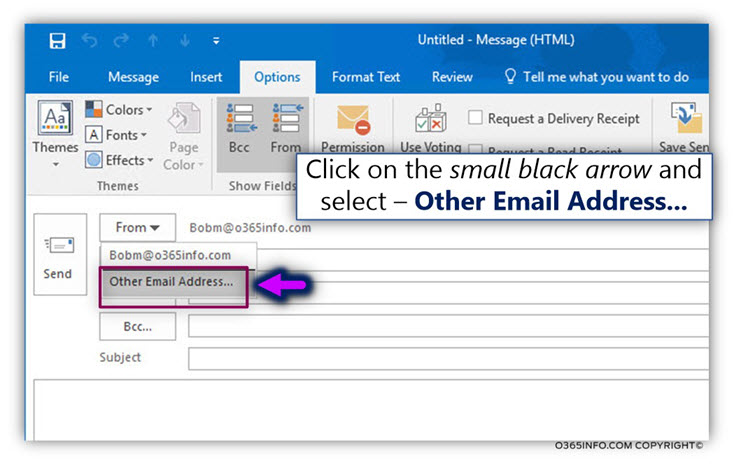
To add the BCC option, we need to create a new E-mail message, select the Options menu and click on the From icon.

Send E-mail message using BCC - Prevent reply to All -A1

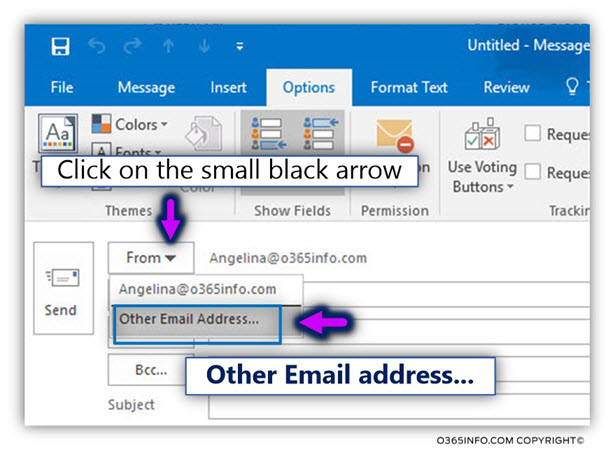
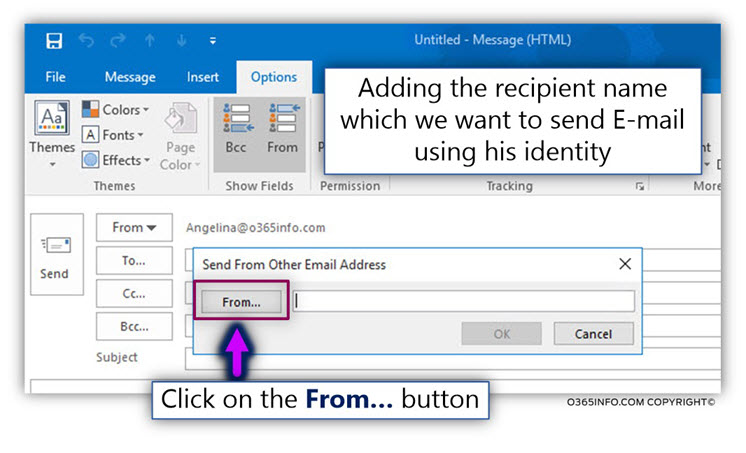
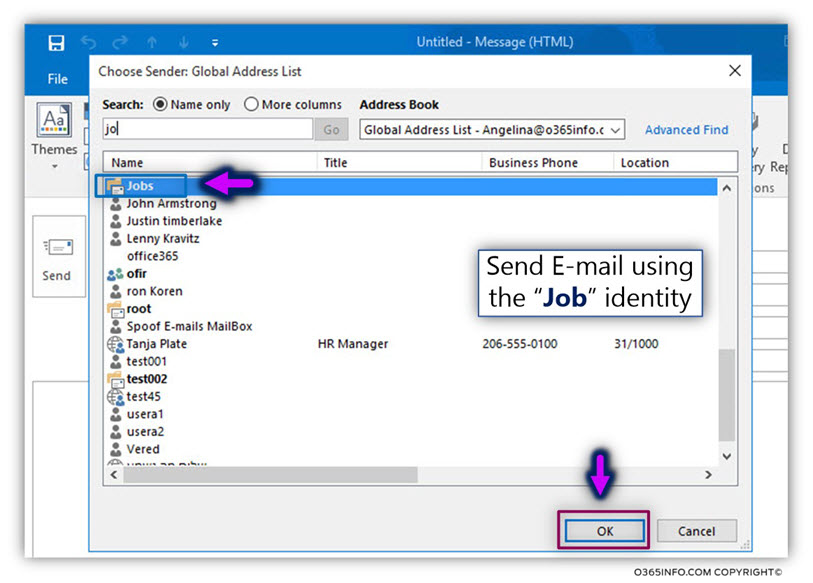
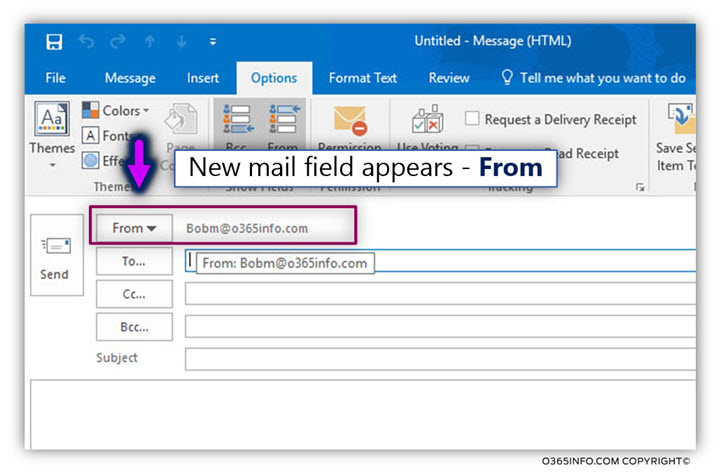
  • Click on the From icon

Send E-mail message using BCC - Prevent reply to All -A2

In the following screenshot, we can see that the BCC option was added to the E-mail message.

Send E-mail message using BCC - Prevent reply to All -A3

This time, Bob adds the recipients to the BCC… field instead of the standard For… field.

Send E-mail message using BCC - Prevent reply to All -A4

When Angelina gets the E-mail, Angelina sees the E-mail, as an E-mail message that was sent from Bob and she cannot see the “reset of the recipients” which was included in the E-mail message that Bob sent.

Send E-mail message using BCC - Prevent reply to All -A5

In case that Angelina decides to select the Reply All button, the outcome is that original originator of the E-mail message will be added to the To… field (Bob in our example).

In our example, when Brad hit the Reply All button, the E-mail will be sent to Bob (and not to all the recipients who appear on the original E-mail message).

Send E-mail message using BCC - Prevent reply to All -A6

Prevent to option of Reply All| Article series index

Now it’s Your Turn!
It is important for us to know your opinion on this article


The post Prevent the option of Reply All using BCC | Part 1#5 appeared first on o365info.com.

Prevent the option of Reply All using Distribution Group + Delivery management restrictions – Part 2#5

$
0
0

This is the second article in the article series Prevent to the option of Reply All.
In the current article, we will review an additional method for preventing to the option of – Reply All.

The method which we use this time is built around a concept in which we send the E-mail message to a distribution group instead to a list of recipients.

Prevent to option of Reply All | Article Series

The Prevent to option of Reply All article series, including the following three articles:

One of the properties of distribution group in Exchange based environment described as – delivery management restrictions. This option enables us to define an “allowed list of the recipient” which are authorized to send E-mail to the species distribution group.

In our scenario, we will restrict this list to one recipient. The outcome is that the recipients who get the E-mail that was sent to the distribution group, will not be able to use the Replay all options which will use the E-mail address of the distribution group.

It’s important to Emphasize that a “smart user” can very easily bypass this restriction by expanding the group and display a list of the group members.

This method is not intending to provide a “Full solution” but instead, prevent accidentally “hitting” the Replay all icons.

Method 2#4 – Prevent “Reply All” | Using a Distribution Group + delivery management restrictions

In the following section, we will demonstrate how to use a Distribution Group + delivery management restrictions for – preventing the option of using “Reply All”.

One of the distribution group management options is related to our ability to define “approved list” of recipients, which are allowed to send E-mail to the distribution group.

In our scenario, we are going to block the “ability to send E-mail” to the distribution group which we are going to use.

In other words, all the organization recipients are not allowed to send E-mail to the particular distribution group beside the manager of the distribution group.

In case that a recipient who got the E-mail want to use the Reply All option, meaning, Reply to the E-mail address of the distribution group, he will not be able to complete the task because he is not allowed to send E-mail to the specific distribution group.

Scenario description

Our scenario has the following characters

  • Bob is the manager of human resources department.
  • Often, Bob needs to send E-mail to the company employees.
  • We want to prevent from the company recipients the ability to Reply to the E-mails that Bob sends.

For this purpose, we will implement the following steps

  • We will create a new distribution group named All Employees.
  • We will add the recipient names of the company recipients to the “All Employees” distribution group.

We will define the following configuration settings:

  • We will set the list of “allowed to reply recipient” to include only Bob’s name by defining the option of – delivery management restrictions.

Phase 1#2 – Creating a new distribution group and set the required configuration

  • Login into the Exchange Online management console
  • On the left menu bar, select the recipient
  • On the top menu bar, select groups menu
  • Select the plus icon
  • Select the Distribution group menu

Using distribution group with delivery management for preventing reply to All -01

In our particular scenario, we will name the distribution group as “All Employees.”

Using distribution group with delivery management for preventing reply to All -02

We will add the recipient named of the company recipients to the “All Employees” distribution group.

  • In the Members section, select the plus icon to add the required recipients

Using distribution group with delivery management for preventing reply to All -03

  • On the left menu bar (the distribution group settings) select the menu
    delivery management

The default setting is – only senders inside my organization

In our scenario, we are going to “harden” this default setting.

We will set the delivery management restrictions so, only one recipient has the permissions to send E-mail to the “All Employees” distribution group.

We will add Bob’s names (Bob is the human resources department manager).

Using distribution group with delivery management for preventing reply to All -04

Phase 2#2 – Sending E-mail to a restricted distribution group

In this section, we will demonstrate the way that Bob is going to send E-mail to the “All Employees” distribution group. In addition, we will simulate a scenario in which one of the recipients tries to use the option of Reply All

Using distribution group with delivery management for preventing reply to All -07

Angelina is a member of the “All Employees” distribution group.
Angelina can see the information about the recipient whom the E-mail sent to them. In our scenario, Angelina can see that the E-mail was sent to the “All Employees” distribution group.

Technically, Angelina can try to use the “Reply All” button although the specific distribution group includes the restriction.

Using distribution group with delivery management for preventing reply to All -08

When Angelina uses the “Reply All” option a warning message (mail tip) appears at the top of the E-mail message and informs her that she doesn’t have the required permissions for “replying” to the specified distribution group.

In our scenario, Angelina decides to ignore the warning message and reply to the “All Employees” distribution group.

Using distribution group with delivery management for preventing reply to All -09

In the following screenshot, we can see the NDR message that was sent by the Exchange Online server. The NDR message informs Angelina that her E-mail couldn’t be sent

The group All-Employees only accept messages from people on its allowed sender’s list, and your email address isn’t on the list.

Using distribution group with delivery management for preventing reply to All -10

The next article in the current article series

Prevent the option of Reply All using Outlook Form – Part 3#5

Prevent to option of Reply All| Article series index

Now it’s Your Turn!
It is important for us to know your opinion on this article


The post Prevent the option of Reply All using Distribution Group + Delivery management restrictions – Part 2#5 appeared first on o365info.com.

Prevent the option of Reply All using Outlook Form | Part 3#5

$
0
0

The current article is a continuation of the article series, that deal with the subject of preventing to the option of – Reply All option, in Exchange based environment.
In this article, we learn about a fascinating and useful Outlook \ Exchange feature named – organizational forms.

The “trick” that we will use is implemented by creating a custom Outlook Form, and then, disable the option of Reply All from the specific Form.

In a scenario in which we want to prevent the Reply All option, the E-mail originator will use this custom Outlook Form and send the required E-mail to the destination recipients.

When the recipients get the E-mail message, the E-mail will look like any other standard E-mail apart from the difference – the Reply All button is deemed (not available).

Prevent to option of – Reply All using Outlook Forms

Phase 1#4 – adding the developer ribbon to Outlook interface

The creation of the Outlook Form is implemented via the developer ribbon.
By default, the developer ribbon doesn’t appear as a default ribbon.
We will need to add the developer ribbon to Outlook interface by using the following steps:

  • Login to Outlook and select the File menu
  • Select the Options menu

Add the developer ribbon to Outlook -01

  • Select – Customize Ribbon
  • In the section – customize the Ribbon selects the toolbar – Developer

Add the developer ribbon to Outlook -02

Phase 2#4 – Creating a custom Outlook Form

In this step, we will create the custom Outlook Form.

  • In the new Developer ribbon that appears, Click on the Design a Form icon

Creating a custom template without reply to All option -01

In the window that appears, we can see a variety of “new Form template” that we can choose from. In our scenario, we will create a new Outlook Form that based on a standard E-mail message template.

  • Select the Message option
  • Select – Open

Creating a custom template without reply to All option -02

In the following screenshot, we can see that the Outlook Form interface enables us to create a very sophisticated Form that includes custom’s fields, additional “Tabs” and so on.

In our particular scenario, we will not use any of these options.

Creating a custom template without reply to All option -03

In our scenario, we want to remove the Reply All option in the custom Form that we are creating.

  • Select the Actions tab (number 1).
  • Select the Row – Reply to All (number 2).
  • In the Action name: field, we can see that by default, to option of Reply to All is Enabled

Creating a custom template without reply to All option -04

In our scenario, we want to remove the option of “Reply All“.

  • Uncheck the option box – Enabled

Creating a custom template without reply to All option -05

  • Select the Properties tab
  • Enable the option box – Send form definition with item
  • Click OK

Creating a custom template without reply to All option -06

After we have finished creating the custom Outlook form, the next step is saving the Form.
Generally speaking, the custom Outlook Form can be saved “locally” on a particular recipient’s mailbox or saved in a “public share” which is available for other organization recipients.

In the current scenario, we will save the custom Outlook Form on the recipient mailbox that creates the Form.

Note – In case that you want to learn how to save the custom Outlook Form in a “public Exchange share” you can read the article – How to create & publish Organizational Forms in Office 365

When we relate to Outlook Form, instead of using the term – “Saving” the common term that we use is – “publishing” (instead of saying – save the Outlook Form, we say – publish the Outlook Form).

  • Click on the Publish icon
  • Select the menu –Publish Form

Creating a custom template without reply to All option -07

  • In our example, we will save the Outlook Form in the local store
    named – Personal Forms library
  • Write the name of the Outlook Form
  • Click Publish

Creating a custom template without reply to All option -08

  • Click Yes to save the Outlook Form

Creating a custom template without reply to All option -09

Phase 3#4 – Sending new E-mail based on the custom Form

In this phase, we create a new E-mail message that is based on the Outlook Form that was created in the previous step.

  • Click on the icon – New items
  • Select – More Items
  • Select – Choose Form…

Creating a custom template without reply to All option -10

  • From the Look in option box, select – Personal Forms Library

Creating a custom template without reply to All option -11

Select the Outlook custom Form that you want to open

In our example, we select a Form named – Template without reply to all option

Creating a custom template without reply to All option -12

Add the required recipient name to whom you want to send the E-mail message.

In our example, we will send the E-mail to a recipient named – Brad.

Creating a custom template without reply to All option -13

Phase 4#4 – verifying that the destination recipient cannot use the Reply All option

In this step, we would like to verify if the custom Outlook Form that we have created is functioning properly. Meaning, verify that the Reply All option is not available

  • We will log into Brad Mailbox.
  • Brad receives the E-mail message.

Creating a custom template without reply to All option -14

When Brad double-click on the E-mail message (the E-mail message that was created based on a custom template), we can see that the Reply All icon is “Dimmed” meaning, the option of Reply All cannot be used.

Creating a custom template without reply to All option -15

Prevent to option of Reply All| Article series index

Now it’s Your Turn!
It is important for us to know your opinion on this article


The post Prevent the option of Reply All using Outlook Form | Part 3#5 appeared first on o365info.com.

Prevent the option of Reply All by using NoReplyAll Outlook Add-In – Part 4#5

$
0
0

In the following article, we review additional method for preventing to option to reply to All by using a very nice utility named – NoReplyAll Outlook Add-In

Prevent to option of Reply All | Article Series

The Prevent to option of Reply All article series, including the following three articles:

The NoReplyAll Outlook Add-In is implemented as Outlook add-on that must be installed on a specific user desktop. The NoReplyAll Outlook Add-In enables the user to “remove” one of the following options:

  1. Disable to the ability of the destination recipient to Forward the E-mail message.
  2. Disable to the ability of the destination recipient to use the Reply All option.
  3. Disable to the ability of the destination recipient to use the Reply option.

In our specific example, we will demonstrate how to use the option to disable the ability of the destination recipient to use the Reply All option.

Download and install the NoReplyAll Outlook Add-In

NoReplyAll Outlook Add-In - Download and install -01

  • Select – I accept the terms and the license agreement
  • Click Install

NoReplyAll Outlook Add-In - Download and install -02

  • Approve the installation by clicking Yes

NoReplyAll Outlook Add-In - Download and install -03

  • Click finish – Yes

NoReplyAll Outlook Add-In - Download and install -04

Method 3#4 – Prevent to option of – Reply All by using NoReplyAll Outlook Add-In

Using the NoReplyAll Outlook Add-In is very simple.
Technically speaking, we can “activate” the option of removing the Reply All from a
specific E-mail that we sent, or we can set this option as a default for every E-mail that we sent.

In our specific scenario, we demonstrate to remove the Reply All option from a specific E-mail message.

After we install the NoReplyAll Outlook Add-In, a new set of icons is added to Outlook ribbon.

  • Create a new E-mail and click on the “new icon” – Reply All
  • Send an E-mail message to some recipient. In our example, Bob sends the E-mail to Angelina.

Send E-mail Using the NoReplyAll Outlook Add-In -01

When Angelina gets the E-mail, the E-mail appear is a “standard E-mail”.
Send E-mail Using the NoReplyAll Outlook Add-In -02

Angelina wants to use the option of – Reply All, by right clicking on the E-mail that was sent by Bob.

Send E-mail Using the NoReplyAll Outlook Add-In -03
The result is – an error message that notifies Angelina that sees cannot use the Reply All option.

Send E-mail Using the NoReplyAll Outlook Add-In -04

Angelina, try to bypass this rustication by double-click on the E-mail and try to click on the Reply All icon.

In the following screenshot, we can see that the Reply All icon is dimmed (not available).

Send E-mail Using the NoReplyAll Outlook Add-In -05

Additional settings \ options of the NoReplyAll Outlook Add-In

In the former section, we review the way that we prevent the option of reply for a specific E-mail message.

When we install the NoReplyAll Outlook Add-In, the additional menu option is added to Outlook.

  • To be able to view the NoReplyAll Outlook Add-In setting, select the File menu and then the NoReplyAll

NoReplyAll Outlook Add-In settings -01

In the following screenshot, we can see the setting of the NoReplyAll Outlook Add-In.

For example, we can select the option – disable reply for a new message and meeting invitations.

When selecting this option, each E-mail that we sent, will be automatically configured with the option of preventing to the option of Reply All.

NoReplyAll Outlook Add-In settings -02

Prevent to option of Reply All| Article series index

Now it’s Your Turn!
It is important for us to know your opinion on this article


The post Prevent the option of Reply All by using NoReplyAll Outlook Add-In – Part 4#5 appeared first on o365info.com.

Set the default Reply option for OWA and set Mail tips for distribution group – Part 5#5

$
0
0

In the current article, I would like to review two different settings that relate to the
subject of Reply All.

1. The default Office 365 OWA reply settings

The first issue is – the default Reply settings of Office 365 OWA mail client.
By default, Office 365 OWA mail client Reply settings configured to use the Reply All option.
Generally speaking, it is recommended to change these default settings to Reply, instead of Reply All.
Changing this default, help our users to avoid from accidentally “hit” the Reply All icon.

2. Using Exchange Online mail tips

The second subject is using the option of – Mail tip.
The Exchange mail tip, is a very nice and useful feature, that we can use for providing Exchange users additional information about a particular event.
In our scenario, we will create a “Mail tip” that will be attached to a particular Exchange distribution group, and will suggest the Exchange user consider twice the option of using Reply All option.

Prevent to option of Reply All | Article Series

The Prevent to option of Reply All article series, including the following three articles:

Set the default reply option for Office 365 OWA client

The management of the default reply option for Office 365 OWA users, can be implemented on two levels:

  1. User level – in this option, the users set the default reply option by himself by using the OWA setting’s options menu.
  2. Administrator level – in this scenario, the Exchange administrator can use the PowerShell command that will be utilized for a particular Office 365 user or for all Office 365 users.

Set the default Reply option for Office 365 OWA client using the OWA Web interface

In this section, we will demonstrate how Office 365 users can set the default reply option of the OWA client.

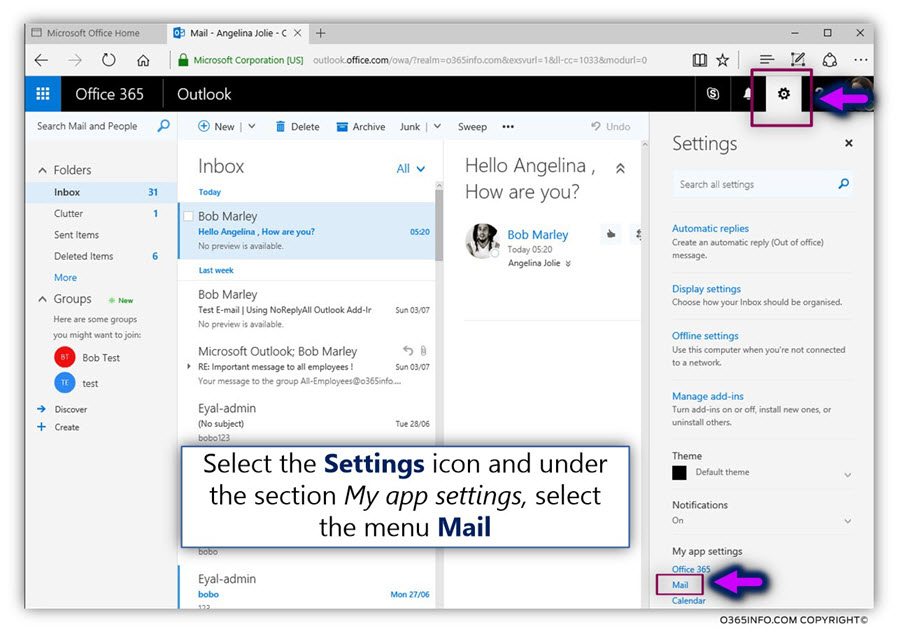
  • In the following screenshot, we can see that the default reply option of Office 365 OWA is
    set to – Reply All

OWA Office 365 default replay settings is reply all – 01

OWA Office 365 default replay settings is reply all – 02

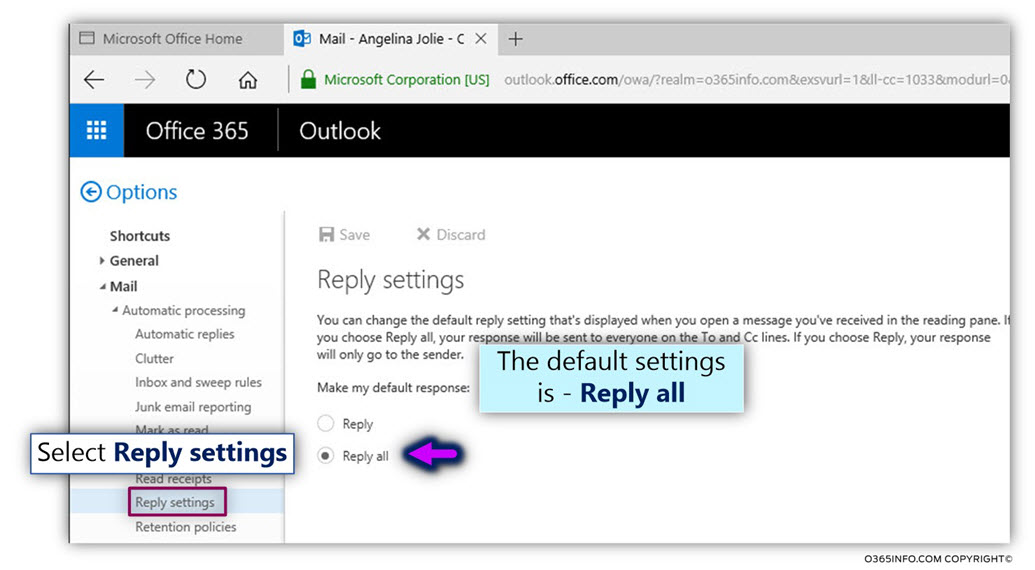
  • On the left menu bar, choose the menu – Reply settings

We can see that the default setting is – Reply All

OWA Office 365 default replay settings is reply all – 03

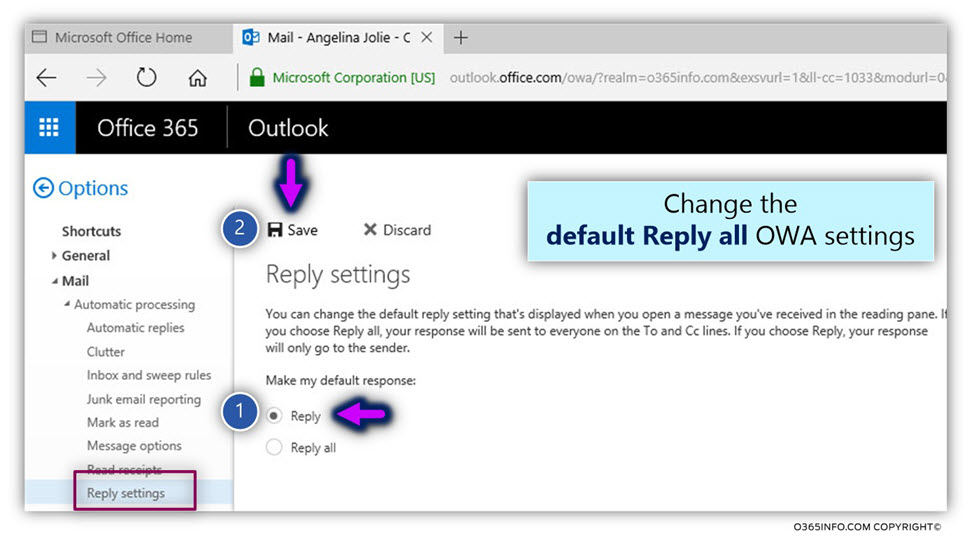
  • Select – Reply and click Save

OWA Office 365 default replay settings is reply all – 04

In the following screenshot, we can see that now the default reply option of the OWA client was updated to – Reply.

OWA Office 365 default replay settings is reply all – 05

Set the default Reply option for Office 365 OWA client using PowerShell

In this section, we review how to manage the default reply option for OWA Office 365 users using PowerShell.

The main advantages of using PowerShell are

  1. We can set the required configuration setting with the need no instructs users how to set the necessary reply option.
  2. When using PowerShell, we can have implemented “Bulk operations.” For example, we can set the default OWA reply settings to “reply” instead of “Reply All” for all the existing Office 365 users.

The PowerShell commands that we use Get-MailboxMessageConfiguration.


For your convenience, I have “Wrapped” all the PowerShell commands that were reviewed in a PowerShell Script named:
Set the default Reply option
You are welcome to download the script and use it.

download-button-02.png


Using this command, we can view information on the default OWA reply setting and also, update the existing OWA reply setting.

Here are some examples of the PowerShell command that we can use

View information about OWA replies setting of a specific recipient

Get-MailboxMessageConfiguration <User> | select identity, IsReplyAllTheDefaultResponse

Set the OWA reply setting of a specific recipient to reply (instead of the default of – Reply All)

Set-MailboxMessageConfiguration <User> -IsReplyAllTheDefaultResponse $False

View information about OWA replies setting of all Office 365 recipients

Get-Mailbox -RecipientTypeDetails UserMailbox -ResultSize Unlimited | Get-MailboxMessageConfiguration | select identity, IsReplyAllTheDefaultResponse

Set the OWA reply setting of all Office 365 recipients to reply (instead of the default of – Reply All)

Get-Mailbox -RecipientTypeDetails UserMailbox -ResultSize Unlimited | Set-MailboxMessageConfiguration -IsReplyAllTheDefaultResponse $false

Using the OWA reply setting PowerShell script

To be able to simplify the utilization of the PowerShell commands that we use for setting and viewing OWA replay settings, I have created a simple PowerShell script.

In the following screenshot, we can see the look at the PowerShell menu interface.

  • Menu 0 – use for starting the remote PowerShell session with Office 365 and Exchange on-Premises. In this step, you will need to provide your Office 365 Global administrator credentials.
  • Menu 1,2 – use for setting the reply setting of Office 365 OWA recipient
  • Menu 3,4 – for setting the reply setting of Office 365 OWA recipients of all Office 365 recipients (Bulk mode). Please think twice before you use the option of “bulk mode” because the setting is affecting all of your Office 365 users.
  • Menu 5 – Export information to three different file types about the reply setting of Office 365 OWA recipients.

Using the OWA reply setting PowerShell script -01

In the following screenshot, we can see an example of the file (TXT, CSV, and HTML) that exported to C:\INFO

Using the OWA reply setting PowerShell script -02

In the following screenshot, we can see an example of the HTML report

Using the OWA reply setting PowerShell script -03

Add a mail tip to Distribution Group that relates to the Reply All option

In this section, we will review a nice option that we can use to raise the awareness of our users to the “Reply All” option.

In reality, the option of “Reply All” as the name Implying, was created for enabling users to Replay to all the recipients who appear in the E-mail message.

As we know, many times the users “hit” the Reply All button without thinking too much or without understanding the consequence.

Using the option of Exchange mail tip, we can cause our users to think twice before they use the Reply All button.

Many times the user uses to hit the Reply All button without noticing that some of the recipients are a distribution group, which can contain tens or hundreds of recipients!

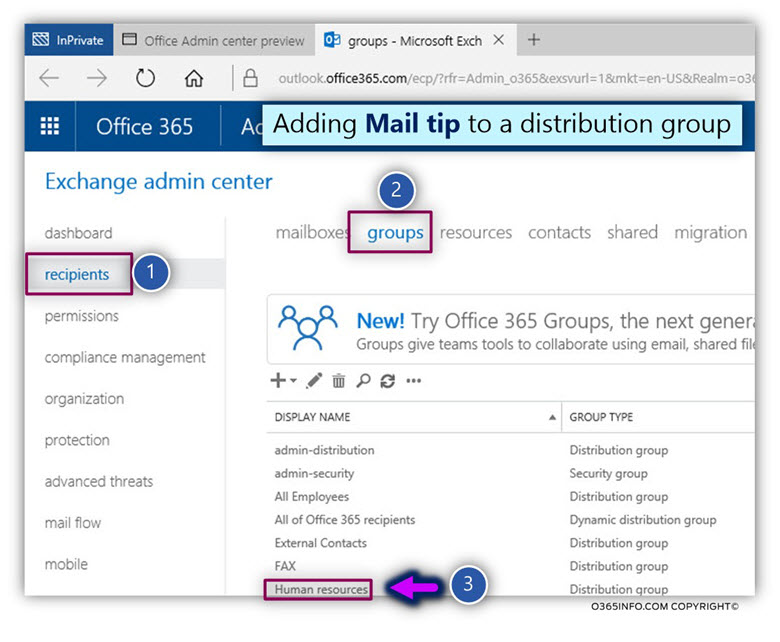
In the following demonstration, we will show how to add a mail tip to a distribution group named – “Human resources.”

  • Log in to the Exchange Online admin
  • On the left menu bar select – recipients
  • On the top menu bar select – groups
  • Select the specific Distribution group that you want to edit (in our example the Human resources group)

Using mail tip for distribution group – recommend not to use reply all -01

  • In the Distribution group window, select multiple
  • In the text, window adds the text that will be used for the mail tip

In our example, we add the following notification.

Before you click on the “Reply All” icon, think again!
Do you really want to Reply All”?

  • Click Save

Using mail tip for distribution group – recommend not to use reply all -02

In the following screenshot, we can see an example to E-mail that was sent to the distribution group – Human resources.

When the destination recipient gets the E-mail, the mail tip appears at the top of the E-mail.

The recipient can decide to ignore the “Tip”, but we have we brought to the attention of the recipient whom he should consider if they want to use the Reply All option.

Using mail tip for distribution group – recommend not to use reply all -03

Prevent to option of Reply All| Article series index

Now it’s Your Turn!
It is important for us to know your opinion on this article


The post Set the default Reply option for OWA and set Mail tips for distribution group – Part 5#5 appeared first on o365info.com.

What is the hostname of my Office 365 MX records?

$
0
0

In the current article, we will review how to find the value of the “Office 365 MX record” that represents our domain name which we registered with Office 365.

After we registrar our domain name and verify the domain name, Office 365 automatically create a dedicated MX record for each of the public domain that we register.

To be able to inform the “world” that our mail infrastructure hosted by Office 365 mail services, we will need to add the required MX record in the DNS that hosts our domain name.

The question is – how can we know what the value of this MX record is?

When using Office 365 mail services the MX record is pointing to the cloud

The MX record that is created for our domain name is based on a predefined naming conversation.

The Office 365 MX records consist of two parts:

1. The “static” part

Office 365 uses the same static suffix for all the domain names
hosted at Office 365 – mail.protection.outlook.com

2. The dedicated part

This section is created for a particular public domain name which was registered.

The naming convention based on the following structure.

Organization name, the hyphen characters and the domain name suffix.

To be able to demonstrate this naming structure, let’s use the domain name – o365info.com

In the following diagram, we can see that process in which Office 365 creates a dedicated MX record for the public domain name – o365info.com

The “result” results” is the host name – o365info-com.mail.protection.outlook.com which includes the “dedicated part” (o365info.com ) + the “shared path” that is identical for every Office 365 tenants (mail.protection.outlook.com)

Office 365 MX record structure

How to get the value of our MX record from the Office 365 portal

The information about the value of the “Office 365 MX record” that represents our domain name appears in the Office 365 portal.

To be able to get this information we will need to login to Office 365 portal using Global administrator credentials.

What is my Office 365 MX record-01

Select the domain name which you want to view his DNS settings

  • In our example, we select the registered domain name – o365info.com
  • In the setting window that appears, select the menu – DNS settings

What is my Office 365 MX record-02

  • Click on the Exchange Online section

What is my Office 365 MX record-03

In the following screenshot, we can see the information about the DNS records

We want to know what is the value of the MX record that Office 365 creates for our publicly registered domain name.

In our example, the value of the MX record is – o365info-com.mail.protection.outlook.com

What is my Office 365 MX record-04


Now it’s Your Turn!
It is important for us to know your opinion on this article


The post What is the hostname of my Office 365 MX records? appeared first on o365info.com.

How to delete corrupted hidden Exchange inbox rules using MFCMAPI

$
0
0
One of our user’s reports that he experiencing a strange phenomenon when he connects to his Exchange mailbox:
Mail item that sent from the recipient automatically sent to a specific folder instead of the inbox folder, E-mail is automatically forwarded to another recipient and so on.

In some scenarios, the problem could be related to corrupted hidden Exchange inbox rule.
In the current article, we review how can we locate such inbox rule using the MFCMAPI tool and delete it.

Technically speaking, there are a couple of optional causes to this issue such as – a problematic mobile device mail client, third party Outlook add-on or Outlook plugin and so on.

We suspect that an inbox rule causes this strange behavior that the user created.
We check the existing inbox rules, and surprisingly; we discover that there is no current inbox rule or that the current inbox rule does relate to the particular issue that the user experience.

The other option that I would like to review in the current article is – the possibility of corrupted, hidden inbox rules.

The phenomenon of “corrupted hidden inbox rules” is not an ordinary scenario, but, in some case, after we have exhausted all possibilities, we need to consider this option.

The main characters of the “corrupted hidden inbox rules” is that, for some reason, the inbox rule doesn’t appear in the standard Outlook \OWA graphic interface.
To be able to verify if we are dealing with a scenario of a “problematic inbox rule” (corrupted hidden inbox rules), and to delete this inbox rule, we will need to use a very powerful and
a useful tool named – MFCMAPI.

Using the MFCMAPI utility, we can see the “under the hood” of an Exchange mailbox.
The MFCMAPI enables us to view the physical structure of the Exchange mailbox and the mailbox mail items.

Delete corrupted hidden Exchange inbox rules using MFCMAPI | The troubleshooting planned scheme.

As mentioned, in our scenario Exchange user experience “strange behavior,” and we suspect that the issue may be related to existing “corrupted hidden inbox rules.”

In some scenarios, the user has an existing inbox rule that can be seen via the Outlook \OWA graphic interface.

When using the MFCMAPI tool to view the content of the user mailbox, we will not be able to differentiate between a “legitimate inbox rule” versus “corrupted hidden inbox rules.”
To be able to “isolate” the corrupted hidden inbox rule.” We will need to implement the following steps:

  1. Back up all the existing inbox rules.
  2. Manually delete all the existing inbox rules by using the Outlook \OWA interface or the MFCMAPI tool.
  3. Use the MFCMAPI tool by searching for corrupted hidden inbox rules” and if we find such as inbox rule\s, delete these rules.
  4. Restore the “original inbox rules” from the backup to – the user mailbox.
Note – in case that you need more information about the process of export import inbox rule, you can read the following article – Import or export a set of rules.

Using MFCMAPI for delete corrupted, hidden Exchange inbox rules.

MFCMAPI and Outlook mail profile

The MFCMAPI tool uses existing Outlook mail profile that already configured on the particular desktop form which we use the MFCMAPI.

In other words – to be able to use the MFCMAPI tool for examining the structure of a particular Exchange mailbox, we will need to have the specific user credentials and configure the Outlook mail profile for the specific Exchange recipient.

  • Download the MFCMAPI tool using the following link MFCMAPI

Download the MFCMAPI tool

MFCMAPI implemented as EXE file; there no need to “install” the MFCMAPI

  • Click on the MFCMAPI executable file
  • Click OK on the welcome screen

How to delete corrupted hidden Exchange inbox rules using MFCMAPI-01

  • Select the Session menu
  • Select the Logon… menu

How to delete corrupted hidden Exchange inbox rules using MFCMAPI-02

In our scenario, we want to use the MFCMAPI for deleting corrupted, hidden Exchange inbox rules from the Exchange mailbox of a recipient named Bob.

  • Select the required Outlook profile

How to delete corrupted hidden Exchange inbox rules using MFCMAPI-03

General note – a specific Outlook mail profile can serve as a container for different Exchange object such as – user mailbox, online archive, Public Folder or other mailboxes which the recipient has Full Access to these mailboxes.

For this reason, when we use the MFCMAPI to log into specific Exchange recipient mailbox, we can see a couple of “databases” represented by the yellow icon.

In our scenario, we wish to examine the content of Bob’s mailbox.

  • Right click of the “yellow icon” of the user mailbox. In our example, we want to view the content of Bob mailbox.
  • Select the menu – Open store

How to delete corrupted hidden Exchange inbox rules using MFCMAPI-04

  • Select the folder named – Root -Mailbox and click on the small white arrow to expand the Folder hierarchy

How to delete corrupted hidden Exchange inbox rules using MFCMAPI-05

  • Click on the folder named – IPM_SUBTREE
  • Click on the folder named – Inbox
  • Right click on the Inbox folder and select the menu – Open associated content table

How to delete corrupted hidden Exchange inbox rules using MFCMAPI-06

New “MFCMAPI window” appears – this window displays the internal structure of the Inbox folder. The window includes many columns.
In our scenario, we want to view the content of a column named – Message Class
To view this column, scroll to the right the column headers

How to delete corrupted hidden Exchange inbox rules using MFCMAPI-07

  • Select the column named – Message Class

The inbox rule saved as an object named – IPM.Rule.Version2.Message

How to delete corrupted hidden Exchange inbox rules using MFCMAPI-08

  • Right click on the value – Rule.Version2.Message
  • On the sub menu select the menu – Delete message

How to delete corrupted hidden Exchange inbox rules using MFCMAPI-09

  • Click on the small arrow

How to delete corrupted hidden Exchange inbox rules using MFCMAPI-10

  • Select the option – Permanent delete passing DELETE_HARD_DELETE (unrecoverable)
  • Click OK

How to delete corrupted hidden Exchange inbox rules using MFCMAPI-11

In some scenario, when we open the Outlook mail profile of the user whom we remove his inbox rule the following warning message appears:

The rules on this computer do not match the rule on Microsoft Exchange. Only one set of rules can be kept. You will usually want to keep the rules on the server. Which rules do you want to keep?

  • Select – Server

How to delete corrupted hidden Exchange inbox rules using MFCMAPI-12

  • Click OK

How to delete corrupted hidden Exchange inbox rules using MFCMAPI-13


Now it’s Your Turn!
It is important for us to know your opinion on this article


The post How to delete corrupted hidden Exchange inbox rules using MFCMAPI appeared first on o365info.com.


How to recognize an event in which Office 365 recipient send spam mail?

$
0
0

One of our Office 365 recipients complains that the E-mail that he sent to an external recipient is blocked or classified as a “spam mail.”

Our underlying assumption is that the problem is related to “Office 365 infrastructure” and they should immediately fix the problem!

In the following article, we will learn how to recognize an event, in which Office 365 recipient send spam mail(outbound spam)!

Q1: Did you allow yourself, to consider the possibility that mail is indeed “spam mail”?

A1: Technically speaking, there are many “causes” that lead to a scenario in which E-mail that sent by one of our Office 365 recipients classified as spam mail.

Posable cases could be:

  • The IP address that represents the network from which the recipient sends his E-mail.
  • The IP address that represents the mail server, which delivers the mail to the destination recipient.
  • The E-mail content such “marketing content” or E-mail signature that include the URL address of a compromised website.
  • A scenario of bulk mail in which specific recipient sends hundreds or thousands of E-mails.
  • A domain name that appears on a blacklist.
  • A user E-mail address that is listed in a Blacklist.
  • Security mail settings that applied to the mail destination infrastructure (the mail server that represents the destination recipient).
  • Security mail settings that are used by the destination recipient, such as inbox rule, antivirus and so on.

The bottom line is – that there are many different “causes” that lead to a scenario in which E-mail that is sent by one of our Office 365 recipients are classified as spam mail.

The different causes that lead Office 365 recipient is classified as spam mail

We need to be aware of these difference “cases” and be familiar with troubleshooting methods that will enable us to eliminate some of the “cases” until we find the specific “cause” of the problem.

For example – in a scenario in which E-mail that sent by Office 365 recipients are identified as spam mail by an external recipient.

Q2: Does Office 365 (Exchange Online) enforce “Spam Detection” for mail that is sent by Office 365 recipients?

A2: Yes, Office 365 and Exchange Online serve as a “mail platform” for many companies and organization. For this reason, Exchange Online enforces “spam check” not only for incoming E-mail but also for outgoing E-mail. In simple words – every E-mail that is sent out by Office 365 recipient is sent to spam mail inspection.

Q3: In case that Exchange Online classifies a particular outbound mail as “spam mail” what happened to this “spam mail”?

A3: Most of the time in case that after the “spam inspection” the E-mail that was sent from Office 365 recipient is classified as spam mail, Exchange Online will not block or delete the E-mail.

Instead, Exchange Online will implement two actions:

  1. Stamp the SCL value of the E-mail using a high number which uses for warning the other side that the E-mail message has a high potential to be a spam mail.
  2. Send the E-mail via a special Exchange server pool named -“High-Risk Risk Delivery Pool.”

High-Risk Delivery Pool

The term -“High-Risk Risk Delivery Pool” defines a specific Exchange Online that used to send “problematic E-mail” that was sent by Office 365 recipients.

Another point that I would like to emphasize is that when we use the term – “Exchange Online identifies outbound E-mail as a spam mail,” we have no certainty level of 100 percent that this is indeed a spam mail because there is some scenario of false positive in which a legitimate E-mail is mistakenly identified as spam mail.

In most of the scenarios in which Exchange Online spam filter identifies specific E-mail as “spam mail,” there is a real reason for this classification.

SCL

The term SCL stands for – Spam Confidence Level. In Exchange based environment, Exchange uses the SCL as a method to provide information about the “spam level” of a specific E-mail item. The SCL values range is between -1 and 9.

SCL value of 3 or more indicates that the E-mail has “some issue” that relates to spam mail.

Q4: Is there an option in which I could be notified about such as an event or detect Traces or clues for such as event?
A4: Exchange Online enables us to define an E-mail address of a designated recipient who will be notified in the event in which Exchange Online recognizes E-mail that was sent by Office 365 recipients as “spam mail” and route the E-mail via the-“High Risk Delivery Pool” servers.

We review this option in the section – Notify a designated recipient about the event of outbound spam mail .
Later on; I will review some methods that we can use for finds a trail for such events. We will review the method that we can use in section – Using the Exchange Online message trace option for getting information about a possible event if outbound spam and in section looking for the value of – SFP:1501 in outgoing mail

Locating the traces of outbound spam mail in Office 365

Notify a designated recipient about the event of outbound spam mail

As mentioned, in Exchange Online based environment every E-mail that is sent by Office 365 recipients are automatically sent to spam filter for further examination.

In case that the spam filter “decide” that the particular E-mail is a spam mail, the E-mail SCL value will be raised, and the E-mail will be forwarded to the -“High-Risk Risk Delivery Pool” servers.

The main issue is that the recipient whom his mail identified as spam and we (Exchange Online administrator) are not aware of this event.

In other words, by default the recipient will not know about this problem. Only in hindsight, after the E-mail will be sent Outlook to the destination recipient and reach to the junk mail folder or blocked.

The good news is that Exchange Online enables us to configure the following options that relate to outbound spam (spam mail that is sent by our Office 365 recipients).

  1. Ask from Exchange Online to send a copy of each outgoing E-mail that was identified as spam mail to a designated recipient.
  2. Ask from Exchange Online to send a notification to a designated recipient about the event in which Exchange Online blocked a particular Office 365 recipients.

The advantage of this setting is that we, receive an early warning about an event of outbound spam.

The disadvantages are that in the current time, Exchange Online doesn’t include the option of sending an incident report to the designated recipient who includes a copy of the “spam mail.”
Instead, Exchange Online sends a copy of the outbound spam mail to the designated recipient.

When the E-mail reaches to the designated recipient, the E-mail is automatically saved in the junk mail folder (because of the high SCL value). Also, from the designated recipient point of view, it’s not easy to understand that the E-mail message that he got was a “copy” that was sent by another Office 365 recipient.

>How to configure the outbound spam Exchange Online settings

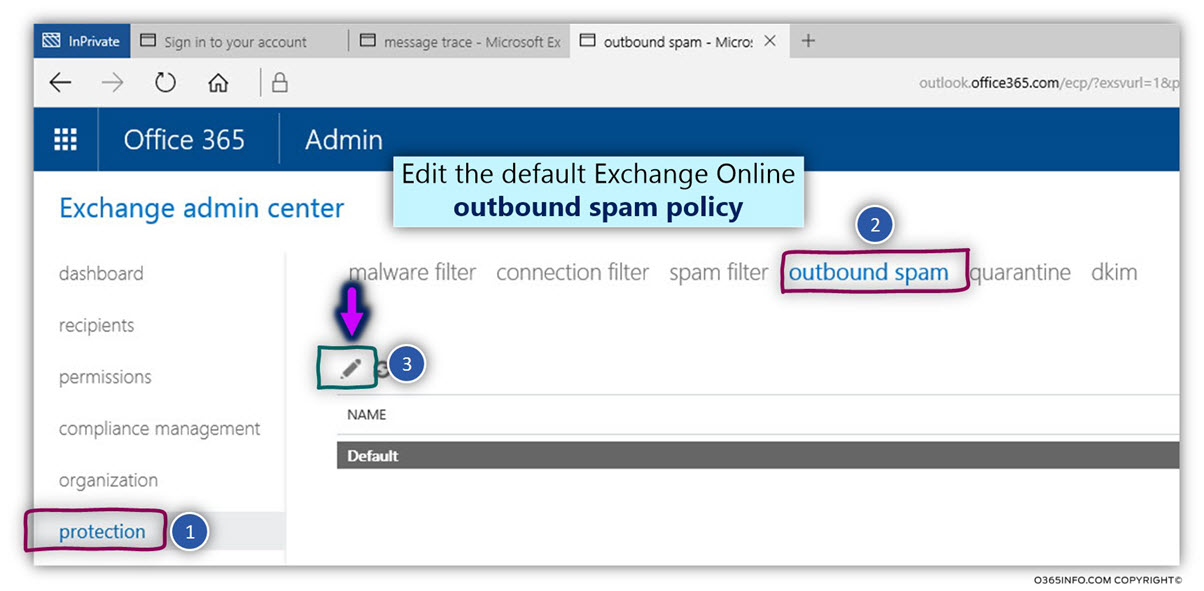
  • Login to Exchange Online admin portal
  • On the left menu bar, select the menu – protection
  • On the top-level menu bar, choose the menu – outbound spam.

Configure the E-mail address of the recipient which will be notified about events of outbound spam mail -01

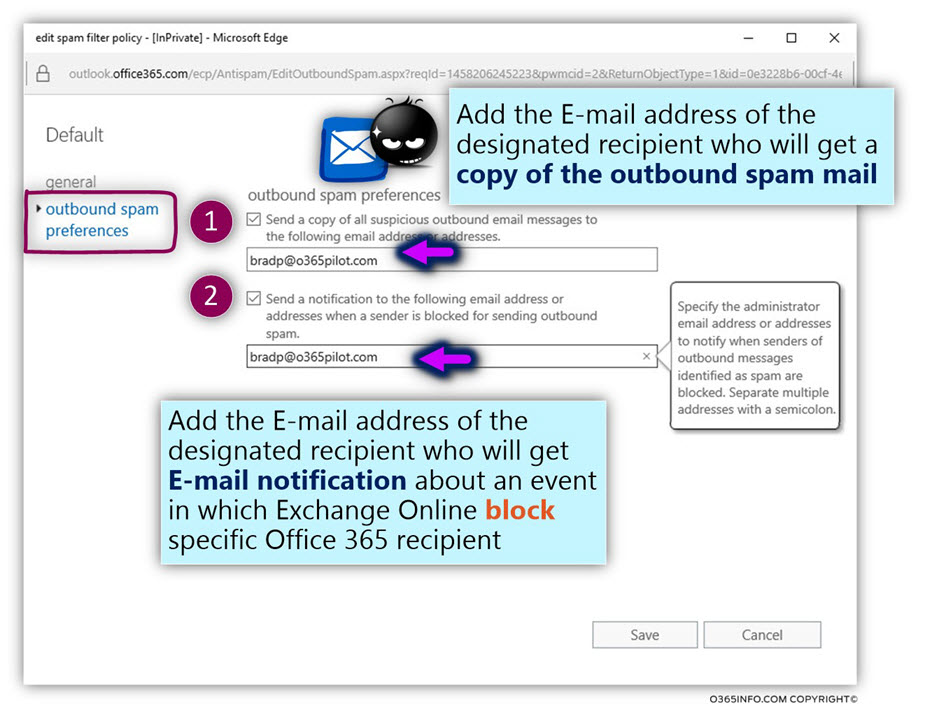
  • Select the menu outbound spam preferences

In the outbound spam preferences section, select the following options:

Send a copy of all suspicious outbound email messages to the following email address or addresses.

Specify the E-mail address or addresses of administrators who will receive copies of all suspicious outbound messages. You can separate multiple addresses with a semicolon.

In our example, the Exchange Online administrator is – Brad.

Send a notification to the following email address or addresses when a sender is blocked from sending outbound spam.

Specify the E-mail address or addresses of administrators who will receive E-mail notification about an event in which Exchange Online block particular Office 365 recipient from sending outbound E-mail.

Configure the E-mail address of the recipient which will be notified about events of outbound spam mail -02

Simulating a scenario of outbound spam mail by Office 365 recipient

In the former section, we review the process of how to configure the Exchange Online outbound spam settings.

The central question that we have known is – how can we know that this setup is actually working?

In the current section, I would like to show you a little trick, that we can use for simulating spam mail. The trick implemented by sending E-mail that includes a particular text string.

When Exchange Online gets the E-mail with the specific text string, he is configured to identify the E-mail as “spam mail.”

Using this method of – simulating spam mail, enable us to test the Exchange Online outbound spam settings and in addition enable us to understand how Exchange Online “react” to the event of outbound spam mail.

Note – in case that you want to read more information about the process of simulating spam mail, you can read the article – How to simulate spam mail?

Simulating spam mail

In the following example, we will perform the following test

In our scenario, Bob is the Office 365 recipients who send outbound spam mail.
We will be logging into Bob’s mailbox and send a spam mail.

Our expectation is that the Exchange Online spam filter will “capture” this event and as a response, a copy of the outbound spam mail will be sent to our Exchange Online administrator – Brad.

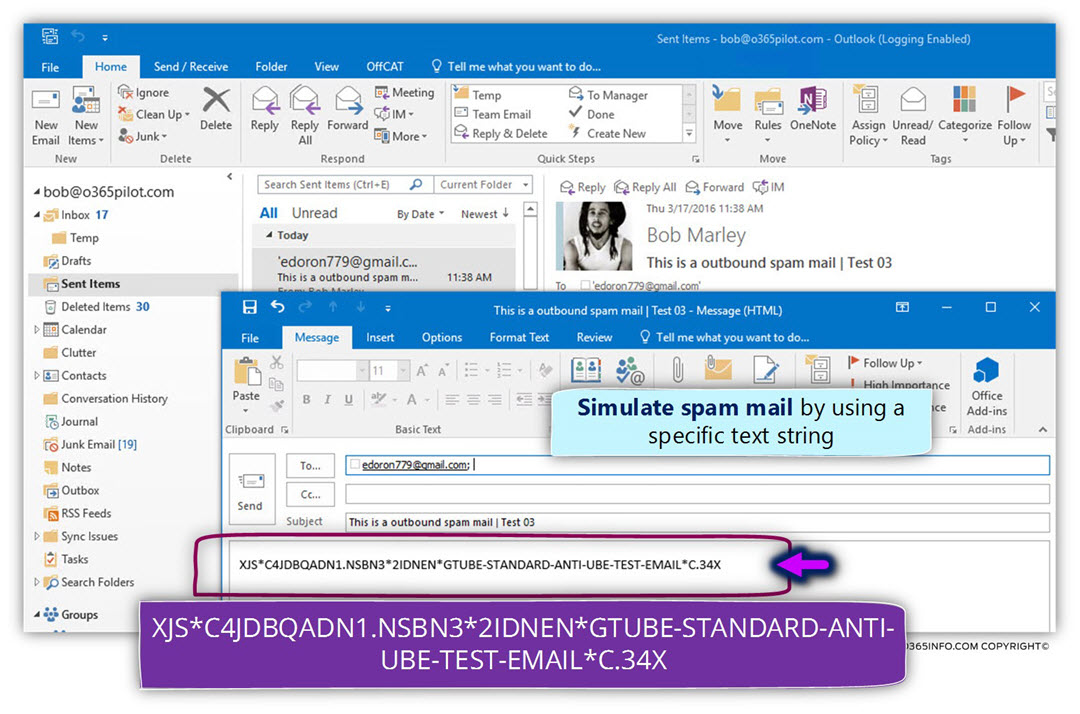
  • Login to Bob’s mailbox

By using Bob mailbox, we create a new E-mail message and add to the E-mail message the following text string

XJS*C4JDBQADN1.NSBN3*2IDNEN*GTUBE-STANDARD-ANTI-UBE-TEST-EMAIL*C.34X

Simulating a scenario of outbound spam mail by Office 365 recipient -01

When the E-mail reaches Exchange Online, the E-mail sent to the spam filter for further examination.

The E-mail identified as spam mail.

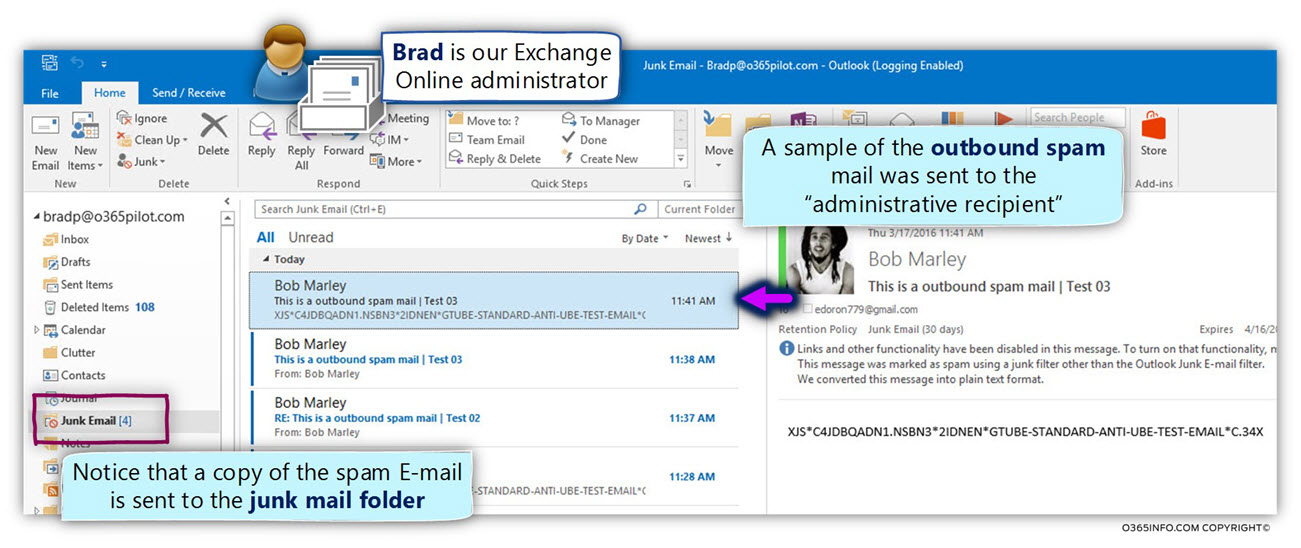
Exchange Online sends a copy of the E-mail to the designated recipient who configured in the former section – notify the designated recipient about the event of outbound spam.

As a result, a copy of the outbound spam mail was sent to Brad.
Notice that the E-mail sent to the Junk mail folder because the E-mail has a high SCL value.

Simulating a scenario of outbound spam mail by Office 365 recipient -02

Using the Exchange Online message trace for getting information about a possible event if outbound spam

In a scenario in which the Exchange Online identifies a specific outgoing E-mail is “spam mail,” the E-mail will be forwarded to the -“High-Risk Risk Delivery Pool” servers.

The event of “forwarded to E-mail to the -“High-Risk Risk Delivery Pool” server documented in the Exchange Online log file.

In other words, in case that outgoing E-mail was sent via the – “High-Risk Risk Delivery Pool,” we can follow the trail of the particular E-mail message by using the Exchange. Online message trace.

Our scenario characters

In our scenario, we suspect that one of our users named Bob (that uses the E-mail address bob@o365pilot.com), sends E-mail that is recognized by Exchange Online as spam mail (outbound spam).
For this reason, the E-mail is “routed” to the -“High-Risk Risk Delivery Pool” servers.

Also, we have already configured the Exchange Online outbound spam policy to send a copy of such as E-mail to a designated recipient – Brad (our Exchange Online administrator).

To be able to demonstrate- how this “outbound spam event” is documented in the Exchange Online log, we will perform the following steps:

  1. Simulate an event of an outbound spam mail – we will send from Bob’s mailbox, an E-mail that includes a particular text string that will identify by Exchange Online as “spam mail.”
  2. Using Exchange Online message trace – we will use the Exchange Online message to trace to look at the Exchange Online log file and find more detailed information about this specific event.

Using the Exchange Online message trace

  • Login to Exchange Online admin center
  • On the left menu bar, select the menu – mail flow
  • On the top menu bar, select the menu – message trace

Using the Exchange Online message trace for getting information about a possible event of outbound spam -01

In our specific scenario, we would like to get more information about E-mail messages that was sent by Bob.

  • Select the option – add sender…
  • Select the specific recipient name (bob@o365pilot.com in our scenario).

Using the Exchange Online message trace for getting information about a possible event of outbound spam -02

  • Select the option – add ->
  • Select the option – OK

Using the Exchange Online message trace for getting information about a possible event of outbound spam -03

  • Select the option – search

Using the Exchange Online message trace for getting information about a possible event of outbound spam -04

In our scenario, we have configured the outbound spam preference to send a copy of the E-mail that was identified as outbound spam E-mail, to a designated recipient (Brad, our Exchange Online administrator), each time the Exchange Online capture an event of internal spoof mail.

In the following screenshot, we can see the result of our search.

When the Office 365 recipient sent an “outgoing spam mail” to the destination recipient (edoron779@gmail.com), the event was recorded in saved to the Exchange Online log file.

We can see that there are two separate events.

When the Exchange Online spam filter identifies the E-mail that was sent by Bob as “spam E-mail,” two different events take place alongside:

  1. Send the E-mail to the destination recipient (number 1).
  2. Send a copy of the E-mail to the designated recipient, in our scenario – Brad (number 2).

Using the Exchange Online message trace for getting information about a possible event of outbound spam -05

One of the most distinct advantages of the Exchange Online log file and the Exchange Online message trace is that we have the ability to get a very detailed information about each of mail transactions that were recorded.

In our example, we would like to get more information about the event in which Exchange Online sends Bob’s E-mail to the destination recipient (the external Gmail recipient).

When we double-click on the Log row that includes information about the E-mail that was sent by Bob to the external recipient, we can see the following details:

The first detailed that I would like to emphasize is that the “spam E-mail”, was successfully sent to the destination recipient (A).
As mentioned, Exchange Online will not delete or block E-mail message that identified as outbound spam mail, but instead, will route the E-mail to the -“High-Risk Risk Delivery Pool.”

At the bottom part of the information window, we can see more details about the specific E-mail transaction (B).

Using the Exchange Online message trace for getting information about a possible event of outbound spam -06
Event 1 – send a copy of the outbound spam E-mail to a designated recipient

In our scenario, we configure the default Exchange Online outbound spam policy to send a copy of the E-mail that was identified spam to a designated recipient (Brad).

This event was registered in the Exchange Online log file as:

Reason: [{LED=250 2.0.0 Spam filter added recipients ?(redirect/bcc)?};{MSG=};{FQDN=};{IP=};{LRT=}]

Using the Exchange Online message trace for getting information about a possible event of outbound spam -07

Event 2 – Routing the outbound spam mail to the -“High-Risk Risk Delivery Pool” servers.

Because the E-mail classified as “problematic E-mail” Exchange Online will not delete the E-mail but instead, send the E-mail to the – High-Risk Delivery Pool servers.

Using the Exchange Online message trace for getting information about a possible event of outbound spam -08

Looking for the value of – SFP:1501 in outgoing mail

In this section, we review an additional interesting “evidence” for a scenario in which Exchange Online identifies a specific outgoing E-mail as a “spam mail” and for this reason, route the E-mail to the -“High-Risk Risk Delivery Pool” servers.

For example, let’s go back to the original scenario – one of our Office 365 recipients complained that the E-mail that he sent to the external recipient is blocked or classified as a “spam mail.”

How can we know what the real cause of this problem was?

  • Did the mail server of the destination recipient decide to classify the E-mail as spam mail?
  • Did the destination recipient antivirus decide to classify the E-mail as spam mail?
  • Maybe the E-mail that sent by our Office 365 recipients are indeed a spam mail?

In case that we are dealing with a scenario in which the Exchange Online spam filter scan the outgoing E-mail that was sent by our Office 365 recipient and decide to classify the E-mail as “spam mail,” the E-mail will be sent via the -“High-Risk Risk Delivery Pool” servers.

Also, Exchange Online will add the following information to the E-mail header.

  1. The value of the SCL – Exchange Online will raise the SCL value to a value in the
    range 2-9 (the specific number is added based on the “spam level” of the specific E-mail).
  2. Exchange adds the following value – SFP:1501 , to the specific E-mail
    header named – X-Forefront-Antispam-Report

An interesting observation regarding the – SFP:1501 value

The interesting thing is that at the current time, there is not much information about this “Exchange Online vale” and detailed description about what this value represents.

Given that we will be able to get a copy of the E-mail message that was sent to the destination recipient, by analyzing the information that appears in the E-mail header, we can find traces for such as event, and in case that we don’t find such traces, we can assume that the E-mail was classified as spam by another element.

To be able to look at the “hidden information” that saved in the E-mail header, we will use the Microsoft web-based tool – Exchange Remote Connectivity Analyzer.

Scenario description

To be able to demonstrate such an event we will use the following scenario:

We will use Bob’s mailbox (an Office 365 recipient) for sending E-mail that will be identified by Exchange spam filter as “outbound spam mail.”

Our expectation is that the Exchange Online spam filter will “capture” this event and will implement the following procedure:

  1. Reroute the E-mail message to the -“High-Risk Risk Delivery Pool” servers.
  2. Raise the SCL value of the specific E-mail
  3. Add the following value – SFP:1501 , to the E-mail header

In our scenario, Bob sends the “spam mail” to a Gmail recipient.

In the following screenshot, we can see that the E-mail successfully sent to the Gmail destination recipient.

Verify a scenario in which the E-mail message was sent from the Exchange Online high risk pool servers -01

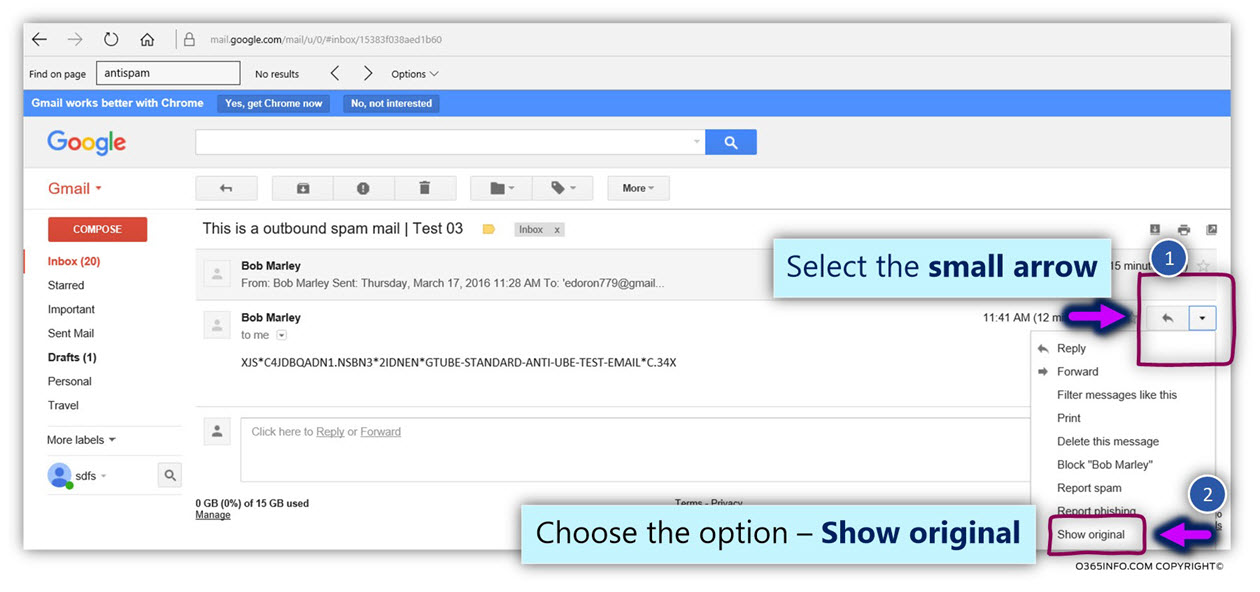
To be able to analyze the E-mail header when using a Gmail account, will need to use the following steps:

  • On the “right part” of the E-mail, click on the small arrow
  • Select the menu – Show original

Verify a scenario in which the E-mail message was sent from the Exchange Online high risk pool servers -02

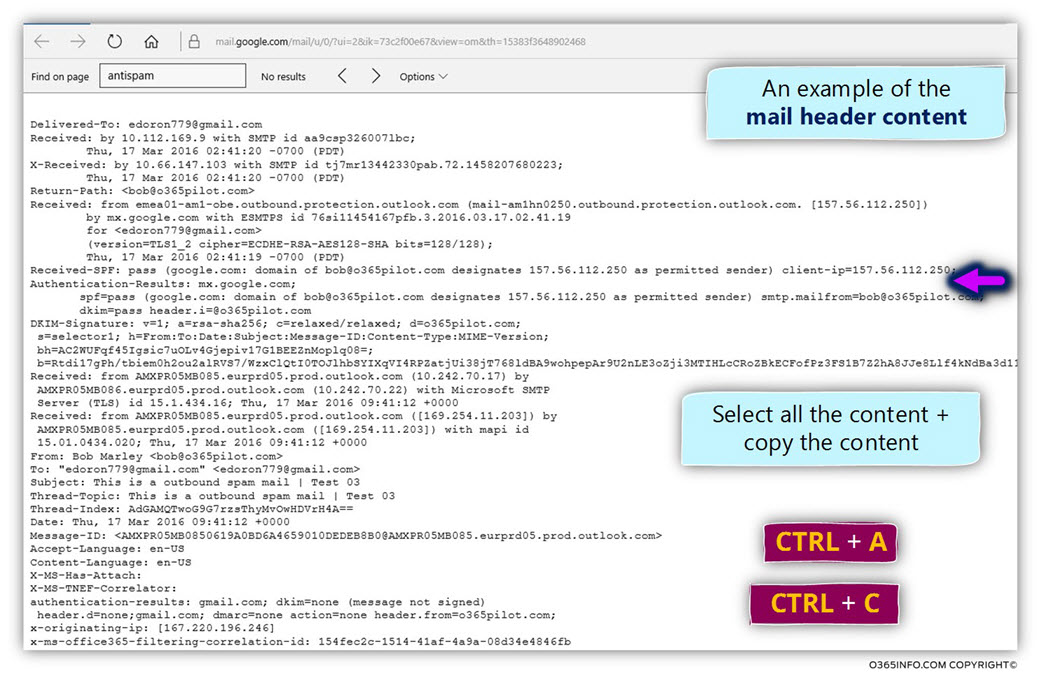
In the following screenshot, we can see the content of the E-mail header.

We will need to copy the substance of the E-mail header.

  • Select the Keyboard key combination – CTRL + A (Select All)
  • Select the Keyboard key combination – CTRL + C (Copy)

Verify a scenario in which the E-mail message was sent from the Exchange Online high risk pool servers -03

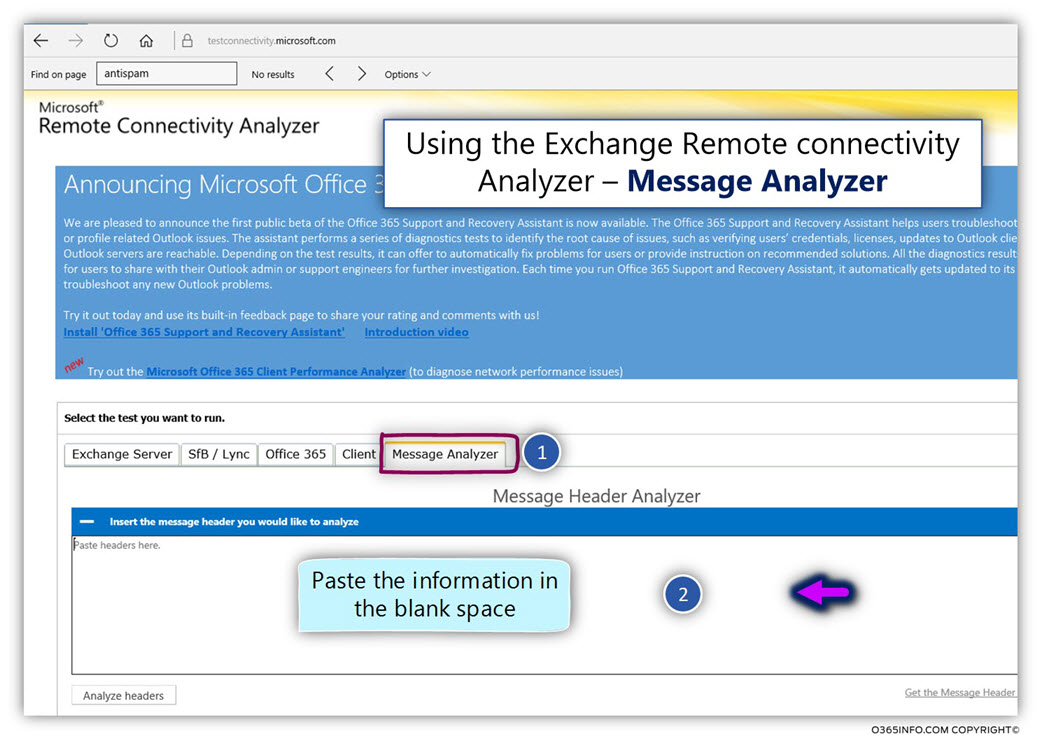
In this step, we will use the Microsoft web-based tool – Exchange Remote Connectivity Analyzer, for analyzing the information from the E-mail header.

Verify a scenario in which the E-mail message was sent from the Exchange Online high risk pool servers -04

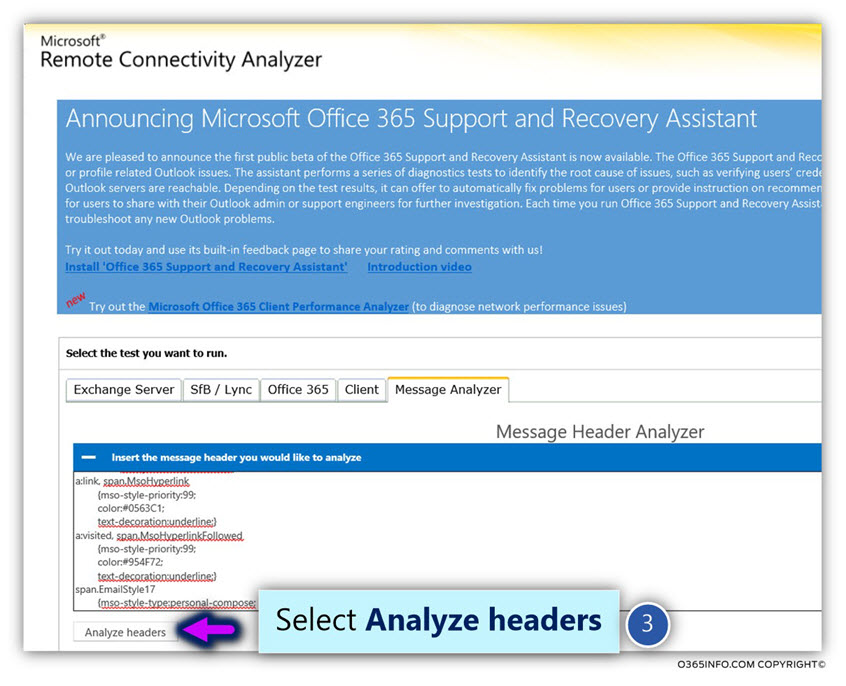
  • Click on – Analyze headers

Verify a scenario in which the E-mail message was sent from the Exchange Online high risk pool servers -05

In the following screenshot, we can see the content of the mail header named –
x-forefront-antispam-report.

The value of SPF:1501 “tell us” that the specific E-mail message was routed via the “High-Risk Risk Delivery Pool” servers.

Verify a scenario in which the E-mail message was sent from the Exchange Online high risk pool servers -06

Also, we can see that the SCL value of the E-mail message is – 9

Verify a scenario in which the E-mail message was sent from the Exchange Online high risk pool servers -07


Now it’s Your Turn!
It is important for us to know your opinion on this article


The post How to recognize an event in which Office 365 recipient send spam mail? appeared first on o365info.com.

How to manage SPF record in an Office 365 based environment

$
0
0

In the current article, we will review the subject of managing SPF record in an Office 365 based environment.The tasks that we will examine are:

  1. How to get the value of the SPF record that represents the Office 365 mail servers.
  2. How to create the new SPF record in the DNS server.
  3. How to verify that the SPF record was successfully published.

What is the purpose of SPF record?

The primary purpose of SPF record is, to include information on the mail servers who consider as “authorized mail servers” that can send E-mail for a specific domain name.

Generally speaking, in an Office 365 environment, there is no “mandatory need” for creating and publishing SPF record. Although it is not a mandatory requirement, we should be aware of that fact that in modern mail environment, there is the great importance of publishing SPF records that relate to each of organization-public domain names.

In this article, we will not provide a detailed review of the subject of SPF record, the syntax of SPF record and the different configuration options of SPF record. Instead, we will satisfy with a simple description.

The Implementation of SPF record

SPF record implemented as Text (TXT) DNS record. TXT record, serve as a “logical container” for the text string.
When configuring SPF record, the TXT record will include information about to the authorized mail server that represented a particular domain name.

An organization mail infrastructure could be considered as a very complicated mail infrastructure, which includes dozens of hosts (mail server) that send E-mail on behalf of a specific domain name or a very simple infrastructure in which organization represented by a single mail server.

In other words, the information that appears on the SPF record could be considered as complex and point to a significant number of mail servers or can be very “thin” and point to a particular IP address.

The Office 365 SPF record

In Office 365 based environment, there are hundreds or even thousands of mail servers. To be able to deal with such a scenario in which we need to relate or describe a significant number of mail servers, the SPF standard uses a unique parameter described as “include.”

The SPF “include” parameter, serve as a “pointer” to additional TXT record that includes a detailed list of the Office 365 mail servers.

The host name of the TXT record that serves as a “container” for the information about the Office 365 mail servers is – spf.protection.outlook.com

Our particular SPF scenario

As mentioned, in reality, the organization mail infrastructure, can be based on Office 365 mail infrastructure and also, other mail servers.

In the current article, we will not relate to such a scenario. Instead, we will refer to a very specific situation, in which an organization (o365pilot.com in our example) uses Office 365 as a “main mail infrastructure” and doesn’t use other external mail servers.

In this case, the SPF record that we are going to create will relate only to the Office 365 mail servers.

Note – in case that you want to read information about additional SPF configuration scenarios, you can read the following articles:

How to get the value of the Office 365 SPF record

Let’s make is simple, the value of the Office 365 SPF record that is relevant to all the Office 365 tenants is-

v=spf1 include:spf.protection.outlook.com

Versus other Offices 365 DNS record such as the MX record, that is created uniquely for a particular registered domain, the basic SPF record is identical to all the Office 365 different organization and the different registered domain.

And again, it’s important to emphasize that in this article, we relate to a very specific scenario in which the organization uses Office 365 as his mail infrastructure without using any additional external servers.

In case that you would like to see the value of the SPF record for your particular domain that registered with Office 365, use the following steps:

How to find the value of office 365 SPF record -01

Select the domain name which you want to view his DNS settings

  • In our example, we select the registered domain name – o365pilot.com

How to find the value of office 365 SPF record -02

  • The domain settings appear.
  • Under the Exchange Online section, we can see information about the DNS records that are related to the Exchange Online services.

In our example, we are interested in the value of the SPF record. The information about the SPF record value appears beneath the “MX record.”

How to find the value of office 365 SPF record -03

In the following screenshot, we can see the value of the SPF.
SPF record implemented by using Text (TXT) record.
A TXT record includes two separated parts:

  1. Hostname – in our scenario, the host name will be represented by the sign – @
  2. The value of the TXT record – the information about the approved Office 365 mail server is configured by using the following text – v=spf1 include:spf.protection.outlook.com -all

How to find the value of office 365 SPF record -04

Creating an SPF record using GoDaddy DNS management interface

In the next section, we will review the required steps that need for creating a “new SPF record.”
In our specific example, we will create the new SPF record using the Godaddy admin interface.

In case that you use another DNS provider, the interface is probably slightly different, but the basic concepts are identical.

  • Login into GoDaddy account
  • Select the DOMAINS section and click – manage.

Configure Office 365 spf text record using godaddy DNS management -01

  • Select the required domain name that you want to edit.
  • Click on the Manage DNS button

In our example, we want to add the SPF record to a domain called – o365pilot.com

Configure Office 365 spf text record using godaddy DNS management -02

A window that includes a list of all the existing DNS records appear.

  • At the bottom of the windows, click on the ADD menu

Configure Office 365 spf text record using godaddy DNS management -03

In this step, we are going to create a new text record (TXT) that will serve as SPF record that includes information about Office 365 authorized mail servers.

In the Type* option box, select – TXT

Configure Office 365 spf text record using godaddy DNS management -05

In the following screenshot, we can see that the TXT includes parameters:

  1. Hostname – each TXT record is represented by a particular name. In our scenario, we use the “@” characters as the host name. The “@” characters represent a generic host name.
  2. The value (the content) of the SPF record – the required information that we need to add to the SPF record that represents Office 365 mail servers is –
    v=spf1 include:spf.protection.outlook.com -all

Configure Office 365 spf text record using godaddy DNS management -06

In the following screenshot, we can see that the new SPF record was successfully created and saved.

Configure Office 365 spf text record using godaddy DNS management -07

Verifying that the new SPF record is published and includes the required syntax.

In this phase, we want to check if the information about the new SPF record that we have created in the previous step for the domain name – o365pilot.com successfully published and that the information is available for the various mail server that will need to verify our SPF record.

The additional thong that we would like to verify is that the information that appears in the SPF recorded seems proper and doesn’t include any strange characters or other errors.

To be able to check this information, we can use a couple of tools, and web base tool.

Using the NSLOOKUP command line tool for checking information about SPF record

In this section, we will use the NSLOOKUP command line tool for getting information about all the existing TXT records of a specific domain name (in our example, o365pilot.com)

  • Open the command prompt (start => Run => CMD).
  • Type the command – NSLOOKUP and hit the Enter key.
  • Enter the following command – set type=txt
  • Type the domain name – o365pilot.com

In the following screenshot, we can see the result. The domain o365pilot.com includes only one TXT record. This is the SPF record that we have created in the above step.

The syntax of the SPF record appears as proper syntax.

Verify information about Office 365 SPF text record -01

Verify SPF record using the MXTOOLBOX website

In this step, we will use a well know website named MXTOOLBOX

Verify information about Office 365 SPF text record using mxtoolbox-02

  • Look for the “SPF box.”
  • Type the required domain name and click on the orange arrow

Verify information about Office 365 SPF text record using mxtoolbox-03

In the following screenshot, we can see the result. The SPF verification test completed successfully. The information about the o365pilot.com SPF record appears as “green.”

Verify information about Office 365 SPF text record using mxtoolbox-04

Verify SPF record using the dmarcian website

An additional interesting website that we can use for verifying information about and SPF record is the dmarcian website (https://dmarcian.com/spf-survey).

  • Enter your domain name and hit the Survey The Domain

Verify information about Office 365 SPF text record using mxtoolbox-05

In the following screenshot, we can see the information about the SPF record.
The additional interesting thing that the dmarcian web-based tool can “do” is the “extract process” which memetic the procedure that is implemented by the mail server when the SPF record syntax uses the “include” option.

The SPF record that represents Office 365 uses the “include'” feature that “point” to
the hostname – spf.protection.outlook.com

At the bottom of the result screen, we can see that the dmarcian web-based tool managed to “extract” the content that is “contained” in the spf.protection.outlook.com record.

Verify information about Office 365 SPF text record using mxtoolbox-06


Now it’s Your Turn!
It is important for us to know your opinion on this article


The post How to manage SPF record in an Office 365 based environment appeared first on o365info.com.

123

Automatic replies (Out of office assistant) versus Automatic reply using mailbox rule – Exchange Online |Part 1#7

$
0
0

In the current article series, we will review the different options for implementing Automatic Reply in Office 365 (Exchange Online) based environment.
Corresponding terms are Automatic respond, Autoresponder, Automatic replies or, Out of office.

The term “Automatic reply” (and of the equivalent terms) defines a configuration in which we configure a specific mail user (mailbox) to respond to incoming E-mail using a predefined text or E-mail template.

Automatic replies (Out of office assistant) versus Automatic responder using inbox rule.

Generally speaking, in Exchange based environment, there are two ways of implementing the
“Automatic reply” mechanism-

Automatic replies (Out of office assistant)

Describe an Exchange mailbox feature, that was created for scenarios, in which Exchange recipient is absent for a limited period of time (vacation, sick leave, pregnancy leave and so on).

The purpose of the Automatic replies is to configure the user mailbox to respond with a predefined E-mail template to each incoming E-mail so the sender will be aware of the “absence” of the specific Exchange user.

In former Exchange server versions, this feature was described as – Out of office. The current formal term is Automatic replies

Automatic reply using Exchange Inbox rule

The Exchange Inbox rule is implemented by a very sophisticated “rule engine” that enables Exchange user to create a “rule” which consist of a “condition”, “actions” and “exceptions”. The Exchange Inbox rule can be used for various business scenarios and one of this scenario can be described as “Automatic reply”.

Generally speaking, there are a lot of shared similarities between this Exchange option but despite the similarities, there is variance between this option such as – different management interfaces, different characters and so on.

Automatic responder using Automatic Replies (Out of office assistant) | Advantages and disadvantages

Automatic Replies (Out of office assistant) – Advantages

The main advantages of the “Automatic Replies” feature is as follows:

1.  Easy to use

The “Automatic Replies” is a very easy to configure option, without the need of using a sophisticated rule wizard.

2.  Setting a trigger for activation based on specific types of a recipient (internal recipient versus external recipient).

The “Automatic Replies” can be activated based on the following triggers:

  • There is an option to configure a different set of “Automatic Replies” in case that the sender is an originating user, versus a scenario in which the sender is an external recipient. The ability to differentiate between an internal organization recipient versus
    “non-organization recipient” enable us to use different sets of “response” for each type or recipient.

3.  Prevent “reply back loops” – Automatic Replies (Out of office assistant)

The outstanding advantage of the “Automatic Replies” mechanism is – that he can prevent “reply back loop”. The “Automatic Replies” mechanism, record the information about the E-mail reply that is sent as an automatic response to a specific sender.
In case that the automatic response was sent to a specific sender, and the same sender sends E-mail again, the “Automatic Replies” mechanism will not send again the automatic reply.

The Out of Office Assistant sends an automatic reply to notify users who send you messages that you are away from the office. Your reply is only sent once to a message sender. The count is reset when you toggle the Out of Office Assistant. Microsoft Exchange clears its internal “sent to” list when you disable the Out of Office Assistant.

If you would like to have a reply sent for every message, use Rules instead of the Out of Office Assistant.

[Source of information – Only one reply is sent to each sender when the Out of Office Assistant is enabled]

4.  Using the option of Mail tips

When organization Exchange recipient creates a new E-mail and adds the E-mail address of other Exchange recipients that configure the option of “Automatic Replies”, Exchange will generate a mail tips, and inform the sender about the fact that he is going to send E-mail to the destination recipient who is not available at the current time.

5.  Using inbox rule with a combination of Automatic Replies

There is an option to use a combination of Automatic Replies + inbox rule. This “combination” enables us to define more complex scenarios in which we want to “expand” the operations of the automatic response. For example, create a custom notification for a specific sender.

6.  Managing Automatic Replies using PowerShell

Exchange administrator can manage the “Automatic Replies” option using PowerShell. Using PowerShell enables us to implement bulk operations. For example – “activate” the Automatic Replies option for all organized users before a national holiday.

Automatic Replies” (Out of office assistant) | Disadvantages

The disadvantages of the “Automatic Replies” feature are as follows:

1 . Limited text and image design options.

  • The automatic response text that we can use is some We can add a text message that will be configured as “automatic response” but we cannot use a more advanced automatic response text that includes images and so on.
  • The “logic” of the “Automatic Replies” is restricted to a specific date range or, to the external recipient versus internal recipient. By default, the “Automatic Replies” doesn’t include a sophisticated “rule engine”, that enable us to create a rule that is “tailored” to a specific Business requirement.

Automatic respond using Exchange inbox rule | Advantages and disadvantages.

The alternative or the “competitor” of the Exchange Automatic is – the option of creating “Automatic respond” using inbox rule.

The feature of inbox rule is a well-known Exchange feature because the inbox rule is a powerful and useful tool that enables Exchange user to create a custom rule for a specific business need.

The Exchange “inbox rule engine”, can cover a very wide area of possible scenarios.

One of the possible inbox rules that we can create described as “have server reply using a specific message“.

Using this specific inbox rule option, enable us to create a custom response (E-mail template) that will be “executed” or “activated” when a specific condition is fulfilled.

For example, we can define a very simple condition that activates the “Automatic respond” each time that E-mail reaches to the recipient mailbox. Versus this “simple condition,” the inbox rule engine enables us to define a very sophisticated condition which is built from many parts.

Service mailbox, inbox rule and custom response

Most of the time, we will use the option of Exchange inbox rule that is configured to generate “Automatic Reply” by using a dedicated Exchange mailbox that will be configured as “service mailbox”.

The term “service mailbox” is for a formal technical Exchange term. I use this term for describing a mailbox (or other types of an Exchange recipient mailboxes such as Public Folder) that serve for representing a specific organization department such as – the Help Desk, Human Resource and so on.

Most of the time, the “service mailbox” is not implemented as a standard user mailbox that “belong” to a specific user, but instead, implemented as a Shared mailbox or Mail enabled Public Folder.

The relevant organization users who need access to the specific “service mailbox”, will be assigned with the required permissions such as Full Access permissions, Send As permissions, and so on.

Automatic respond using inbox rule | Advantages

  1. Inbox rule a powerful rule engine

As mentioned, the Exchange inbox rule evolved to become a very sophisticated rule engine, that can cover most of the common business scenarios. For example, we can create a very complex condition that will activate the Automatic response (“have server reply using a specific message“) only in a very specific scenario.

Another example is the ability to create multiple inbox rules, that will respond with a different template for different scenarios.

Automatic respond using inbox rule | Disadvantages.

1.  No History transaction records (partial support in loop back scenarios).

The main disadvantages of using an Exchange inbox rule as a tool for implementing Automatic respond is – that the inbox rule is not aware of “former Automatic respond” that was sent to recipients.

For example, in a scenario in which we create an inbox rule that will respond with a predefined mail template each time that someone sends E-mail to the recipient, the “respond” will occur every time, even in the case that the “source sender” sends E-mail repeatedly.

Versus the Exchange “Automatic Replies” (Out of office assistant) feature that includes a record for “respond E-mail” to a specific recipient, the inbox rule doesn’t include this information.

This disadvantage can lead to a scenario described as “mail storm” or “mail loopback”.

To understand better, the possible scenario of “mail loopback”, let’s use the following scenario:

  1. Recipient A mailbox was configured using inbox rule the respond with a specific E-mail template to each E-mail that is sent to recipient A.
  2. The recipient B mailbox was configured using inbox rule the respond with a specific E-mail template to each E-mail that is sent to recipient B.
  3. Recipient A sends E-mail to recipient B.
    The Inbox Rule of recipient B is “activated,” and recipient B responds by sending a reply to recipient A.
  4. The Inbox Rule of recipient A is “activated,” and recipient A respond by sending a reply to recipient B.

In this type of scenario, the mail flow between these two mailboxes (recipient A mailbox and recipient B mailbox) can continue forever!

When we use an inbox rule there is no way for predicting such a scenario or identifying such a scenario.

The scenario of “mail storm” or “mail loop back”” is not a common scenario because, in Exchange based environment, the Exchange server is “Smart enough” to add information to the E-mail header of the E-mail that was generated by the inbox rule as an Automatic reply.

This information should prevent “mail storm” scenario.

We will cover this issue in more details in the article – Automatic Reply in Office 365 -Dealing with mail loop (mail storm) scenarios |Part 7#7  

2.  Manage inbox rule using PowerShell

The Exchange administrator can manage the ” inbox rule” option using PowerShell, but the task of creating the specific condition, and the specific response is not so easy.

3.  Shared mailbox and Automatic respond using inbox rule

In case that we use Shared Mailbox as a “serviced mailbox” and we want to create an Automatic respond using inbox rule, we will need to use a little trick to be able to login to the Shared mailbox using Outlook mail profile, for creating the required Automatic respond using inbox rule.

We will review the required steps in the article – Setting up an Automatic Reply in Office 365 using Public Folder | Part 3#7

Automatic responder using inbox rule versus Automatic Replies (Out of office assistant) – Exchange recipient

In the next articles, we will review how to implement the option of ” Automatic respond” using Inbox rule and Automatic Replies (Out of office assistant) using three types of Exchange server mailboxes:

  • User mailbox
  • Shared mailbox
  • Public Folder

Each of this option has advantages and disadvantages.
For example-

  • Using Shared mailbox or Public Folder – in an Office 365 based environment (Exchange Online), we don’t have to purchase a license for Shared mailbox and for Public Folder.
  • Using the option of Public Folder enables us to easily share information between many users without the need of adding an additional mailbox to their Outlook mail profile

In the following table, we can see the matrix of specific Exchange recipient mailbox, and the support option in the two Automatic respond option.

The main conclusion is that the option of Inbox rule is supported when using all the Exchange recipient types.

The Exchange Public Folder doesn’t support the option of Automatic Replies (Out of office assistant).

Exchange rule and Automatic respond solutions. 

Q1: What about the option of using Exchange rule for implementing a solution of Automatic respond?

A1: The Exchange server rule infrastructure, consider as a very powerful and sophisticated “rule engine”.

The interesting thing regarding the “Exchange server rule feature” is, that although Exchange rule includes a huge amount of different options and business scenario, in the current time, there is no option to create an Exchange rule that will “activate” automatic response that will be sent to the sender (the mail originator).

In other words, in the current time, we cannot use the “Exchange server side rule” option for creating an “organization level” Automatic reply rule.

Implementing Automatic responder in Exchange on-Premises versus Exchange Online environment

The demonstrations in the current article series, are based on Office 365 and Exchange Online environment. It’s important to emphasize that most of the information is relevant to Exchange on-Premises base environment.

Manage Automatic Reply in Office 365 and Exchange Online article seriesArticle series index


Now it’s Your Turn!
It is important for us to know your opinion on this article


The post Automatic replies (Out of office assistant) versus Automatic reply using mailbox rule – Exchange Online |Part 1#7 appeared first on o365info.com.

Configuring Automatic Replies (Out of office) using Outlook, OWA, and PowerShell |Part 2#7

$
0
0

In the current article, we will review how to configure the option of Automatic replies (Out of office assistant) in Exchange based environment.
Most of the time, the activation of the Automatic replies (Out of office assistant) will be implemented by the user himself via the Outlook or the OWA graphic interface.

In addition, Exchange administrators can manage the Automatic replies (Out of office assistant) settings using PowerShell.

Configuring Automatic Replies (Out of office) using Outlook

Configuring Automatic Replies (Out of office) using Outlook is implemented using the following steps:

  • Select the File menu

Configuring Automatic Replies - Out of office – using Outlook -01

  • Select – Automatic Replies

Configuring Automatic Replies - Out of office – using Outlook -02

We can use a different Automatic Replies “text” for internal organization users versus external recipients (non-organization recipients).

In our example, we will use the same “automatic response text” for internal organization users + external recipients.

Configuring the “automatic response text” for organization recipients

  • Select the tab – Inside My Organization (number 1).
  • Select the option – Send automatic replies (number 2).
  • Select the option of – Only send during this time range if you want to activate the Automatic Replies only for a predefined time range (number 3).
  • In the text box, add the required text that will be automatically sent to organization recipients (number 4).

Configuring Automatic Replies - Out of office – using Outlook -03

Configuring the “automatic response text” for external recipients

  • Select the tab Outside My organization (On) (number 4).
  • Select – Auto-reply to people Outside My organization (number 5).
  • In the text box, add the required text that will be automatically sent to external recipients (number 6).
  • Click OK to save the settings (number 7).

Configuring Automatic Replies - Out of office – using Outlook -04

In the following section, I would like to view the “experience” of recipient organization that wants to send E-mail to another organization recipient who activates the Automatic Replies (Out of office) option.

When the sender adds the E-mail of the organization recipient that activates the Automatic Replies option, a mail tip appears in the top of the E-mail message.

The Exchange mail tip informs the sender that the destination recipient, is not available in a specific time range.

Testing Automatic Replies - Out of office – using Outlook -01

In our example, when the sender sends E-mail to the other organization recipient who activates the Automatic Replies, the automatic respond E-mail is sent back to the sender.

Testing Automatic Replies - Out of office – using Outlook -02

Adding an inbox rule to existing Automatic Replies (Out of office)

An additional interesting feature that we can use in addition to the standard Automatic Replies (Out of office) settings is – the option of creating a new inbox rule, that will be “attached” to the Automatic Replies (Out of office).

The special character of this configuration is that the inbox rule is “bound” to the Automatic Replies (Out of office) condition.

In other words, the inbox rule that we define using the Automatic Replies (Out of office), will be activated only when the Automatic Replies (Out of office) option will be activated.

Using this option, we can define a sophisticated Automatic Replies scenario.
For example – add an additional “action” in case that the sender is a specific sender.

To add an inbox rule to existing Automatic Replies (Out of office) use the following steps:

Access the setting of existing Automatic Replies (Out of office) settings.

  • Click on the Rules .. button

Configuring Automatic Replies - Out of office – using Outlook -05

  • Click on the Add .. button

Configuring Automatic Replies - Out of office – using Outlook -06

In the following screenshot, we can see the interface of a “new inbox rule.”

We can define the required condition for activating the rule such as – in case the sender is a specific recipient, do “something” (a unique reply template, forward a copy of the E-mail and so on).

Configuring Automatic Replies - Out of office – using Outlook -07

Configuring Automatic Replies (Out of office) using OWA

In this section, we will review how to activate the option of Automatic Replies (Out of office) using OWA mail client.

In our specific example, the Automatic Replies (Out of office) were already activated. When the user login to OWA, a notification message appears.

Configuring Automatic Replies - Out of office – using Owa -01

  • Click on the settings icon

Configuring Automatic Replies - Out of office – using Owa -02

  • Select the Automatic Replies menu

Configuring Automatic Replies - Out of office – using Owa -03

In the following screenshot, we can see that we can configure the Automatic Replies (Out of office) setting only for organizing user or in addition, also for external recipients.

The two different sections describe as:

  1. sender inside my organization
  2. sender outside my organization

Configuring Automatic Replies - Out of office – using Owa -04

In our example, we would like to “activate” the Automatic Replies (Out of office) for internal + external recipients.

  • Select the option box – Send Automatic Replies (number 1).
  • In the text Box, add the “Outlook of office” text \ information (number 2).

Configuring Automatic Replies - Out of office – using Owa -05

In case that you need to set the Automatic Replies (Out of office) also for external recipients use the following steps:

  • Select the option- send automatic replies to all external senders (number 1).
  • In the text Box, add the “Outlook of office” text \ information (number 2).

Configuring Automatic Replies - Out of office – using Owa -06

Configuring Automatic Replies (Out of office) using PowerShell

In this section, I would like to briefly review an example of how to manage Automatic Replies (Out of office) using PowerShell in Office 365 (Exchange Online) based environment.

Using PowerShell for managing Automatic Replies has two distinct advantages:

  1. Implementing Automatic Replies in bulk mode

Using the option of PowerShell, enable the Exchange administrator to activate the Automatic replies (Out of office assistant) for multiple organization users (bulk mode).

  1. Configure Automatic Replies settings for a specific recipient, without the need for user credentials.

When using PowerShell, the Exchange Online administrator can configure the Automatic replies settings for a specific user, without the need to access the user mailbox or to have the user credentials.

Note – To be able to run the required PowerShell command, you will need to connect Exchange Online by creating a remote PowerShell session.If you are not familiar with this process, you can read the article – Connect to Exchange Online using PowerShell

Get information about Automatic Replies (Out of office) settings of specific recipient

Get-MailboxAutoReplyConfiguration <Identity>

Disable Out of office message settings for specific recipient

Set-MailboxAutoReplyConfiguration <Identity> -AutoReplyState Disabled

Activate Automatic Replies (Out of office) for external + internal recipients for specific recipients

Set-MailboxAutoReplyConfiguration <Identity> -AutoReplyState Enabled

-InternalMessage "OOF message to internal recipients"

-ExternalAudience all

Activate Automatic Replies (Out of office) for external + internal recipients | Bulk mode

Get-Mailbox -RecipientType UserMailbox |
Set-MailboxAutoReplyConfiguration -AutoReplyState Enabled
-InternalMessage "OOF message to internal recipients"-ExternalAudience all

Activate Automatic Replies (Out of office) for external + internal recipients + schedule

Set-MailboxAutoReplyConfiguration <Identity> –AutoReplyState Scheduled –StartTime “<Date>? –EndTime "<Date>” –ExternalMessage "OOF message to external recipients" –InternalMessage "OOF message to internal recipients

The next article in the current article series

Setting up an Automatic Reply in Office 365 using Public Folder | Part 3#7

Manage Automatic Reply in Office 365 and Exchange Online article seriesArticle series index


Now it’s Your Turn!
It is important for us to know your opinion on this article


The post Configuring Automatic Replies (Out of office) using Outlook, OWA, and PowerShell |Part 2#7 appeared first on o365info.com.

Setting up an Automatic Reply in Office 365 using Public Folder | Part 4#7

$
0
0
The current article is the sequel to the former article, in which we review the process of configuring Public Folder in Office 365 based environment to use the option of an automatic reply.

Our specific scenario is quite complicated and include many “parts” (business requirements).
In the former article, we have already reviewed all the required steps that are needed for creating a mail-enabled Public Folder + create the required automatic reply inbox rule.

In the current article, we will review the “additional tasks” that need to be completed in our scenario.

Brief scenario description

A quick reminder of our scenario:

We want to enable the Human resource employees to access the “Jobs” Public Folder that contains the “resume E-mails” that sent by the external recipient who applies for a job position.

Human resource employees will need to have the Send As permissions to the “Jobs Public Folder”, so they will be able to send E-mail on behalf of the jobs Public Folder.

An additional requirement is – to create an automatic forwarding rule, that will forward a copy of each E-mail that sent to the Jobs Public Folder to additional Exchange recipient – Angelina.

Angelina is the Human resource reprehensive, that will handle the resume E-mails that will be sent to the job’s Public Folder.

Step 7#12 – Creating a new security group for the Human Resources members

In the following section, we will create a new security group and add each of the Human resources employees to this group as a member.

Technically speaking, we can assign the required permissions to each of the Human resource employees separately. The reason for using a “security group” for assigning the required permissions is, that assign permissions to a group are more “right” from the administrative perspective.

When using a group, the permissions are assigned to the “group,” and the group members inherit the permissions from the group. In this way, we don’t “play” with the permissions that are assigned to the group. Instead, we only add or remove members from the security group.

To create an Exchange Online security group, use the following steps:

  • Log in to the Exchange Online admin center
  • On the left menu bar, choose the menu – recipients
  • On the top menu bar, select the menu – groups
  • Click on the plus icon
  • Select – Security group

Creating a new security group for the Human resources members -01

We will need to fill-in the following group properties:

  • *Display name: in our example, the display name is – Human Resources
  • *Alias: in our example, the alias name is – Human-Resources
  • *E-mail address: in our example, the E-mail address is – Human-Resources@o365info.com
  • Scroll down to continue editing the group properties

Creating a new security group for the Human resources members -02

  • To add the required group members, click on the plus icon

Creating a new security group for the Human resources members -03

Select the required recipients who will be added as group members.

  • Click – add ->
  • Click OK

Creating a new security group for the Human resources members -04

  • Click Save

Creating a new security group for the Human resources members -05

Step 8#12 – Assign Public Folder “access permissions” to the human resources group.

In this step, we will assign the Human resource security group, the required permissions that will enable the Human resource employees to access the job’s Public Folder.

This time, the assignment of the required Public Folder permissions will be implemented via the Outlook interface by – Bob, that has the owner permissions on the Jobs Public Folder.

The permissions that we want to assign to the Human Resources group are: publishing editor

  • We will log into Bob’s mailbox using Outlook and display the Public Folder tree.
  • Right click on the job’s Public Folder and select Properties…

Assign Public Folder permissions to the specific recipients Exchange Online -01

  • Select the Permissions tab
  • Click on the Add… button

Assign Public Folder permissions to the specific recipients Exchange Online -02

  • Select the required recipients that will be assigned with the permissions. In our scenario, we select the Human Resources group.
  • Click on the Add-> button
  • Click OK

Assign Public Folder permissions to the specific recipients Exchange Online -03

In the following screenshot, we can see that the Human Resources group has the publishing editor permissions.

Assign Public Folder permissions to the specific recipients Exchange Online -04

Step 9#12 – Assign Public Folder “Send As permissions” to the human resources group.

In this step, we will assign the Send As permissions to the Human Resources group.
As mentioned, each of the Human resource employees needs to have the ability to send E-mail address on behalf of the Jobs Public Folder.

The assignment of Send As permissions in Exchange Online is implemented as follows:

  • Log in to the Exchange Online admin center
  • On the left menu bar, choose the menu –public folders
  • On the top menu bar, select the menu – public folders
  • Select the specific Public Folder that you want to edit. In our example, we select the Jobs Public Folder
  • Click on the pencil (edit) icon

Assign Send As permissions to a Public Folder Exchange Online -01

  • On the left menu bar, select the menu – delivery options
  • In the Send As section, click on the plus icon

Assign Send As permissions to a Public Folder Exchange Online -02

  • Select the required recipients. In our example, we will select the Human resources

Assign Send As permissions to a Public Folder Exchange Online -03

  • Click – Save

Assign Send As permissions to a Public Folder Exchange Online -04

Step 10#12 – Testing the Public Folder Send As permissions

In this section, we would like to verify that the Human resources employees, can send E-mail on behalf of the Job Public Folder.

The jobs Public Folder uses the E-mail address – Jobs@o365info.com

Angelina work in the Human resources department and she is a member of the Human resources security group.

We would like to verify if Angelina can send E-mail using the Jobs@o365info.com E-mail address.

  • We will log into Angelina Outlook mail profile

Testing the Public Folder Send As permissions -01

  • To be able to use the Send As option, Angelina creates a new mail
  • Select the Options menu
  • Click on the From icon

In the following screenshot, we can see that a new “From…” field was added to the new mail

Testing the Public Folder Send As permissions -02

  • Click on the Form button
  • Select – Other email address…

Testing the Public Folder Send As permissions -03

  • To select the required recipient, click on the Form button

Testing the Public Folder Send As permissions -04

  • In our example, we select the “Jobs” recipient
  • Click OK

Testing the Public Folder Send As permissions -05

  • Click OK

Testing the Public Folder Send As permissions -06

In our example, Angelina will send the E-mail to herself using the “identity” of the job’s recipient.

Testing the Public Folder Send As permissions -07

In the following screenshot, we can see that the E-mail was successfully sent. The E-mail that sent to Angelina, look like an E-mail that sent from the “jobs recipient”

Testing the Public Folder Send As permissions -08

Step 11#12 – creating a Public folder automatic Forwarding rule

A quick reminder, in our scenario, Angelina (Human resources employee), needs to get a copy of each E-mail that will reach the “Jobs Public Folder.”

Technically speaking, in case that a user has permission to access the specific Public folder (jobs Public folder in our scenario), he can access and view the content of the Public folder.

This option is not suitable for our need because, Angelina (the Human resources reprehensive) reprehensive prefers not to check every five minutes of a new mail arrived at the jobs Public folder but instead, to get a copy of each E-mail.

In the following step, we will configure the property of the “Jobs Public Folder” to send a copy of each E-mail that accepted to – Angelina.

  • Log in to the Exchange Online admin center
  • On the left menu bar, choose the menu – public folders
  • On the top menu bar, select the menu – public folders
  • Select the specific Public Folder that you want to edit. In our example, we select the Jobs Public Folder
  • Click on the pencil (edit) icon

Testing the Public folder automatic Forwarding rule – Exchange Online -01

  • On the right menu bar, select the menu – delivery options
  • In the Forward to: section, click on the Browse… button

Testing the Public folder automatic Forwarding rule – Exchange Online -02

  • Select the required recipient name. In our example, we want to forward a copy
    of E-mail message to Angelina.
  • Click OK

Testing the Public folder automatic Forwarding rule – Exchange Online -03

  • Select the option – Deliver message to both forwarding address and mailbox
  • Click OK

Testing the Public folder automatic Forwarding rule – Exchange Online -04

Step 12#12 – Testing the Public folder automatic Forwarding rule

In this step, we would like to verify that the Public folder automatic Forwarding rule functions properly.

To be able to test the Public Folder Automatic Forwarding rule, we will send E-mail to the Public Folder jobs, and check if a copy of the E-mail sent also to the recipient who was configured – in our example – Angelina

In our scenario, we will use Bob’s Outlook mail profile

Testing the Public folder automatic Forwarding rule Exchange Online -01

  • Bob sends E-mail to the Jobs Public Folder

Testing the Public folder automatic Forwarding rule Exchange Online -02

In the following screenshot, we can see that the E-mail was successfully sent to the Jobs Public Folder (Bob can view the content of the Jobs Public Folder).

Testing the Public folder automatic Forwarding rule Exchange Online -03

In addition, a copy of the original E-mail was forwarded to Angelina

Testing the Public folder automatic Forwarding rule Exchange Online -04

Manage Automatic Reply in Office 365 and Exchange Online article seriesArticle series index


Now it’s Your Turn!
It is important for us to know your opinion on this article


The post Setting up an Automatic Reply in Office 365 using Public Folder | Part 4#7 appeared first on o365info.com.

Setting up an Automatic Reply in Office 365 using mailbox rule and Shared mailbox | Part 6#7

$
0
0
In the current article, we continue to review the steps that are needed for completing the tasks of – creating an Exchange Online shared mailbox that will serve as a “service mailbox” for the service request tickets that will be opened by our organization users.

In the former article , we have reviewed the process of creating the Help Desk Shared mailbox + created the required Automatic reply mailbox rule.

In the current article, we review the rest of the administrative tasks of our scenario.
The tasks that we need to complete are as follows:

  1. Creating a new security group for the Help Desk team and Assign the required permissions to the Help Desk group on the shared mailbox.
  2. Add the Shared mailbox to a Help Desk user Outlook mail profile
  3. Testing the Send As permission assigned to Help Desk members.

Step 5#8 – Creating a new security group for the Help Desk team

Technically speaking, this step is not a mandatory step because theoretically, we can start with the process of creating a new “Help Desk shared mailbox” and then in the second phase, provide the required permissions for each of the Help Desk members separately.

Although we can assign permissions for each of the Help Desk members separately, the more efficient and the more “right” administrative method is – to provide permissions to a “Group”, instead of providing permissions individually for each user.

When providing permissions to a group, each time that a new Help Desk member is accepted or each time that a Help Desk member is leaving the company, all we need to do is add or remove the user from the security group.

When we want to assign permissions to a “Group,” the Exchange Online group should be created as a “Security group” and not as a standard Distribution group.

An Exchange Online Security Group serve as a “security group” + Distribution group that uses for mail purposes.

Note – you can read more information about the subject in the article:
Effective management of permission in Exchange Online by using Security groups

Creating new Exchange Online security group

  • Log in to the Exchange Online admin center
  • On the left menu bar, select the recipients menu
  • On the top menu bar, select the groups menu
  • Click on the Plus sign and choose the option of Security group

Creating a new security group in Exchange Online -01

Fill in the required information

  • *Display name: – in our example, the Security Group display name is – IT Help Desk
  • *Alias: – in our example, the Security Group display name is – ITHelpDesk
  • *Email address – in our example, the Security Group E-mail address is – ITHelpDesk@o365info.com

Creating a new security group in Exchange Online -02

In the next step, we will add some members to the security group.

  • Scroll down and under the Members: section, click on the Plus icon

In our example: there are three members in the Help Desk: John, Bob, and Alice.

Creating a new security group in Exchange Online -03

  • In our example, we select the Help Desk team members from the recipient list
  • Click on the add -> button
  • Click OK

Creating a new security group in Exchange Online -04

  • Click – Save

Creating a new security group in Exchange Online -05

In the following screenshot, we can see that a new Security distribution group was created.

Creating a new security group in Exchange Online -06

Step 6#8 – Assign the required permissions to the Help Desk group on the shared mailbox

In this step, we assign the required permissions to the Help Desk security group (IT Help Desk) to the Help Desk Shared mailbox (Help desk support tickets).

The permissions that will be assigned are – Full access + Send As

  • Select the mailbox to which you are requesting to assign permissions
  • Click on the Pencil icon to edit the settings

Assign the required permissions to the Help Desk group on the shared mailbox -01

Select the mailbox to which you are requesting to assign permissions

  • Select the mailbox delegation menu

In the following screenshot, we can see that at the current time, a user named Bob has
Full Access + Send As permissions on the shared mailbox.

Assign the required permissions to the Help Desk group on the shared mailbox -02

In this step, we will assign the Full Access permissions to the Help Desk security group (IT Help Desk). The Help Desk members need to have the Full Access permissions, so they will be able to add the Help Desk Shared mailbox as an additional mailbox to their Outlook mail profile.

  • Under the Full Access section, click on the plus icon
  • From the recipient list, select the recipient that will be assigned with the Full Access permissions. In our scenario, we select the IT Help Desk security group.
  • Click add -> and OK

Assign the required permissions to the Help Desk group on the shared mailbox -03

In this step, we will assign the Send As permissions to the Help Desk security group (IT Help Desk). The Help Desk members, need to have Send As permissions, so they will be able to send E-mail using the “identity” of the Help desk shared mailbox (hd@o365info.com).

  • Under the Send As section, click on the plus icon
  • From the recipient list, select the recipient that will be assigned with the Send As In our scenario, we select the IT Help Desk security group.
  • Click add -> and OK

Assign the required permissions to the Help Desk group on the shared mailbox -04

In the following screenshot, we can see that the Help Desk security group (IT Help Desk) have Full Access and Send As permissions on the shared mailbox.

  • Click Save

Assign the required permissions to the Help Desk group on the shared mailbox -05

Step 7#8- Add the Shared mailbox to a Help Desk user Outlook mail profile

When we assign the Full Access permissions to recipient A on the mailbox of recipient B, the mailbox of recipient B will be automatically added to the Outlook mail profile of recipient A.
This “magic” happened because of the special Exchange feature named – AutoMapping.

The exception is – a scenario in which we assign the Full Access permissions to a security group and not for the individual user.
In this case, the member of the specific security group inherits the Full Access permissions from the security group, but the AutoMapping option will not be activated for each of the security group members.

In other words, in a scenario in which we assign the Full Access permissions to a security group, we will need to add the mailbox which they have Full access permissions onto the Outlook mail profile manually.

In the following example, we will add the Help Desk Shared mailbox to Bob’s Outlook mail profile (Bob is a member of the Help Desk security group).

  • Log in to the Outlook mail profile of the specific user. In our example, we log in to Bob Outlook mail profile.

Add the Shared mailbox to the Help Desk Outlook user profile -01

  • Open Outlook and choose the File menu

Add the Shared mailbox to the Help Desk Outlook user profile -02

  • Choose the Info menu and then Account Settings and then again Account Settings…

Add the Shared mailbox to the Help Desk Outlook user profile -03

  • Choose the recipient profile (John in our example) and click the Change… icon

Add the Shared mailbox to the Help Desk Outlook user profile -04

  • Click on the More Settings … button

Add the Shared mailbox to the Help Desk Outlook user profile -05

  • Select the Advanced tab
  • Click on the Add… button

Add the Shared mailbox to the Help Desk Outlook user profile -06

  • In the Add mailbox window, write down the Alias of the mailbox that you want to add.
    In our example, the Shared mailbox alias is – Help Desk support tickets

Add the Shared mailbox to the Help Desk Outlook user profile -07

  • The process will take a couple of seconds and in the end, we can see that the mailbox was added.
  • Click OK

Add the Shared mailbox to the Help Desk Outlook user profile -08

  • Click on the Next button to finish the task

Add the Shared mailbox to the Help Desk Outlook user profile -09

  • Click – Finish

Add the Shared mailbox to the Help Desk Outlook user profile -10

In the following screenshot, we can see that now, “Bob Outlook mail profile” included two mailboxes -Bob mailbox + the Shared mailbox (Help desk support tickets)

Add the Shared mailbox to the Help Desk Outlook user profile -11

Step 8#8 – Testing the Send as permission assign to Help Desk members

In the current section, we would like to verify that the Help Desk team members, can use the option of “Send As” and send E-mail by using the E-mail address of the Help Desk shared mailbox.

To verify the Send As an option, we will use Bob’s mailbox to verify if the permissions are assigned correctly.

  • Open the Outlook and create a New Email

Testing the Send as permission -01

  • Select the Options menu
  • Click on the From icon

Testing the Send as permission -02

By default, the “Send As” E-mail address is the E-mail address of the mailbox owner (in our example Bob).

To be able to send E-mail address using another recipient identity, click on the small black arrow

Testing the Send as permission -03

Select the menu – Other Email address…

Testing the Send as permission -04

From the recipient list, select the required recipient whom you want to send E-mail using his “identity.” In our example, we select the recipient – “Help Desk Support tickets” recipient (security – distribution group).

  • Click – OK

Testing the Send as permission -05

In the following screenshot, we can see that the From the mail field is populated with the E-mail address of the “Help desk E-mail address” (in our example – hd@o365info.com).

We will send the E-mail to another organization recipient, and verify if we manage to send the
E-mail address using the Help Desk identity + if the mail successfully sent to the destination recipient.

In our example, the destination recipient is Angelina.

Testing the Send as permission -06

In the following screenshot, we can see that the E-mail was successfully sent to the destination recipient.

From Angelina perspective, the E-mail was sent by the “Help Desk” team.

Testing the Send as permission -07


Now it’s Your Turn!
It is important for us to know your opinion on this article


The post Setting up an Automatic Reply in Office 365 using mailbox rule and Shared mailbox | Part 6#7 appeared first on o365info.com.


Automatic Reply in Office 365 -Dealing with mail loop (mail storm) scenarios |Part 7#7   

$
0
0
In the current article, I would like to review the possibility of a scenario which can be described as Mail loop (other common terms are – Mail storm or “reply back loop”) when using the option of Automatic Reply.

The term “Mail loop” and Automatic Reply scenario

The term “Mail loop” describes an unwanted scenario, in which two recipients are configured to respond with Automatic Reply.

When recipient A Send E-mail to recipient B, recipient B responds with an “Automatic Reply.”
When the E-mail sent to recipient A, recipient A response with an ” Automatic Reply.”

Theoretically, the mail transaction between the two recipients can go on forever!

The results of E-mail storm

Mail loop Automatic Reply and mail standard.

To be able to deal (preventing) such “Mail loop” scenarios, the SMTP protocol RFC includes a description of the required “mail fields” that are needed to be added to an E-mail message, by the “hosting mail server” when the E-mail sent as a consequence of Automatic Reply configuration.

The information that is “inserted” by the hosting mail server, which sends the Automatic Reply
E-mail should be read by the destination mail server.

In case that the destination recipient also uses the configuration of Automatic Reply, the receiving mail server will be responsible for preventing the phenomena of “Mail loop.”

Q1: So if mail servers “know how to deal” with Automatic Reply E-mails, is it possible that a mail loop scenario will occur?

A1: Yes, in case that the “client side” meaning the mail infrastructure that sends the Automatic Reply E-mail isn’t aware of this need and doesn’t add the required information to the E-mail header, there is a possibility of the scenario of a mail loop.

Another possible scenario is related to the “destination recipient mail infrastructure.” In case that the “receiving mail server,” doesn’t know how to read or interpret information that exists in the
E-mail message header of the Automatic Reply E-mail, there is a possibility for a scenario of a mail loop.

How to prevent the scenario of “Mail loop \storm” the formal SMTP RFC recommendation

The guys who create the SMTP protocol thought in advance about such a scenario.
The formal SMTP RFC specification, include a dedicated mail filed named Auto-Submitted, that was created especially for “Automatic Reply” scenario.

The purpose of the Auto-Submitted mail field is, to contain a value that will help the destination mail server, to “understand”, if a specific E-mail message is a “standard E-mail” or an E-mail that was created was some Automatic response process.

In case that the E-mail sent because of “Automatic response process,” the originating mail server, that sends the E-mail, should add to the E-mail header the
Special E-mail field Auto-Submitted with a required value such as –auto-replied

The use of Auto-Submitted mail feild, is implemented as follows:

  1. Source mail server

When we define the configuration of “Automatic Reply” for a specific mailbox, each time that the “Automatic Reply” setting is activated, the mail source server should add the Auto-Submitted
mail field to the E-mail that is sent and define and use a predefined value
such as – auto-replied or auto-generated.

  1. Destination mail server \ destination recipient

When the E-mail message reaches to the destination mail server, and the destination mail server “notice” that the E-mail is supposed to be sent to a recipient who also uses “Automatic Reply” configuration, the destination mail server, should decide if he wants to stop\prevent the “Automatic Reply” E-mail or send the automatic response only one time.

In other words, because that the sender E-mail header includes the mail field – Auto-Submitted and the value of auto-replied (or auto-generated, and because the destination recipient uses an “Automatic Reply” configuration, the receiving mail server should prevent the automatic respondent from being sent to the “original sender.”

Attached some quotes from the SMTP RFC:

Automatic responses SHOULD NOT be issued in response to any message which contains an Auto-Submitted header field (see below), where that field has any value other than “no”.

The Auto-Submitted field, with a value of “auto-replied“, SHOULD be included in the message header of any automatic response.

The purpose of the Auto-Submitted header field is to indicate that the message was originated by an automatic process, or an automatic responder, rather than by a human; and to facilitate automatic filtering of messages from signal paths for which automatically generated messages and automatic responses are not desirable.

The auto-generated keyword:

– SHOULD be used on messages generated by automatic (often periodic)

processes (such as UNIX “cron jobs”) which are not direct

responses to other messages,

– MUST NOT be used on manually generated messages,

– MUST NOT be used on a message issued in direct response to another

message,

– MUST NOT be used to label Delivery Status Notifications (DSNs)

[I2.RFC3464], or Message Disposition Notifications (MDNs) [I3.RFC3798], or other reports of message (non)receipt or

(non)delivery. Note: Some widely-deployed SMTP implementations

currently use “auto-generated” to label non-delivery reports.

These should be changed to use “auto-replied” instead.

[Source of information – Recommendations for Automatic Responses to Electronic Mail]

Dealing with a scenario of “Mail loop \ Storm” – Exchange based environment | Server side.

Just a quick reminder, in Exchange base environment, there are two major ways for implementing a solution of – Automatic Reply.

  1. Automatic replies (Out of office assistant)
  2. Automatically respond using inbox rule

Exchange server, relate to the subject of “Mail loop\Storm” when using automatic response using two aspects:

Exchange infrastructure | Outgoing mail | Automatic response behavior

In case that the Exchange recipient uses the option of – Automatic replies (Out of office assistant), each time that the “Out of office” E-mail message is sent to the specific sender, the information is “registered” in Exchange server.

In case that the same sender sends an additional E-mail, the Automatic replies (Out of office assistant) response will not send again.

This process was created for – preventing the scenario in which the same E-mail will be sent over and over to the same sender, and in addition, prevent a scenario in which the “original sender” use the option of automatic response E-mail.

The Out of Office Assistant sends an automatic reply to notify users who send you messages that you are away from the office.

Your reply is only sent once to a message sender.

The count is reset when you toggle the Out of Office Assistant.

Microsoft Exchange clears its internal “sent to” list when you disable the Out of Office Assistant.

If you would like to have a reply sent for every message, use Rules instead of the Out of Office Assistant.

[Source of information – Only one reply is sent to each sender when the Out of Office Assistant is enabled]

An additional mechanism that is implemented by the Exchange for outgoing E-mail that was generated by Automatic replies (Out of office assistant), is adding a specific mail field and values to the E-mail message. We will review this method in the next section.

Automatically respond using inbox rule

In a scenario in which Exchange user implements the option of – Automatic reply using mailbox rule, Exchange server doesn’t keep any information about an event in which E-mail was already sent to s specific recipient.

In other words, in case that Exchange user configures the Automatic Reply mailbox rules, and in case that a specific sender sends E-mail couple of times, the mailbox rule will be activated each time.

Q1: Can we assume that in a scenario in which the sender also uses an Automatic Reply, that the result will be “Mail loop \ Storm”?

A1: Most of the time, the answer is “No.” In another word, most of the time, Exchange servers will know how to prevent a scenario of “Mail loop \ Storm.”
The basic assumption is that the “source mail server” (the originator mail server) will add the required E-mail field to the E-mail header. The “Automatic Reply mail fields,” will enable the destination Exchange server who gets the E-mail on behalf of the recipient, to “understand” that the E-mail was sent as “Automatic Reply.”
In case that the destination recipient (the Exchange recipient) also uses Automatic reply, the mailbox rule will be activated only once.

Exchange infrastructure | Outgoing mail | Automatic response behavior

The other side of the equation is the procedure that Exchange server uses for “outgoing mail” that was created as a result of the Automatic responder using inbox rule or when using the option of – Automatic replies (Out of office assistant).

In this scenario, Exchange server adds to the E-mail header, a specific mail field with a specific value that should be used by the “destination mail server.”

Exchange server uses a combination of “standard SMTP RFC” recommendation + a dedicated Exchange mail field.

The purpose of these mail fields is – to “signal” the receiving mail server that a specific E-mail
Is an E-mail that was generated as an automatic response.

  • In case that the destination mail server is an Exchange based server, he will “know” how to relate to the “Exchange dedicated mail field.”
  • In case that the destination mail server is not an Exchange based server, he will relate to the “SMTP standard” mail field the Auto-Submitted mail field with the
    value –auto-generated

Automatic response mail field’s Exchange versus Gmail

Testing Automatic Reply E-mail process in a Exchange Online based environment

To be able to understand better the way that Exchange server use for “stamping” E-mail message that was created as a result of Automatic reply, I have configured two Exchange Automatic reply options:

  1. Exchange mailbox to use – Automatic replies (Out of office assistant)
  2. Exchange mailbox to use – Automatic respond using inbox rule

I have generated the process of “Automatic Reply E-mail” that was sent to the destination recipient, get the E-mail address header that was sent to the destination recipient, and analyze the information that was added to the E-mail header (the E-mail that was generated as Automatic Reply E-mail)

The mail fields that Exchange server generates that relate to processing of Automatic Reply are as follows:

Mail Fields Value Exchange or SMTP RFC
X-Auto-Response-Suppress all Exchange
X-MS-Exchange-Inbox-Rules-Loop <Recipient E-mail address> Exchange
auto-submitted auto-generated SMTP RFC
x-ms-exchange-generated-message-source Mailbox Rules Agent Exchange

A couple of “insight” from the information that was “reviled” in the E-mail header:

  1. The E-mail fields that relate to Automatic Reply are identical when using the option of Automatic replies (Out of office assistant) versus the option of Automatic responder using mailbox rule. My assumption was that Exchange server would use different mail fields or different values for each of the separated Automatic Reply options, but when looking at the data, there is no difference between the E-mail fields that relate Automatic Reply.
  2. There is very little information on the public network about the characters or the purpose of the “Exchange mail fields” that are used in E-mail that was generated as Automatic Reply. When I try to look for detailed information about this “Exchange mail fields,” I could not find helpful information that will explain clearly the role of each mail field.
  3. Exchange server uses the standard SMTP RFC mail field that “stamp” E-mail as an Automatic Reply by using the mail field “auto-submitted” and the
    value “auto-generated”.

Testing Automatic Reply E-mail process in a Gmail based environment

To be able to understand better how another mail infrastructure such as Gmail relates to the subject of Automatic Reply and mail fields, I use a Gmail account and activate the option named – “Out of office or vacation reply.”

When we look at the mail header of the E-mail that was sent from a Gmail account as a result of an Automatic Reply E-mail, we can find the following mail fields that relate to the “Automatic Reply” process:

Mail Fields Value Exchange or SMTP RFC
X-Autoreply Yes Gmail \other
auto-submitted auto-replied SMTP RFC

A couple of “insights” from the information that was “reviled” in the E-mail header:

  1. Gmail mail server uses a “non SMTP RFC” mail filed named – “X-Autoreply” with the value “Yes.”
  2. Gmail mail server uses the standard SMTP RFC mail field that “stamp” a specific E-mail as an Automatic Reply, by using the mail field “auto-submitted” and the
    value “auto-replied”.

Mail loop \storm | Real life scenario | Testing Automatic response behavior in different scenarios

One of the main “issues” in a scenario in which we use Automatic Reply using mailbox rule, relate to the concern about a possible scenario of “Mail loop” or “Mail storm.”

In case that booth of the sided (the sender and the recipient) is configured to use Automatic Reply, this configuration could lead to a scenario of “Mail loop.”

Assuming the both of the side supports the SMTP RFC and the RFC “instructions” that relate to Automatic Reply mail fields, and the source mail server “stamp” the E-mail Hader with information about the fact the E-mail considers as an Automatic response, the scenario of “Mail loop” or Mail storm” should not be realized.

Because most of the time, we cannot be sure about the “other side” (the other involved mail infrastructure) marks correctly Automatic Reply E-mail, I have tried to test a couple of passable scenarios in which booths of the mail recipient using Automatic respond to settings.

To be able to verify the behavior of automatic response in an Office 365 based environment that interact with the other mail environment, I have configured Office 365 to use Automatic Reply by using mailbox rule, and try to interact with a recipient from another mail infrastructure, that also uses Automatic Reply configuration.

  • The Office 365 recipient described as – recipient A
  • The other mail infrastructure recipient described as – recipient B

Booth of the recipients was configured to use Automatic Reply.

Our purpose is to verify if a scenario of “Mail loop” or “Mail storm” could be realized when Office 365 recipients interact with other mail infrastructures.

The test will be implemented in the following way:

  • Recipient A (Office 365 recipient) is configured to use Automatic Reply using mailbox rule.
  • Recipient A sends E-mail to recipient B.
  • The E-mail should be accepted by recipient B.
  • Recipient B will “respond” with Automatic Reply E-mail.
  • The E-mail should be accepted by recipient A.

The “thing” that we want to check \ test is – if this scenario leads to a “Mail loop” or “Mail storm.”

Our main concern is to verify if the Office 365 user (recipient A) will continue to respond using Automatic Reply E-mail.

Scenario 1: Exchange Online environment versus Exchange Online

In this scenario, recipient A is an Office 365 recipients who belong to organization X and recipient B are also an Office 365 recipient who belong to organization Y.

In other words, although a both of the recipients is hosted at Office 365 mail infrastructure, each of the recipients belongs to a different organization.

The result

When we implement the scenario in which recipient A send E-mail to recipient B and both recipients are configured to use Automatic Reply, the scenario of “Mail loop” or “Mail storm” was not realized.

Scenario 1 - Testing Mail loop storm -Exchange Online environment versus Exchange Online

Scenario 2: Exchange Online environment versus Exchange on-Premises

In this scenario, recipient A is an Office 365 recipients who belong to organization X and recipient B are Exchange on-Premises recipient, that belongs to organization Y.

The result

When we implement the scenario in which recipient A send E-mail to recipient B and both of the recipient are configured to use Automatic Reply, the scenario of “Mail loop” or “Mail storm” was not realized.

Scenario 2 - Testing Mail loop Exchange Online environment versus Exchange on-Premises

Scenario 3: Exchange Online environment versus Gmail

In this scenario, recipient A is an Office 365 recipient who belongs to organization X and recipient B, is Gmail recipient, that belongs to organization Y.

The result

When we implement the scenario in which recipient A send E-mail to recipient B and both recipients are configured to use Automatic Reply, the scenario of “Mail loop” or “Mail storm” was not realized.

Scenario 3 - Testing Mail loop storm scenarios -Exchange Online environment versus Gmail

How to detect and prevent a scenario of “Mail loop \ mail storm” that was caused by Automatic reply configuration.

Generally speaking, regarding the best practice of implementing Automatic reply configuration, the ideal scenario is a scenario, in which the mail infrastructure that sends E-mail as an Automatic reply, will “stamp” the E-mail with some information (a unique mail fields), that will inform the “other side” that the E-mail is an “Automatic reply E-mail.”

At the same time, we were expecting from the destination recipient mail infrastructure, to know how to read the “unique mail fields” that say that the E-mail is an “Automatic reply E-mail” and responds appropriately.

In case that the “source mail infrastructure” didn’t add the required information about “Automatic reply E-mail” or in case that the destination mail infrastructure doesn’t know how to relate to the specific mail fields in the header that include information about “Automatic reply
E-mail”, we could face a possible scenario of “Mail loop \ mail storm.”

To be able to prevent a “Mail loop \ Mail storm” scenario, in Exchange based environment, we can add to the Exchange Automatic reply inbox rule that we were created or to the Automatic replies (Out of office assistant), an additional “configuration layer.”

The purpose of the “additional configuration layer” is to enable the Exchange recipient to identify a scenario, in which the E-mail that reaches the mailbox is an “Automatic reply E-mail.”

Configuring the Exchange Online mailbox to - identify Automatic Reply E-mail

In this case, we would like to “instruct” the Exchange mailbox that uses an Automatic reply mailbox rule, not to respond with Automatic Reply E-mail.

In other words, in case that the E-mail that is sent from the sender considers as Automatic Reply E-mail, don’t activate the Automatic Reply E-mail response.

Q1 – How can we identify a scenario in which the E-mail that was sent is an Automatic
Reply E-mail?

A1 -In case that the source mail infrastructure didn’t use standard mail fields for classifying the specific E-mail as “Automatic reply E-mail,” there is no mechanism that can detect such as an event in 100 percent certainty.

The good news is that there are some “tricks” that we can use, for identifying E-mail that can be considered as an “Automatic reply E-mail” because many times, this type of E-mails has a unique character.

In the following section, I would like to review some possible configuration that we can add to Exchange mailbox rule, that will try to identify as “Automatic reply E-mail.”

The configuration that we add to the Exchange mailbox rule, will be added to a section described as “exception”, which instruct the Exchange mailbox rule when not to activate the mailbox rule.

In our scenario, we will add the exceptions to the Exchange Automatic reply inbox rule that we have reviewed in the article – Setting up an Automatic Reply in Office 365 using mailbox rule and Shared mailbox | Part 5#7

Our “exceptions” will relate to three different types of scenarios:

Scenario 1 – we will add an exception that relates to a specific sender. For example, we experience a scenario of “Mail loop \ mail storm” because, external support ticket system, that uses the E-mail address – Support@thankyouforsharing.org, send E-mail automatically to one of our organization users and this “support tickets system” doesn’t comply with the SMTP RFC (the E-mail doesn’t include any indication of the fact that the E-mail is an Automatic Replay
E-mail).

Scenario 2 – our mail server doesn’t know how to identify “Automatic reply E-mail,” although the sender adds the required mail fields.

To be able to handle this scenario, we will instruct the Exchange mailbox rule, to look at the E-mail header, and look for a specific mail field that used in the case that the E-mail considers as “Automatic reply E-mail.”

Scenario 3 – We experience a scenario of “Mail loop \ Mail storm” because – external recipient sends “Automatic reply E-mail” but doesn’t add the required mail fields to the E-mail (doesn’t comply with the SMTP RFC).
This time, we will try to locate a specific keyword in the E-mail subject or the E-mail body that suggests that the specific E-mail is an “Automatic reply E-mail.”

Configuring Exchange mailbox rule exception – preventing “Mail loop \ mail storm” that was caused by Automatic reply configuration.

Log in to the Exchange mailbox that was configured to use the Automatic reply inbox rule.

In our example, we log in to the “Help desk support tickets” shared mailbox (the Automatic reply inbox rule was created in the article – Setting up an Automatic Reply in Office 365 using mailbox rule and Shared mailbox | Part 5#7).

  • Select the Rules menu
  • Select the Mange Rules & Alerts… menu

Detect and prevent a scenario of Mail loop -caused by Automatic reply – Exchange inbox rule -01

  • Select – Edit Rule Settings…

Detect and prevent a scenario of Mail loop -caused by Automatic reply – Exchange inbox rule -02

In our example, we edit an existing inbox rule. To be able to get to the “exception” configuration screen, we will need to go over the inbox rule condition and action.

  • Click – Next

Detect and prevent a scenario of Mail loop -caused by Automatic reply – Exchange inbox rule -03

  • Click – Next

Detect and prevent a scenario of Mail loop -caused by Automatic reply – Exchange inbox rule -04

Step 1#3 – Adding an exception for scenario 1 | Don’t reply if the sender is X

In this section, we define an exception that relates to a specific sender.
In our example, an external recipient is a support system, that uses the E-mail address – Support@thankyouforsharing.org.
This support system sends “Automatic reply E-mail” to one of our organizations that also uses an “Automatic reply E-mail” configuration.

Because that the sender doesn’t mention the fact that the E-mail considers as “Automatic
reply E-mail” (doesn’t add information to the E-mail header) the result
was “Mail loop \ mail storm.”

To prevent this scenario, we will add to the existing Automatic reply mailbox rule, an exception that includes the E-mail address of the source sender.

  • Select the check box – except if from people or public group

Detect -and prevent a scenario of Mail loop -caused by Automatic reply – Exchange inbox rule -05

Write down the E-mail address of the recipient who will be added to the exception. Note that the E-mail address will probably will not appear in the recipient list because this is an “external recipient” E-mail address.

  • Click – OK

Detect and prevent a scenario of Mail loop -caused by Automatic reply – Exchange inbox rule -06

In the following screenshot, we can see that the information about the source, sender E-mail address was updated in the mailbox rule exception section.

Detect and prevent a scenario of Mail loop -caused by Automatic reply – Exchange inbox rule -07

Step 2#3 – Adding an exception | Don’t reply if the E-mail subject or body includes specific keywords

In this section, we will create an additional mailbox rule exception that will try to “capture” incoming E-mail that has the characters of Automatic Reply E-mail.

For example, in many scenarios the Automatic Reply E-mail will include specific keywords such as:

  • Auto Response
  • AutoReply
  • Auto Reply
  • Out of Office

We will configure our mailbox rule exception to – try to recognize these specific
Keywords in the E-mail message or the E-mail body.

  • Click on the link – specific words
  • Select the check box – except if the subject or body contains specific words

Detect and prevent a scenario of Mail loop -caused by Automatic reply – Exchange inbox rule -08

  • Add the required keyword such as – Auto Response, AutoReply, Auto Reply, Out of Office.
  • Click – OK

Detect and prevent a scenario of Mail loop -caused by Automatic reply – Exchange inbox rule -09

In the following screenshot, we can see that the information about the Keywords was updated in the mailbox rule exception section.

Detect and prevent a scenario of Mail loop -caused by Automatic reply – Exchange inbox rule -10

Step 3#3 – Adding an exception | Don’t reply if the E-mail header includes specific keywords

In this section, we will create an additional mailbox rule exception, that will try to “capture” incoming E-mail that has a specific mail field that are related to Automatic Reply E-mail.

For example, Exchange, and other mail server add the following mail fields to E-mail that considered as Automatic Reply E-mail:

  • X-Autoreply
  • auto-submitted
  • X-Auto-Response-Suppress
  • X-MS-Exchange-Inbox-Rules-Loop

We will configure our mailbox rule exception to – recognize these specific mail field’s keywords in the E-mail header.

  • Click on the link – specific words
  • Select the check box – except if the message header contains specific words

Detect and prevent a scenario of Mail loop -caused by Automatic reply – Exchange inbox rule -11

  • Add the required keyword such as – X-Autoreply, auto-submitted, X-Auto-Response-Suppress, X-MS-Exchange-Inbox-Rules-Loop
  • Click – OK

Detect and prevent a scenario of Mail loop -caused by Automatic reply – Exchange inbox rule -12

In the following screenshot, we can see that the information about the Keywords was updated in the mailbox rule exception section.

Detect and prevent a scenario of Mail loop -caused by Automatic reply – Exchange inbox rule -13

In the following screenshot, we can see the “summary” of the exceptions rules that were created.

Detect and prevent a scenario of Mail loop -caused by Automatic reply – Exchange inbox rule -14

Manage Automatic Reply in Office 365 and Exchange Online article seriesArticle series index


Now it’s Your Turn!
It is important for us to know your opinion on this article


The post Automatic Reply in Office 365 -Dealing with mail loop (mail storm) scenarios |Part 7#7    appeared first on o365info.com.

Configure your WordPress site to send E-mail via SMTP mail server | GoDaddy and Office 365 based environment | Part 1#6

$
0
0
In the current article series, we review the steps by step instructions,
that are needed for configuring WordPress site to send E-mail by using an SMTP mail server.

Generally speaking, the required configuration that is needed depends on three variables:

  1. The network infrastructure which hosts the WordPress site
  2. The specific characters of the mail server that we address
  3. The WordPress site plugin or PHP code that we use

The scenarios that we will review are:

1. A WordPress site that has SMTP\TLS access to external Office 365 mail servers.

In the article – Configure your WordPress site to send E-mail via Exchange Online (Office 365) anonymous session | Part 2#6, we review the required settings, in a scenario in which we want to configure our WordPress site to address the Office 365 mail server using SMTP protocol without authentication (Anonymously, without providing user credentials).

The outcome of this configuration will lead to a scenario in which the E-mail that will be sent to our organization users will be classified as “spam mail.
In the article – Creating Exchange Online bypass spam rule – whitelist specific sender E-mail address | Part 3#6, we will learn how to avoid this “outcome,” by creating a rule that will “whitelist” the sender E-mail address.

In the article – Configure your WordPress site to send E-mail via Exchange Online (Office 365) provide user credentials | Part 4#6 , we review the required settings, in a scenario in which we want to configure our WordPress site, to address the Office 365 mail servers using TLS protocol + providing user credentials.

In the article – Configure WordPress site send E-mail via Exchange Online (Office 365) | Provide user credentials without purchase Office 365 license | Part 5#6, we review a method which we can use for saving the cost of purchase Office 365 license to the user that our WordPress site for the authentication purpose.

2.  WordPress site that hosted at GoDaddy using Shared Hosting

In the article – Configure your WordPress site to send E-mail via GoDaddy mail server – Shared Hosting plan | Part 6#6 , we review the required settings in a scenario, in which we want to configure our WordPress site that uses Shared Hosting plan, to address the GoDaddy mail server.

Why is it so hard to configure my WordPress site to use mail server?

The task of successfully manage to configure our WordPress site to address mail server puts before us a number of challenges ahead.

The obstacles we went through in order to set our WordPress site to use mail server

The main challenge is – our need, to be familiar with the specific requirement of the mail infrastructure that we need to address, and the structure of the network, that hosts our WordPress site.

Apparently, the configuration of WordPress, setting look quite simple because we use a graphic interface, but the “catch” is that in many scenarios, we don’t really know what are the required configuration settings that are required by the destination mail infrastructure.

In the following diagram, we can see an example of the different “mail components” that we need to know about the mail server which we want to address.

WordPress and mail server -What are the details that we need to know about the mail server

A1. Mail communication protocol

The default communication protocol that we usually use – is the SMTP protocol. The SMTP protocol is a non-encrypted protocol. In some scenario, we would prefer to use the TLS mail protocol because the TLS protocol encrypts to the communication channel between the two endpoints.

In case that we want to use (or need to use) the TLS mail protocol there are additional elements that we should relate to such as

A1.1 – The TLS version that supported by the mail client and the mail server.

For example, in a scenario in which we want to configure our WordPress site to address Exchange Online as mail server using TLS, the supported TLS version is TLS 1.0 and above.

From my own experience, many WordPress plugins don’t support the required TLS version or have other problems when trying to address Exchange Online using TLS.

A1.2 – The TLS mandatory requirement of the mail server

The TLS protocol can be configured using advanced configuration, such as the requirements of using the certificate, the requirement in which the certificate should include a specific hostname and more. These requirements could be considered as optional or mandatory requirements.

For example, in a scenario in which we want to configure our WordPress site to address Exchange Online as mail server using TLS, the Exchange Online doesn’t enforce a mandatory requirement in which the side that communicates the mail server will need to use a certificate.

In other words, in a scenario in which we need to address Exchange Online using TLS, we don’t need to use a “client side” certificate.

A2. Mail communication protocol port number

  • The default SMTP communication port number is – 25
  • The default TLS communication port number is – 587

We will need to verify that we know what is the port number that is used by the mail server that we need to address.

For example

  • When we need to configure our WordPress site to address Exchange Online as mail server using SMTP, the communication port number that we need to configure is – 25.
  • When we need to configure our WordPress site to address Exchange Online as mail server using TLS, the communication port number that we need to configure is – 25 or 587. Exchange Online support TLS communication using port 25 and in addition port 587.

Mail communication protocol port number and Firewall infrastructure

A very important issue to consider that relates to the communication protocol port number is – the existing outbound Firewall policy.

For example, in many scenarios, the reason for the “mail communication failure” is related to the fact that the existing Firewall infrastructure that “protect” our WordPress site, doesn’t allow our web server to communicate with external hosts using SMTP (port 25) or TLS (port 587) protocols.

We will need to verify that the existing network in which we host our WordPress site, allow this type of outbound mail communication.

In the article -Configure your WordPress site to send E-mail via Exchange Online (Office 365) using TLS | Part 4#6, we will review how to verify the outbound communication with the destination mail server using a special feature of the Postman SMTP Mailer/Email Log mail plugin.

B. Mail communication and Authentication

The communication channel between the mail client the (WordPress site in our scenario) and the mail server, can be implemented as a “none- authenticated” session or “authenticated session”.

The mail server can “dictate” a mandatory requirement, in which he is willing to accept the mail client requests only if the mail client proof his identity by providing user credentials. Another scenario could be – a scenario in which the mail server is willing to accept anonymous mail delivery request.

Example 1 – in a scenario in which we want to configure Exchange Online as a mail server, we can address the Exchange Online mail server without providing user credentials or with user credentials (later on we will explain why the preferred option is – provide user credentials).

Example 2 – in a scenario in which the WordPress site is hosted at GoDaddy using Shared Hosting plan, we don’t need to provide user credentials

The other element that relates to the subject of – authenticated session is the authentication protocol that is required by the mail server.

For example, when we address Exchange Online as a mail server, and we want to provide user credentials, Exchange Online will “agree” to accept the user credentials only if we configure the session using the TLS protocol.

C. The address of the mail server, which we need to address

Although these “requirement” looks like an obvious requirement, in reality, you will find that is not so “clear”.

Addressing Office 365 mail servers | WordPress site

In case that we want to address Office 365 mail infrastructure, we can address the “Office 365 mail server” using one of the following “entities”:

1.  The Office 365 mail server – SMTP entity

In case we configure the WordPress mail plug-in to connect Exchange Online using SMTP, the host name whom we need to use is – the hostname who appears as the “Office 365 MX record.”

In case that you need more information, you can read the article – What is the hostname of my Office 365 MX records?

I will demonstrate this configuration in the article in the section – Configure your WordPress site to send E-mail via Exchange Online (Office 365) anonymous session | Part 2#6

2.  The Office 365 mail server – TLS entity

In case we configure the WordPress mail plug-in to connect Exchange Online using authenticated session + using TLS protocol, the host name whom we need to use
is –  smtp.office365.com
Addressing GoDaddy mail server -Shared Hosting plan | WordPress site

The characters of this scenario are WordPress site that is hosted at some Web hosting providers such as GoDaddy.

In this type of scenario, the common network infrastructure is implemented by a mail server that the web hosting provider “expose” to the use of his customers.

For customers who use GoDaddy Shared Hosting plan, the mail server that provides by GoDaddy named – relay-hosting.secureserver.net

I will demonstrate this configuration in the article – Configure your WordPress site to send E-mail via GoDaddy mail server – Shared Hosting plan | Part 6#6

Implementing an authenticated mail session in an Office 365 based environment

Generally speaking, the preferred communication channel between the mail client (the WordPress site in our scenario), and the mail server should be implemented as “authenticated session.”

In other words, the mail client needs to provide user credentials before starting The SMTP session with the mail server.

In case that the mail client provides his credentials, the mail server can “trust” the mail client, and trust the mail client requests for delivering E-mail to organization recipient or external mail recipients.

There are two main advantages for a scenario in which we configure the mail client to provide user credentials:

1.  E-mail address that sent to an organization recipient is not classified as spam mail

To be able to understand better the above sentence, let’s use the following scenario:

  • Our domain name is – o365info.com
  • We want to configure our WordPress site, to use our organization’s mail server (the mail server that represents the domain name – com).
  • Our WordPress site is configured to send E-mail using the E-mail address –support@o365info.com
  • The WordPress site sends E-mail to a destination recipient – Bobm@o365info.com

Option 1 – In case that the mail client (WordPress site), was configured to provide user credentials, the E-mail that was sent will be considered as a “legitimate E-mail” because the organization sender (support@o365info.com) can prove his identity.

Option 2 – In case that the mail client (WordPress site), was configured to not to provide user credentials (anonymous connection), the E-mail that was sent will be considered as a “non-legitimate E-mail” because, the sender (support@o365info.com) “claim” that he is a legitimate organization sender, but he cannot prove his identity. In this case, the outcome could be that the E-mail will be rejected by the o365info mail server or “stamped” as a spam mail.

2.  The ability to send E-mail to the external recipient

When we address our mail server and ask him to “deliver” E-mail to an external recipient, (recipient whom his E-mail address includes a domain name that is not hosted by our mail server) from the mail server point of view, the recourse for delivering the E-mail
considers as a “relay.”

By default, most of the mail servers are configured to “agree” to relay mail delivery requests, only if the mail client considers as “trusted mail client.” In other words, only if the mail client can prove his identity by providing legitimate user credentials.

In a scenario in which we need to send E-mail to “external recipient,” and we don’t provide user credentials to the mail server; the mail delivery request will be rejected!

WordPress site address Exchange Online as mail server - Authenticated session

And now, let’s ask an obvious question that can appear in your mind:

Q1: If you say that the method in which we provide user credentials have all of the above advantages, why don’t we just provide the required credentials instead of philosophizing this subject?

A1: A common scenario, is a scenario in which we define the “identity” (E-mail address) of the WordPress site, to use a “service E-mail” such as – support@o365info.com, that will serve as a “logical entity” and in reality, there is no such user account.

To be able to implement the “best practice” configuration and provide the required user credentials, we will need to have the credentials of a “legitimate Office 365 users” with a license.

Many times, we would prefer to avoid from purchasing the Office 365 licenses
for the WordPress “service account.”

In this case, we can define the communication with the Exchange Online mail server as “anonymous session,” without providing credentials, but this method has cons versus the authenticated session.

Office 365 user with mailbox need a license

Q2: In case that we want to enjoy the benefits of using authenticated session, does it mean that we have to purchase a dedicated Office 365 user license?

A2: Generally speaking, the answer is “yes.” The good news is that we can use a little trick that will enable us to use an existing Office 365 user credentials, and configure the WordPress site to use a different E-mail address from the original E-mail address of the Office 365 user.

For example, in case that we have Office 365 users named Bob that has an Exchange Online mailbox (Office 365 license) we can use Bob’s credentials and provide the “logic E-mail address” such a support@o365info.com

We will review how to implement this option in the article – Configure WordPress site send E-mail via Exchange Online (Office 365) | Provide user credentials without purchase Office 365 license | Part 5#6

A scenario in which our WordPress site supports only SMTP

In case that we cannot provide Office 365 user credentials or in case that from some reason, the WordPress mail plugin that we use doesn’t support the required TLS protocol version, we can configure a “standard SMTP session” without providing any user credentials.

As mentioned, this method has drawbacks versus the “authenticated configuration”

We will review how to create the required configuration in Exchange Online in the  article – Configure your WordPress site to send E-mail via Exchange Online (Office 365) anonymous session | Part 2#6

WordPress and mail server | Additional challenges

In this section, I would like to review an additional challenge, that we will need to face in our journey of configuring our WordPress mail plug-in to connect mail server.

1.  How to troubleshoot or debug mail communication failure?

In a scenario in which we configure all the necessary configurations in our WordPress mail
Plug-in, and still don’t manage to successfully send E-mail to the required destination recipient, the main troubleshooting challenge is – how to locate the specific cause of the problem?

Q: Does the reason for our mail communication failure, relate to the Firewall to protect our network and maybe block SMTP communication?

Q: Does the reason for our mail communication failure, relate to user credentials that we use or the credentials that we didn’t provide?

Q: Does the reason for our mail communication failure, relate to the TLS protocol settings?

In the real-life scenario, there could be many optional causes for the mail communication failure. The ability to locate the problem become more difficult because, many of the WordPress mail plug-ins, are very limited in their ability to provide detailed information about the mail session or. Provide tools and log files that can help us to understand better the real cause of the problem.

2.  What WordPress plugin to use?

If you perform a simple search looking for – WordPress mail plug-in, you will find plenty of such plug-ins.

I try some of the “recommended” or “Popular” WordPress mail plug-ins, and finally select the following WordPress mail plug-in – Postman SMTP Mailer/Email Log.

I have selected the Postman SMTP Mailer/Email Log because he has a very friendly user interface, and he includes very powerful and useful built troubleshooting tools, that can help us to troubleshoot mail flow failure scenarios.

I want to emphasize the fact that I am “neutral” and I have no special relationship with the creator of the Postman SMTP Mailer/Email Log WordPress mail plug-in. I’m sure that there are more useful and “easy to use” WordPress mail plug-ins.

3.  Requirement of configurations in Exchange Online, to prevent scenarios in which the
E-mail will be classified as spam mail

As mentioned before, in a scenario in which configure the WordPress mail plug-in to address Exchange Online server without providing user credentials, the main disadvantage is that the E-mail that is sent from the WordPress site will probably classify as spam mail.

To be able to prevent this scenario, we will need to add some configurations on the Exchange Online server side, that will “inform” the Exchange Online server that E-mail that is sent by our WordPress website is a legitimate E-mail.

We will review this configuration in the article – Creating Exchange Online bypass spam rule – whitelist specific sender E-mail address | Part 3#6

WordPress and mail server - Additional challenges

Configure WordPress site to address mail server | Three common mail flow scenarios

In the following section, I would like to review the most common mail flow scenarios that implemented when we want to configure our WordPress site to address mail server.

The information about the specific characters of each scenario will help us to understand better what is the specific scenario which is related to our specific environment.

For example, our WordPress site could be installed (hosted) on the organization server who’s located in our local organization’s network. Another scenario could be a scenario in which our WordPress site is hosted at the external provider such as GoDaddy.

In a scenario in which our WordPress site is hosted by external providers, we will need to verify if this provider provides us an access to the mail server which we can address or in a scenario in which we want to address “external mail server” such as Exchange Online, does the provider enable us to create an outbound session using port 25 or 587.

Scenario 1 – WordPress website using the local SMTP server

In this scenario, the server who hosts the WordPress site, host, in addition, an “SMTP mail server.”

To be able to send E-mail to recipients, we will configure the WordPress mail plug-in, to address the hostname or the IP address of the local SMTP server.

Needed less to say that we will need to get the local IP address of the host name of the local SMTP server from the “person” that manage the specific server.

Scenario 1 – WordPress web site using local SMTP server

Scenario 2 – WordPress website and shared hosting using the External SMTP server

In this scenario, the “SMTP mail server” is installed on another machine. An example could be -web hosting provider such as GoDaddy.

GoDaddy customers who shared hosting web hosting service, that needs the services of “SMTP mail server” can address the GoDaddy mail server that is represented by the host name – relay-hosting.secureserver.net

Scenario 2 – WordPress web site using External SMTP server

Scenario 3 – WordPress website using Exchange Online as External SMTP server

In this scenario, the “SMTP mail server” that we want to address is – the Office 365 mail servers (Exchange Online).

This scenario is relevant for Office 365 customers, that want to use the Office 365 mail services as the “mail server” that will be used by the WordPress site.

Just a quick reminder regarding the specific characters of Office 365 mail services:

We can address Office 365 mail servers by using SMTP or TLS protocol.

  • In case that we address Office 365 mail servers by using SMTP, we cannot provide user credentials, and the connection will be considered as “anonymous connection.” In this scenario, at a later stage, we will need to configure a specific Exchange Online setting that will not classify the E-mail that is sent from the WordPress site as spam (because of the anonymous connection).
  • In case that we address Office 365 mail servers by using authenticated session and TLS protocol, we will have to address the Exchange Online server by using the host name – office365.com.

Scenario 3 – WordPress web site using Exchange Online as External SMTP server

Comparison table – addressing Office 365 mail servers anonymously versus authenticated session

The following table, serve as a comparison table between the two optional methods that we can use in a scenario in which we want to configure our WordPress site to use Office 365 mail services:

Comparison table – addressing Office 365 mail servers anonymously versus authenticated session

Configure your WordPress site to send E-mail via Office 365 or SMTP mail server| Article series index

Now it’s Your Turn!
It is important for us to know your opinion on this article


The post Configure your WordPress site to send E-mail via SMTP mail server | GoDaddy and Office 365 based environment | Part 1#6 appeared first on o365info.com.

Configure your WordPress site to send E-mail via Exchange Online (Office 365) anonymous session | Part 2#6

$
0
0

In the current article, we review a scenario in which we need to configure our WordPress site to use Exchange Online as “mail server”.The main character of this scenario is – that we want to configure our WordPress site to address Office 365 mail services without providing any user credentials (anonymously).


The reason for this requirement is – that we would like to avoid the need of purchase Office 365 user license that will be used for the authentication purposes.

Office 365 mail server host name

In Office 365 based environment, when we need to address the mail server that represents our domain name, anonymously, we need to address the hostname who is published in the MX record for our domain name.

In case that you don’t know the value of the Exchange Online server host name that represents your domain name, I add a special section at the bottom of the current article, in which we review the steps we need to implement for getting the required MX value.

WordPress mail plugin that we use

To mail communication configuration will be implemented by using useful WordPress mail plugin named- Postman SMTP Mailer/Email Log

The main advantage of this WordPress mail plugin is that he offers us a comfortable interface, and tools that enable us to deal with a troubleshooting scenario of mail failure, in which we don’t manage to send an E-mail to the destination recipient.

Scenario description – configure WordPress mail plugin to use Exchange Online as a mail server using SMTP

The characters of our scenario are as follows:

  • We need to configure our WordPress website to send an E-mail notification to our organization users. The public domain name of our organization is – com
  • Our organization purchased Office 365 subscriptions, and we want that our WordPress website will use Office 365 mail servers (Exchange Online) as “his mail server.”
  • The “identity” that will be used by the WordPress website will be – support@o365info.com
  • The support@o365info.com E-mail address is not “attached” to Office 365 user account. In other words, there are no Office 365 users who use this E-mail address.
  • For this reason, we will configure the Postman SMTP Mailer/Email Log to address Exchange Online server using SMTP session without authentication.
  • The host name of the Exchange Online mail server that host our domain
    name is –o365info-com.mail.protection.outlook.com

WordPress site address Exchange Online as mail server-Using SMTP session

In the following table, we can see a summary of the “relationship” that are our WordPress website will have with the Office 365 (Exchange Online) mail server:

WordPress site address Exchange Online as mail server - Using SMTP session -table

Because we don’t provide any user credentials, the E-mail that will be sent from the WordPress website to Exchange Online, will be identified as “problematic E-mail” and the Exchange Online server will stamp these E-mails with high SCL (spam confidence level) value.

In the next article – Creating Exchange Online bypass spam rule – whitelist specific sender E-mail address | Part 3#6 , we will review how to deal with this issue by creating an Exchange Online bypass spam rule, that will prevent the spam check when the sender E-mail address is support@o365info.com

In addition, we need to know that in this configuration, we will not be able to use the Exchange Online mail server for sending E-mails to recipients who considered as external recipients. In a scenario in which don’t provide user credentials, the Exchange Online mail server will not approve to “forward” (relay) the E-mail to the external recipients.

1#5 – Install the Postman SMTP Mailer WordPress plugin

In this section, we will review how to install the Postman SMTP Mailer/Email Log WordPress plugin.

  • Login to your WordPress site
  • Select the plugins menu
  • Click – Add New

Using WordPress to send E-mail to Office 365 – install -Postman SMTP Mailer -01

  • In the search box – type postman SMTP and hit the Enter key
  • When the search result appears, select the Postman SMTP Mailer/Email Log plugin
    and click Install Now

Using WordPress to send E-mail to Office 365 – install -Postman SMTP Mailer -02

  • Click on the link – Activate Plugin

Using WordPress to send E-mail to Office 365 – install -Postman SMTP Mailer -03

  • On the left menu bar, select the menu – Plugins
  • Look for the Postman SMTP plugin
  • Click on the Settings menu

Using WordPress to send E-mail to Office 365 – install -Postman SMTP Mailer -04

2#5 – Configure the SMTP Mailer WordPress plugin | Send E-mail via Office 365 (Exchange Online) server using SMTP

In the following section, we review how to configure the Postman SMTP plugin to use Exchange Online as a “mail server.” server”. It is important to emphasize that in our scenario, we will configure a communication channel with the Exchange Online server using SMTP protocol.

I emphasize this “detail” because, there is an option to use another communication channel, that is based on an authenticated mail session + TLS protocol, and that scenario requires different configuration settings. The article – Configure your WordPress site to send E-mail via Exchange Online (Office 365) provide user credentials | Part 4#6  include step by step description of the TLS settings.

  • On the left menu bar, select the menu – Postman SMTP
  • Select the menu – Show All Settings

Configure your WordPress site to send E-mail via Exchange Online Office 365 using SMTP -01

  • Select the – Account tab

In the following table, we can see the values of the different parameters that we will configure in our specific scenario:

Type SMTP Number 1
Transport Settings
Outgoing Mail Server Hostname o365info-com.mail.protection.outlook.com Number 2
Outgoing Mail Server Port 25 Number 3
Envelope-From Email Address The “sender” E-mail address Number 4
Security None Number 5
Authentication None Number 6

Outgoing Mail Server Hostname

In the field name – Outgoing Mail Server Hostname, we need to write the hostname of the mail server that we are going to address.

In our scenario, I use the hostname of the Office 365 mail servers (Exchange Online) that represent my domain – o365info.com

The hostname of my Office 365 mail server is- o365info-com.mail.protection.outlook.com

Security + Authentication

The value that we set for the Security + Authentication field is “None” because the E-mail address that we use is not “attached” to a specific Office 365 user.

  • Select – Save Changes

Configure your WordPress site to send E-mail via Exchange Online Office 365 using SMTP -02

  • Select the – Message tab

In this section, we define the “identity” of the WordPress sender that will appear in the E-mail message that will be sent out.

In our example, the E-mail address that we will use as the “sender E-mail address”
Is – support@o365info.com

Configure your WordPress site to send E-mail via Exchange Online Office 365 using SMTP -03

  • Select – Save Changes

Configure your WordPress site to send E-mail via Exchange Online Office 365 using SMTP -04

3#5 – Send test E-mail to organization recipient using the SMTP Mailer WordPress plugin | Send E-mail via Office 365 (Exchange Online) server

In the following section, we review the process in which we verify that the mail server settings were configured correctly and that we manage to successfully send E-mail to the destination recipient.

In our scenario, the WordPress sender identity is represented by the E-mail address support@o365info.com and we will send E-mail to “another o365info.com recipient.”

The expected results are:

  • The E-mail message will successfully reach the Exchange Online mail server.
  • The Exchange Online mail server will deliver the E-mail message to the destination recipient (Bobm@o365info.com in our example).

In addition, the E-mail that we sent via the WordPress site will probably classify by the Exchange Online server, as a “problematic E-mail” because, the sender “claim” that he belongs to o365info.com, but he cannot provide user credentials.

WordPress site - Send E-mail to organization recipient the same domain name

Sending test E-mail to organization recipient

  • Select the menu – Send a Test Email

Send test E-mail organization recipient - WordPress send E-mail via Exchange Online Office 365 -SMTP -01

  • In the recipient E-mail address text box, provide the E-mail address of the destination recipient. In our example, the recipient is Bobm@o365info.com. The destination recipient considers as an “organization recipient” because our organization is – o365info.com
  • Click Next

Send test E-mail organization recipient - WordPress send E-mail via Exchange Online Office 365 -SMTP -02

In the following screenshot, we can see that the E-mail address was successfully sent to the destination recipient.

The meaning is that:

  1. That our WordPress site manages to create an SMTP session with the Office 365 mail server.
  2. That the Office 365 mail server (Exchange Online) “agrees” to accept the E-mail.

Send test E-mail organization recipient - WordPress send E-mail via Exchange Online Office 365 -SMTP -03

Now, we want to check what happened to the “other side” meaning, the side of the destination recipient.

In the following screenshot, we can see that the E-mail reaches to Bob’s mailbox. However, it’s important to notice that the E-mail was classified a “spam mail” and for this reason, sent to the junk mail folder!

Send test E-mail organization recipient - WordPress send E-mail via Exchange Online Office 365 -SMTP -04

How does Exchange Online treat “suspicious sender”?

The reason for this “strange phenomenon” in which the E-mail address that was sent from the WordPress site reaches the junk mail folder is, because the mail server that host our domain (o365info.com in our example) cannot trust a mail client, that his E-mail address includes our domain name, but the mail client didn’t provide any user credentials.

From the mail server point of view, the sender considers “suspicious”!

For this reason, the mail server can decide to reject the E-mail message that sent from the “untrusted sender” or mark the E-mail message as “spam mail.”

In Exchange Online based environment, the Exchange Online mail will not reject or delete the
E-mail that was sent by the “suspicious sender” but instead, “stamp” the E-mail using high SCL value.

  • The “spam Grade,” is represented by a value named – SCL (Spam Confidence Level).
  • The SCL score ranges over start with -1 and end with 9.
  • Each E-mail that has a spam score of 2 – 9, consider as spam mail.

Analyzing the information in the E-mail message header

To be able to understand better the reason for this “phenomena,” we will look at the E-mail header content that was sent to Bob.

In our example, we analyze the E-mail header content by using the Microsoft Remote Connectivity Analyzer

Exchange stores the information about the “spam level” of specific E-mail in the mail
field- X-Forefront-Antispam-Report.

In the following screenshot, we can see that Exchange Online stamp the E-mail using SCL=5. The meaning is that there is high chance that the E-mail is sent by “problematic sender.”

Send test E-mail organization recipient - WordPress send E-mail via Exchange Online Office 365 -SMTP -05

When looking at an additional mail field named – MS-Exchange-Organization-AuthAs, we can see that the value is – Anonymous

The reason in which the Office 365 mail server “think” that the E-mail is a spam mail is, because the sender uses the domain name that is hosted by Exchange server (o365info.com) but considers as “Anonymous sender” meaning, unauthenticated the sender.

Send test E-mail organization recipient - WordPress send E-mail via Exchange Online Office 365 -SMTP -06

Don’t worry!

In the next article – Creating Exchange Online bypass spam rule – whitelist specific sender E-mail address | Part 3#6 , I will provide a possible solution for this problem, by creating an Exchange Online bypass spam rule that will treat E-mail that sends by support@o365info.com as a legitimate E-mail message.

4#5 – Send test E-mail to an external recipient using the SMTP Mailer WordPress plugin | Send E-mail via the Office 365 (Exchange Online) server

In the following section, we will review an additional scenario in which we want to send E-mail to the external (non-organization) recipient.

The expected result is that the test will fail!

WordPress site - Send E-mail to external -non-organization recipient

The reason for this “expected failure” is related to the fact that we address Office 365 mail server Anonymously.

In the former section, we have seen, that the Office 365 mail server “agreed” to accept the E-mail address that was sent to Bob@o365info.com.

The Office 365 mail server “agreed” to accept the E-mail because he represents the specific domain name (in our example – o365info.com).

In case that we ask from a mail server to deliver E-mail to the recipient who is hosted at “other domains,” this process described as “relay.”

By default, the basic security setting of mail servers, will not allow to the mail server to “relay E-mail message” if the sender is Anonymous meaning – didn’t provide any user credentials.

To recap, one of the disadvantages of the scenario in which we address Office 365 mail server using SMTP and without providing user credentials is – that we cannot ask from Office 365 mail server to send E-mail to “external recipient.” This issue cannot be “fixed.”

In case that we need to send E-mail to “external recipient,” we will need to use TLS session + provide user credentials.

The instructions for this configuration appear in the article – Configure your WordPress site to send E-mail via Exchange Online (Office 365) provide user credentials | Part 4#6

Sending test E-mail to external recipients

  • Select the menu – Send a Test Email

Send test E-mail external recipient - WordPress send E-mail via Exchange Online Office 365 -SMTP -01

  • In the recipient E-mail address text box, provide the E-mail address of the destination recipient.
    The destination recipient considers as an “external recipient.”
  • Click Next

Send test E-mail external recipient - WordPress send E-mail via Exchange Online Office 365 -SMTP -02

In the following screenshot, we can see that we didn’t manage to send the E-mail to the external recipient. The error message is –

5.7.64 TenantAttribution; Relay Access Denied.

In simple word – the Office 365 mail server inform us that – he is not willing to “relay” (deliver) the E-mail address to the destination recipient!

Send test E-mail external recipient - WordPress send E-mail via Exchange Online Office 365 -SMTP -03

5#5 – View information about email that that sent by using the Postman SMTP Mailer Log files

In the following section, I would like to review the process of accessing information about mail transaction that is stored in the Log file.

One of the features that I like in the Postman SMTP Mailer/Email Log plugin is the ability to access the Log file that includes detailed information about each mail transaction.

The ability to look at the log file, enable troubleshoot a scenario, and we experience “mail communication failure” for a specific recipient or specific domain.

  • To be able to view information about specific mail transaction, select the setting of the Postman SMTP Mailer/Email Log plugin.
  • Click on the link named – In the log

View send mail log information - WordPress send E-mail via Exchange Online Office 365 -SMTP -01

In the following screenshot, we can see an example of the “documentation” of the mail transaction that occurred.

  • To be able to get details on a specific mail transaction, select the required mail and click on the menu – Session Transcript

View send mail log information - WordPress send E-mail via Exchange Online Office 365 -SMTP -02

In the following screenshot, we can see the “recording” of the session that occurred between our WordPress site (the Postman SMTP Mailer/Email Log plugin) and the destination mail server.

In our specific example, we can see information about the E-mail that we try to send to external recipients. We can see that we manage to connect the Office 365 mail server but the Office 365 mail server “refuse” to accept the “delivery request” to the external recipient (refusing to relay the E-mail).

View send mail log information - WordPress send E-mail via Exchange Online Office 365 -SMTP -03

How to get the value of our MX record from the Office 365 portal

To be able to address the Office 365 mail server (Exchange Online) that represent our domain name anonymously, we will need to find the host name of our mail server.

The information about the host name of “our Office 365 mail server” or in other words, the hostname who appears in the MX record that represents our domain, the name appears in the Office 365 portal.

To be able to get this information we will need to login to Office 365 portal using Global administrator credentials.

What is my Office 365 MX record-01

Select the domain name which you want to view his DNS settings

  • In our example, we select the registered domain name – o365info.com
  • In the setting window that appears, select the menu – DNS settings

What is my Office 365 MX record-02

  • Click on the Exchange Online section

What is my Office 365 MX record-03

In the following screenshot, we can see the information about the DNS records

We want to know what is the value of the MX record that Office 365 creates for our publicly registered domain name.

In our example, the value of the MX record is – o365info-com.mail.protection.outlook.com

What is my Office 365 MX record-04

Configure your WordPress site to send E-mail via Office 365 or SMTP mail server| Article series index

Now it’s Your Turn!
It is important for us to know your opinion on this article


The post Configure your WordPress site to send E-mail via Exchange Online (Office 365) anonymous session | Part 2#6 appeared first on o365info.com.

Creating Exchange Online bypass spam rule – whitelist specific sender E-mail address | Part 3#6

$
0
0
In the following article, we will provide “step by step” instructions for creating Exchange Online bypass spam rule, that will prevent the “spam check” that the Exchange Online mail server performs for a specific E-mail address.

The current article is the continuation of the former article. A quick reminder, in the previous article, we learn how to configure our WordPress site to address Exchange Online mail server.

We manage to successfully send E-mail to an organization recipient, but the main problem was that the E-mail that was sent from the WordPress site, was “stamped” as spam mail by the Exchange Online server (because we didn’t provide any user credentials).

Our request is – to “tell” the Exchange Online mail server not to treat E-mail that is sent from the WordPress site as a “problematic E-mail.”

In our scenario, the WordPress send E-mail by using the E-mail address – support@o365info.com

To be able to ” instruct ” Exchange Online not to execute the spam verification on the E-mail addresses support@o365info.com, we will create an Exchange Online rule that described as – bypass spam rule.

The rule will instruct the Exchange Online mail server to “stamp” each E-mail that sent from the E-mail address support@o365info.com using the SCL score of “-1”.

Creating Exchange Online bypass spam rule – whitelist specific sender E-mail address

Part 1#2 – configuring the “condition part” of the Exchange Online Bypass spam rule

  • Log in to the Exchange admin portal
  • On the left menu bar, select – mail flow
  • On the top menu bar, select –rules
  • Click on the plus icon
  • Select – Create a new rule…

Configuring bypass spam rule using Exchange Online for a specific sender -01

  • Click on the – More Options… link (by default, the interface of the Exchange Online rule, includes only a limited set of options. To be able to display the additional options, we will need to “activate” the More Options…).

Configuring bypass spam rule using Exchange Online for a specific sender -02

  • In the Name: box, add a descriptive name for the new rule.
    In our specific scenario, we will name the rule – Approve E-mail send by support@o365info.com
  • In the section named –Apply this rule if… click on the small black arrow

Configuring bypass spam rule using Exchange Online for a specific sender --03

Condition 1#1

  • Choose the primary menu –The sender…
  • In the submenu, select the option –Is this person

Configuring bypass spam rule using Exchange Online for a specific sender -04

  • In our example, we add the E-mail address of the “WordPress support” (support@o365info.com).
  • Click – Check names

Configuring bypass spam rule using Exchange Online for a specific sender -06

  • Click – OK

Configuring bypass spam rule using Exchange Online for a specific sender -07

Part 2#2 – configuring the “action part” of the Exchange Online Bypass spam rule

In this step, we configure the “second part” of the Exchange Online rule, in which we define the required Exchange response (action) to a scenario in which the “source sender” E-mail address is support@o365info.com

In our scenario, we ask from Exchange Online not to implement spam check on E-mail messages that sent by this recipient!

If we want to use more technical terms, we will instruct Exchange Online to set the SCL value of E-mail message that sends from the E-mail address support@o365info.com to “-1”.

In Exchange based environment, the meaning of SCL=-1 is translated into “this is a secure E-mail message”.

  • In the section named –*.Do the following… click on the small black arrow.

Configuring bypass spam rule using Exchange Online for a specific sender -08

  • Select the menu option –Modify the message security…
  • In the submenu, select – Set the spam confidence level (SCL)

Configuring bypass spam rule using Exchange Online for a specific sender -09

  • Click on the small arrow to select the required SCL value

Configuring bypass spam rule using Exchange Online for a specific sender -10

  • Select the option – Bypass spam filtering. The option of ” Bypass spam filtering” will
    stamp the E-mail message with the SCL value of “-1”.

Configuring bypass spam rule using Exchange Online for a specific sender -11

  • Click OK

Configuring bypass spam rule using Exchange Online for a specific sender -12

In the following screenshot, we can see the “final result.”
The Exchange Online Bypass spam rule includes two parts – the condition part and the action part.

  • Click Save

Configuring bypass spam rule using Exchange Online for a specific sender -13

Analyzing the information stored in the E-mail header.

To be able to understand better the process that is implemented by the Exchange Online bypass spam rule, we will analyze the information stored in the E-mail header.

In our example, we analyze the E-mail header content by using the Microsoft Remote Connectivity Analyzer

Just a quick reminder, in our scenario the WordPress site address Office 365 mail server without providing any user credentials.

Sender’s identity

In Exchange based environment, the information about the sender identity stored in a mail field named –X-MS-Exchange-Organization-AuthAs =Anonymous

In our specific scenario, we can see that the value that appears in the X-MS-Exchange-Organization-AuthAs is Anonymous

The meaning is that from the Exchange server point of view, the sender is “unknown.” Usually when the sender considered “unknown” and in addition, he uses the organization E-mail address (o365info.com in our example) this is a sign for a Spoof mail attack!

By default, Exchange server was supposed to stamp this E-mail message using high SCL value!

Analyzing E-mail header Exchange remote connectivity Analyzer- bypass spam rule Exchange Online sender -01

The E-mail message SCL value

Exchange stores the information about the “spam score” of specific E-mail in the mail field-
X-Forefront-Antispam-Report.

The “spam score” is represented by a value named – SCL (spam confidence Level).

The SCL grade range starts with -1 and end with 9

In our example, the SCL values identity “-1”.
The meaning is that Exchange Online server will not implement a “spam check” for this E-mail message because the SCL value “-1”, tell Exchange Online that the E-mail message is “trusted.”

Analyzing E-mail header Exchange remote connectivity Analyzer- bypass spam rule Exchange Online sender -02

Configure your WordPress site to send E-mail via Office 365 or SMTP mail server| Article series index

Now it’s Your Turn!
It is important for us to know your opinion on this article


The post Creating Exchange Online bypass spam rule – whitelist specific sender E-mail address | Part 3#6 appeared first on o365info.com.

Configure your WordPress site to send E-mail via Exchange Online (Office 365) provide user credentials | Part 4#6

$
0
0

In the current article, we review how to configure a WordPress site, to address Office 365 mail by using the recommended configuration.

In a scenario in which our WordPress website serves as a “mail client” that addresses mail server and asks him to be “his mail server,” the best practice is to configure the mail client (WordPress site in our exhale) to provide user credentials to the mail server.

The best practice is that the mail client, will proof his identity

The configuration in which the mail client provides user credentials have the following advantages:

  1. An e-mail message that is sent from the WordPress site to – organization recipients, will not be “stamped” as spam mail by the Exchange Online server because the mail client considers as a legitimate mail client (authenticated and trusted mail client).
  2. We can “ask” from Exchange Online server to – send an E-mail message to “external recipient” (non-organization recipient) because, the mail client (WordPress site in our scenario) considers as “trusted client” and for this reason, the mail server will agree to relay the E-mail message to external recipients.

Exchange Online, authentication, session, TLS protocol and the hostname

Before we start, I would like to mention a couple of a unique character which is relevant for our scenario.

  1. In Office 365 based environment (Exchange Online), in case that the mail client wants to provide user credentials, the information should be “transmitted” over secure communication channel meaning – TLS protocol. This is a mandatory requirement of the Exchange Online mail server.
  2. The user credentials that the mail client provides, should be a credential of a valid Office 365 user who have a license to Exchange Online mailbox.
  3. In case that we want to address Exchange Online mail server using TLS, we will need to address the Exchange Online server using the hostname – smtp.office365.com

Scenario description – configure WordPress mail plugin to use Exchange Online as a mail server using SMTP

The characters of our scenario are as follows:

  • We need to configure our WordPress website to send an E-mail notification to our organization users. In addition, we will also need to send E-mail to our company customers (external recipients).
  • The public domain name of our organization is – o365info.com
  • Our organization purchased Office 365 subscriptions, and we want that our WordPress website will use Office 365 mail server (Exchange Online) as “his mail server.”
  • The “identity” that will be used by the WordPress website will be – support@o365info.com
  • The “Support” is a valid Office 365 user with an Exchange Online license, that has a username + password.
  • We want to configure the Postman SMTP Mailer/Email Log to address Exchange Online server using TLS and provide the required user credentials.
  • The host name of the Exchange Online mail server taht we need to
    address is –smtp.office365.com

Note – Office 365 mail server have two “identities.” The SMTP based identity and the TLS identity. When we want to address Exchange Online by using TLS, we will need to use the following predefined host name –
smtp.office365.com

You can read more information about the Exchange Online identities, in the article – Configure your WordPress site to send E-mail via SMTP mail server | GoDaddy and Office 365 based environment | Part 1#6

Send E-mail to organization recipient - Using authenticated session and TLS

Summary of the relationship between the mail client and Office 365

In the following table, we can see a summary, of the “relationship” that are our WordPress website, will have the Office 365 (Exchange Online) mail server:

WordPress site address Exchange Online as mail server - Using TLS session -table

  • To be able to “build a trust” with Exchange Online mail server we will need to provide Office 365 user credentials.
  • Exchange Online will agree to accept user credentials only if we use the TLS protocol
  • The communication port number is port 25 and in addition; you can use the port number 587.
  • The TLS version that the mail client needs to support is TLS version 1.0 and above

The WordPress mail plugin that we use

In our demonstration, we will use a WordPress mail plugin named- of Postman SMTP Mailer/Email Log mail plugin.

Install the Postman SMTP Mailer WordPress plugin

The instruction regarding the installation of the Postman SMTP Mailer/Email Log mail plugin appears in the article – Configure your WordPress site to send E-mail via Exchange Online (Office 365) anonymous session | Part 2#6.

1#4 – Configure the SMTP Mailer WordPress plugin | Send E-mail via Office 365 (Exchange Online) server using TLS protocol

In the following section, we review how to configure the Postman SMTP plugin, to use Exchange Online as a “mail server.” server”. The configuration will be implemented by providing the user credentials and by using the TLS protocol.

  • On the left menu bar, select the menu – Postman SMTP
  • Select the menu – Show All Settings

Configure mail server settings to use TLS - send E-mail via Exchange Online Office 365 - Postman SMTP -01

  • Select the – Account tab

In the following table, we can see the settings and the values that we will configure in our specific scenario:

Type SMTP Number 1
Transport Settings
Outgoing Mail Server Hostname smtp.office365.com Number 2
Outgoing Mail Server Port 25 Number 3
Envelope-From Email Address The “sender” E-mail address Number 4
Security STARTTLS Number 5
Authentication Login Number 6

Outgoing Mail Server Hostname

In the field name – Outgoing Mail Server Hostname, we need to write the hostname of the mail server that we are going to address.

In our scenario, I use a “general Office 365 mail server name” that we need to use in case that we want to address the Exchange Online mail server using TLS protocol. The host name whom we will need to use is smtp.office365.com

Configure mail server settings to use TLS - send E-mail via Exchange Online Office 365 - Postman SMTP -02

Security

The security will be configured as – STARTTLS. In other words, we instruct the Postman SMTP Mailer/Email Log WordPress plugin to use the TLS protocol

Authentication

In our scenario, we must provide the required user credentials (mandatory requirement for creating a TLS session with Office 365 mail servers).

Configure mail server settings to use TLS - send E-mail via Exchange Online Office 365 - Postman SMTP -03

  • Select the – Message tab

In this section, we define the “identity” of the WordPress sender who will appear in the E-mail message that will be sent out.

In our example, the E-mail address that we will use as the “sender E-mail address”
is –support@o365info.com

Configure mail server settings to use TLS - send E-mail via Exchange Online Office 365 - Postman SMTP -04

  • Select – Save Changes

Configure mail server settings to use TLS - send E-mail via Exchange Online Office 365 - Postman SMTP -5

2#4 – Send test E-mail to organization recipient | SMTP Mailer WordPress plugin | Send E-mail via Office 365 (Exchange Online) server

In the following section, we review the process, in which we verify that the mail server settings were configured correctly and that we manage to successfully send E-mail to the destination recipient.

In our scenario, we want to verify that we successfully manage to send Outlook E-mail to the recipient from our organization.

The expected results are:

  • The E-mail message will successfully reach the Exchange Online mail server.
  • The Exchange Online mail server will deliver the E-mail message to the destination recipient (Bobm@o365info.com in our example).

Send E-mail to organization recipient - Using authenticated session and TLS

Sending test E-mail to organization recipient

  • Select the menu – Send a Test Email

Send test E-mail organization recipient - WordPress send E-mail via Exchange Online Office 365 -TLS -01

  • In the recipient E-mail address text box, provide the E-mail address of the destination recipient. In our example the recipient is Bobm@o365info.com.
    The destination recipient considers as an “organization recipient” because our organization
    is – o365info.com
  • Click Next

Send test E-mail organization recipient - WordPress send E-mail via Exchange Online Office 365 -TLS -02

In the following screenshot, we can see that the E-mail address was successfully sent to the destination recipient.

The meaning is that:

  1. The WordPress site successfully manages to contact Exchange Online mail server and provide the required user credentials.
  2. The WordPress site manages to successfully create a TLS session with the Office 365 mail servers.
  3. That the Office 365 mail server “agree” to accept the E-mail.

Send test E-mail organization recipient - WordPress send E-mail via Exchange Online Office 365 -TLS -03

Now, we want to check what happened to the “other side” meaning – the side of the destination recipient.

In the following screenshot, we can see that the E-mail reaches to Bob’s mailbox.

Send test E-mail organization recipient - WordPress send E-mail via Exchange Online Office 365 -TLS -04

3#4 – Send test E-mail to an external recipient using the SMTP Mailer WordPress plugin | Send E-mail via Office 365 (Exchange Online) server

In the following section, we will review an additional scenario, in which we want to send E-mail to the external (non-organization) recipient.

Because we configured the Postman SMTP Mailer/Email Log mail plugin to provide user credentials, Exchange Online mail server, will relate to our WordPress site as a “trusted client,” and will “agree” to deliver (to relay) the E-mail message to the destination recipient.

Send E-mail to external non-organization recipient - Using authenticated session and TLS

Sending test E-mail to external recipients

  • Select the menu – Send a Test Email

Send test E-mail external recipient - WordPress send E-mail via Exchange Online Office 365 -TLS -01

  • In the recipient E-mail address text box, provide the E-mail address of the destination recipient.
  • Click Next

Send test E-mail external recipient - WordPress send E-mail via Exchange Online Office 365 -TLS -02

In the following screenshot, we can see that the E-mail address was successfully sent to the destination recipient.

The meaning is that:

  1. The WordPress site successfully manages to contact Exchange Online mail server and provide the required user credentials.
  2. The WordPress site manages to successfully create a TLS session with the Office 365 mail server.
  3. That the Office 365 mail server “agree” to accept the E-mail.

Send test E-mail external recipient - WordPress send E-mail via Exchange Online Office 365 -TLS -03

In the following screenshot, we can see the mailbox of our external recipient. The E-mail address was successfully sent to the Gmail recipient.

Send test E-mail external recipient - WordPress send E-mail via Exchange Online Office 365 -TLS -04

Step 4#4 -verify communication with the mail server using Connectivity Test

In the current section, I would like to review a very useful and powerful feature, that the Postman SMTP Mailer/Email Log mail plugin includes.

The feature name is – Connectivity Test and the purpose of the connectivity test option is – to implement a “scan test” that will try to verify if our WordPress site can access the “mail ports” of the mail server that we want to address.

In addition, the connectivity test option will try to verify the communication channel with other public mail servers such as Gmail mail servers.

I describe the “connectivity test option” as a very useful and powerful feature because, in many scenarios, the WordPress is hosted by a web hosting provider or, located in a network that uses Firewall that block mail communication with external hosts (port 25, 587).

When using “other WordPress mail plugins” that doesn’t include this troubleshooting tool, the process of finding the cause for “send E-mail failure,” can be quite frustrating.

In a scenario, in which we don’t manage to send E-mail to the destination recipient, it’s very hard to know what is the cause of the problem.

We cannot be sure if the problem relates to the user credentials, the protocol version, the hostname of the mail server or to a problem of firewall that blocks our communication.

Using the Postman SMTP Mailer/Email Log – connectivity test

  • Select the menu option – Connectivity Test

Using WordPress to send E-mail to Office 365 – using connectivity test -Postman SMTP Mailer --01

Type the hostname of the mail server that you want to address as “your mail server”.
In our example, we address the Exchange Online mail server using the
host name – smtp.office365.com

  • Click – Begin Test

Using WordPress to send E-mail to Office 365 – using connectivity test -Postman SMTP Mailer --02

In the following screenshot, we can see the result of the connectivity test. From the results, we can see that the destination mail server is “listing” using port 25 and port 587.

The meaning is that we have an “open communication channel” to the required mail server and that the network Firewall “approve” to use these communication ports.

Using WordPress to send E-mail to Office 365 – using connectivity test -Postman SMTP Mailer --03

Configure your WordPress site to send E-mail via Office 365 or SMTP mail server| Article series index

Now it’s Your Turn!
It is important for us to know your opinion on this article


The post Configure your WordPress site to send E-mail via Exchange Online (Office 365) provide user credentials | Part 4#6 appeared first on o365info.com.

Viewing all 370 articles
Browse latest View live